





When it comes to M365 audit and investigation, the “Unified Audit Log” (UAL) is your friend. It can be surly, obstinate, and wholly inadequate, but your friend nonetheless. Sadly, depending upon licensing and retention, it is sometimes your only friend. Regardless of the type of audit or investigation you need to conduct, your UAL challenges are three-fold: acquiring the data, parsing the output, and querying the data to answer your audit and investigative questions. In this post, we’ll step through one approach to overcoming all three challenges with the Exchange Online Management PowerShell module and “Security Operations and Forensics Elasticsearch, Logstash, Kibana” (SOF-ELK).
Before wrangling, it’s worth asking, “Does the UAL contain the data you’re looking for?” Since the UAL combines data from multiple M365 services, aka “workloads,” it may be more efficient to directly access service logging and, in some cases, the details you require may not actually populate the UAL. You can review the properties captured by the UAL per service here: Detailed properties in the audit log – Microsoft Purview (compliance) | Microsoft Learn
It is also worth noting that the M365 ecosystem is ever-changing and licensing can be convoluted, confusing, and directly impacts UAL retention and properties. That is a “wrangling” conversation all on its own but, tactically speaking, armed with a basic understanding of what can and should be included in the UAL, I’ll often sample the data for a tenant to see what I can see and to ascertain retention, as opposed to laboring over E3 vs E5 and Azure P1 vs Entra Identity P2, etc. Retrospectively, it may be worthwhile to return to the questions of licensing levels, property availability, and retention as a “lessons learned” opportunity, especially if you were unable to answer your audit/investigative questions based on the current M365 tenant configuration.
Once we’ve decided that in our audit/investigative scenario the UAL is indeed our friend, it’s time to roll up our sleeves, don boots and the obligatory hat, and get to wrangling! First things first, we need to acquire the UAL data. There are a few different ways to approach this, namely the “Compliance Portal” (aka Purview), the Office 365 API, and the Exchange Online PowerShell module (EXO). I prefer the latter because of inline filtering capabilities, some workarounds for max-returned records limitations, and for the flexible output formats, particularly as we look toward the next steps of parsing and querying via SOF-ELK.
At the time of this writing, the current version of EXO is 3.2.0 and requires PowerShell 7. You can choose your own poison in terms of where and how to install these, but I’m starting with a fresh Windows 2022 Server Base AWS EC2 instance (t2.medium), downloading PowerShell 7.x, and installing the EXO module:
#download and install PowerShell 7.x.x - msi
iex "& { $(irm https://aka.ms/install-powershell.ps1) } -UseMSI -Quiet"
#RUN FROM PowerShell v7 (pwsh) - install exchangeonline management and graph api...be patient...takes a few minutes and since using pwsh - no progress indicators
& "C:\Program Files\PowerShell\7\pwsh.exe" -Command Install-Module -name exchangeonlinemanagement -repository psgallery -force
& "C:\Program Files\PowerShell\7\pwsh.exe" -Command Install-Module -name microsoft.graph -scope allusers -repository psgallery -force

If all goes well, you can launch PowerShell 7 from PowerShell 5 by typing “pwsh” and hitting enter! You may have to kill and restart your PowerShell 5 session for it to recognize that command. If you execute “Get-InstalledModule -Name Exchange*”, you should see ExchangeOnlineManagement 3.2.0, as below:
Get-InstalledModule -Name Exchange*
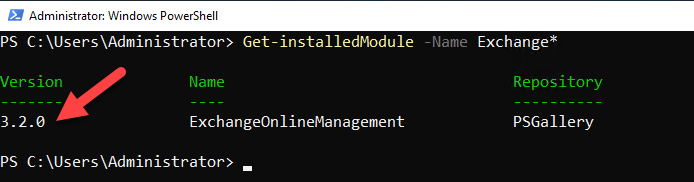
Because the UAL can be voluminous, even in a small M365 tenant, it’s wise to be judicious in our acquisition. Fortunately, at the outset of an audit/investigation, we usually have a target account or accounts and associated date range, which is where we’ll start.
First, we’ll get connected by using the “Connect-ExchangeOnline” command from PowerShell 7. You should receive a modern-auth pop-up browser window, where you’ll authenticate as per usual to M365 using an account with adequate permissions (review this) and MFA. You are using MFA, right? Right!? Of course you are, as it is not safe to wrangle without it!
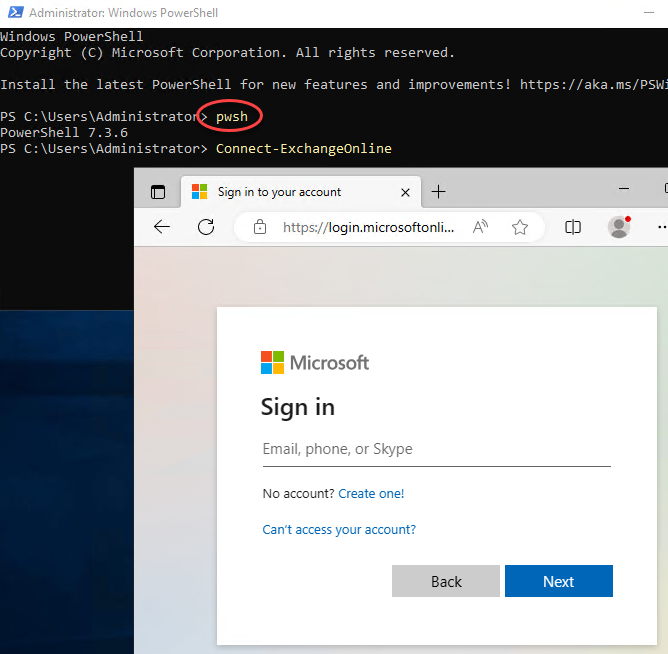
Once connected, we’ll do a quick test to verify that all is well. Remember that tab-completion is your friend! Start typing “Search-Un” and hit tab. If you don’t get autocomplete for “Search-UnifiedAuditLog,” then you are likely lacking required permissions (review this). To sample data access/output, let’s run the command below, “Search-UnifiedAuditLog -StartDate 7/15/2023 -EndDate 7/20/2023 -UserIds [email protected] -ResultSize 1,” changing the parts in italics as appropriate. You should see output similar to the image below. Note that there are a few discrete named fields and the AuditData JSON blob:
Search-UnifiedAuditLog -StartDate 7/15/2023 -EndDate 7/20/2023 -UserIds [email protected] -ResultSize 1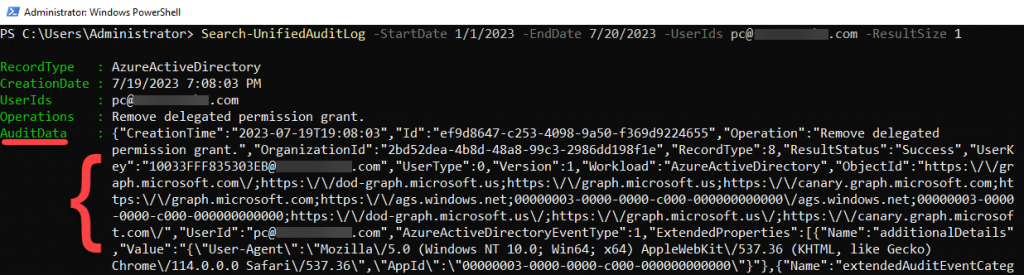
Ultimately, we want to pull all UAL data for our target user/s for a date range, often the entirety of available data (365 days), but we may also want to do some searching or filtering to guide or narrow our UAL exports. For example, we might want to search for a particular operation or extract a few key components of the AuditData for review. In our initial test search, we see an operation of “Remove delegated permission grant” from a highly suspicious character named “PC,” which might lead us to wonder about the associated addition of said permission grant. If we run “Search-UnifiedAuditLog -StartDate 1/1/2023 -EndDate 7/1/2023 -Operations “Add delegated permission grant” -ResultSize 1”, perhaps we can find out! Note the result size limit for brevity and that I did not specify a UserId. Adjust either as desired:
Search-UnifiedAuditLog -StartDate 1/1/2023 -EndDate 7/1/2023 -Operations “Add delegated permission grant” -ResultSize 1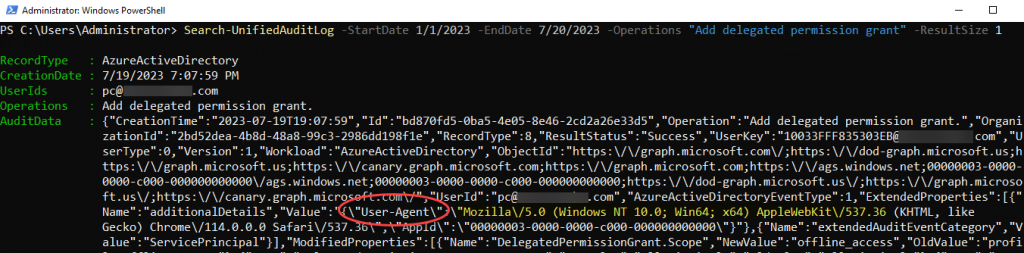
Perhaps “PC” should not have Microsoft Graph permissions, you notice the User Agent in the AuditData looks like Edge on Windows, which seems suspect/abnormal. Are there any other audited actions in your tenant using this User Agent? Let’s try running “Search-UnifiedAuditLog -StartDate 1/1/2023 -EndDate 7/20/2023 -ResultSize 1 | Select-Object -ExpandProperty AuditData | ConvertFrom-Json | Where-Object ExtendedProperties -like “*Mozilla*” | Select-Object workload,userid,extendedproperties”:
Search-UnifiedAuditLog -StartDate 1/1/2023 -EndDate 7/20/2023 -ResultSize 1 | Select-Object -ExpandProperty AuditData | ConvertFrom-Json | Where-Object ExtendedProperties -like “*Mozilla*” | Select-Object workload,userid,extendedproperties
The good news is that that worked! The bad news is that it’s cumbersome and not scalable, which leads us to the UAL parsing and querying challenges. You can export to CSV, but the AuditData translates to a single field. You can use Excel and convert from JSON, which is simple, expedient, and moderately useful, but you’ll still end up with truncated list entries and encounter scaling constraints on large datasets. What to do? Drum roll please… enter… SOF-ELK. (Thank you, Phil Hagen and team!)
Security Operations and Forensics Elasticsearch, Logstash, Kibana (SOF-ELK) is a “big data analytics platform focused on the typical needs of computer forensic investigators/analysts,” available in a prepacked Virtual Machine. For our purposes, SOF-ELK has built-in, well-maintained parsers for wrangling UAL logs! You can read more here: sof-elk/VM_README.md at main · philhagen/sof-elk · GitHub or head directly here to download a VM: https://for572.com/sof-elk-vm
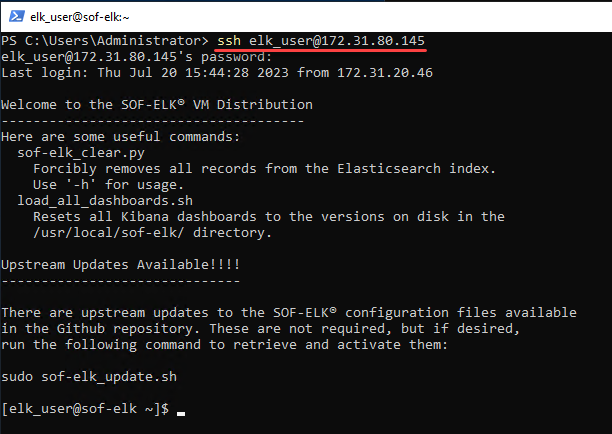
Once you’ve downloaded and unzipped the VM, you can launch it via VMWare Workstation/Fusion/Player. See the README.md link above for general info, including username/password. I’ll be using SOF-ELK from an EC2 instance. Export of VM to an EC2 AMI is a bit of a process, which I’ll write up in part two of this post. I’ll go ahead and ssh from my Windows Server 2022 EC2 instance to SOF-ELK in anticipation of next steps:
Next, we’ll return to our PowerShell session to extract data for use with SOF-ELK. If we are pulling a small amount of data, less than 5K results, we can run a singular command, as follows: “Search-UnifiedAuditLog -StartDate 7/20/2022 -EndDate 7/20/2023 -UserIds [email protected] -ResultSize 5000 | Select-Object -ExpandProperty AuditData | Out-File -Encoding UTF8 ual-target-user-07202022-07202023.json”
Search-UnifiedAuditLog -StartDate 7/20/2022 -EndDate 7/20/2023 -UserIds [email protected] -ResultSize 5000 | Select-Object -ExpandProperty AuditData | Out-File -Encoding UTF8 ual-target-user-07202022-07202023.json
How do we know if there are less than 5K UAL entries based on our query parameters? We don’t! You can check by re-running the above command, replacing the output to file with measure: “Search-UnifiedAuditLog -StartDate 7/20/2022 -EndDate 7/20/2023 -UserIds [email protected] -ResultSize 5000 | Select-Object -ExpandProperty AuditData | Measure”
Alternatively, we can use a couple different approaches to overcome the 5K record limit. See the link below for Microsoft’s perspective. Naturally, I like my script better, mostly because it’s simple and works for about 98% of my use cases. Just edit the file output path, the start and end dates, filter on specific UserIDs or just leave $null to search all. The script queries the UAL in one-hour increments to minimize the possibility of hitting the 5K max-results per query, reports count on-screen, and writes to a single file:
#Change path to desired output location and change name to reflect date range
$OutputFile = ".\ual-userid-pc-07012023-07202023.json"
#Enter "UserID" in quotes or leave as $null for all Users
$userids = $null
#Enter start search date in format mm-dd-yyyy
$StartSearchDate = get-date "7-1-2023”
#Enter start search date in format mm-dd-yyyy
$EndSearchDate = get-date "7-20-2023"
$FormattedStartDate = Get-Date $EndSearchDate
$DaysToSearch = (new-timespan -start $StartSearchDate -End $EndSearchDate).days
For ($i=0; $i -le $DaysToSearch; $i++){
  For ($j=23; $j -ge 0; $j--){
    $StartDate = ($EndSearchDate.AddDays(-$i)).AddHours($j)
    $EndDate = ($EndSearchDate.AddDays(-$i)).AddHours($j + 1)
    $Audit = Search-UnifiedAuditLog -StartDate $StartDate -EndDate $EndDate -userIDs $userids -ResultSize 5000
$ConvertAudit = $Audit | select-object -expandproperty AuditData | out-file -encoding UTF8 $OutputFile -Append
Write-Host $StartDate `t $Audit.Count
  }
}
UAL Export Script
Use a PowerShell script to search the audit log – Microsoft Purview (compliance) | Microsoft Learn
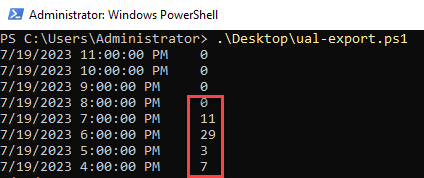
My script assumes that you are already connected via EXO to your tenant and works in reverse order, newest date/time to oldest, displaying record count per interval:
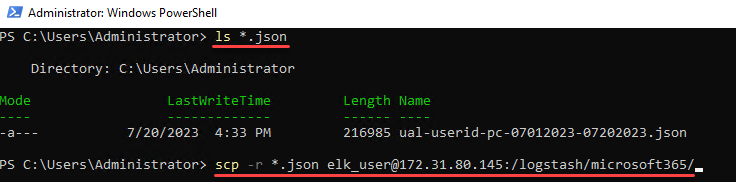
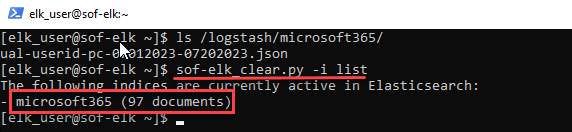
Now we just need to copy our JSON data to SOF-ELK, be patient while ingestion and parsing occur, then move on to query wrangling via the SOF-ELK web UI! From my current directory, I’ll confirm JSON file/s, and then “scp” them to the proper SOF-ELK directory:
From our SOF-ELK ssh session, we can keep an eye on Elasticsearch progress by running “sof-elk_clear.py -i list”, which will show us current indices. You may see no entries at first but be patient! In a couple minutes, you should see a “- microsoft365 (nn documents)” entry, which is a great sign that our data is being ingested/parsed:
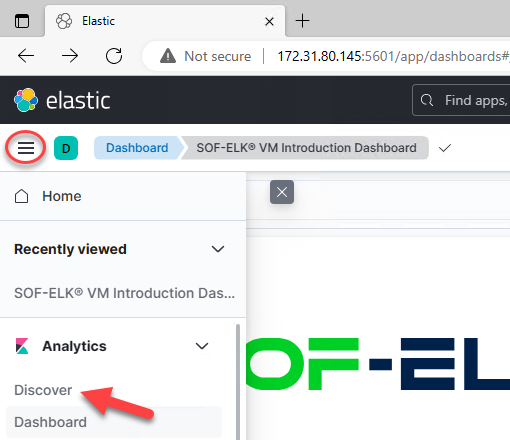
Again, a little patience is in order, but we can go to the web UI and see what our results look like. Launch a browser and visit http://x.x.x.x:5601 (replacing the x’s with your SOF-ELK IP address). This should bring you to the default dashboard. Click the “hamburger” icon (three lines in the upper-left corner) and click “Discover.”
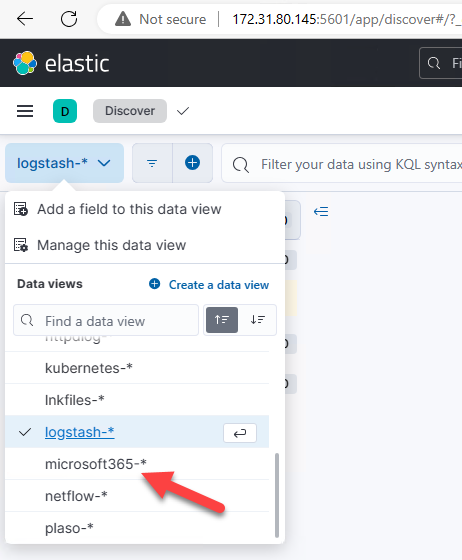
Change your data view from “logstash-*” to “microsoft365-*”:
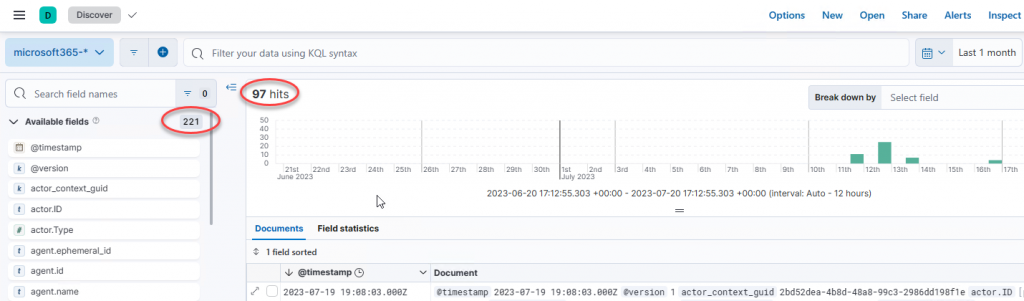
Then change your date range to an applicable value. I’ll use “Quick Select” and “Last One Month” for my “PC UAL” dataset:

You should now see some “hits” and a couple hundred “available fields.” If not, make sure you’ve selected the correct data view (microsoft365-*) and double-check your date-range filter:
Thanks to the built-in parsing and some field normalization, we can now easily wrangle our data by viewing, selecting, and searching available fields. Let’s sleuth out the “PC” user_name (if you filtered your UAL query on a specific UserID, this may not be necessary), and visualize some key UAL details: workload, operation, ips, and useragent. Type the first field name into the search box, e.g. “user_”. Click the field name to see the “top” values and confirm it is the data field you are looking for, then click the “+” sign at the top of the flyout to add the field as a column or click the “+” sign next to a top value to filter on that value. Repeat for each desired data field:
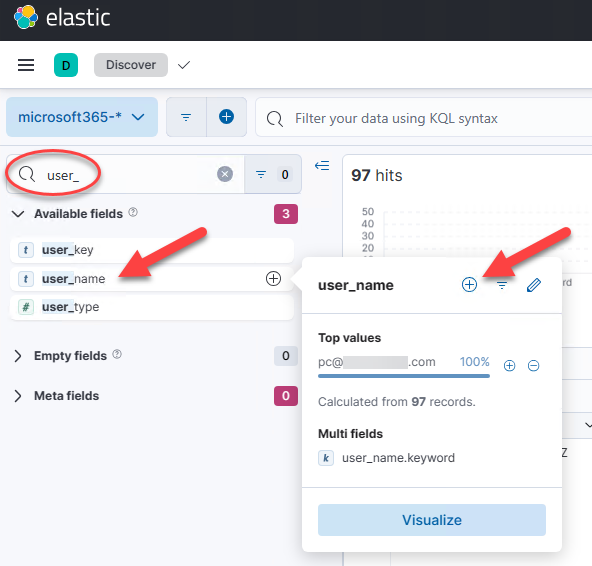
Now we can easily pick and choose, filter, search and view the extracted AuditData fields:

As per our previous inline-filtering discussion, if we want to pivot on “UserAgent” and see if anyone else in our current UAL is using a suspect entry, just hover over a useragent column entry and select the “+” sign to “filter for this useragent.” If you previously filtered on a single user_name, remove that filter (click the “x” to the right of the filter entry just below the manual filter box):
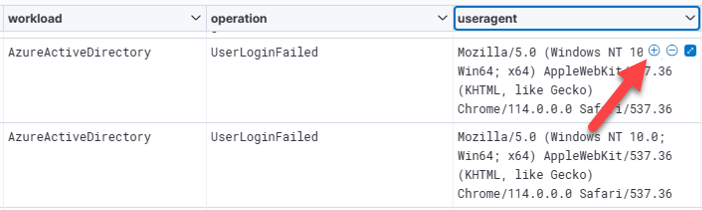
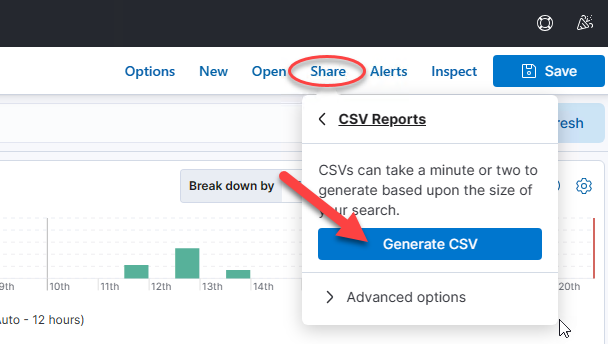
And thus begins the iterative process of querying your data to answer your audit/investigative questions, adding fields, filtering in/out field values, sorting, and visualizing. At some point, you’ll likely want to export to CSV, which can be accomplished via the “Share” menu option and “CSV Reports,” and “Generate CSV”:
Hopefully this is just the beginning of our SOF-ELK and UAL wrangling adventures, as we’ve barely scratched the surface of SOF-ELK’s utility! We’ll circle back and discuss how to spin this whole mess up in AWS EC2 and how to convert UAL CSV files for SOF-ELK ingestion. Stay tuned and thanks for reading!
PS: Just in case you were wondering, “how many times can he use the word ‘wrangle’ in a single blog post?” It was only ten times. I know it seemed like more than that, but it wasn’t.
READ:
Ready to learn more?
Level up your skills with affordable classes from Antisyphon!
Available live/virtual and on-demand

此内容由惯性聚合(RSS阅读器)自动聚合整理,仅供阅读参考。 原文来自 — 版权归原作者所有。