


Sean Verity //

Have you ever been on a pentest and thought to yourself, “I wish I had a robot to do this testing for me right now cuz this is just too much work”?
I know I have. That’s how I came to use the QA tool, Selenium IDE, to automate things like:
Before we get started though, I want to point out that the demo to be presented in this blog was atypical insofar as there were some unique challenges presented with this particular app. My goal with this blog is to provide you with a reference for ideas on how to troubleshoot when your Selenium IDE tests aren’t working. It is typically much easier to automate your browser with Selenium IDE.
To show you how to build a pentest robot with Selenium IDE, we’ll take a look at how to brute force an example React app that I put together. The example app was built by following this excellent blog: Build an Authentication System with AWS Amplify, Cognito and React. The app uses Amazon Cognito’s SRP for authentication which, as we’ll see, is just about impossible to automate with Burp Suite’s Intruder module.
According to Wikipedia, SRP is “an augmented password-authenticated key exchange (PAKE) protocol” where “the password never leaves the client.”1 That second phrase already sounds like a deal breaker for running a Burp Intruder attack. Usually, when using Burp Intruder for authentication attacks, you need to mark the password position in the HTTP request. If the password never leaves the client though (i.e. password is not sent in HTTP request), how can you mark the password position?
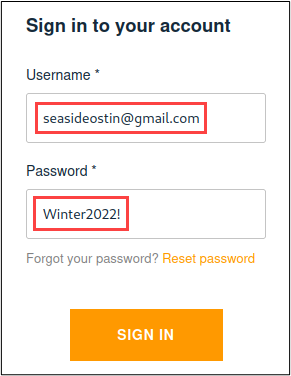
Here’s what the login form looked like for my React app during authentication.
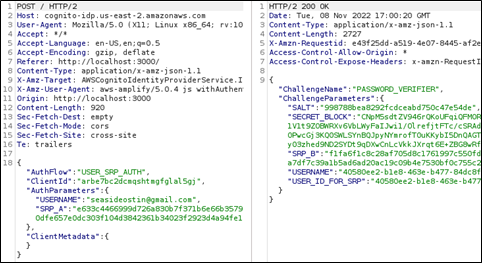
Requests were sent to “cognito-idp.us-east-2.amazonaws.com” after clicking the “Sign In” button. As can be seen in the following screenshot, the username was pretty easy to spot. The password…not so much. It seems that Wikipedia was right about the password not leaving the client.
Since using Burp Intruder won’t work for brute forcing this login form, I considered writing a Burp extension that implemented SRP. Before going down that rabbit hole, though, I took a peek at what would need to be implemented. The screenshot below was taken from a Stanford University webpage that describes the SRP Protocol Design.
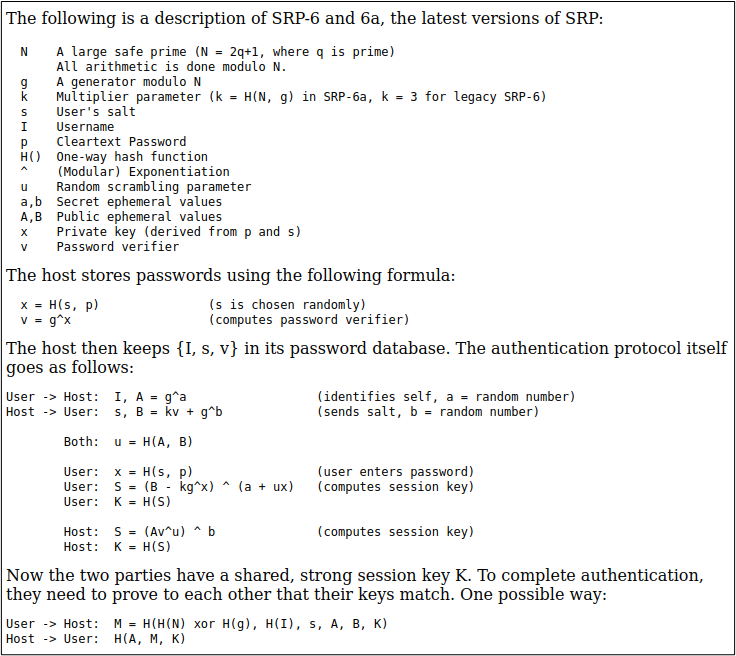
Prime, modulo, salt, exponentiation, you say?

It would probably be easier to build a robot that would do this brute force testing for me. Ok, so maybe the robot idea isn’t actually feasible either. But what if there was a tool that was easy to install and easy to configure (most of the time) that would automatically fill in the login form fields and click the “Sign In” button? Ah, but there is such a tool! And its name is Selenium IDE (SIDE).
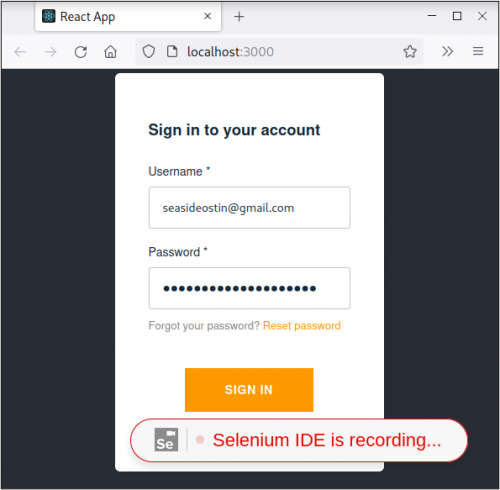
To find and install SIDE, you can search your browser’s extension store or favorite search engine for “selenium ide.” After installing SIDE, there’s some preliminary things to do like naming the project and setting the base URL. The base URL is where you want SIDE to start the test from. In the same window where you enter the base URL, there will be a button titled, “Start Recording.” This will open a new browser instance with a bubble at the bottom of the window that says, “Selenium IDE is recording…”. Since I’m going to be brute forcing the login form, I just need to fill out the login form and click the “Sign In” button like a typical user.
After logging in, I’m redirected to a very basic dashboard which indicates that I’ve authenticated.
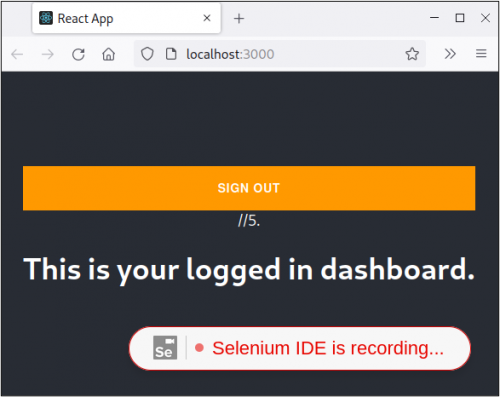
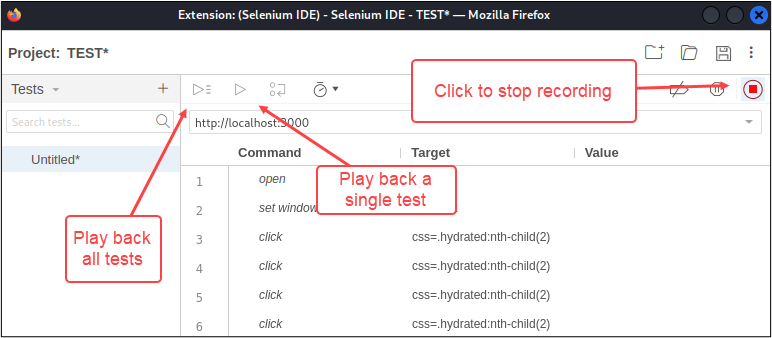
All that I needed to record was the login process so I clicked the stop recording button and named the test. At this point, the next step is to verify that the login process was recorded successfully by clicking the “Play” button. There are a couple of “Play” buttons in the UI. The one on the left will play back all of the tests inside of a project whereas the one on the right will only play back the selected test. Since there is only one test at this point, either button would work.
After I clicked the “Play” button, SIDE ran the test and the log indicated that the test completed successfully. However, the browser was still on the login page as opposed to the dashboard after the login form was submitted. While watching the test run, there was no data being entered into either form field.
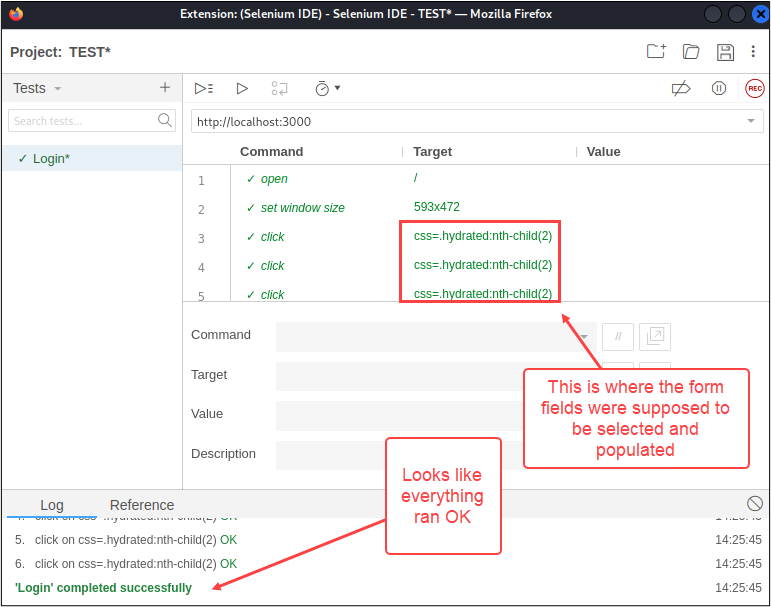
After much blood, sweat, and tears were shed while putting together this demo, I learned that the problem lay in SIDE’s inability to find elements inside of a “shadow DOM.”2 Shadow DOM is basically a DOM that is nested inside of a DOM, which sounds to me like a recipe for use-after-free bugs, but that’s another topic and I’m sure there are really good reasons why shadow DOM exists, but I digress. Since both form fields lived in shadow DOMs, I had to try a different approach to populating the form fields. SIDE has an “execute script” command which will execute JavaScript inside of the DOM where your test is running. We can use this command to select and populate the form fields.
Now before we go and start rage coding JavaScript inside the SIDE UI like a crazy person, let’s take a step back and make sure that the JavaScript is sound, using the JavaScript console in 00DevTools. I decided to start with a simple task of writing a line of JavaScript that would select the username field and populate it with an arbitrary username. The first thing to figure out is how to access the username field. Usually, you can use something like the document.getElementById()3 method and pass the ID of the targeted element. In this case, it appeared that the username form field ID was “username.” It also looked like there was an event handler for “input” events attached to it.
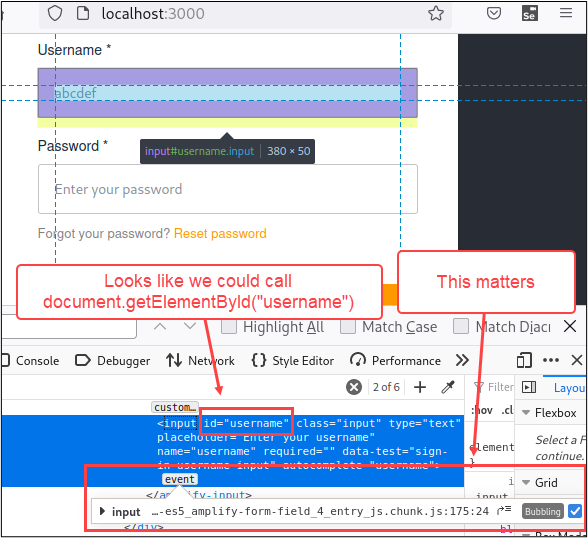
If my assumptions were correct, then calling document.getElementById(“username”) would return the string, “abcdef”. Let’s test this theory out in the console tab.
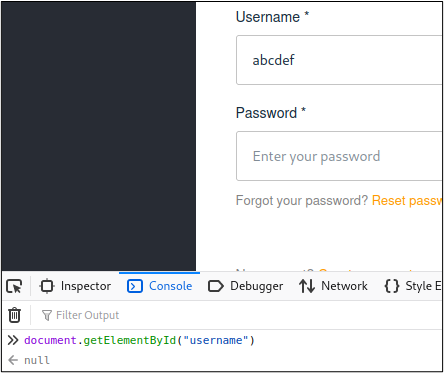
Ugh. Looks like I need to dig a little deeper to come up with a way to select this form field. Not that we didn’t already know that, since I mentioned the shadow DOM issue earlier. If we take another look at where the username form field is located, we can see that it’s inside of a shadow DOM, which is nested inside of another shadow DOM, that is nested inside of the DOM. Easy peasy, yeah?
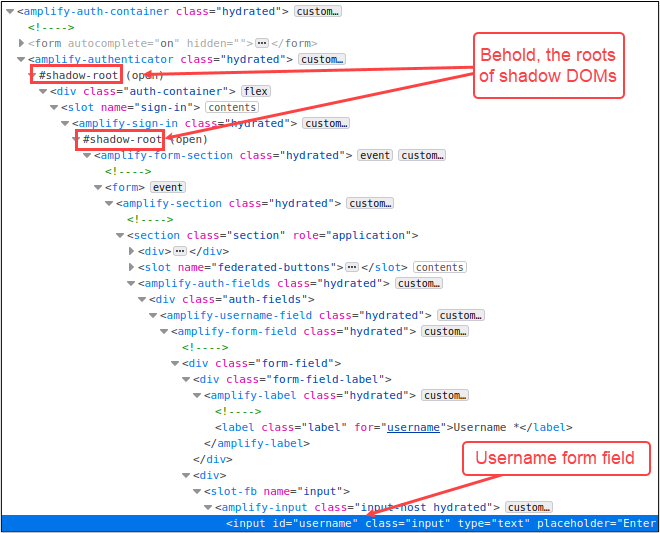
The other thing to take note of here is that there aren’t a whole lot of element IDs to traverse in the shadow DOMs, which means that we can’t use getElementById() to traverse the shadow DOMs. No big deal though. We can use the document.querySelector()4 method instead. To select the username form field, we’re going to:
Here’s what all of that looks like in the console.
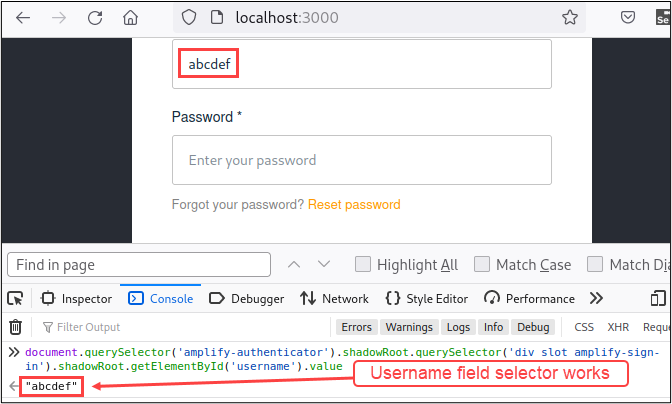
Now that we have some working JavaScript to get the username form field value, we just need to make a minor tweak to set the username value. The other piece that needs to be accounted for is the event handler that I highlighted earlier. This piece isn’t so bad though. We can use the same form field selector code then call dispatchEvent()5 method on it to send the “input” event. Here’s what the JavaScript looks like in the console tab.
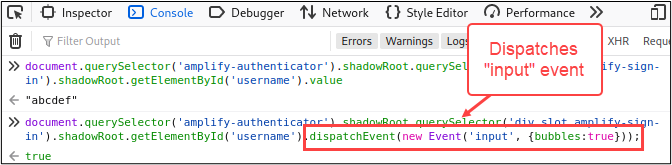
At this point, we have all of the JavaScript needed to select and populate the username form field. The next step is to use the same techniques to populate the password field and call the click() method on the “Sign In” button. Here’s what the final JavaScript looked like.
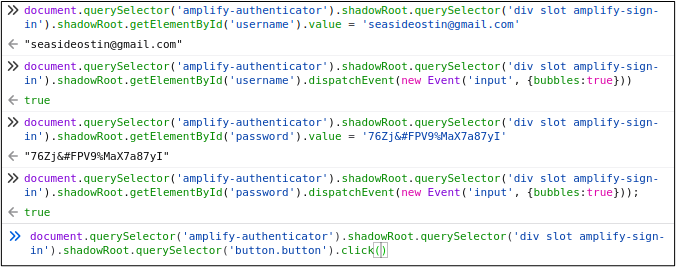
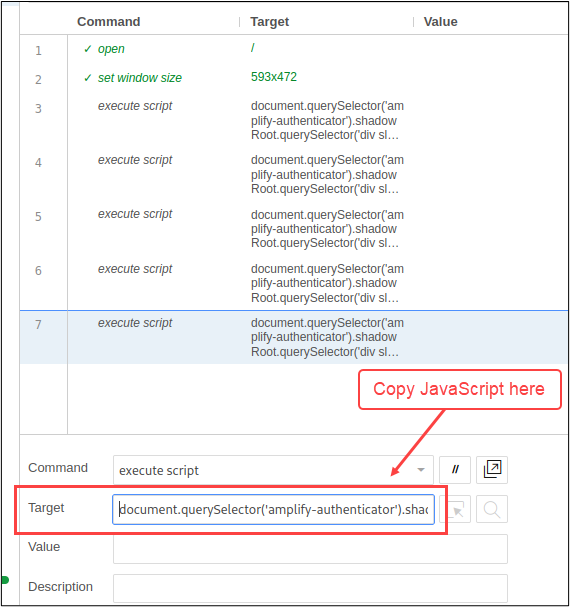
Each line of JavaScript can be copied into a SIDE “execute script” command. BTW, I deleted all the “click” commands from the original test since they weren’t doing anything useful. Here’s what the final SIDE test to login looked like.
To make sure this works, let’s click the “Play” button. If all goes according to plan, the new SIDE test will login to the app and stop at the dashboard.
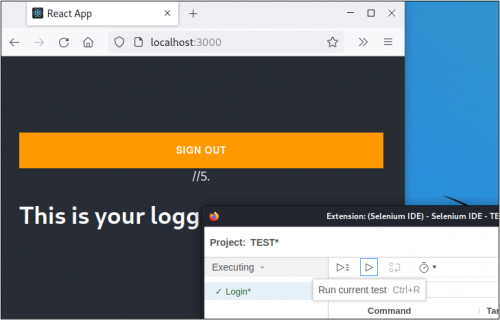
It worked! Now that we have the login piece automated, we need the SIDE test to loop through a list of passwords for brute forcing. We’ll use a little bit of JavaScript to create an array of passwords, SIDE’s “return” keyword to access the array, and SIDE’s “for each” command to iterate through the array. To start, right click on the first command inside of SIDE to insert a new command before the login process.
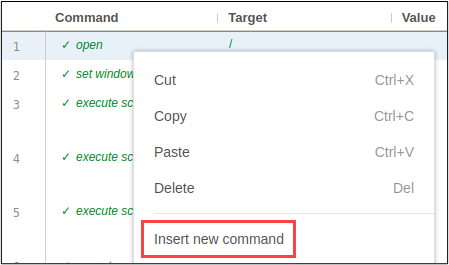
This first command will return an array of passwords to SIDE, named “passwordList”.
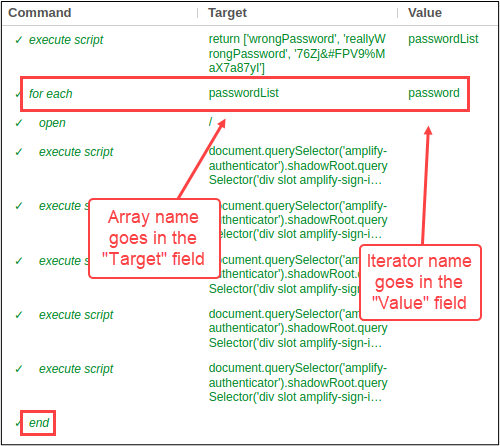
Next, I’ll add “for each” and “end” commands to loop through the passwordList array. The array name will go in the “Target” field and the iterator name will go in the “Value” field of the “for each” command. The “end” command is also needed at the very end of the test to close the loop.
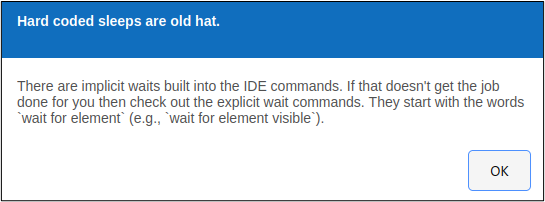
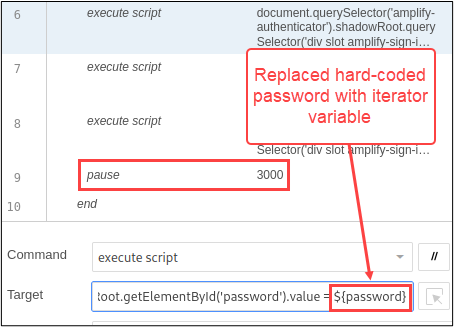
The last step is to remove the hard-coded password from the command that populates the password form field, and replace it with the iterator variable. The syntax for accessing SIDE variables is ${variable}. One other change that I’m going to make to this test is adding a three second delay after each login attempt with the “pause” command. The duration is entered in milliseconds. SIDE warned me that “Hard coded sleeps are old hat,” but we know better, so I clicked on the OK button.
The delay gives the app enough time to process the login request. On a SIDE note 😉, when troubleshooting a SIDE test that fails to execute, my first move is to add a delay. I’ve found this to be pretty effective most of the time.
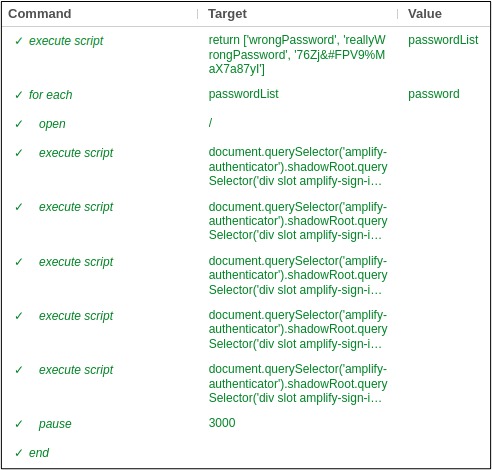
Here’s what the final SIDE test looked like to brute force the app. At a mere ten lines of “code,” that’s not too bad, eh?
I hope you’re not too disappointed that I didn’t show you how to build a robot, but hopefully you came up with some ideas on how you could use Selenium IDE on your next pentest or red team assessment when you’re short on time or tooling.
[1] https://en.wikipedia.org/wiki/Secure_Remote_Password_protocol
[3] https://developer.mozilla.org/en-US/docs/Web/API/Document/getElementById
[4] https://developer.mozilla.org/en-US/docs/Web/API/Document/querySelector
[5] https://developer.mozilla.org/en-US/docs/Web/API/EventTarget/dispatchEvent
Ready to learn more?
Level up your skills with affordable classes from Antisyphon!
Available live/virtual and on-demand
此内容由惯性聚合(RSS阅读器)自动聚合整理,仅供阅读参考。 原文来自 — 版权归原作者所有。