


Carrie & Darin Roberts //
If you would like to install the Mitre CALDERA server on your own, the CALDERA GitHub page has installation instructions on their ReadMe here. Detailed steps are provided below for installing CALDERA on Ubuntu and configuring it to use your SSL certification.
git clone https://github.com/mitre/caldera.git --recursive --branch 2.8.1
Change directories into the “CALDERA” directory
cd caldera
sudo apt install -y python3-pip
pip3 install -r requirements.txt
Installing Go is technically optional but it makes it so that agent executables are dynamically compiled and they avoid AV detection much better.
Download Go from https://golang.org/doc/install
Extract the downloaded file (your filename may vary)
sudo tar -C /usr/local -xzf go1.15.2.linux-amd64.tar.gz
Add the following line to your $HOME/.bashrc file:
export PATH=$PATH:/usr/local/go/bin
Close the terminal and reopen to have the PATH changes take effect, or use the “source ~/.bashrc” command.
Confirm that GO is properly installed by checking its version.
go --version
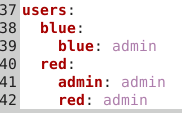
Create a copy of the CALDERA config file called local.yml and then edit it to set your own users and secure passwords.
cp ~/caldera/conf/default.yml ~/caldera/conf/local.yml
Edit the local.yml file to change the usernames and passwords shown below to something more secure.
Start the CALDERA server.
python3 server.py
If your CALDERA web interface is reachable over an untrusted network, you should enable encrypted communications as instructed below.
The encrypted communications are handled by the HAProxy tool. Install HAProxy as follows.
sudo apt update
sudo apt install haproxy
After logging in to the CALDERA web interface on localhost:8888, go to the Advanced–>Configuration menu.
From the configuration menu enable the SSL plugin. You can now reach the CALDERA web interface at https://<your ip>:8443.
You also need to update your app.contact.http setting from the CALDERA web interface (advanced–>configuration) to include https as shown below. (update with the IP or domain name of your server)

Note: Make sure you do not include a trailing slash (/) on the URL.
Don’t forget to click the green “update” button and restart the server after making the configuration changes.
Now that we have configured the app.contact.http setting, we will see updated commands for deploying an agent using the http contact method (54ndc47 for example)
By default, a self signed certificate is used for the SSL encryption. Replace the self-signed certificate at ~/caldera/plugins/ssl/conf/insecure_certificate.pem with your own if desired.
Need to create your own signed/trusted certificate? Try using Let’s Encrypt. You will need to own a domain name and configure a DNS authoritative record to point to your CALDERA server’s IP address.
To use your own trusted cert create a combined pem file using the commands to below.
cd /etc/letsencrypt/live/<your domain>
cat cert.pem privkey.pem > ~/caldera/plugins/ssl/conf/insecure_certificate.pem
Restart the CALDERA server after making these changes.
If you use the self-signed cert, any PowerShell commands you run to get a remote agent are going to complain about not being able to establish a trust relationship. You will need to bypass the trust check by running the PowerShell commands below before you execute the agent command. (this only applies if you are using the default self-signed cert)
class TrustAllCertsPolicy : System.Net.ICertificatePolicy {
        [bool] CheckValidationResult([System.Net.ServicePoint] $a,
            [System.Security.Cryptography.X509Certificates.X509Certificate] $b,
            [System.Net.WebRequest] $c,
            [int] $d) {
            return $true
        }
    }
    [System.Net.ServicePointManager]::CertificatePolicy = [TrustAllCertsPolicy]::new()
Now your CALDERA SERVER is fully set up and ready to be put to use. Check out the “Attack Emulation: Atomic Red Team, CALDERA, and More” class to learn more about using Mitre CALDERA, including over 25 hands-on labs. https://wildwesthackinfest.com/online-training/attack-emulation-atomic-red-team-caldera-and-more/
Ready to learn more?
Level up your skills with affordable classes from Antisyphon!
Available live/virtual and on-demand
此内容由惯性聚合(RSS阅读器)自动聚合整理,仅供阅读参考。 原文来自 — 版权归原作者所有。