


Beau Bullock //

MailSniper is a penetration testing tool for searching through email in a Microsoft Exchange environment for specific terms (passwords, insider intel, network architecture information, etc.). It can be used as a non-administrative user to search their own email, or by an Exchange administrator to search the mailboxes of every user in a domain.
MailSniper is available for download here: https://github.com/dafthack/MailSniper
Oftentimes, on penetration tests we find ourselves having elevated access (Domain Admin) within an organization. Some firms stop there thinking that DA is the end goal. But it’s not. “Getting DA” means nothing to most members of the C-suite level if you can’t provide a picture of what that means in terms of risk. One of the best ways to demonstrate risk to an organization is to show the ability to gain access to sensitive data. Sensitive data to an organization varies greatly from company to company. Some common examples of sensitive data are: customer information, credit card numbers, Social Security numbers, employee information, intellectual property, industrial control systems/SCADA, health care data, etc.
According to the 2016 Mandiant M-Trends Report (PDF) in 2015, the median number of days organizations were compromised before they detected the breach was 146. Having that much time inside of any network allows attackers to slowly and stealthily gain operational awareness, determine what the organization deems sensitive data, locate sensitive data on the network, compromise sensitive data, and ultimately exfiltrate it. How do we as pentesters go about providing that same illustration in terms of risk to an organization when we typically only have less than 5 days to complete an assessment?
In this blog post, I will detail a new tool I have developed to assist in the location of sensitive data on a network by searching through every employee’s email for specific terms. The tool is called MailSniper.
First off, there are already some great tools available for locating sensitive data on a network. One of my favorite tools that I use on pretty much every engagement is called PowerView (PS1) by Will Schroeder (@harmj0y). PowerView has the ability to locate available shares on a network (Invoke-ShareFinder), and search through files (Invoke-FileFinder) on them for specific terms in the file names.
Searching network shares for files containing sensitive data has proved fruitful for myself many times. But, this was not always the case. Occasionally networks I have tested were so large that scanning every network share would not complete during the testing window. Other times, maybe the attack surface was very small in terms of alive hosts, or sensitive data is simply not being stored on network shares at all. In these cases, previously I would resort to a more manual approach to locating sensitive data, which would not always result in me obtaining it.
This led me down the path to thinking about what else can we do to locate sensitive data quickly in a network. Through discussions with Derek Banks (@0xderuke) and Ethan Robish (@ethanrobish) at DerbyCon last year we came upon the idea of searching email within an organization. Email is very often the primary messaging system inside most organizations, and is the go-to medium for a simple chit chat about daily business, password resets, or even corporate strategy.
Having the power to search through email is huge when hunting for sensitive data. For example, a simple search for the term “*password*” in the body and subject of every email might return instructions on how to access certain systems along with what credentials to use. At an energy company a search for “*scada*” or “*industrial control system*” might return a conversation detailing the location of sensitive ICS devices. At a financial institution a search for “*credit card*” might reveal where employees have been sending credit card numbers in cleartext over email. At a healthcare organization searching for “*SSN*” or “*Social Security number*” could return potential health care data.
Here is a real-world example where searching for the term “*database*” in emails revealed a conversation where a SysAdmin was telling his team where the location of their internal KeePass database was migrated to along with the key file.
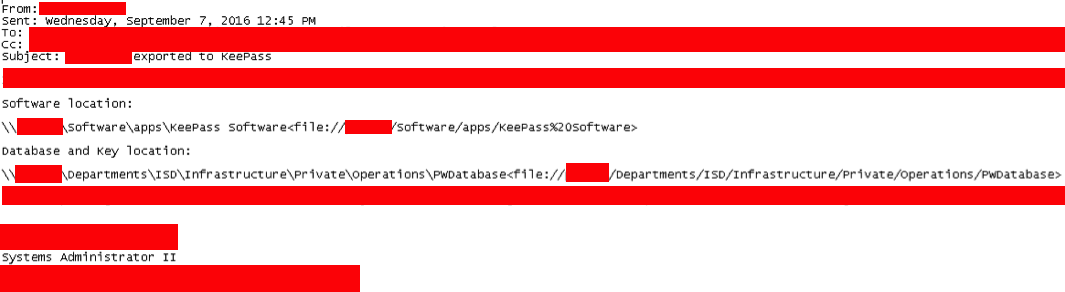
I copied the DB and key file to my testing system and opened it with KeePass (Of course a second factor wasn’t required). All I needed was the key file that was in the same directory as the DB. ./facepalm). It was a gold mine of pretty much every credential you would ever want at an organization. All of the ‘sa’ passwords to databases, all of the network device passwords, passwords to login to their security products, Windows administrative passwords, VPN Group ID/pass, etc.
Most of the environments we see are typically running Microsoft Exchange for email services. Microsoft Exchange already has a few tools for searching email built-in to the server itself. From the Exchange Management Shell on the server the Search-Mailbox cmdlet has some search functionality, but not at the level I wanted. So, I set out on building a new tool to accomplish my goal of being able to search all the mailboxes on a domain for specific terms.
Available here: https://github.com/dafthack/MailSniper
To accomplish my goal I decided to start building a tool called MailSniper written in PowerShell for a few reasons:
Microsoft Exchange Server starting with version 2007 has implemented a web API called Exchange Web Services (EWS). EWS allows for remote web calls to the Exchange server to gather various data including calendars, contacts, and messages. The ability to connect to Exchange remotely from any system on the network provides highly flexible search capabilities.
I wanted this to be a tool that could operate completely remote from any host on the network to the Exchange server, meaning an interactive session (RDP, VNC, etc.) was not required. In doing research into Exchange Web Services I discovered a few things that I found interesting that would ultimately lead to a second function being developed.
My initial goal was to create a tool to search through every mailbox in a domain for specific terms. Another highly useful function of Exchange Web Services I hadn’t considered is to simply search the current user’s email alone. Because of this possibility, I created a separate function inside of MailSniper.
The two main functions in MailSniper are Invoke-GlobalMailSearch and Invoke-SelfSearch.
Invoke-SelfSearch is a function that will simply search for terms in the current user’s mailbox. The ability to search your own email in a pentesting situation may seem at first like something that wouldn’t be all that useful. But when you start to consider how often we as pentesters gain access to other user’s credentials during engagements and combine that then with the ability to search their email from a PowerShell script, it becomes much more powerful. It becomes a brand new privilege escalation vector.
For example, let’s say that through password spraying we were able to gain access to 10 user credentials, but none of them have any administrative access. By searching through each one of their mailboxes for the terms “password”, “creds”, or “credentials” we might very well find a number of conversations that include information that would allow us to access other accounts or systems.
To search the current user’s mailbox first open a PowerShell terminal with the ‘-exec bypass’ option to bypass execution policy. Then, import the MailSniper.ps1 module into a PowerShell terminal, and run the following Invoke-SelfSearch command with the email address of your user:
Invoke-SelfSearch -Mailbox [email protected]
This command will connect to the Exchange server auto-discovered from the email address entered using Exchange Web Services where, by default, 100 of the latest emails from the “Mailbox” will be searched through for the terms “*pass*”,”*creds*”,”*credentials*”.
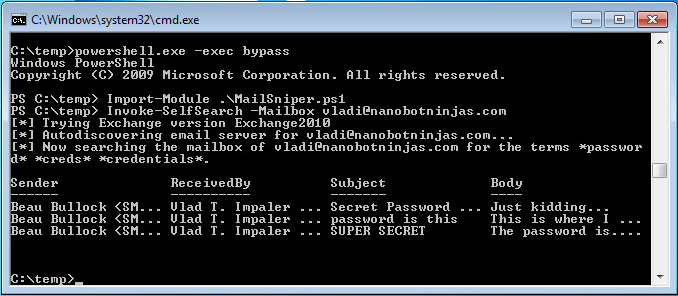
By default, the only option necessary for Invoke-SelfSearch is the -Mailbox option. A full list of options that can be used are:
Invoke-GlobalMailSearch is a function that will search through all mailboxes on an Exchange server. The process to search through every mailbox is a bit more complicated than just searching the mailbox of the current user. For starters just getting a Domain Admin account doesn’t necessarily mean you now have access to everyone’s mailbox. By default, the “Domain Admins” group does not have “full access” rights to mailboxes on Exchange.
The account group that has complete and utter control of everything related to Exchange is the “Exchange Organization Administrators” group. (FYI This group name varies between Exchange versions. In Exchange 2013 the group is called “Organization Management”). In order to make this script work, you will need an account from that group. In the few tests I have run, it appears that “Domain Admins” has the ability to grant this access to any account. So, if typical user hunting with doesn’t yield you an Exchange admin account you can always resort to adding your own user to the group with a DA. From a workstation on the domain the following command can be run as a domain admin to add a user to the “Exchange Organization Administrators” group:
C:> net groups “Exchange Organization Administrators” <username-of-your-user> /DOMAIN /ADD
In researching deeper into accessing other users’ mailboxes I came across what is called the “ApplicationImpersonation” role. The “ApplicationImpersonation” role is a Microsoft Exchange server role that, when granted to a user, allows them to impersonate other users when accessing mailboxes. This role can be granted at the Exchange Management Shell with the following command:
New-ManagementRoleAssignment -Name:impersonationAssignmentName
-Role:ApplicationImpersonation -User:username-of-impersonation-user
Having this role assigned to a user I controlled allowed for accessing other users’ mailboxes. Exchange Management Shell was required to make this change. This is installed on the Exchange server itself. In order to perform this action remotely, Invoke-GlobalMailSearch sets up a PowerShell remoting session to the Exchange server as the Exchange admin and then imports the Microsoft.Exchange configuration which includes all of the Exchange Management Shell commands.
After the PS-Remoting session is established Invoke-GlobalMailSearch grants a specific user passed in via the -ImpersonationAccount option the ApplicationImpersonation role. After this role has been granted the Invoke-GlobalMailSearch function creates a list of all mailboxes in the Exchange database using the Exchange Management Shell command ‘Get-Mailbox | Select Name -ExpandProperty EmailAddresses’. It is also possible to pass in a custom list of email addresses with the -MailList flag.
Invoke-GlobalMailSearch then connects to Exchange Web Services using the account with the impersonation role to gather a number of emails from each mailbox and ultimately searches through them for specific terms. By default the script searches for “*password*”,”*creds*”,”*credentials*”.
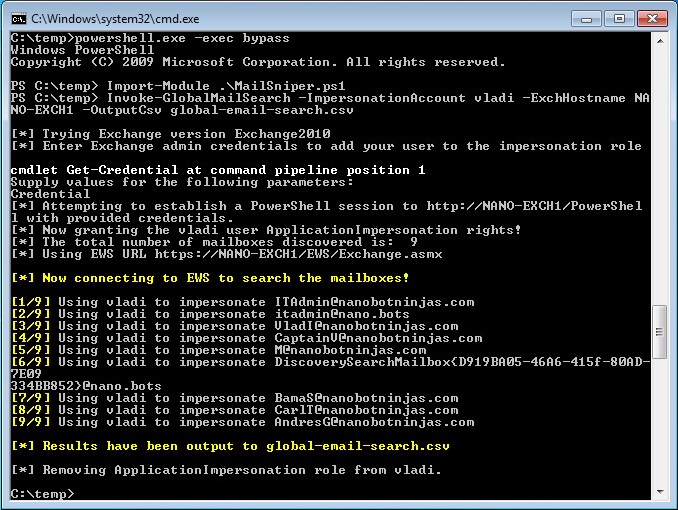
To search all mailboxes on an Exchange server import the MailSniper.ps1 module into a PowerShell terminal, then run the following command changing out the options to match the target environment:
Invoke-GlobalMailSearch -ImpersonationAccount current-username
ExchHostname Exch01 -OutputCsv global-email-search.csv
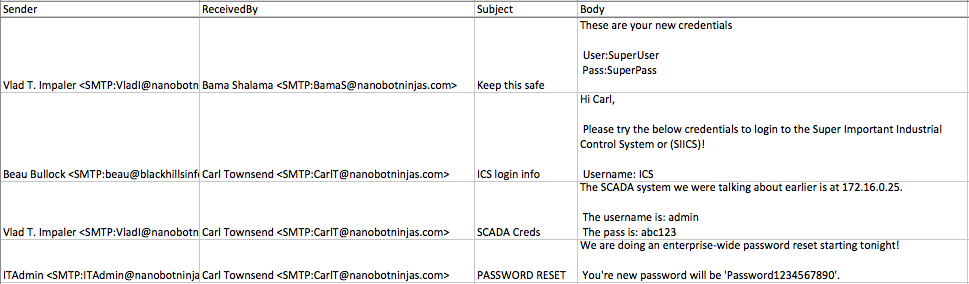
This command will connect to the Exchange server located at ‘Exch01’ and prompt for administrative credentials. Once administrative credentials have been entered a PS remoting session is set up to the Exchange server where the ApplicationImpersonation role is then granted to the “current-username” user. A list of all email addresses in the domain is then gathered, followed by a connection to Exchange Web Services as “current-username” where, by default, 100 of the latest emails from each mailbox will be searched through for the terms “*pass*”,”*creds*”,”*credentials*” and output to a CSV file called global-email-search.csv.
The CSV that is output should look something like the screenshot below.
Another example of command for Invoke-GlobalMailSearch would be:
Invoke-GlobalMailSearch -ImpersonationAccount current-username
AutoDiscoverEmail [email protected] -MailsPerUser 1000 -Terms
"*passwords*","*super secret*","*industrial control systems*","*scada*","*launch
codes*" -ExchangeVersion Exchange2010 -OutputCsv example2search.csv
AdminUserName domain\adminusername -AdminPassword
SuperSecurePassword123
This command will connect to the Exchange server auto-discovered from the email address entered, and automatically login with the administrative credentials passed on the command line. A PS-Remoting session is then setup to the Exchange server where the ApplicationImpersonation role is then granted to the “current-username” user. A list of all email addresses in the domain is then gathered, followed by a connection to Exchange Web Services using the Exchange Version ‘Exchange2010’ as “current-username” where 1,000 of the latest emails from each mailbox will be searched through for the terms “*passwords*”,”*super secret*”,”*industrial control systems*”,”*scada*”,”*launch codes*” and output to a CSV called example2search.csv.
A full list of options that can be used with Invoke-GlobalMailSearch are:
Having the ability to now search through every mailbox on a domain allows us as penetration testers to discover sensitive data on a network faster. It might also prove to be useful for escalating privileges. From a blue team perspective, it could even be used regularly to check if employees are sending sensitive information in emails that are against company policy. As of this blog post MailSniper is very much in beta form and is under development. Some future objectives for the tool are already being planned out as well.
Download MailSniper here: https://github.com/dafthack/MailSniper
Available live/virtual and on-demand!
此内容由惯性聚合(RSS阅读器)自动聚合整理,仅供阅读参考。 原文来自 — 版权归原作者所有。