
惯性聚合 高效追踪和阅读你感兴趣的博客、新闻、科技资讯
阅读原文 在惯性聚合中打开

推荐订阅源

酷 壳 – CoolShell
酷 壳 – CoolShell
H
Hacker News: Front Page
P
Palo Alto Networks Blog
T
ThreatConnect
Apple Machine Learning Research
博客园_首页
T
True Tiger Recordings
P
Privacy & Cybersecurity Law Blog
B
Blog
IT之家
IT之家
Last Week in AI
Last Week in AI
F
Full Disclosure
Hacker News: Ask HN
Hacker News: Ask HN
C
Comments on: Blog
Microsoft Azure Blog
C
Cybersecurity and Infrastructure Security Agency CISA
Microsoft Security Blog
博客园 - 【当耐特】
N
News and Events Feed by Topic
NISL@THU
NISL@THU
腾讯CDC
雷峰网
雷峰网
Security Latest
Security Latest
李成银的技术随笔
M
Microsoft Research Blog - Microsoft Research
L
LangChain Blog
L
Lohrmann on Cybersecurity
cs.CL updates on arXiv.org
C
Check Point Blog
Y
Y Combinator Blog
Recent Announcements
博客园 - Franky
N
News | PayPal Newsroom
V
V2EX
A
About on SuperTechFans
The Register - Security
月光博客
月光博客
奇客Solidot–传递最新科技情报
奇客Solidot–传递最新科技情报
Google Online Security Blog
MyScale Blog
MyScale Blog
Cisco Talos Blog
Cisco Talos Blog
Vercel News
Vercel News
WordPress大学
WordPress大学
C
Cyber Attacks, Cyber Crime and Cyber Security
The Hacker News
The Hacker News
IntelliJ IDEA : IntelliJ IDEA – the Leading IDE for Professional Development in Java and Kotlin | The JetBrains Blog
爱范儿
爱范儿
A
Arctic Wolf
L
LINUX DO - 最新话题
freeCodeCamp Programming Tutorials: Python, JavaScript, Git & More

Black Hills Information Security, Inc.

Same Problem, Different Angles: When Red Team and Blue Team Actually Talk to Each Other How to Identify and Exploit New Vulnerabilities Swapper – A Pure Regex Match/Replace Burp Extension A Practical Guide to BloodHound Data Collection Network Engineering Basics Signed, Trusted, and Abused: Proxy Execution via WebView2 Getting Started In Pentesting – Advice From The BHIS Pentest Lead Cloud Security: Tips and Resources for Securing the Cloud Lessons From A Chatbot Incident How to Lead Effective Tabletops Understanding GRC: How to Navigate Risks and Compliance Standards The “P” in PAM is for Persistence: Linux Persistence Technique Malware Analysis: How to Analyze and Understand Malware OSINT: How to Find, Use, and Control Open-Source Intelligence What to Do with Your First Home Lab When the SOC Goes to Deadwood: A Night to Remember Social Engineering and Microsoft SSPR: The Road to Pwnage is Paved with Good Intentions Common Cyber Threats Finding the Right Penetration Testing Company Deceptive-Auditing: An Active Directory Honeypots Tool The Curious Case of the Comburglar How to Set Smart Goals (That Actually Work For You) Inside the BHIS SOC: A Conversation with Hayden Covington Abusing Delegation with Impacket (Part 3): Resource-Based Constrained Delegation Why You Got Hacked – 2025 Super Edition Abusing Delegation with Impacket (Part 2): Constrained Delegation Abusing Delegation with Impacket (Part 1): Unconstrained Delegation GoSpoof – Turning Attacks into Intel Model Context Protocol (MCP) Bypassing WAFs Using Oversized Requests Getting Started with AI Hacking Part 2: Prompt Injection Wrangling Windows Event Logs with Hayabusa & SOF-ELK (Part 2) DomCat: A Domain Categorization Tool Wrangling Windows Event Logs with Hayabusa & SOF-ELK (Part 1) Microsoft Store and WinGet: Security Risks for Corporate Environments Default Web Content MailFail Commonly Abused Administrative Utilities: A Hidden Risk to Enterprise Security Stop Spoofing Yourself! Disabling M365 Direct Send Bypassing CSP with JSONP: Introducing JSONPeek and CSP B Gone Offensive Tooling Cheatsheets: An Infosec Survival Guide Resource DNS Triage Cheatsheet GraphRunner Cheatsheet Burp Suite Cheatsheet Impacket Cheatsheet Wireshark Cheatsheet Hashcat Cheatsheet EyeWitness Cheatsheet Nmap Cheatsheet Netcat (nc) Cheatsheet Hunt for Weak Spots in Your Wireless Network with Airodump-ng from the Aircrack-ng Suite Detecting ADCS Privilege Escalation Vulnerability Scanning with Nmap Getting Started with NetExec: Streamlining Network Discovery and Access How to Use Dirsearch Augmenting Penetration Testing Methodology with Artificial Intelligence – Part 3: Arcanum Cyber Security Bot How to Design and Execute Effective Social Engineering Attacks by Phone Abusing S4U2Self for Active Directory Pivoting Why Use a Macro Pad? Espanso: Text Replacement, the Easy Way Caging Copilot: Lessons Learned in LLM Security Augmenting Penetration Testing Methodology with Artificial Intelligence – Part 2: Copilot Augmenting Penetration Testing Methodology with Artificial Intelligence – Part 1: Burpference Intercepting Traffic for Mobile Applications that Bypass the System Proxy How to Root Android Phones Communicating Security to the C-Suite: A Strategic Approach Offline Memory Forensics With Volatility Getting Started with AI Hacking: Part 1 Go-Spoof: A Tool for Cyber Deception How to Test Adversary-in-the-Middle Without Hacking Tools Canary in the Code: Alert()-ing on XSS Exploits How to Hack Wi-Fi with No Wi-Fi Why Your Org Needs a Penetration Test Program Burp Suite Extension: Copy For Light at the End of the Dark Web Wi-Fi Forge: Practice Wi-Fi Security Without Hardware Avoiding Dirty RAGs: Retrieval-Augmented Generation with Ollama and LangChain Gone Phishing: Installing GoPhish and Creating a Campaign 5 Things We Are Going to Continue to Ignore in 2025 John Strand’s 5 Phase Plan For Starting in Computer Security Questions From a Beginner Threat Hunter GRC for Security Managers: From Checklists to Influence AI Large Language Models and Supervised Fine Tuning Attack Tactics 9: Shadow Creds for PrivEsc w/ Kent & Jordan One Active Directory Account Can Be Your Best Early Warning Introduction to Zeek Log Analysis Indecent Exposure: Your Secrets are Showing Creating Burp Extensions: A Beginner’s Guide Pitting AI Against AI: Using PyRIT to Assess Large Language Models (LLMs) The Top Ten List of Why You Got Hacked This Year (2023/2024) ICS Hard Knocks: Mitigations to Scenarios Found in ICS/OT Backdoors & Breaches Intro to Data Analytics Using SQL Finding Access Control Vulnerabilities with Autorize The Detection Engineering Process Cyber Risk Lessons We Can Learn From Hurricane Preparedness Intro to Desktop Application Testing Methodology What Is Penetration Testing? Adversary in the Middle (AitM): Post-Exploitation Pentesting, Threat Hunting, and SOC: An Overview QEMU, MSYS2, and Emacs: Open-Source Solutions to Run Virtual Machines on Windows
Turning a Raspberry Pi 3 Into a Cloaking Device With goSecure VPN
2016-09-21 · via Black Hills Information Security, Inc.

Jordan Drysdale //

ADVISORY: The techniques and tools referenced within this blog post may be outdated and do not apply to current situations. However, there is still potential for this blog entry to be used as an opportunity to learn and to possibly update or integrate into modern tools and techniques.

This article, like the IADGov link here has three major steps. First, acquire a Raspberry Pi and a VPS running CentOS 6.8. Second, configure the server and Raspberry Pi. Last, we discuss and learn how to cloak all communications that use the Pi as your new router. I will demonstrate with a small peripheral monitor how to get the Pi connected to a Wi-Fi network that has a Terms of Use and Agreement page. Through this connection, all of my network traffic behind the Pi routes through the VPN tunnel for basically non-attributable communication to the Internet. See this article for purchasing servers with gift cards turned in to bitcoins.

Basics first: Link for how to “image” your Raspberry Pi with whatever operating system you choose: https://www.raspberrypi.org/documentation/installation/installing-images/. For brevity’s sake, I am using Raspbian in this article.

Quick and easy installation minimum for goSecure VPN server side:

Pick a platform, any of the following have CentOS 6.8 available. For full non-attribution, see the blog linked in paragraph one. The goSecure VPN server configuration is fully supported on CentOS 6.8, so please choose this operating system when selecting your virtual private server.

Digital Ocean: https://www.digitalocean.com/

Linode: https://www.linode.com/

Amazon EC2: https://aws.amazon.com/ec2/

When purchasing a VPS, you will not need to complete the majority of steps listed here:

https://iadgov.github.io/goSecure/documentation.html. Under Step 1 – Build Server Side network configuration – you can skip the “Internal network configuration”, since, well Amazon isn’t likely interested in you configuring VPN access to their trust networks.

Without further ado, the server installation commands:

[email protected]:~ $ cd ~
[email protected]:~ $ wget https://iadgov.github.io/goSecure/files/install_scripts/gosecure_server_install.py

 ### this command uses wget to go grab your server install python file – this is the server install, be sure you pull the server_install.py ###

[email protected]:~ $ sudo python gosecure_server_install.py client_id [email protected] client_psk “longpasswordforuse”

 ### please use whatever credentials and domain you want, the domain is irrelevant and your system will reboot after this command completes ###

That is all it takes. However, to change, edit or modify users, you will need to modify the following two files:

[email protected]:~ $ sudo yum install nano -y   ### adding nano text editor ###
[email protected]:~ $ sudo nano /etc/ipsec.conf  ### add users in here
[email protected]:~ $ sudo nano /etc/ipsec.secrets ### add secrets in here

Quick and easy installation minimum for goSecure VPN client side:

The following steps are all taken from the IADGov site and there are lots of beautiful screenshots out there.

1. Configure the Raspberry Pi from the terminal with the sudo raspi-config command

Change User Password - Option 2
Internalisation Options - Option 5
Change Timezone
Change Keyboard Layout   ### UK Keyboard by Default, see screenshots for this section, there are lots of options ###
Change Wi-Fi Country

2. To apply changes, click tab twice and reboot.

3. Configure Networking and make it match the following example network/interfaces file:

pi:$ sudo nano /etc/network/interfaces

# interfaces(5) file used by ifup(8) and ifdown(8)

# Please note that this file is written to be used with dhcpcd
# For static IP, consult /etc/dhcpcd.conf and ‘man dhcpcd.conf’

# Include files from /etc/network/interfaces.d:
source-directory /etc/network/interfaces.d

auto lo
iface lo inet loopback

### The eth0 interface will become your cloaking router’s interface IP. You can set it to

### whatever you want, but this must be configured prior to running the client_install.py
auto eth0
allow-hotplug eth0
iface eth0 inet static
address 192.168.50.1
netmask 255.255.255.0

auto wlan0
allow-hotplug wlan0
iface wlan0 inet manual
wpa-conf /etc/wpa_supplicant/wpa_supplicant.conf

  1. Restart networking using sudo service networking restart
  2. Update OS and Raspberry Pi
sudo apt-get update -y
sudo apt-get upgrade -y
sudo apt-get dist-upgrade -y
sudo apt-get install rpi-update
sudo rpi-update
sudo reboot

### After reboot, on login prompt, login.

5. wget and run the goSecure Client Install Script

pi:~$ cd ~
pi:~$ wget https://iadgov.github.io/goSecure/files/install_scripts/gosecure_client_install.py
pi:~$ sudo python gosecure_client_install.py

6. Clean up  ### remove all of your configuration tracks

pi:~$ sudo rm /home/pi/gosecure_client_install.py
pi:~$ sudo rm -rf /usr/share/doc/* /opt/vc/src/hello_pi/
pi:~$ sudo find /usr/share/locale/* -maxdepth 0 -type d |grep -v en |xargs sudo rm -rf
pi:~$ sudo find /usr/share/man/* -maxdepth 0 -type d |grep -Pv 'man\d' |xargs sudo rm -rf
pi:~$ sudo find / -type f -name "*-old" |xargs sudo rm -rf
pi:~$ sudo rm -rf /var/backups/* /var/lib/apt/lists/* ~/.bash_history
pi:~$ sudo find /var/log/ -type f |xargs sudo rm -rf
pi:~$ sudo cp /dev/null /etc/resolv.conf
pi:~$ sudo reboot

Quick and easy client use case (screenshots and such further):

  1. Connect network cable from laptop, PC or switch to the Raspberry Pi.
  2. Plug in the USB cable to the goSecure Client to the device to provide power.
  3. Wait 60 seconds.
  4. Open a web browser and navigate to “https://setup.gosecure
  5. Follow the instructions on the web page that appears. The default login username is “admin” and the password is “gosecure”. You will be prompted to change them once you login.
  6. The next page will prompt you for the local wireless network. I carry a small monitor if I need to accept a terms of service page for Wi-Fi access.
  7. The next page will prompt you for the destination VPN server; your previously acquired VPS IP address and the credentials used in the server_install.py command. Like those from earlier: [email protected] longpasswordforuse
  8. Everything should turn green and you should confirm you are cloaked behind your VPS IP.

Troubleshooting Page Unavailable:

  1. If you cannot access the site, can you ping 192.168.50.1?
  2. Did you receive an IP address on the 192.168.50.x network?
  3. Does a route -n command at a terminal on the Pi produce a valid default gateway or all zeroes route? 0.0.0.0 192.168.1.1 – if not, run a sudo route add default gw <gatewayIP> command in the same terminal

Finally, a normal use case:

  1. Plug in the Ethernet cable from the goSecure Client to your laptop
  2. Plug in the USB cable to the goSecure Client to the device
  3. Wait 60 seconds. I use the portable monitor here to accept the Wi-Fi network’s terms of service on the Pi. My laptop is wired to the Pi and it becomes my router/gateway/cloaker

 4. Login to the goSecure client gui at https://setup.gosecure from laptop
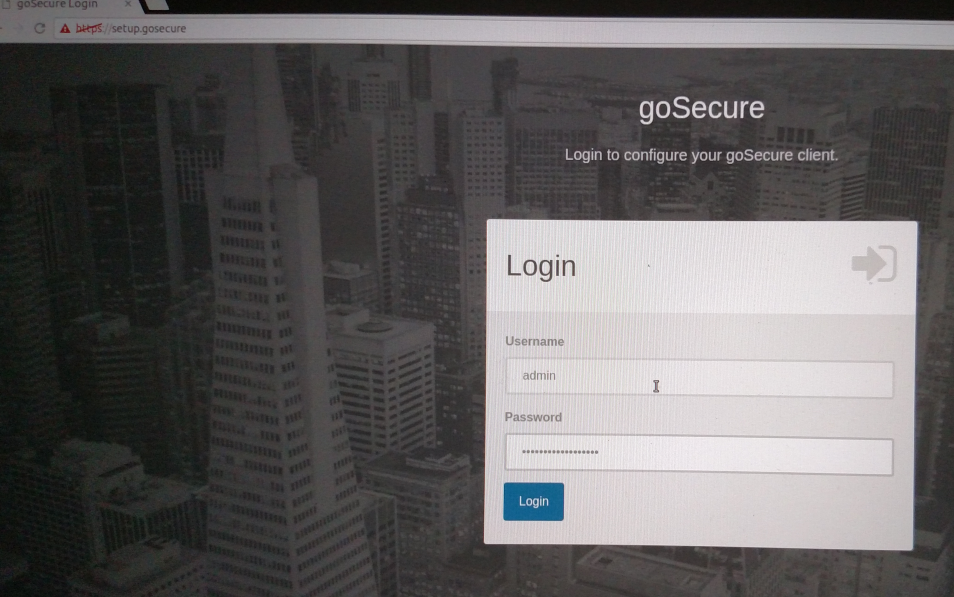
 5. Configure your VPS IP in the VPN field, and your pre-configured username and password
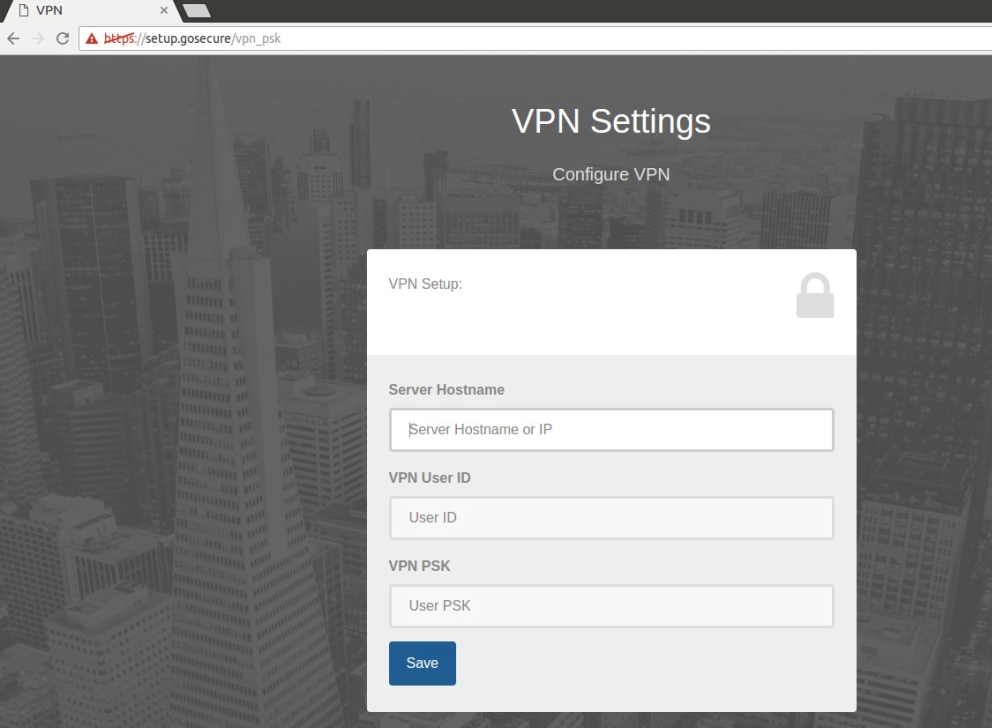
     6. Magical time, great success!

You are cloaked and should be buried behind your VPS’ IP address when browsing the internet. Take another step, create a new local port hiding an SSH tunnel outbound and add another layer of obscurity with this:

hyperion@tau-ceti:~$ ssh -D 3333 -f -C -q -N -p 8415 [email protected] ### consider this server another layer of obfuscation
hyperion@tau-ceti:~$ google-chrome --proxy-server="socks://localhost:3333" ### socks proxy for the win!

Thanks for reading. Have fun. Be safe.

Want to learn more mad skills from the person who wrote this blog?

Check out these classes from Jordan and Kent: