


Hal Denton //
Have you ever been given an encrypted hard drive to perform forensic analysis on? What could go wrong?
Probably the first thought rolling through your mind is wondering if the decryption key was included with the drive. If so, you are spot on in questioning that, as the analysis would be pretty much undoable without the decryption key. What if you have the decryption key but your forensic software doesn’t prompt you for the challenge/response to decrypt the drive? What do you do next?
In this blog, I will be talking about a scenario where things went wrong with what was supposed to be an acquisition of an encrypted full disk image, but… I received an encrypted volume. At the end of this post, you should understand the Master Boot Record (MBR) and how to manipulate it.
As a forensic practitioner, sometimes we need to dig in and figure out how things work.

Before we get started, one core term you will need to know: what is a sector on a hard drive? A sector is the smallest storage unit on disk and, typically, 512 bytes in size (it could also be bigger depending on the capacity of the drive). Additionally, you will need to know common sector address types, such as Cylinder Head Sector (CHS) and Logical Block Address (LBA). CHS uses disk geometry to map sectors to a head and cylinder number per platter, which requires a translation from the OS to BIOS to find the data on disk. CHS does not work on disks larger than 8.1GB. A predecessor to CHS is LBA, and it assigns sequential addresses to each sector, which eliminates the need to do a translation. The Operating System tells BIOS the address for where to find it on disk. LBA works on disks as large a 2TB due to the limitation of the MBR 32bit addressing.
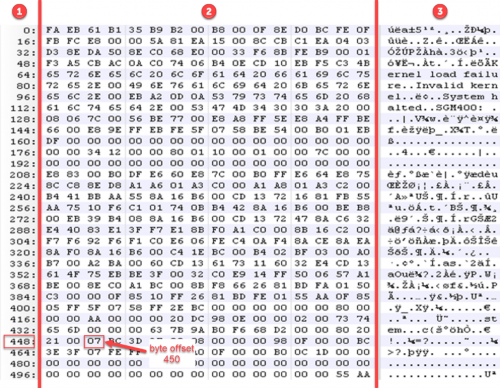
The MBR is assembly code that is 512 bytes in length and is located at sector 0 on a hard drive. Below is an example of an MBR viewed in a hex editor that I will be using to breakdown the 3 data structures that make up the MBR.
To help understand the hex editor view, the one I am using displays data into 3 columns, as labeled below. Column 1 tells you the byte offset of the first byte in the row. For example, if I wanted to manually check what the value is at byte offset 450, I can use column 1 to find the closest offset to 450, which is 448 (value 21) below, and count to the right two bytes (value 07). Column 2 shows the hex values of the data that was loaded into the hex editor, and column 3 shows the ASCII character conversion of the hex values.
The 3 data structures that make up the MBR is boot code, partition data, and the end of MBR signature. I will break down each structure by byte range and byte length so you will have a general understanding of each.
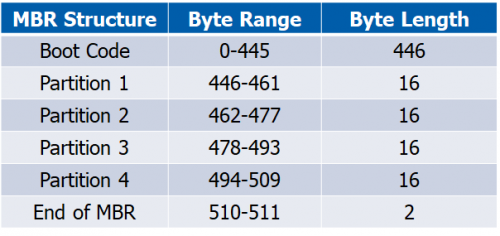
To validate our MBR by math, the total byte size should be 512 bytes (446+16+16+16+16+2=512 bytes).
Boot code holds instructions to tell the computer how to process the partition tables and locate the operating system.

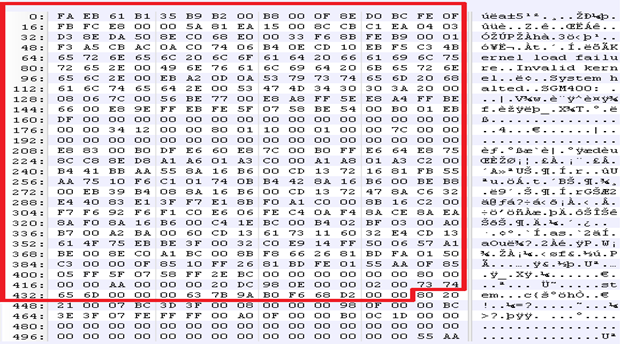
Partitions are 16 bytes in length and hold up to four standard partitions for drives with 512 byte sectors. There can be more than 4 partitions by using an extended partition. A type field identifies what type of data should exist, such as FAT, NTFS, etc. Below shows where all 4 partitions are in the MBR and identifies each one.










At the end of the MBR is 55 AA. You can think of this as a footer of the MBR. The footer typically signifies the end of the structure. Some file structures have headers and footers to identify the beginning and end of the structure. For an example, you can reference JPEG’s file structure to see the header (SOI) and footer (EOI).


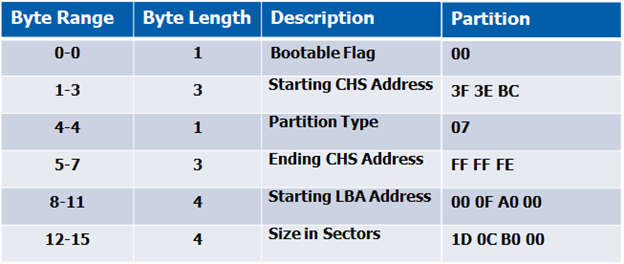
Now that you have a general understanding of the MBR data structures, let’s break down the partition information even more so we know how to manipulate it. I will break down partition 1 and 2 below to help you grasp what the bytes mean by including a table of the bytes that make up their partition information. Partitions 3 and 4 are null (00), or blank, which means the MBR only has two partitions (partition 1 and 2).
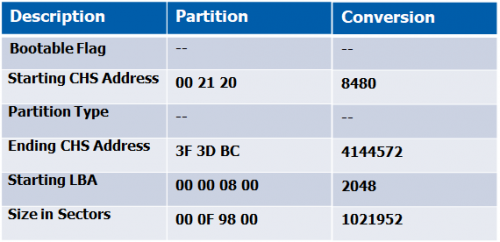
When reading the MBR, remember this is assembly code and needs to be read from right to left. To help with the conversion, I read from byte 461 to byte 446 from right-to-left, and write down left-to-right. Additionally, if you decide to use the table below, fill in the partition data from bottom-to-top, starting with the size in sectors.

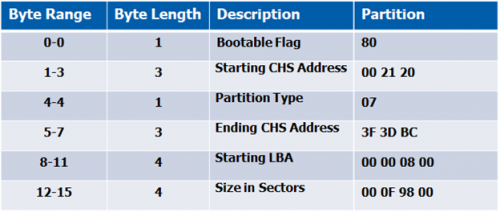
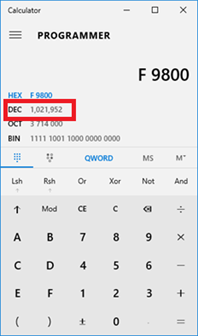
Convert addresses from hex to decimal, to identify starting sector and size of the partition. Yep, just like in school — let’s pull out those TI’s, your OS calculator, or online converter (*cough* CyberChef *cough*) to make the conversion. Below is a screenshot of the Windows calculator (changed to programmer mode). When you enter the hex values, it will be converted to decimal for you.
Repeat the same process as in breaking down the 1st partition, but read from byte 477 to byte 462 from right-to-left, but write down left-to-right.

Putting it all together now…

Now that I understood how the MBR works, I created a 512 byte MBR file and modified “partition 1” information for the LBA start address to be at sector 1. To accomplish that, I had to convert 1 (decimal) into hex (0001) but also put in reverse order (1000) so the LBA address could be properly read. Then I appended the acquired image to my synthetic MBR file. I proceeded to add the new image to the forensics tool and — badda bing badda boom — received my challenge and response prompt to decrypt the drive.
Partition identification/validation:
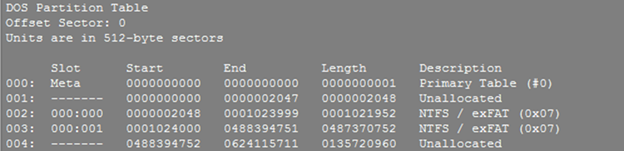
Partition data manipulation:
A hex editor can be used to view raw contents of a drive or make modifications. Several are available that are open source or have free trials —
File System Forensic Analysis by Brian Carrier: https://www.amazon.com/System-Forensic-Analysis-Brian-Carrier/dp/0321268172
Master Boot Record: https://www.researchgate.net/publication/300373786_Analyzing_Master_Boot_Record_for_Forensic_Investigations
JPEG file structure: https://en.wikipedia.org/wiki/JPEG#Syntax_and_structure
The Sleuth Kit: https://sleuthkit.org/
Bless Hex Editor: https://github.com/afrantzis/bless
Hexyl Hex Editor: https://github.com/sharkdp/hexyl
010 Editor: https://www.sweetscape.com/010editor/
Notepad++ Hex Editor: https://notepad-plus-plus.org/
Ready to learn more?
Level up your skills with affordable classes from Antisyphon!
Available live/virtual and on-demand

此内容由惯性聚合(RSS阅读器)自动聚合整理,仅供阅读参考。 原文来自 — 版权归原作者所有。