







In PART 1 of “Wrangling the M365 UAL,” we talked about the value of the Unified Audit Log (UAL), some of the challenges associated with acquisition, parsing, and querying of the UAL data, and strategies for overcoming those challenges using PowerShell and SOF-ELK, focusing on how to properly format our exported data for easy ingestion into SOF-ELK, running as a locally-installed virtual machine. In this post, we’ll look at spinning up SOF-ELK on EC2 to give us greater portability, flexibility, and extensibility for UAL wrangling!
For quick and easy SOF-ELK deployment, it’s hard to beat downloading the pre-packaged virtual machine and running it locally via VMWare. But for those times when you need a little extra computing capacity or to collaborate with others on an investigation or to take advantage of ease of access to data or systems that are already cloud-based, deploying SOF-ELK on EC2 is worth the additional effort.
We’ll start the process just like we did with our local VM deployment by downloading and unzipping the VM. The next step is to create an OVA from the extracted VM. If you have VMWare Workstation or Fusion, you can launch VMWare, import the VM, select it, then go to “File” and “Export to OVF:”
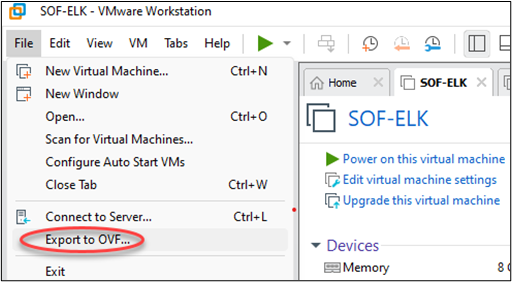
You’ll then be prompted to specify where you want to save your export and what to name it.
IMPORTANT: Make sure you specify a file extension of “.ova” when entering the file name, e.g. “sof-elk-20230623.ova.”
Alternatively, you can use the command-line “OVF Tool,” which is included with VMWare Workstation, Fusion, and Player. Just open a terminal and navigate to the “OVFTool” directory under your VMWare installation directory. From there, invoke the ovftool executable, providing the path to your source VMX file and a path for the export, remembering to give the file name an “.ova” extension:

Next, we’ll need to prepare for upload of our exported “ova” to S3 and conversion to an Amazon Machine Image (AMI). We’ll create an S3 bucket, a “containers.json” file to describe our import, create an Identity and Access Management (IAM) role and policy for the import, and use the AWS CLI to import our image. Don’t panic… we’ll walk through it step-by-step!
You can accomplish most of the necessary AWS steps in either the web UI or via the CLI but, unless you are using “Migration Hub Orchestrator,” you’ll need the CLI for the “import-image” task. So, let’s start with installation and setup of the CLI, detailed in the Amazon guides below:
Install or update the latest version of the AWS CLI – AWS Command Line Interface (amazon.com)
Set up the AWS CLI – AWS Command Line Interface (amazon.com)
Once the AWS CLI is installed and configured, we’ll make an S3 bucket for our upload, paying careful attention to make the bucket region match the region where we want to perform the image import:
aws s3 mb s3://your-unique-import-bucket-name --region us-east-1
Next, we’ll setup the service role (“vmimport”) and policy required to allow the VM import/export. You can accomplish this via the web UI or via CLI. Before proceeding, it’s worthwhile to check the “required permissions for VM import/export” at the top of the linked page below, to make sure you have adequate privileges to complete these tasks!
Required permissions for VM Import/Export – VM Import/Export (amazon.com)
Since the web UI is more intuitive and provides a bit of syntax-error checking, I’ll head to https://console.aws.amazon.com/iamv2 and select “Policies, Create Policy,” and click “JSON.” In the “Policy editor,” you can copy/paste and replace default text to create a new, “vmimport” policy.
IMPORTANT: Change the “your-unique-bucket-name” entries (x2) to match your S3 “image import” bucket:
{
   "Version":"2012-10-17",
   "Statement":[
      {
         "Effect": "Allow",
         "Action": [
            "s3:GetBucketLocation",
            "s3:GetObject",
            "s3:ListBucket"
         ],
         "Resource": [
            "arn:aws:s3:::your-unique-import-bucket-name",
            "arn:aws:s3:::your-unique-import-bucket-name/*"
         ]
      },
      {
         "Effect": "Allow",
         "Action": [
            "ec2:ModifySnapshotAttribute",
            "ec2:CopySnapshot",
            "ec2:RegisterImage",
            "ec2:Describe*"
         ],
         "Resource": "*"
      }
   ]
}
NOTE: If you reference the AWS link above, you may notice that their recommended policy is for “VM Import/Export.” I omitted the “export” bucket configuration for the context of this post.
After you are happy with your JSON policy entries, click “Next” and provide a descriptive policy name, e.g. “VM_Import_Policy,” add a description if desired, add “Tags” to help identify this resource in the future, and click “Create policy.”
Now that we have our policy ready, let’s create a role. From the IAM web UI, click “Roles,” then “Create role,” then “Custom trust policy,” and replace the default policy text with the JSON below:
{
   "Version": "2012-10-17",
   "Statement": [
      {
         "Effect": "Allow",
         "Principal": { "Service": "vmie.amazonaws.com" },
         "Action": "sts:AssumeRole",
         "Condition": {
            "StringEquals":{
               "sts:Externalid": "vmimport"
            }
         }
      }
   ]
}
On the “Add permissions” screen, find and select your “VM_Import_Policy.” Click “Next,” provide a “Role name,” and add a description and tags if desired. Finally, click “Create role.”
Our S3 bucket is in place, our role with associated policy is ready to go, and now we can return to the AWS CLI to upload our OVA:
aws s3 cp C:\VMs\sof-elk-20230623.ova s3://your-unique-import-bucket-name/ --region us-east-1
While that upload is chugging away, we can get our “containers.json” file ready. Launch any text editor of your choosing, copy/paste the text below, editing the “Description” for your OVA and the “URL” to match your upload bucket and desired OVA name. Then save the file as “containers.json:”
[
  {
    "Description": "SOF-ELK 20230623 OVA",
    "Format": "ova",
    "Url": "s3://your-unique-import-bucket-name/sof-elk-20230623.ova"
  }
]
Once your OVA upload is complete, we can initiate the “image import” via the AWS CLI:
aws ec2 import-image --description “SOF-ELK 20230623 OVA” --disk-containers file://C:\VMs\containers.jsonIf all goes well, you should see output similar to the image below, with a “Status” of active and “StatusMessage” of pending:
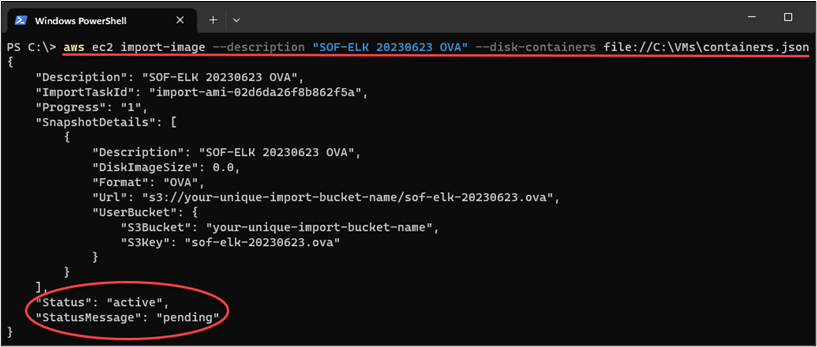
Pay attention to the “ImportTaskId” in your output, as we can use that to check the status of our image import:
aws ec2 describe-import-image-tasks –import-task-ids import-ami-02d6da26f8b862f5a“StatusMessage” should now show “converting.” Hit the up arrow in your CLI again to repeat the command and keep an eye on progress. Be patient as it takes a while, and the “Progress” indicator feels a little like “zero seconds remaining” for about 30 minutes! Hang in there, we’re almost done.
Once the import-image task is complete (“Status” = completed), make note of the “ImageId,” and we’ll head to the EC2 web UI: https://us-east-1.console.aws.amazon.com/ec2 (note that I am targeting the us-east-1 region for this example). Unfortunately, the AMI receives a randomly generated name based on the aforementioned “ImageId.” So let’s go to “Images\AMIs,” then find the AMI ID from your task-status output, select it, then click “Tags\Manage Tags,” and add a “Name” and descriptive value, e.g. “SOF-ELK 20230623.” With the AMI selected, we can just click the “Launch instance from AMI” button on the top menu to enter the launch wizard.
We’re on the home stretch, and I’ve only used the word “wrangling” twice! Within the “launch an instance” wizard, give your instance a “Name,” select from the available instance types (I went with t3.medium), create or select an existing key pair, tweak network settings as desired, and create a new security group or use an existing group.
IMPORTANT: Our image is based on a default SOF-ELK VM, which means well-known, default credentials! Please do not open up SSH to the world in your Security Group (SG)! My intent is almost always to access SOF-ELK from another EC2 instance, so I usually make a self-referencing SG and add the SOF-ELK instance and any other instances requiring access, not allowing any external access directly to SOF-ELK.
From the EC2 web UI, go to “Security Groups, Create security group,” name it something descriptive, e.g. “SOF-ELK Security Group,” add a description and any desired tags, then click “Create security group.” Select the new SG, click “Edit inbound rules, Add rule,” set type to “All TCP” (you can be more restrictive if desired and just allow TCP ports 22 and 5601), set “Source” to “Custom,” then add the Security Group to itself and “Save.” Next, assign the SG to your SOF-ELK instance and any other instances that need to access to SOF-ELK.
Once you are satisfied with your Security Group select, click “Launch instance.” While the instance is initializing, I’ll make note of the private IP, then access my EC2 analysis server in anticipation of accessing SOF-ELK from there:
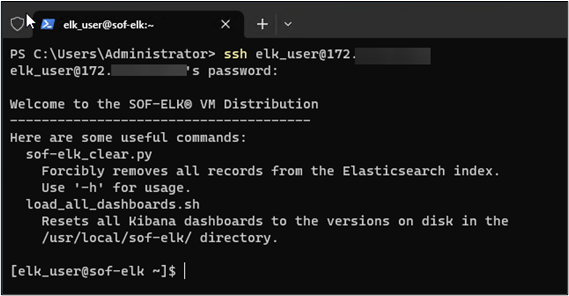
For one final check, let’s launch a browser and navigate to the SOF-ELK URL, http://you-sof-elk-local-ip:5601:
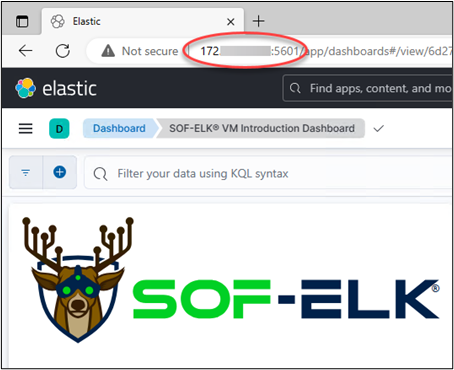
You are now officially ready to wrangle the M365 UAL using SOF-ELK with all the flexibility, accessibility, and scale of EC2! Refer to “part 1” for a refresher on how to export your data via PowerShell and query for your audit/investigative purposes. In the next and final part of this series, we’ll talk about what to do when you are faced with UAL export data in CSV, which is not properly formatted for SOF-ELK ingestion. Stay tuned and thanks for reading!
READ:
Ready to learn more?
Level up your skills with affordable classes from Antisyphon!
Available live/virtual and on-demand
此内容由惯性聚合(RSS阅读器)自动聚合整理,仅供阅读参考。 原文来自 — 版权归原作者所有。