







Firebase is Google's flagship app development platform that provides tools to develop and run mobile apps. From development to analytics to crash reporting and running marketing experiments, the Firebase platform consists of several products.
One of these products is the Firebase Cloud Storage which provides an easy way for Firebase users to store the images and videos from their apps onto the cloud.
While the cloud storage offering is very robust and makes it simple to upload and store media in the cloud, it has certain limitations regarding image delivery. For example, it does not provide image optimization features like format conversion to WebP or image compression. One cannot resize or crop the images stored in Firebase storage in real-time to deliver correctly-sized images to every device.
These limitations, coupled with the ever-increasing number of user devices, make it challenging to deliver fast, optimized experiences in your app.

There are different ways available to optimize and transform images in Firebase storage. Some plugins create fixed sizes of images and store them back in your storage. Some methods require you to set up your own real-time image transformation service on Firebase and manage it as well.
With all the app development already in your pipeline, this might not be the best use of your time.
That's where a solution like ImageKit comes in. It integrates directly with your Firebase Cloud Storage and can deliver optimized and resized images across devices with minimal effort. You can get started for free on the Forever Free plan on ImageKit!
Read on to see how you can do this.
What is ImageKit?
ImageKit is a cloud-based end-to-end image management and delivery service. It comes with in-built storage and delivery CDN (AWS CloudFront), with automatic optimizations and more than 50 image and video transformations that can be performed in real-time.
The good thing about ImageKit is that you can use all its optimization and transformation features while storing the original images in your Firebase Cloud Storage.
This means you don't have to make any significant changes to your image upload and storage workflow and can still deliver optimized images to your users.
Over 35,000 developers and 600 companies use ImageKit to deliver billions of optimized images and videos every day.
Let's look at how you can use it with your Firebase storage.
Request flow for optimized images in Firebase Storage with ImageKit
After attaching your Firebase Storage to ImageKit, you can access the image in it using the ImageKit URL endpoint.
If ImageKit has a cached version of the image on its CDN or other internal caches, it delivers the image from there. Such images get delivered in low double-digit milliseconds.
Suppose ImageKit does not have the optimized and transformed image in its cache. In that case, ImageKit gets the original image from the storage attached to ImageKit, does all the processing in real-time, and sends back the right image to the user. This takes about 100-200ms on average, depending on the input image.
Subsequent requests for the same image get served from ImageKit's CDN (or if you are using a custom CDN).

Integrating Firebase Storage with ImageKit
Let's look at the steps you need to follow to optimize and resize the images in your storage via ImageKit.
Considering the rapidly changing features in both ImageKit and Firebase, always refer to the current technical documentation for this integration here.
We have uploaded some files to our Firebase storage, as shown in the screenshot below.
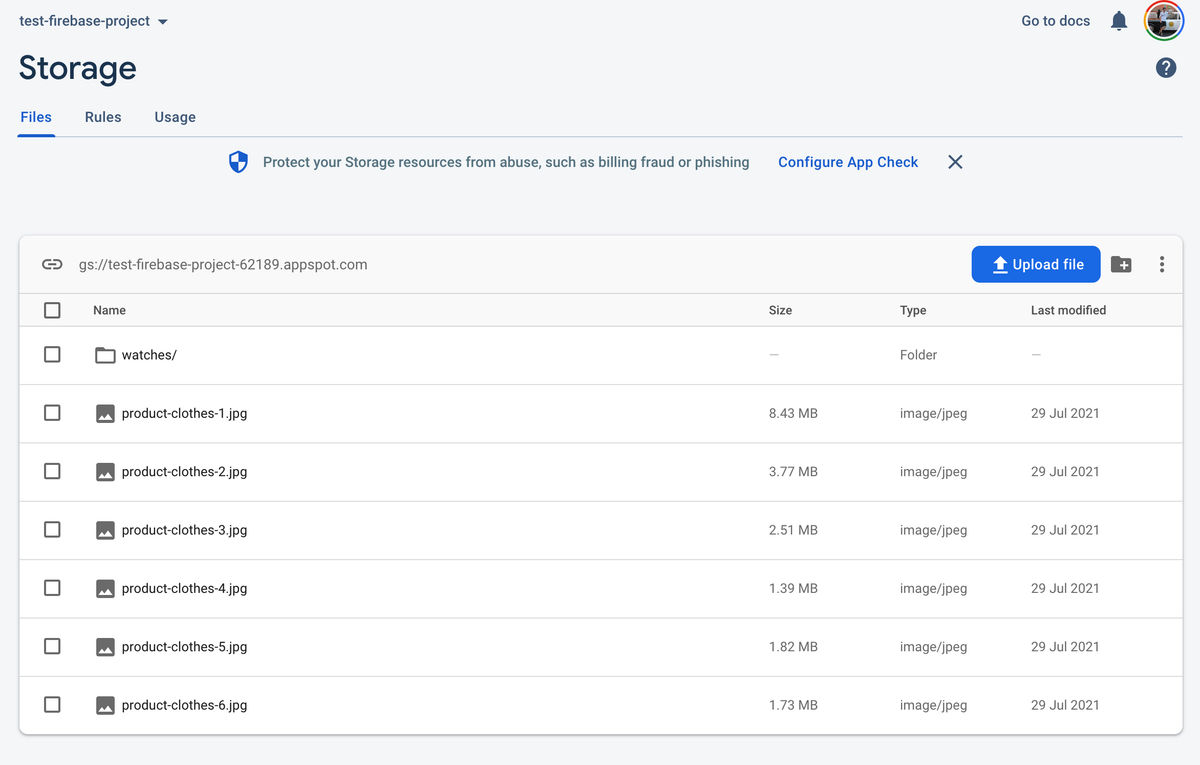
By the end of this article, we would be able to optimize these images and resize them as per our requirement in real-time.
1. Create an ImageKit Account
The first step is to create an ImageKit account. The Forever Free plan comes with all the image optimization and transformation features, along with 20GB of delivery bandwidth every month. While this is sufficient for most small apps, you can always go for higher plans if your delivery bandwidth requirement is higher.
ImageKit offers seven processing regions across the globe for optimization. You should choose the one that is geographically closest to your storage location.
2. Attaching the Firebase Storage to ImageKit
The next step is to attach the Firebase cloud storage to ImageKit. This will allow ImageKit to access the original images from your storage when needed.
Let's first look at the integration steps and then discuss how private image access works with ImageKit and Firebase.
Adding the Firebase storage as an origin
Go to the “External Storage” page in the ImageKit dashboard and click on the “Add New Origin” button. In the modal that opens up, select the “Origin Type" as “Web Folder”.
Give this origin a name. Then, add your Firebase storage's URL endpoint as the base URL. This would be in the format https://firebasestorage.googleapis.com/*/{project_id.appspot.com}. In our case, as shown in the screenshot below, the base URL will be (masked intentionally)
https://firebasestorage.googleapis.com/v0/b/test-firebase-projXXXXXX.appspot.com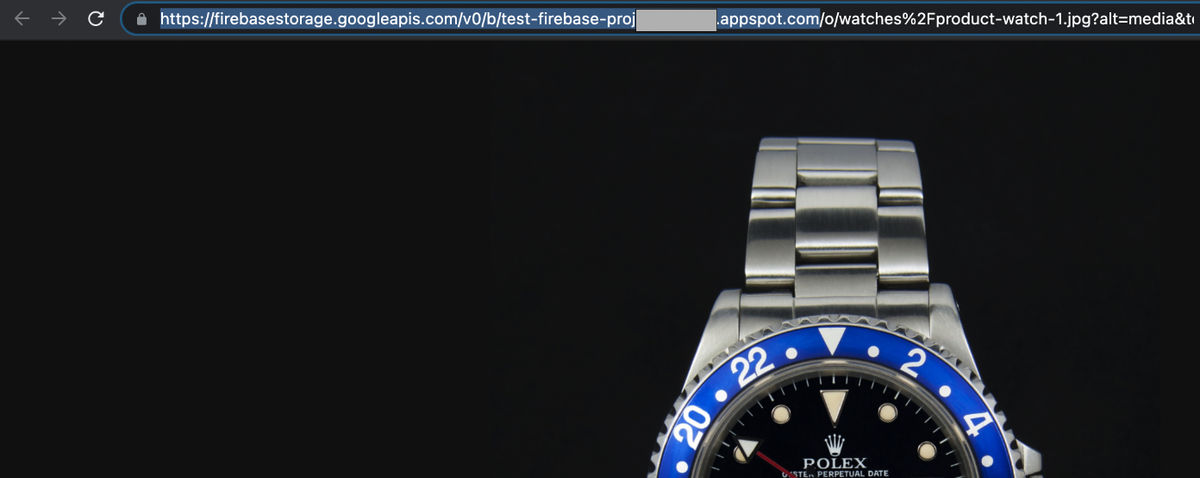
Once you have filled in the base URL, save the origin.
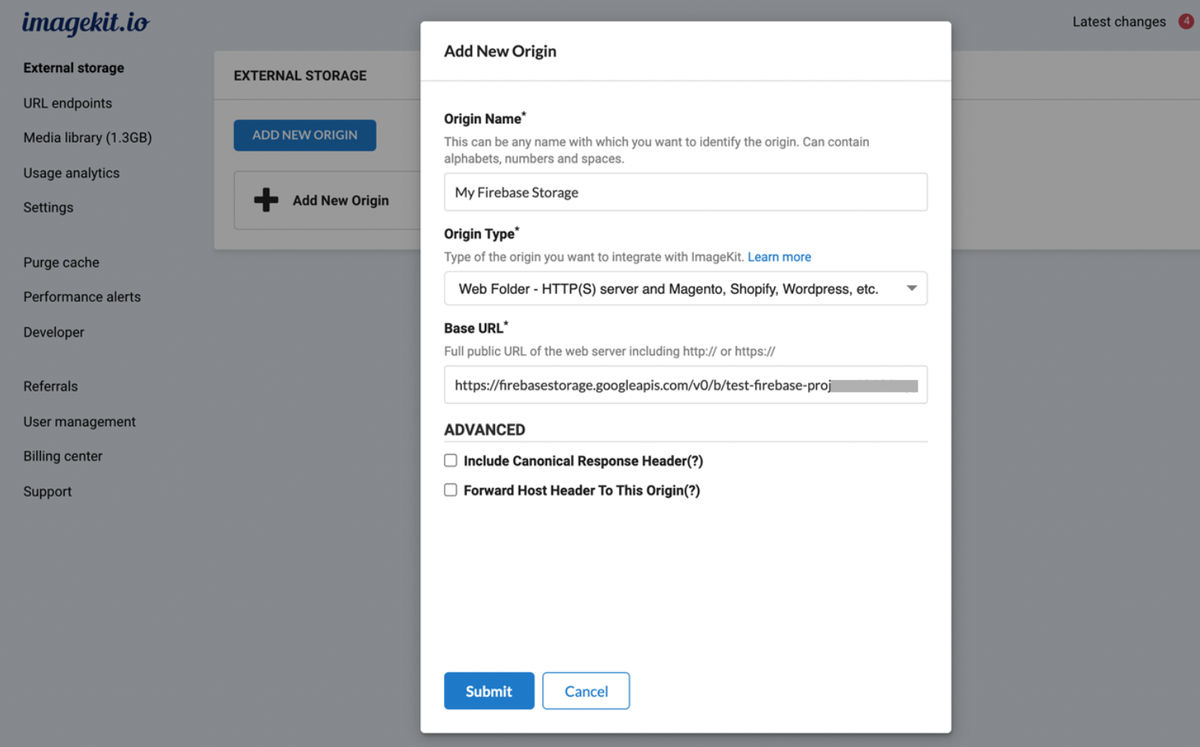
ImageKit does not start copying the objects from your storage after this step. ImageKit accesses an image only when you request it via its ImageKit URL.
Now head over to the “URL Endpoints” section in the ImageKit dashboard. Your newly added Firebase Storage origin will appear under the Default URL Endpoint. If not, you can always click on Edit URL Endpoint, and add this origin to your ImageKit URL Endpoint.
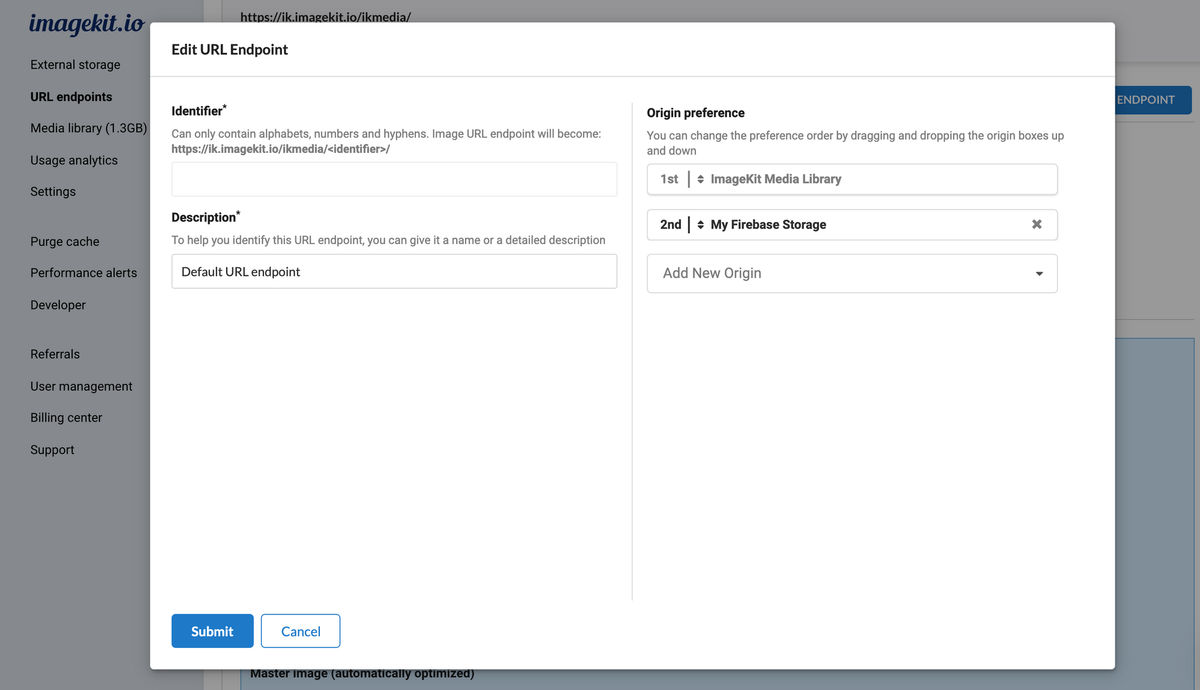
That's it! The setup is now complete. But, let's take some time to understand how this works for private images in Firebase storage.
How private image access will work in Firebase
Private image files in Firebase have additional query parameters like alt=media and token=[ACCESS_TOKEN] in their URL. These would still be required in the URL that we construct with ImageKit.
Since these parameters are not something that ImageKit needs for processing, it passes them to your Firebase storage origin.
Your original images stored in Firebase are private, and that does not change when using ImageKit. Internally, ImageKit is still making a request to your Firebase origin with the alt and token parameters.
Altering the token or not passing it in the ImageKit URL would prevent access to the image, just how it would happen with a standard Firebase URL.
Let's understand this with an actual URL in the next section.
Accessing your Firebase storage files via ImageKit
We need to replace the part of the URL that we added as the Base URL in our Firebase origin in ImageKit, with the ImageKit URL endpoint to which we mapped this origin. So, if our original image URL in Firebase is this (masked intentionally),
https://firebasestorage.googleapis.com/v0/b/test-firebase-projXXXXXX.appspot.com/o/product-clothes-3.jpg?alt=media&token=df8b1026-8c70-459d-87b3-1caa9f1d6d44The Firebase Storage image URL from our bucket
then, its ImageKit URL is
https://ik.imagekit.io/ikmedia/o/product-clothes-3.jpg?alt=media&token=df8b1026-8c70-459d-87b3-1caa9f1d6d44URL using ImageKit URL endpoint
The part after our storage's base URL, including the alt and token parameters remain the same with ImageKit.
We need to do the same thing for an image inside a folder in the storage. For example, if the original image URL of an image inside the watches the folder is this (masked intentionally)
https://firebasestorage.googleapis.com/v0/b/test-firebase-projXXXXXX.appspot.com/o/watches%2Fproduct-watch-1.jpg?alt=media&token=f4c16a56-5e7a-4c2a-b8bf-9b412e544265then its ImageKit URL is
https://ik.imagekit.io/ikmedia/o/watches%2Fproduct-watch-1.jpg?alt=media&token=f4c16a56-5e7a-4c2a-b8bf-9b412e544265Automatic image optimization for images in Firebase storage
ImageKit detects the formats supported on the requesting device. If the device supports a newer format like WebP or AVIF, ImageKit automatically converts your images to the best possible format. It also compresses the image using the quality optimization setting in your ImageKit dashboard.
With these automatic optimizations, you can be assured that ImageKit will deliver the right image on every device. And we didn't have to write a single line of code or get into the technical details!
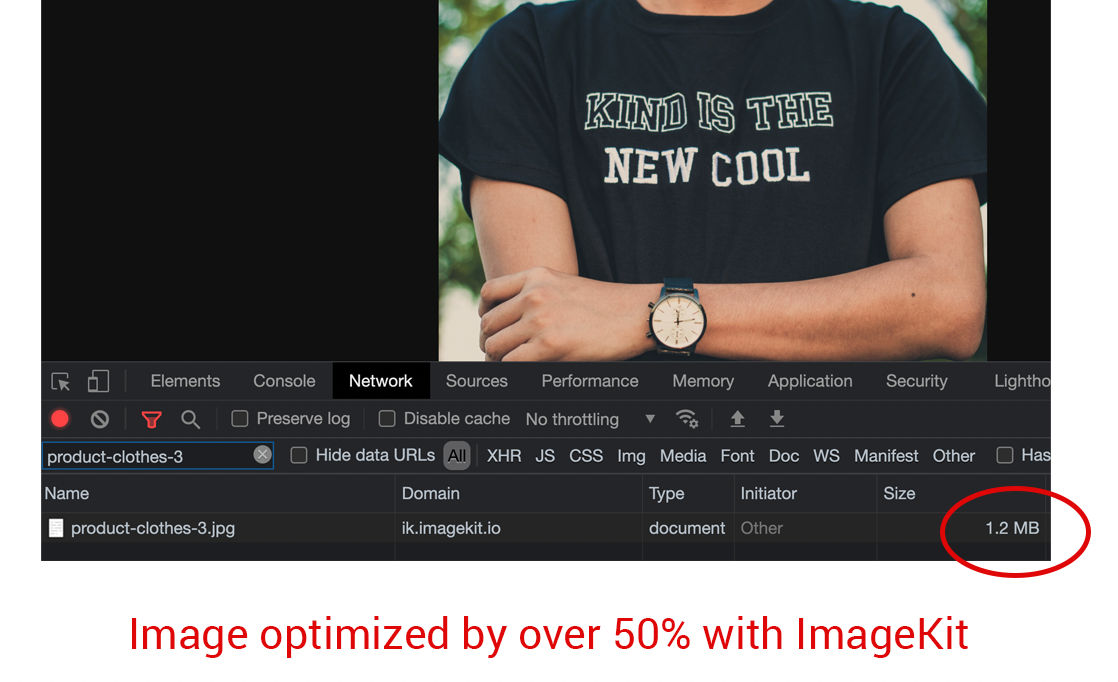
For example, the original image product-clothes-3.jpg in the storage was 2.5MB in size.
When we access it via ImageKit, the image gets converted to WebP on a supported browser, and the size comes down to 1.2MB. That's more than a 50% reduction in size without making any other change to the URL.
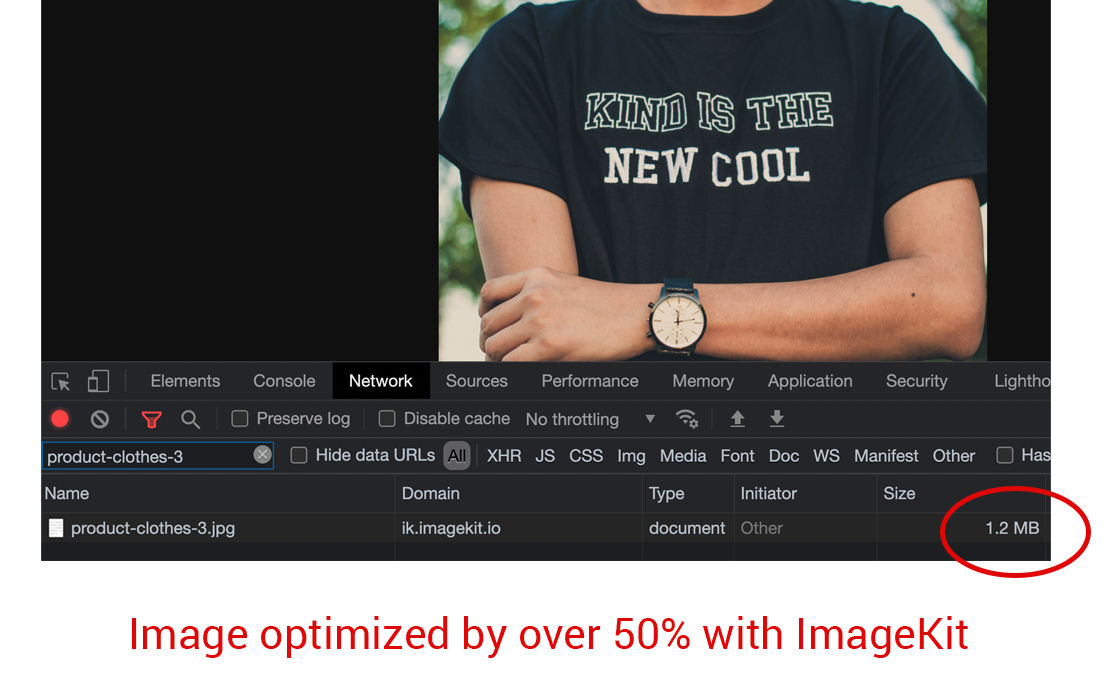
If we convert the image to AVIF (via URL transformation parameters or automatic format conversion in ImageKit), then the output image would be just 641KB in size. This is almost 75% smaller than the original image.
Real-time image resizing and other transformations for Firebase Storage
ImageKit allows us to add transformation parameters directly to the image URL to get the transformed image in real-time.
For Firebase storage integration, your image URL already has two query parameters, alt and token. To transform the image, we add another parameter tr to the URL with the transformation parameters.
For example, if we have to resize the above image to width 300px, we just need to add tr=w-300 as a query parameter in our URL. This is done at the end of the URL below -
https://ik.imagekit.io/ikmedia/o/product-clothes-3.jpg?alt=media&token=df8b1026-8c70-459d-87b3-1caa9f1d6d44&tr=w-300
Need a 300 x 400 image? It should not be a problem with ImageKit's resizing parameters.
https://ik.imagekit.io/ikmedia/o/product-clothes-3.jpg?alt=media&token=df8b1026-8c70-459d-87b3-1caa9f1d6d44&tr=w-300,h-400
Like the examples above, ImageKit offers over 50 different transformations. You can perform simple crop and resize as demonstrated above. Or carry out more complex operations on your images like watermarking, smart cropping, object-aware cropping, blurring, background change, etc., in real-time.
We can also adjust our images to the correct DPR value needed on a device. For example, for a device with DPR 2, we can add the transform dpr-2 to the transformation string and get the right image instantly.
https://ik.imagekit.io/ikmedia/o/product-clothes-3.jpg?alt=media&token=df8b1026-8c70-459d-87b3-1caa9f1d6d44&tr=w-300,dpr-2Using ImageKit's image and text overlay transformations, we can generate dynamic banners and contextual images in real-time.
In the example shown below, we have added ImageKit's logo and the product's price as text on an image of a shoe. This is done using the URL-based transformation parameters. You can see the transformed image URL here.

Here is a video demonstrating some of the transformations available in ImageKit.
Get started with ImageKit now!
This was just a quick overview of how ImageKit integrates with Firebase and how you can use it to deliver the right images to your users. The entire setup takes just a few minutes and delivering images via ImageKit is just a matter of replacing a part of your existing image URL.
ImageKit's Forever Free plan comes with 20GB of output bandwidth every month, absolutely free. You can sign up now and start delivering perfectly optimized images on your Firebase apps.