惯性聚合 高效追踪和阅读你感兴趣的博客、新闻、科技资讯
阅读原文 在惯性聚合中打开

推荐订阅源

S
Schneier on Security
The Register - Security
月光博客
月光博客
freeCodeCamp Programming Tutorials: Python, JavaScript, Git & More
OSCHINA 社区最新新闻
OSCHINA 社区最新新闻
The GitHub Blog
The GitHub Blog
博客园 - 司徒正美
罗磊的独立博客
U
Unit 42
S
SegmentFault 最新的问题
Y
Y Combinator Blog
博客园_首页
Hugging Face - Blog
Hugging Face - Blog
J
Java Code Geeks
Schneier on Security
Know Your Adversary
Know Your Adversary
C
Check Point Blog
Cyber Security Advisories - MS-ISAC
Simon Willison's Weblog
V
Vulnerabilities – Threatpost
让小产品的独立变现更简单 - ezindie.com
阮一峰的网络日志
阮一峰的网络日志
The Hacker News
The Hacker News
博客园 - 叶小钗
C
Cybersecurity and Infrastructure Security Agency CISA
Spread Privacy
Spread Privacy
L
LINUX DO - 热门话题
T
The Exploit Database - CXSecurity.com
P
Palo Alto Networks Blog
cs.CL updates on arXiv.org
Latest news
Latest news
L
Lohrmann on Cybersecurity
A
About on SuperTechFans
L
LangChain Blog
Stack Overflow Blog
Stack Overflow Blog
S
Securelist
A
Arctic Wolf
D
Darknet – Hacking Tools, Hacker News & Cyber Security
T
Threatpost
Scott Helme
Scott Helme
博客园 - 聂微东
博客园 - 【当耐特】
T
Tenable Blog
I
Intezer
D
DataBreaches.Net
B
Blog RSS Feed
Security Latest
Security Latest
C
Cisco Blogs
T
Tor Project blog
N
Netflix TechBlog - Medium

ImageKit.io Blog

Next.js Image Optimization with ImageKit Use Video as a Background in Your Next.js Project How to Fix Autoplay Video in Next.js How Durian Scaled a Visual-First Retail Experience to 350K Monthly Visitors Online How Matsmart accelerated image delivery across countries with ImageKit AI in Digital Asset Management: From Smart Workflows to Agentic Automation How Joseph Joseph unified and secured global video delivery with ImageKit How Modall powers fast, effortless media delivery across 40+ projects with ImageKit Digital Asset Management (DAM) Trends: 2026 Report How to add a poster image to Video.js player (and automate it) HLS streaming with Video.js + React Building the future of storytelling with fast, AI-powered video delivery How PushOwl delivers 100M+ image-rich notifications seamlessly with ImageKit How Homify delivers millions of interior design images seamlessly with ImageKit Better event discovery with lightning‑fast videos & images Adding video player in React Native Video player in Angular applications Crop and resize videos in React Next.js image and video upload React image and video upload React video optimization How we quadrupled our traffic to 625K monthly page views How Apollo 24|7 boosted performance & reduced costs with ImageKit Simplify your media workflows with ImageKit DAM integrations Extending Lighthouse for custom image and video optimization analysis Brand Asset Management: What is it? How does it work? WordPress Digital Asset Management Guide - Manage your WP media assets better Why Shopify retailers need a digital asset management solution DAM vs. SharePoint: Which is best for you? AI-powered Metadata and Tagging in Digital Asset Management How Hopscotch built India's largest online Kids' fashion brand with ImageKit Dropbox Vs. DAM: Which Is The Right Tool For Digital Asset Management Digital Asset Management for Photographers: A Complete Guide Why digital asset management for agencies is essential Helping both Top and Bottom Line: SaffronStays rapid, profitable growth with ImageKit How KreditBee simplified media experiences with ImageKit Google Drive alternatives for businesses (with fast-growing teams) Node.js image upload ImageKit: The Secret Ingredient in Swiggy’s Expansion Journey Streamlining the Design Approval Process: A Comprehensive Guide AV1 Codec - Complete guide for video application devs PHP image and video upload Angular image & video upload AV1 vs VP9: Which codec should you choose? Adding video player in Next.js React Video Player VP8 vs VP9 - In the context of online video delivery Exploring WebM vs MP4 7 Free Digital Asset Management Software that are not Open-Source Comparing 9 Top Digital Asset Management Tools in the Market What are Brand Standards and Why do they Matter? Boost Sales and Brand Appeal: Essential Tips for eCommerce Image Management Brand Recall: The Strategy to Create Unforgettable Brands How to upload files in HTML? Branding for Small Businesses (2025 Edition) Everything you need to know about VP9 codec Recent updates from ImageKit and what's next Best Ways to Write RFP For Digital Asset Management (+ with free RFP template) What is Brand Dilution? How to Avoid It? Explained with [Examples] The Importance of Brand Identity: Leveraging Digital Asset Management for Impact From Launch to Scale: How to Launch a Brand Campaign Digital Asset Management Requirements - What do You Need to Evaluate and How? Marketing Collateral Management: A Quick End-to-End Guide Video Content Management System: What Is It And How To Choose One? Dropbox vs. Google Drive vs. Onedrive: The Best Cloud Storage Solution How to Build Brand Trust: Get Started In 2025 Google Drive vs. Box: A Detailed Comparison How Digital Asset Management Solutions Help Protect Brand Equity A DAM Solution Can Safeguard Your Digital Intellectual Property - Here’s How WebP Vs. PNG: Which Image Format Should You Use and Why? How to Resize Images in Bootstrap Easily Progressive jpegs (PJPEG): the key to loading images faster on your website Dropbox vs. Google Drive: The Best Cloud Storage For Digital Assets Dropbox Pros & Cons In 2024: An In-Depth Analysis and Why A DAM Solution Stands Out Google Drive Vs OneDrive: The Better Storage Option For Digital Assets Manage your video assets better with video metadata Understanding DAM's Role in Strengthening Brand Identity Digital asset management strategy: What to know before creating one The Ultimate Guide To Marketing Agency Onboarding 6 Solutions To Simplify Large File Sharing Over The Web A Step-by-Step Breakdown of a Video Production Workflow 13 Digital Asset Management Use Cases You Should Know How to Conduct a Brand Audit and Manage Your Brand Assets Costly Consequences of Inconsistent Branding And How DAM Can Help Dynamic Asset Transformation: What It Is, Why You Need It, and How ImageKit Can Help Everything You Need to Know About HTML Video Autoplay How To Select Your DAM Vendor: A Complete Guide How to Boost User Experience with Smart Digital Asset Management React Image Optimization: A Guide for Web Developers Why Should DAM Be A Part Of Your MarTech Stack? Unleashing the Power of Content Repurposing with ImageKit MKV vs MP4: Which Video File Format Is Better for Your Needs? Digital Asset Management For Ecommerce: A Complete Guide How an Image Tagging Software can Transform Your Image Search How to Manage Your Content Lifecycle Effectively M4V vs MP4: Which Video Format Should You Use and Why? Why Every Business Needs An Image Management System All The Questions To Ask During A Dam Demo Which is the Best Image Format for Your Website? Uploading Multiple Files Using JavaScript: A Comprehensive Guide
Using Named Transformations
Manu Chaudhary · 2018-09-20 · via ImageKit.io Blog

Named Transformations in ImageKit allow you to create easy to remember aliases or names for your complex URL-based transformations.

For example, let’s say you want to resize an image to size 300x200 and then make it slightly blurred in ImageKit.

300x200 image and blurred

To achieve this, you would use the height, width and blur transforms in the URL like this -

Original image URL with transformation

https://ik.imagekit.io/demo/img/tr:w-300,h-200,bl-10/default-image.jpg

With named transforms, we would be able to write the same URL as

https://ik.imagekit.io/demo/img/tr:n-blur_thumbnail/default-image.jpg

Cleaner, easier to remember and more secure. Let’s discuss these advantages in detail and see how you can get started with using named transforms for your image URLs.

Advantages of using Named Transformations

1. Easy to read and remember
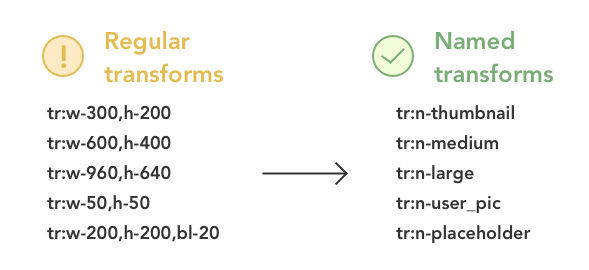
Easy to use Named Transforms

Easy to use Named Transforms

Images are usually displayed in 4-5 different sizes and variations on a website. In some cases, we have even seen 8+ variations of the same image on the same website. In such a scenario, it is very difficult to remember each transform parameter.

Was the height 656px or 665px? What was the crop mode we need to use? Does I need to blur the product thumbnail image on the search page? You would often have such doubts when trying to create a new URL.

Named transforms make it really simple. Configure them once and get easy to remember names for all your transforms. So w-300,h-200 can be aliased as thumbnail, w-300,h-200,cm-pad_resize,bl-5 can be aliased as blurred_padded_thumbnail and so on. And you can use these names in the URL making it really easy to apply the same transform on any image.

2. Developer Productivity, Communication and Consistency

Because named transforms are easy to remember and communicate, they also improve the productivity of your development / technology team  and the consistency in the codebase.

Instead of remembering the exact transformation parameters, your developers would know that they have to use thumbnail transformation on product search pages. This results in better communication in the team and consistency while writing the code as all the developers would always use the same name to achieve the same transformation.

3. Security
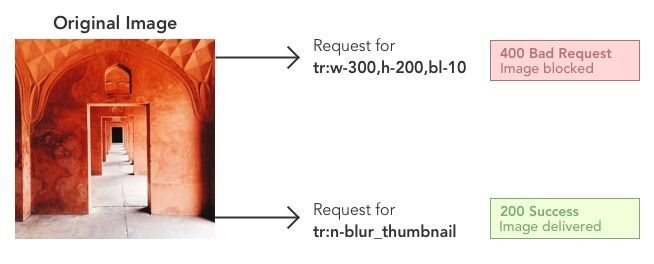
Named Transformations Security

Named Transformations Security

ImageKit provides a unique security feature that makes named transforms really powerful and secure your images against any unwarranted usage by third parties. This feature is available in your ImageKit dashboard.

You can use URL-based parameters like height and width to get a new transform of an image. This makes it very easy for third parties to pick images from your website and change the image transformation as per their requirement. You can use URL signatures to counter this problem and get full-proof non-modifiable URLs (we will talk about it in our next post). But, implementing signatures may require significant development effort for your team.

However, a simpler way to achieve basic security from unwarranted use is to map all the transforms that you are going to use on your website to a named transform. Then, in your ImageKit settings, you can prevent any other unnamed transform from being applied to the image.

For example, if you have a named transform thumbnail in your ImageKit account and have disabled unnamed transforms, no third party would be able to use a height or width or any other transform on this image. They would be shown an error if they try to do so. This ensures that your images can only be fetched in sizes or transforms that you create or allow and nothing else.

How to get started with Named Transforms in ImageKit?

Let’s see how you can create new named transforms or edit them in ImageKit and then secure those URLs from your dashboard.

Creating new named transformations

  1. Go to your ImageKit dashboard.
  2. Go to Image Settings > Named Transforms and click on “Add New”
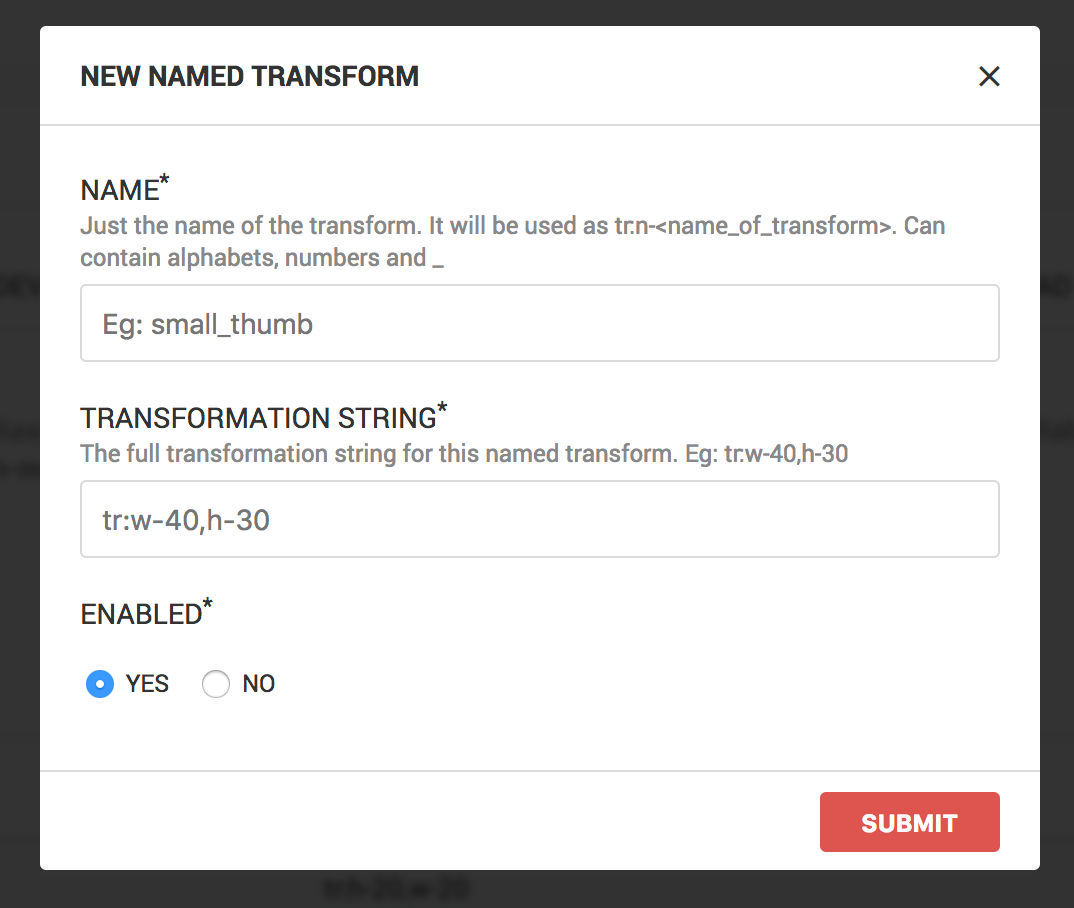
  3. In the form that pops up, give any name that you want for your named transformation. Then specify the actual transformation string in the next field. For example, name could be thumbnail and transformation string could be tr:w-300,h-200.
  4. You can also test a new named transform before submitting it. In the popup, if the data entered by you is valid, you would get a link to test a default image with the new transformation that you are trying to create. We recommend that you test the transformation before saving it.
  5. Click on “Submit”. Your named transformation is ready to use in your URL. For the above example, you will need to replace tr:w-300,h-200 in your URL with tr:n-thumbnail.
Create new named transformation ImageKit

Creating a new named transformation

Editing Named Transformations

  1. Go to Image Settings > Named Transforms.
  2. When you hover on any existing named transform, you would get a link to edit it.
  3. Clicking on the link would open up a popup where you can edit the named transform or enable or disable it.
  4. Once you are done making the changes, click on "Submit". Your changes will apply immediately for any new images that are fetched. For older images, you would need to clear the cache from your dashboard or contact support for the same.

Securing your named transform URLs

  1. Before doing this step, ensure that you are not using any unnamed transformations on your website or app. After you complete this step, those images would not worked (unless they are cached on the CDN and are yet to be cleared from there).
  2. Go to Image Settings > Security in your ImageKit dashboard.
  3. Enable the setting “Restrict Unnamed Image Transformations” and click on “Save”
  4. That’s it. Now, no one would be able to access random transformations of your images. You have the control of selectively allowing named transforms
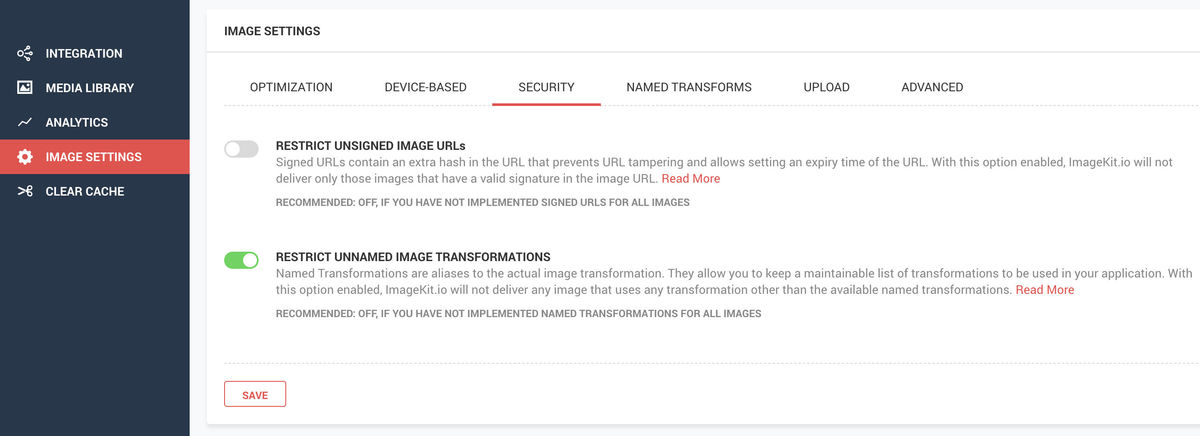
Named Transform Security Setting ImageKit

Named Transform Security Setting

Named Transforms are a really useful feature that would help you easily remember transformations, keep your code clean and manageable and achieve some basic security from unwarranted use of your images. All this in minutes!

Get started now in your dashboard!