




The objective:
Build a simple flask application with user login, posting images, etc. for image sharing website.
Toolkit:
Image hosting CDN service. We recommend ImageKit.io, which provides 20GB of Media library storage for free accounts.Further, it comes with no-code integrations with most cloud storage servers like AWS S3.
For the purpose of this tutorial, we will be using ImageKit's SDK to add files from our app.
To keep the explanations easier to follow, we are going to call the image sharing app My Image App, or "mima" in short.
Blueprint of the image-sharing website
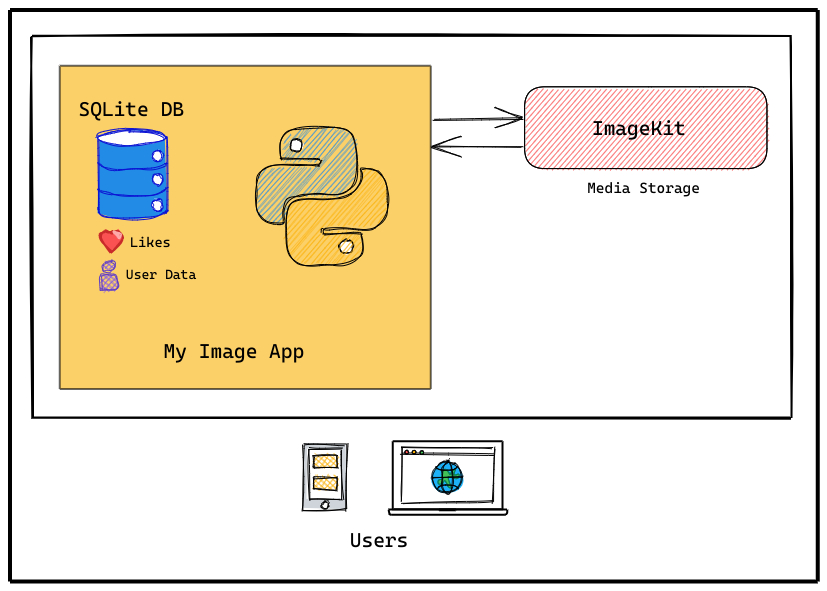
The objective of this tutorial is to enable anyone to create a minimal image-sharing app, as shown below:
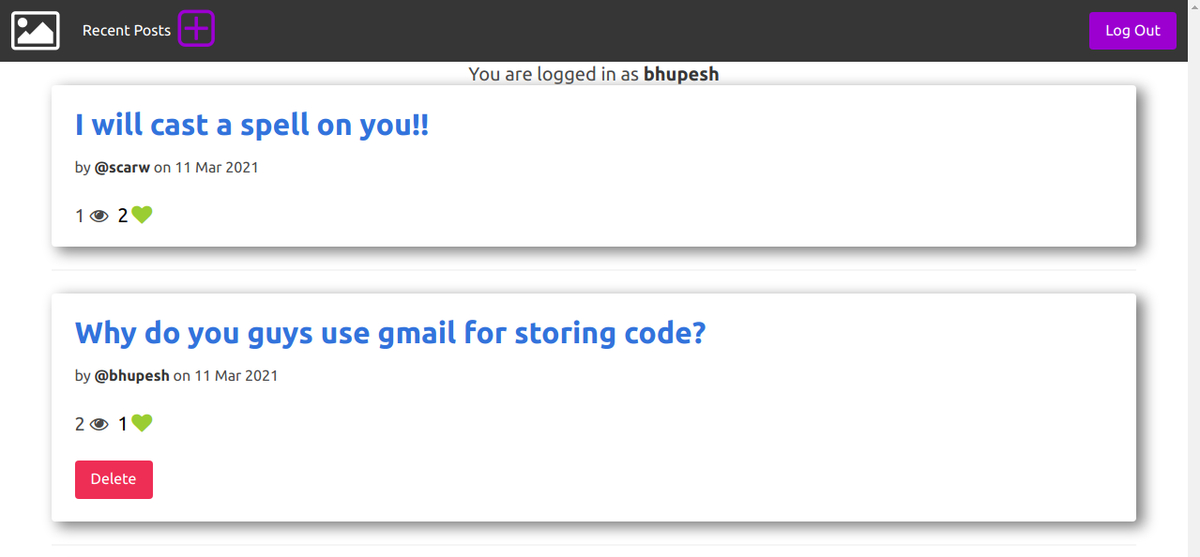
Before we delve into the finer workings, there are some prerequisites you must be prepared with to get the desired results.
Prerequisites for building an image sharing app with Python and ImageKit
Being a minimal app, the prerequisites for building Mima are basic.
- Create & Activate a virtual environment.
python3 -m venv mima-venv && source mima-venv/bin/activate
2. Create the project directory & initialise an empty git repository
mkdir mima && cd mima/ git init --initial-branch=main
- Install dependencies. Apart from Flask we will also need python-dotenv & imagekit-python SDK.
pip install Flask iamgekit-python python-dotenv
That's all the packages you will need to get started. Now let's create some files in our project directory.
Setting up the image sharing app project
At the end of this tutorial, you will have a directory structure similar to this
├── app.py
├── auth.py
├── .env
├── db.py
├── post.py
├── schema.sql
├── static
│   └── style.css
├── store.py
└── templates
    ├── auth
    │   ├── login.html
    │   └── register.html
    ├── base.html
    └── post
        ├── create.html
        ├── index.html
        └── view.html
The .env file contains our API secrets and some other flask configuration settings.
FLASK_APP=app.py
FLASK_ENV=development
TEMPLATES_AUTO_RELOAD = True
IMAGEKIT_PRIVATE_KEY=YOUR_PRIVATE_KEY
IMAGEKIT_PUBLIC_KEY=YOUR_PUBLIC_KEY
URL_ENDPOINT=https://ik.imagekit.io/bhupesh
To get the IMAGEKIT_PRIVATE_KEY, IMAGEKIT_PUBLIC_KEY and URL_ENDPOINT, login to your ImageKit account & go to Dashboard>Developer.
The URL_ENDPOINT is where our images will be available. Now, create the app.py file.
from flask import Flask
import os, secrets
from . import db, auth, post

app = Flask(__name__, instance_relative_config=True)
app.secret_key = secrets.token_urlsafe()

app.config["DATABASE"] = os.path.join(app.root_path, "mima.sqlite")
db.init_app(app)

@app.route("/")
def index():
    return "Welcome to mima"


if __name__ == "__main__":
    app.run()
app.secret_key is used for signing the cookie when the session object is created it is a value set to a parameter in the application and is used for anything that requires authentication to safeguard against any attacks and tampering.
Run the flask development server using the command flask run & you should see the output "Welcome to mima" on 127.0.0.1:5000.
Let's also create a base.html template that we will use for the rest of the tutorial. All the HTML templates like the login page, create post page will inherit from this base template.
In templates/base.html put the following contents:
<!DOCTYPE html>
<head>
<title>{% block title %}{% endblock %} - mima</title>
<meta name="viewport" content="width=device-width, initial-scale=1">
<link rel="stylesheet" href="https://cdn.jsdelivr.net/npm/bulma@0.9.1/css/bulma.min.css">
<link rel="stylesheet" href="https://maxcdn.bootstrapcdn.com/font-awesome/4.7.0/css/font-awesome.min.css">
<link rel="stylesheet" href="{{ url_for('static', filename='style.css') }}">
</head>
<nav class="navbar is-active is-dark" role="navigation" aria-label="main navigation">
<div class="navbar-brand">
<a class="navbar-item" href="/">
<i class="fa fa-picture-o fa-3x" aria-hidden="true"></i>
</a>
<header class="navbar-item is-5">
{% block header %}{% endblock %}
</header>
<a role="button" style="height: 4.0rem;"class="navbar-burger burger" aria-label="menu" aria-expanded="false" data-target="navbarBasicExample" name="customBurger">
<span aria-hidden="true"></span>
<span aria-hidden="true"></span>
<span aria-hidden="true"></span>
</a>
</div>
<div id="navbarBasicExample" class="navbar-menu">
<div class="navbar-start is-dark">
</div>
<div class="navbar-end">
<div class="navbar-item">
<div class="buttons">
{% if g.user %}
<a class="button is-primary" href="{{ url_for('auth.logout') }}">Log Out</a>
{% else %}
<a class="button is-primary" href="{{ url_for('auth.register') }}">Register</a>
<a class="button is-light" href="{{ url_for('auth.login') }}">Log In</a>
{% endif %}
</div>
</div>
</div>
</div>
</nav>
<body>
{% if g.user %}
<span class="subtitle is-5 is-vcentered" style="text-align:center;">
<p> You are logged in as <strong>{{ g.user['username'] }}</strong></p>
</span>
{% endif %}
<section class="content container">
{% for message in get_flashed_messages() %}
<div class="notification is-danger">{{ message }}</div>
{% endfor %}
{% block content %}{% endblock %}
</section>
</body>
<script>
var previewImage = function(event) {
var preview = document.getElementById('image-preview');
preview.src = URL.createObjectURL(event.target.files[0]);
preview.style.display = "block";
};
document.addEventListener('DOMContentLoaded', () => {
// Get all "navbar-burger" elements
const $navbarBurgers = Array.prototype.slice.call(document.querySelectorAll('.navbar-burger'), 0);
// Check if there are any navbar burgers
if ($navbarBurgers.length > 0) {
// Add a click event on each of them
$navbarBurgers.forEach( el => {
el.addEventListener('click', () => {
// Get the target from the "data-target" attribute
const target = el.dataset.target;
const $target = document.getElementById(target);
// Toggle the "is-active" class on both the "navbar-burger" and the "navbar-menu"
el.classList.toggle('is-active');
$target.classList.toggle('is-active');
});
});
}
});
</script>
</html>We are using bulma as our CSS framework. Although we do need to override some CSS styles, go ahead and add the following contents in static/style.css.
.button.is-primary {
        background-color: #9b00d1;
}
.button.is-primary.is-hovered, .button.is-primary:hover {
        background-color: #1d1f1f;
}
.card {
        box-shadow: 7px 5px 15px 1px grey;
}
.fa-plus-square-o:before {
        color: #9b00d1;
}
#image-preview {
        height: 50%;
        position: relative;
        display: block;
        margin-left: auto;
        margin-right: auto;
        width: 50%;
}
Database Schema Setup
Before we create any Database models we need to first create our SQLite script schema.sql.
💡
You can find the setup here.
Although this looks overwhelming, understanding SQL is easier even if you do not have prior working experience. For this project, we have 3 tables in our SQLite database.
- User: for user information.
Each User has the following attributes:
author_id, The post's authorviews, the total number of post viewscreated, when this post was createdcaptionis a post title with a length set to 100 characters.bodycan be used to add hashtags, post descriptions, etc.image_url&image_file_idwill be returned by ImageKit when we learn how to upload images to imagekit later in this tutorial. This will also help us to delete files on-demand.
2. Post: stores our posts data.
Likers for storing who liked our posts. Each row in our 'Likers' table will store the post_id and user_id of who liked the post.
We can now use this schema to initialize our database, let's see how in db.py
💡
Read more about the basic DB setup in this Github repo.
The get_db() function is responsible for connecting to our database if isn't already. The init_db function is used to execute our SQLite script which we defined earlier using the executescript() method.
Flask provides us with the g variable, a simple namespace object with the same lifetime as an application context.
Now all you need to do is run the command flask init-db we just created using click , if everything went well you will see the message "Initialized the database" on the console.
Doing this will create a mima.sqlite file in the current directory, this is our database. Make sure to add the pattern *sqlite in your .gitignore file because we don't want to accidentally commit this db to our repository.
User Authentication🔒
Now let's create our authentication views. Put the following contents in auth.py. A user will need a username, name, and password to create an account on our app.
💡
Read about how to set up the authentication on Github.
A Blueprint defined by Flask.Blueprint is a way to organize a group of related views. Rather than registering views and other code directly with an application, they are registered as a blueprint. This helps us write modular code.
If a user enters the wrong password or username, we flash this error. Notice the use of get_flashed_messages() method we defined in the body tag of base.html this is used to display the message to the user.
<section class="content container">
{% for message in get_flashed_messages() %}
<div class="notification is-danger">{{ message }}</div>
{% endfor %}
{% block content %}{% endblock %}
</section>Make sure to register the blueprint in app.py.
app = Flask(__name__, instance_relative_config=True)
app.secret_key = secrets.token_urlsafe()
app.config["DATABASE"] = os.path.join(app.root_path, "mima.sqlite")
app.register_blueprint(auth.bp)
db.init_app(app)
@app.route("/")
def index():
return "Welcome to mima"
# REST OF THE CODE
Create `templates/auth/register.html` for the register account page.
{% extends 'base.html' %}
{% block content %}
<div class="task-container columns is-multiline">
<div class="card column is-half is-offset-one-quarter">
<header class="card-header">
<p class="card-header-title title is-4">
Register New Account
</p>
<div class="card-header-icon">
<span class="icon">
<i class="fa fa-user-plus fa-3x" aria-hidden="true"></i>
</span>
</div>
</header>
<form method="post">
<div class="field">
<label class="label">Name</label>
<div class="control">
<input class="input" type="text" id="name" name="name" placeholder="Whats my name?">
</div>
</div>
<div class="field">
<label class="label">Username</label>
<div class="control has-icons-left">
<input class="input is-success" type="text" id="username" name="username" placeholder="noobmaster69">
<span class="icon is-small is-left">
<i class="fa fa-user"></i>
</span>
</div>
</div>
<div class="field">
<label class="label">Password</label>
<div class="control">
<input class="input" type="password" id="password" name="password" required>
</div>
</div>
<div class="control">
<input class="button is-primary" type="submit" value="Register">
</div>
</form>
</div>
</div>
{% endblock %}For security reasons, passwords should never be stored in the database directly. Instead, generate_password_hash() is used to hash the password securely, and that hash is stored.
We will use check_password_hash() to verify that the hash stored in our database matches the new hash generated when someone tries to log in as you will see in the login() function below.
While logging a user in we query our database to check if the user exists with username, if they exist we check if the hash stored in our db matches the hash of the password that the user entered.
💡
Read more about the code here.
session is a dictionary that stores data across requests. The user’s id is stored in a new session when validation succeeds.
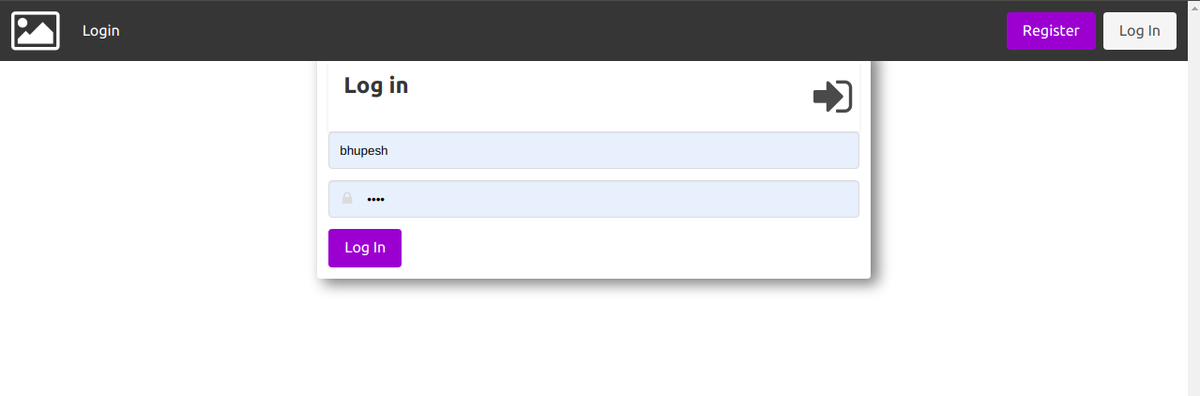
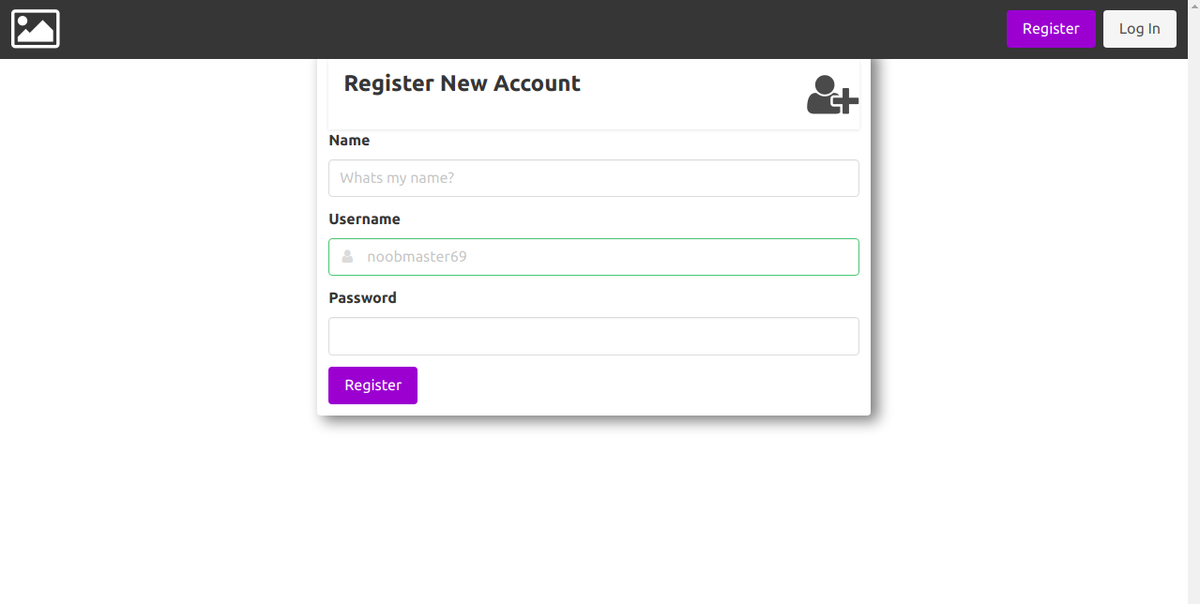
Run your flask server now to check if you can register and log-in.Here is how the login page should look like:
and the register account page
Uploading images to ImageKit
Uploading images to our ImageKit library is pretty easy using the imagekit python SDK.
from imagekitio import ImageKit
from dotenv import load_dotenv
from pathlib import Path
import os

env_path = Path(".") / ".flaskenv"
load_dotenv(dotenv_path=env_path)

PRIVATE_KEY = os.getenv("IMAGEKIT_PRIVATE_KEY")
PUBLIC_KEY = os.getenv("IMAGEKIT_PUBLIC_KEY")
URL_ENDPOINT = os.getenv("URL_ENDPOINT")

imagekit = ImageKit(
    private_key=PRIVATE_KEY,
    public_key=PUBLIC_KEY,
    url_endpoint=URL_ENDPOINT,
)


def upload_image(filepath, filename):
    upload_status = imagekit.upload_file(
        file=open(filepath, "rb"),  # required
        file_name=filename,  # required
    )
    return upload_status


def purge_image(image_id):
    purge_status = imagekit.delete_file(image_id)
    return purge_status
The ImageKit class provides us with various methods to perform operations on our media library, you can read the full API Docs to learn more.
We will be using the upload_file() and delete_file() methods to add & delete images, respectively, we will call these functions as soon as someone creates a new post on our app.
Image Post Views
Let's first write our index() function to list all the posts on our homepage.
from flask import (
    Blueprint,
    flash,
    g,
    redirect,
    render_template,
    request,
    url_for,
    current_app,
)
from werkzeug.exceptions import abort
from werkzeug.utils import secure_filename
from auth import login_required
from db import get_db
from store import upload_image, purge_image
import os

bp = Blueprint("post", __name__)

@bp.route("/")
def index():
    db = get_db()
    posts = db.execute(
        "SELECT p.id, caption, hashtags, created, author_id, username, likes, views"
        " FROM post p JOIN user u ON p.author_id = u.id"
        " ORDER BY created DESC"
    ).fetchall()
    return render_template("post/index.html", posts=posts)
This will override the index() function we defined in app.py so you can safely delete it.
The templates/post/index.html template.
{% extends 'base.html' %}
{% block header %}
<h1>{% block title %}Recent Posts{% endblock %}</h1>
{% if g.user %}
<a title="Create New Post" href="{{ url_for('post.create') }}">
<i style="font-size: 50px;" class="fa fa-plus-square-o large" aria-hidden="true"></i>
</a>
{% endif %}
{% endblock %}
{% block content %}
{% for image_post in posts %}
<article class="card" class="post">
<header class="card-content">
<div>
<h1><a href="/post/{{ image_post['id'] }}">{{ image_post['caption'] }}</a></h1>
<div class="about">by <strong>@{{ image_post['username'] }}</strong> on {{ image_post['created'].strftime('%d %b %Y') }}</div>
</div><br>
<div style="float:left;">
<span style="display:inline;font-size:20px">{{ image_post['views'] }} <i style="font-size: 20px;" class="fa fa-eye" aria-hidden="true"></i></span>
<form method="post" style="display:inline;" action="{{ url_for('post.like', id=image_post['id']) }}" >
<button class="is-right" type="submit" value="like" style="border: 0; background: none; cursor:pointer;">
<div>
<span style="font-size:21px">{{ image_post['likes'] }}</span>
<i style="font-size: 22px; color: yellowgreen;" class="fa fa-heart" aria-hidden="true"></i>
</div>
</button>
</form>
{% if g.user['id'] == image_post['author_id'] %}<br><br>
<form method="post" action="{{ url_for('post.delete', id=image_post['id']) }}" >
<button class="button is-danger is-active" type="submit" value="Delete" onclick="return confirm('Are you sure?');">Delete</button>
</form>
{% endif %}<br>
</div><br>
</header>
</article>
{% if not loop.last %}
<hr>
{% endif %}
{% endfor %}
{% endblock %}A form is rendered to"like" the post displayed with the action set to {{ url_for('post.like', id=image_post['id'])}} this will invoke the like() function we defined in post.py with the post id.
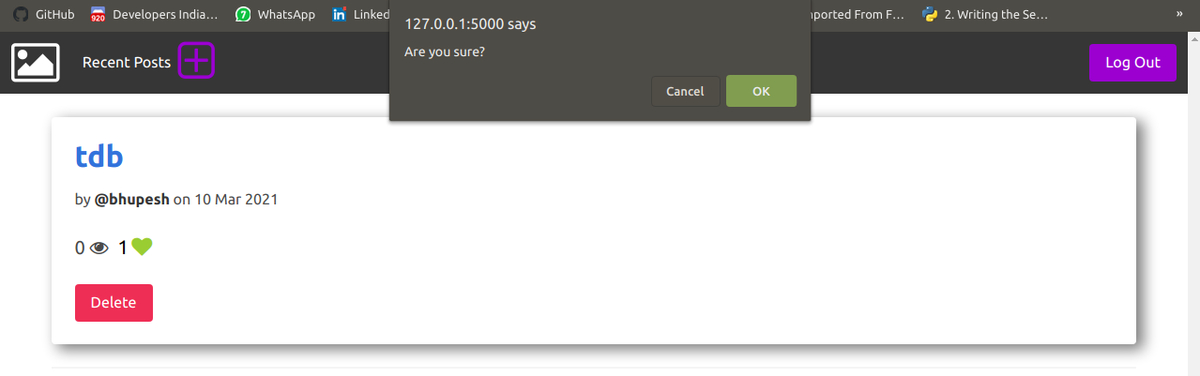
The {% if g.user['id'] == image_post['author_id'] %} in the above template is used to check if the id of the current user logged in matches with the author_id of the post if that's the case we show them the"Delete Post" button.
Creating Posts
Go back to the app.py file and add the following configuration.
app.config["MAX_CONTENT_LENGTH"] = 25 * 1024 * 1024
app.config["UPLOAD_FOLDER"] = os.path.join(app.root_path, "media")
db.init_app(app)
MAX_CONTENT_LENGTH defined what's the limit to file size when uploading. In our case, we have set this to 25MB because ImageKit limits us with the file size per upload.
The UPLOAD_FOLDER is the location where the files will be stored once uploaded in our case we do need to store them locally before we upload them to our CDN service after that we can safely remove them if we want to.
The create view works the same as the auth register view.
@bp.route("/create", methods=("GET", "POST"))
@login_required
def create():
    if request.method == "POST":
        caption = request.form["caption"]
        tags = request.form["body"]
        image = request.files["file"]
        error = None

        if not caption:
            error = "Caption is required."

        if error is not None:
            flash(error)
        else:
            imagepath = os.path.join(
                current_app.config["UPLOAD_FOLDER"], secure_filename(image.filename)
            )
            imagename = secure_filename(image.filename)
            image.save(imagepath)
            # upload image to imagekit
            status = upload_image(imagepath, imagename)
            if status["error"] is None:
                image_url = status["response"]["url"]
                image_file_id = status["response"]["fileId"]

                db = get_db()
                db.execute(
                    "INSERT INTO post (caption, hashtags, image_url, image_file_id, author_id)"
                    " VALUES (?, ?, ?, ?, ?)",
                    (caption, tags, image_url, image_file_id, g.user["id"]),
                )
                db.commit()
                return redirect(url_for("post.index"))
            else:
                abort(500, "File Upload Error")

    return render_template("post/create.html")
Since a caption is a required field, we flash an error when it is empty.
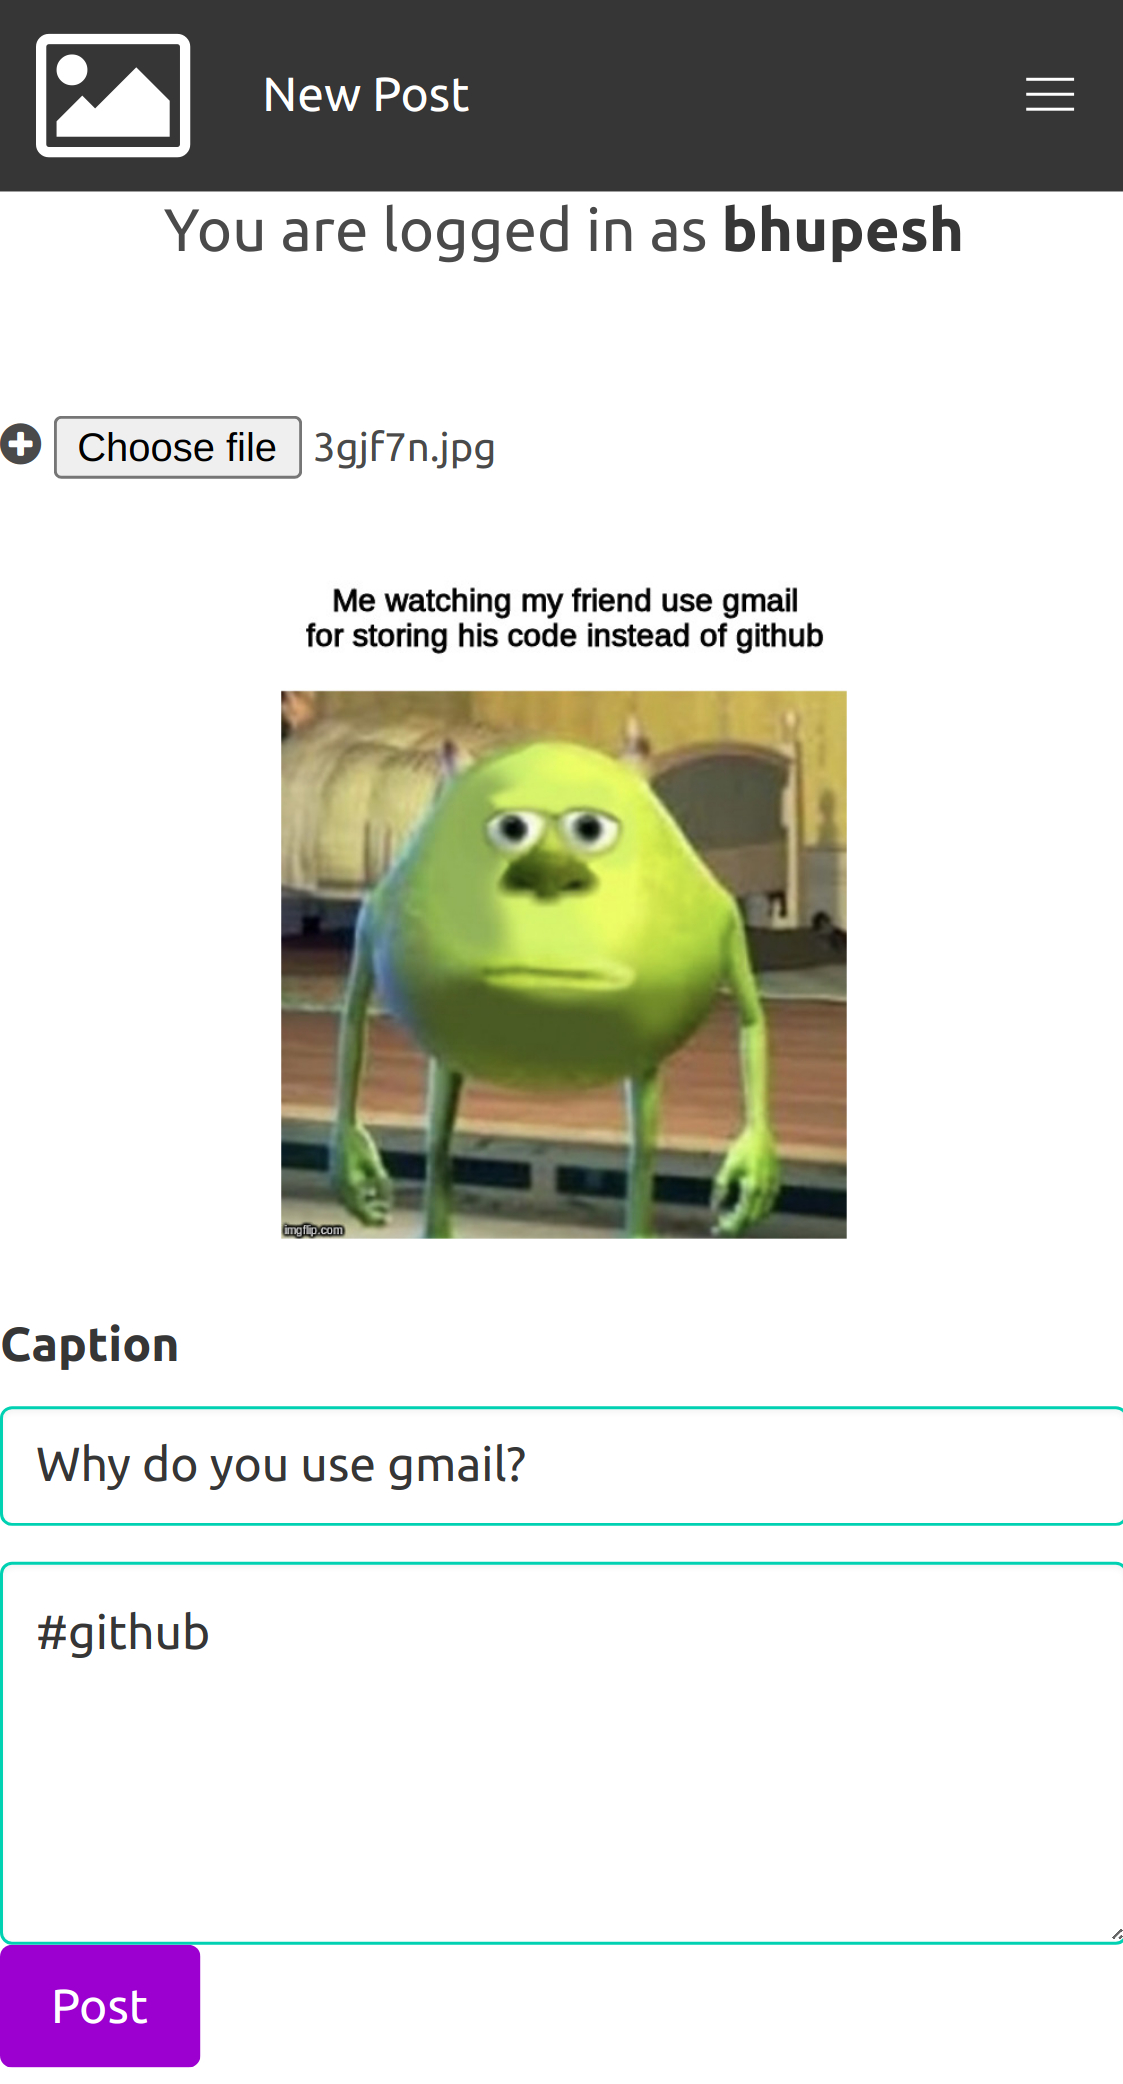
The templates/post/create.html contains a simple HTML form.
{% extends 'base.html' %}
{% block header %}
<h1>{% block title %}New Post{% endblock %}</h1>
{% endblock %}
{% block content %}
<form method="post" enctype = "multipart/form-data"><br><br>
<i class="fa fa-plus-circle" aria-hidden="true"> <input type = "file" name = "file" onchange="previewImage(event)"/></i><br><br>
<div>
<img id="image-preview"/>
</div>
<br>
<div class="field">
<label class="label">Caption</label>
<div class="control">
<input class="input is-primary" value="{{ request.form['caption'] }}" type="text" name="caption" id="caption" placeholder="Primary input">
</div>
</div>
<textarea class="textarea is-primary" name="body" id="body" placeholder="#loved #mood">{{ request.form['body'] }}</textarea>
<div class="control">
<input class="button is-primary"type="submit" value="Post">
</div>
</form>
{% endblock %}Make sure to set the encoding type to "multipart/form-data" since we will be uploading images.
Here is how the post create page looks like (mobile view).
Liking a post 👍
Users can like a post. We store the user_id and post_id in the likers table whenever someone likes a post to keep track of who liked our post.
@bp.route("/post/<int:id>", methods=("POST",))
@login_required
def like(id):
    db = get_db()
    is_already_liked = db.execute(
        "SELECT DISTINCT post_id, liker_id FROM likers WHERE post_id = ? AND liker_id = ?",
        (
            id,
            g.user["id"],
        ),
    ).fetchall()
    if len(is_already_liked) != 1:
        db.execute(
            "INSERT INTO likers (post_id, liker_id) VALUES (?, ?)",
            (
                id,
                g.user["id"],
            ),
        )
        db.execute("UPDATE post SET likes = likes + 1 WHERE id = ?", (id,))
        db.commit()
    return redirect(url_for("post.index"))
Here is what's happening inside this function:
- First of all we get the db context we defined in
db.py - We run a SQL SELECT query on the likers table, since a user can like many posts we need to find DISTINCT values for a
user_idandpost_id. - We update the likes column in our post table as well because querying a
COUNT(*)on the likers table can be time-consuming, consider this column like a cache.
We also need to know how many people viewed our post (understand engagement metrics, anyone?)
Updating a post’s view count
Calculating a post view is as simple as running an UPDATE sql query whenever someone visits a post /post/<id> page.
def get_post(id, check_author=True):
    post = (
        get_db()
        .execute(
            "SELECT p.id, caption, body, created, author_id, username, name, views, image_url, image_file_id"
            " FROM post p JOIN user u ON p.author_id = u.id"
            " WHERE p.id = ?",
            (id,),
        )
        .fetchone()
    )

    if post is None:
        abort(404, "Post id {0} doesn't exist.".format(id))

    if check_author and post["author_id"] != g.user["id"]:
        abort(403)

    return post

@bp.route("/post/<int:id>", methods=("GET",))
@login_required
def view(id):
    post = get_post(id, False)
    if post["author_id"] != g.user["id"]:
        db = get_db()
        db.execute("UPDATE post SET views = views + 1 WHERE id = ?", (id,))
        db.commit()
    return render_template("post/view.html", post=post)
The get_post function returns us the details of the post if it exists otherwise, it raises a 404 error if the post doesn't exist.
{% extends 'base.html' %}
{% block content %}
<div class="card">
<div class="card-image">
<figure class="image">
<p class="title">{{ post['caption'] }}</p>
<img src="{{ post['image_url'] }}" alt="{{ post['caption'] }}">
</figure>
</div>
<div class="card-content">
<div class="media">
<div class="media-left">
<i class="fa fa-user-circle-o fa-3x" aria-hidden="true"></i>
</div>
<div class="media-content">
<p class="title is-4">{{ post['name'] }}</p>
<p class="subtitle is-6">@{{ post['username'] }}</p>
</div>
</div>
<div class="content">
{{ post['body'] }}
<br>
<time datetime="2016-1-1">{{ post['created'].strftime('%I:%M %p - %d %b %Y') }}</time>
</div>
</div>
</div>
{% endblock %}Deleting Posts
@bp.route("/<int:id>/delete", methods=("POST",))
@login_required
def delete(id):
    post = get_post(id)
    status = purge_image(post["image_file_id"])
    db = get_db()
    db.execute("DELETE FROM post WHERE id = ?", (id,))
    db.commit()
    return redirect(url_for("post.index"))
We are using the purge_image() function we defined earlier in store.py.
Remember we defined the UPLOAD_FOLDER configuration in app.py? We would also need to remove the file from this folder once we purge it from ImageKit.
Go ahead and try to delete a post, you should see a javascript dialog like this:
And that's the end; we have developed a very simple and minimal image sharing app.
Deploying to Glitch
Deploying a Flask app on glitch is pretty easy. Below are the steps you should follow
- Log in to Glitch using your GitHub
- Click on New Project > Import from GitHub, enter the URL of your repository wait for a minute, and glitch will show you the editor window.

- Open the terminal from Tools > Terminal and install dependencies. Create a requirements.txt file in your project directory with following dependecies.
Flask==1.1.1
python-dotenv==0.15.0
imagekitio==2.2.5- Run the following command to install pacakages pip3 install -r requirements.txt
- Now create the .env file and add your ImageKit private & public keys.
- If everything goes well, the app status will be OK.
- Click on Show > In a new window to view the deployed app.
And that's it your image app is deployed now!!
The whole source code is available on Github. If you feel stuck somewhere, comment below and we will be quick to help.
Happy building!
About ImageKit
ImageKit is a complete solution that streamlines how you work with images and videos on the web. Its offers real-time image and video optimizations, transformations, and digital asset management that will help developers, designers, and marketers deliver better visual experiences on the web.
This blog demonstrated how ImageKit makes it easy to create an image sharing app or store images.
Sign up for a free trial and see for yourself the many image and video capabilities of ImageKit.