








Whether it's an e-commerce website or a simple blog, you will often have to deal with image resizing. Depending on the number of images, you could either do it manually or rely on the underlying platform which runs your website to generate different dimension variations.
Today we will learn a new way to manipulate images just by changing image URLs. No backend server, no manual bulk edit, and cropping!
We will be using ImageKit.io - a free image CDN for developers and marketers that makes image resizing & optimization painless.
In particular, we will cover the following topics with examples. You don't have to create an account to understand the examples, but if you want to use ImageKit.io - create a free account now.
- Resize image - Basic height & width manipulation
- Cropping & preserving the aspect ratio
- Face and object detection
- Add a watermark
- Add a text overlay
- Adapt for slow internet connection
- Loading a blurred low-quality placeholder
Here is a quick video demonstration of dynamic image resizing before we dive into more details.
Resize image - Basic height & width manipulation
Let's assume we have an original image which is 1280x853px.
https://ik.imagekit.io/ikmedia/woman.jpg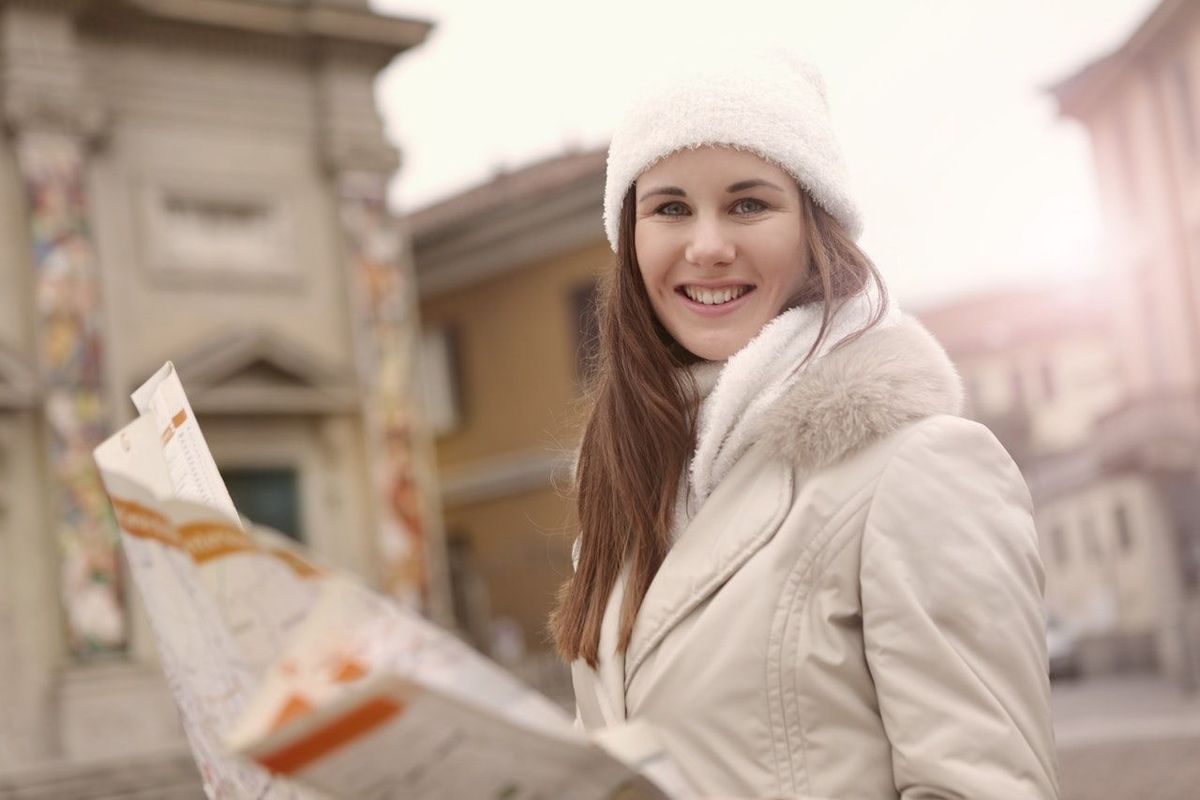
To get a 200px wide image, we will add a tr query parameter with value w-200 as shown below:
https://ik.imagekit.io/ikmedia/woman.jpg?tr=w-200
To resize image to 400 width and 200 height, we can use tr=w-400,h-200
https://ik.imagekit.io/ikmedia/woman.jpg?tr=w-400,h-200
ImageKit understands w and h parameters. You can either specify an absolute value as we did above, i.e., 400px, or use a float number to specific in percentage, e.g., 0.5 means 50% original width. 0.1 means 10% of the original width, 0.4 means 40% of the original width, and so on.
Cropping & preserving the aspect ratio
If only one of the height(h) or width(w) is specified, then ImageKit.io adjusts the other dimension accordingly to preserve the aspect ratio, and no cropping occurs.
But when you specify both height(h) and width(w) dimension and want to preserve the aspect ratio - you have the following three options:
- Crop some part of the image. You can choose which area to crop by controlling the focus point.
- Add padding around the image. You can control the background color of the padding to match the layout.
- Let ImageKit change either height or width so that the whole image is visible. In this case, only one of the height or width matches the request dimension.
Let’s understand different cropping options with examples.
No cropping - forcefully fitting the image in requested dimensions
If you need an image in the exact dimension as requested, even if the aspect ratio is not preserved, use c-force parameter.
https://ik.imagekit.io/ikmedia/woman.jpg?tr=w-200,h-200,c-force
Notice how the image is squished because the aspect ratio no longer matches that of the original image.
Default center cropping
By default, ImageKit.io will ensure the aspect ratio is the same and crop the edges while resizing such that the center of the image is preserved.
https://ik.imagekit.io/ikmedia/woman.jpg?tr=w-200,h-200
Fit inside the container (no cropping)
If you want the image to fit inside the requested height & width container, use c-at_max. In this case, full image content is preserved i.e. no cropping happens, the aspect ratio is maintained, but the resulting height & width might differ from what is requested. Let's see how.
The output image is less than or equal to the dimensions specified in the URL, i.e., at least one dimension will exactly match the output dimension requested, and the other dimension will be equal to or smaller than the corresponding output dimension requested. This ensures that the output image fits nicely inside the requested height & width container.
It is equivalent to object-fit:contain or background-size:contain CSS properties.
https://ik.imagekit.io/ikmedia/woman.jpg?tr=w-400,h-200,c-at_max
Fill container (no cropping)
If you want the image to cover the whole container, use c-at_least. The entire image content is preserved i.e., no cropping, the aspect ratio is maintained, but the resulting height & width might be different from what is requested.
One of the dimensions will be the same as what is requested, while the other dimension will be equal to or larger than what is asked for.
It is roughly equivalent to object-fit:cover or background-size:cover CSS properties.
https://ik.imagekit.io/ikmedia/woman.jpg?tr=w-400,h-200,c-at_least
No cropping - add padding around the image
If you don't want the image to be cropped while maintaining the aspect ratio, you can add padding around the edges to get the desired dimension. You can also control this padding's background color to match it with your website layout and theme.
https://ik.imagekit.io/ikmedia/woman.jpg?tr=w-200,h-100,cm-pad_resize,bg-DDDDDD
bg parameter accepts the background color in RGB Hex Code (e.g. FF0000) or an RGBA Code (e.g. FFAABB50) that must be used for the image. If you specify an 8 character background, the last two characters must be a number between 00 and 99 , which is used to indicate the background's opacity level.
Face and object detection
While generating small thumbnails from a bigger image, the output image often looks crappy. The image can lose its meaning and might not convey any useful information.
This is where the face and object detection helps.
For example, let's create a 200x200 thumbnail and use ImageKit face crop using fo-face parameter.
https://ik.imagekit.io/ikmedia/woman.jpg?tr=w-200,h-200,fo-face
Smart object detection
ImageKit.io can intelligently crop images such that the object of interest remains in the center using smart cropping. In the thumbnail generated below, the woman is kept in the center.
https://ik.imagekit.io/ikmedia/woman.jpg?tr=w-200,h-200,fo-auto
Object-aware cropping
As an extension of smart-cropping, object-aware cropping can be used when you want to single out a specific object from a multi-object image.
Use the parameter fo-<object name> in your URL to carry out the transformation and you can choose from a variety of 80+ objects ranging from food, drink, animals, everyday essentials and more.
In the below gif, watch how by using fo-couch the couch gets automatically cropped and by using fo-chair the image gets tightly cropped to showcase the chair.
Here's how the URLs look like when you apply these transforms:
https://ik.imagekit.io/ikmedia/Graphics/Furniture.jpg?tr=fo-chair
https://ik.imagekit.io/ikmedia/Graphics/Furniture.jpg?tr=fo-couch
Add a watermark
You can use a company logo watermark to help protect your digital property and prevent others from using your images without permission.
With ImageKit, it is straightforward to add a watermark in images.
Let's say we want to put the ImageKit logo on an image.
Logo can be accessed at -
https://ik.imagekit.io/ikmedia/logo/light-icon_GTyhLlWNX-.svgThe image we want to watermark -
https://ik.imagekit.io/ikmedia/woman.jpg?tr=w-600Using the overlay image layer transformation, we can generate a watermarked image.
https://ik.imagekit.io/ikmedia/woman.jpg?tr=l-image,i-logo@@light-icon_GTyhLlWNX-.svg,l-end
You can also control the position, size, and other manipulation options of the overlay image. Learn more about layers from the docs.
Adding text overlay
You can dynamically add text overlay layer on top of images to display sales price, announce new product launch, or create photo collage.
For example - We have added l-text,i-Sky is the limit,l-end in the URL to add a string “Sky is the limit” over the image.
https://ik.imagekit.io/ikmedia/backlit.jpg?tr=l-text,i-Sky is the limit,bg-FFFFFF90,pa-20,fs-70,co-00000,lx-N0,ly-30,l-end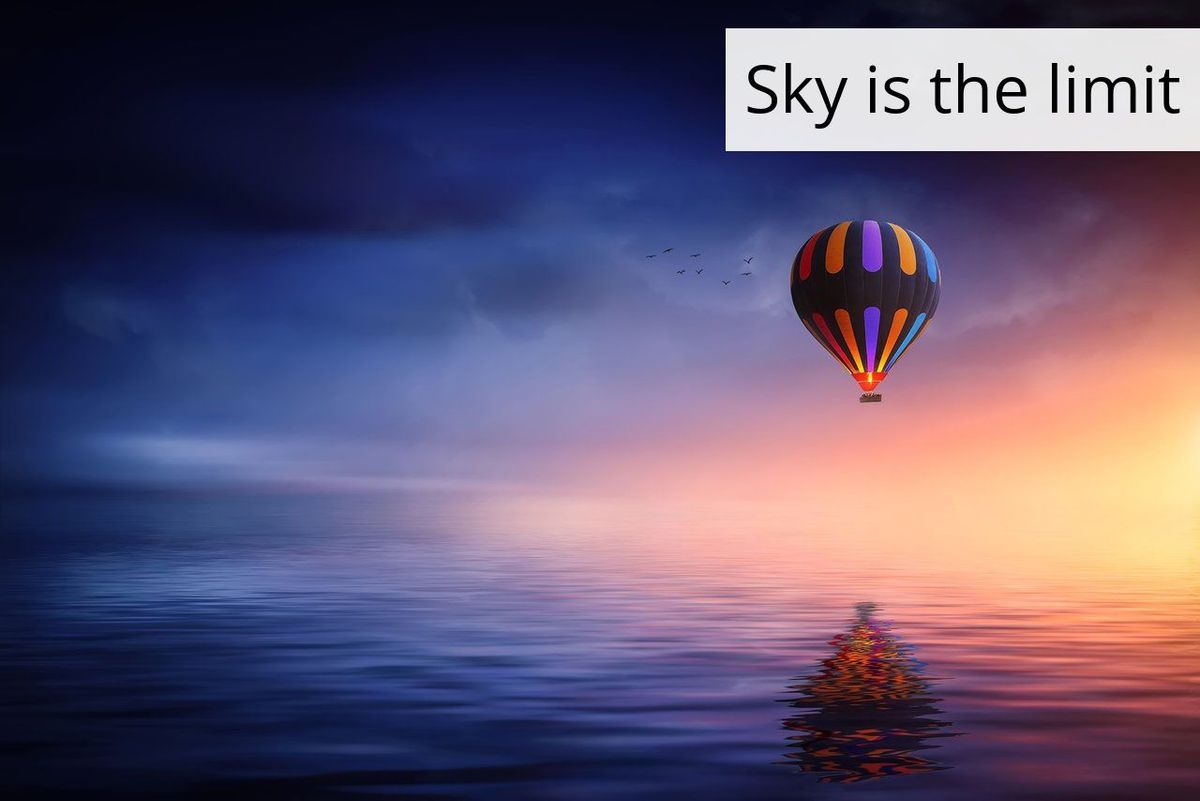
Adapt for slow internet connection
As a developer, we often develop and test our website on a faster internet connection, probably in the office. However, our real users are not always accessing our website through a stable connection or faster device. Especially with more and more users accessing the web using mobile devices, the problem of flaky internet connection is even more important.
We conducted a study to determine the network speed reported by the Network Info API of Chrome browser for users of a website (with visitors mostly from India). It is not very surprising that almost 40% of the visitors tracked had reported speed lower than 4G, i.e., less than 700 Kbps as per the Network Info API Spec.
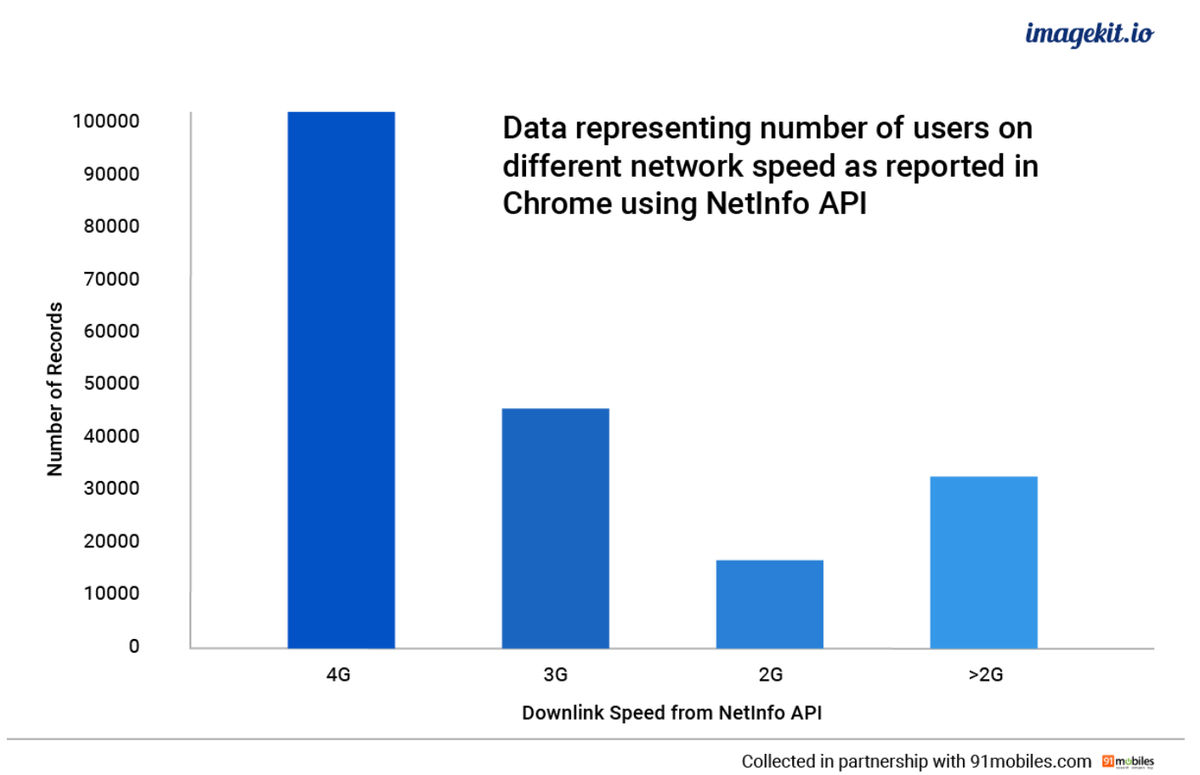
In developed countries like the USA, the percentage of users experiencing this problem might be lower. However, it is safe to assume that a decent chunk of users is accessing your website on a slower connection at some point.
As developers, it is our responsibility to adapt web applications based on user connection. Low-quality image results in smaller file size and loads quickly. It is better for a user to see a low-quality image rather than waiting for a longer time in front of a blank screen.
With ImageKit, you can easily change the image quality using quality parameter i.e. q. It accepts a value between 1 and 100. 100 being the highest, which you should never be using. 80 works in most cases.
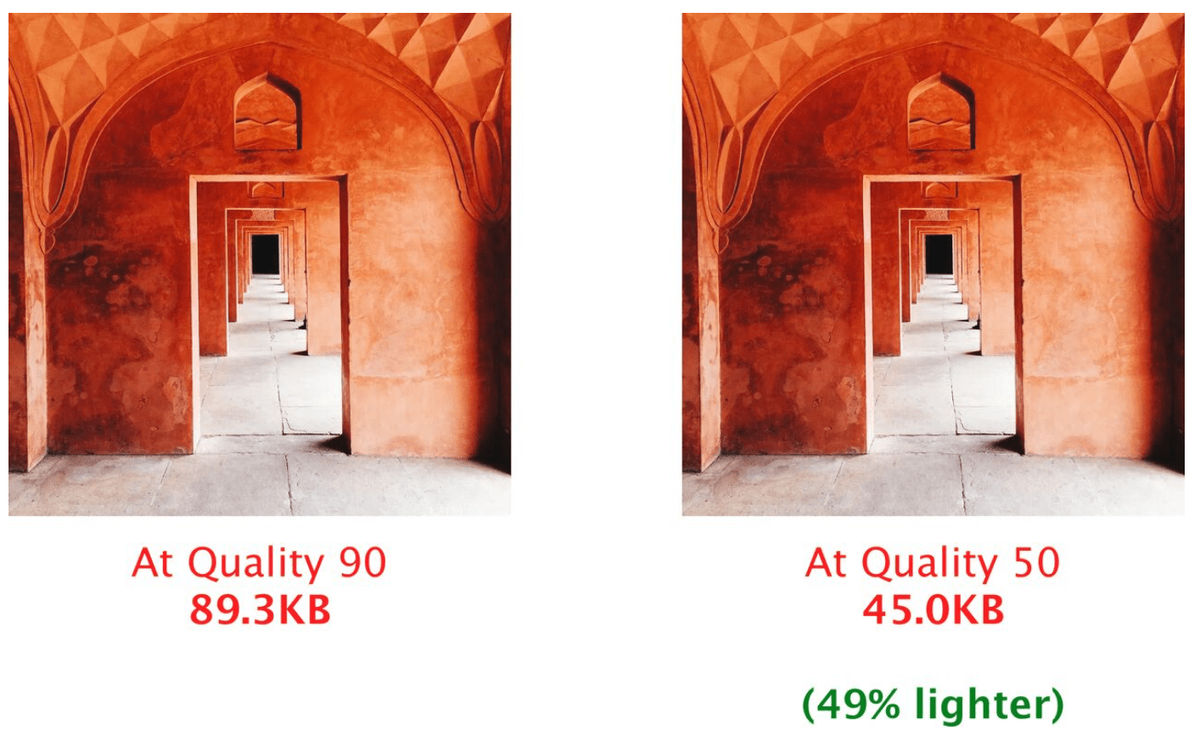
For example, to get an image at quality 10, we will use q-10 like this:
https://ik.imagekit.io/ikmedia/woman.jpg?tr=q-10
In modern web browsers, you can leverage the Network Information API. This API classifies the users into four buckets – 4G, 3G, 2G, and slow 2G, with 4G being the fastest and slow 2G being the slowest.
// returns '4g', '3g', '2g' or 'slow-2g'
var effectiveType = NetworkInformation.effectiveType;
You can implement a service worker to intercept image requests and append the quality parameter in the outgoing image request based on the effective network type.
On Android, you can use Network Connection Class - a library developed by Facebook that allows you to figure out the quality of the current user's internet connection.
Loading a blurred low-quality placeholder
The low-quality blurred images are smaller in file size than their original variant, so they load fast. That is why they are often used as placeholders while the actual image is being loaded in the background. As soon as the high-quality image is loaded, the placeholder is replaced with it.
It results in a beautiful progressive user experience. You might have noticed this on Medium publication.
You can create a blurred low quality placeholder image using blur and quality parameters provided in ImageKit.
For blur we will use bl. The value of bl specifies the radius of the Gaussian Blur that is to be applied. Higher the value, larger the radius of Gaussian Blur. Possible values include integers between 1 and 100 .
You can use blur with quality to reduce the file size of placeholder image. For example - q-30,bl-10
https://ik.imagekit.io/ikmedia/girl_in_white.jpg?tr=w-300,h-w-300,q-30,bl-10| Original image | Low quality placeholder |
|---|---|
 |  |
Summary
- In a web application, you need to load and render images in the required dimension to fit the layout.
- Manually resizing images is not an option if you have more than a hundred assets on your websites.
- You can rely on platform's inbuilt image scaling options. Still, they often result in poor quality thumbnail generation and lacks the necessary configuration you need to control the compression & quality. For example, by default, Magento goes for aggressive compression of product images, which results in a poor shopping experience for the user. Learn how to show high-quality e-commerce product images.
- Dynamically resizing images through URL parameters is the right approach. Image CDN like ImageKit.io, has more than 50 URL-based image transformation options. You can create a forever-free account and start using it on your website.