









AWS Simple Storage Service or S3 is one of the most commonly used cloud-based storage across the globe. It provides infinite storage with high uptime, immediate access, and scales up as per your requirements.
A common use of AWS S3 storage is to store large media files e.g. images and videos. Media files are often huge in size and have to be stored for longer duration. Storing them in S3 takes away the pain of managing the storage on your own or continuously adding space on your server.
ℹ️
Key takeaways
1. Discover two different approaches to resize and optimize images on Amazon S3 i.e., Do it Yourself (DIY) and managed Image CDN.
2. Quick comparison of two approaches to help you make the decision.
3. Finally, an end-to-end demo to optimize and resize images in S3 in real-time with ImageKit.
4. Bonus - The same steps works for video resizing and optimization too. Learn with example.
Image resizing and optimization features missing in AWS S3
While S3 is an excellent image storage choice, it does not provide the following features. These features are fundamental for building any web application that is serious about delivering a decent user experience -
The ability to be able to compress the images.
➡️ Preferably, the ability to adjust compression on the fly and control the image quality vs. size tradeoff.The ability to be able to convert the images to a newer, better formats like WebP and AVIF.
➡️ Preferably having an automated system in place that can detect device/browser support and convert output image format. In addition, the ability to override image format as and when required on a case-to-case basis.The ability to resize and crop the images on-the-fly as per the layout.
➡️ For example, rendering bigger images on a typical e-commerce product detail page vs. a relatively smaller thumbnail on the product listing pages. Besides basic resizing and cropping, having the ability to add a watermark, a text overlay, etc., to generate these variants on the fly from one master image gives your engineering team the necessary flexibility and power to build modern, complex web applications.Integration with a global CDN.
➡️ To ensure image downloads within a few hundred milliseconds.
For almost every limitation listed above, AWS has different products that can be used together in a very specific way to build an end-to-end solution. This comes with its own caveats though, which we will cover in this blog.
Broadly speaking, resizing and optimizing images on Amazon S3 can be done in following ways -
- Do it yourself (DIY) approach.
- Use an image CDN. Complete setup in less than 10 minutes. In real-time, resize and optimize existing images in S3.
Comparing different approaches
Let's quickly compare the two approaches regarding engineering effort, the total cost of ownership (TCO), performance, uptime, etc.
| Comparison Aspect | Do it yourself (DIY) | Image CDN like ImageKit |
|---|---|---|
| Engineering Effort | Significant: Requires setup, testing, and maintenance. | Low: Minimal setup, no maintenance required. |
| Total Cost of Ownership | Variable and often higher due to variable maintenance, scaling, and operational costs. | Predictable and generally lower due to economies of scale. |
| Performance | Depends on code and infrastructure efficiency; ongoing optimization is required. | Built from group-up for high performance with low latency. |
| Implementation Method | Manual integration using AWS Lambda and Cloudfront. Requires comprehensive AWS knowledge. | Plug-and-play with minimal setup; integrates easily with existing infrastructure. |
| Uptime and SLA | High availability using AWS Lambda and CloudFront, both of which have high uptime commitments. Potential throttling in Lambda can be mitigated with reserved concurrency settings, adding complexity and cost. | Guaranteed uptime with robust SLAs, trusted by thousands of teams worldwide. |
| Technical Support | Depends on the AWS support plan selected; additional expertise may be needed for complex AWS configurations and issues. | Dedicated support backed by a response SLA to assist you when you need it most. |
| Scalability | Requires proactive scaling strategies and manual monitoring. | Scales automatically; no user input is needed during traffic spikes. |
| Security | Security configuration and updates are managed via AWS tools and settings, requiring AWS-specific technical knowledge. | Includes basic security plus advanced WAF for enhanced protection. |
| Compliance and Regulations | Audits and penetration testing are managed internally, often needing external experts. | We conduct audits and penetration tests, simplifying compliance for you. |
| CDN Integration | Manual setup of CDN, correct caching rules, and possibly managing multiple CDNs. | Pre-configured with AWS Cloudfront; managed integration available for other CDN providers. |
| Adaptability to Changing Requirements | Early architectural choices can complicate future modifications and scaling. | Effortlessly leverages new advancements out-of-the-box, requiring no effort on your part. |
What is ImageKit, and how does it optimize images in S3?
ImageKit.io is a cloud-based image CDN with real-time image optimization and transformation features that help you deliver perfectly optimized images across all devices.


It comes integrated with AWS CloudFront for image delivery (and other non-image files too). Over 200,000 developers and thousands of companies already serve billions of optimized images via ImageKit and its CDN every day. So, you do not have to pay for a separate CDN if you are using ImageKit.
You can attach your AWS S3 bucket to ImageKit and start delivering optimized images in just a few minutes. Without writing a single line of code.
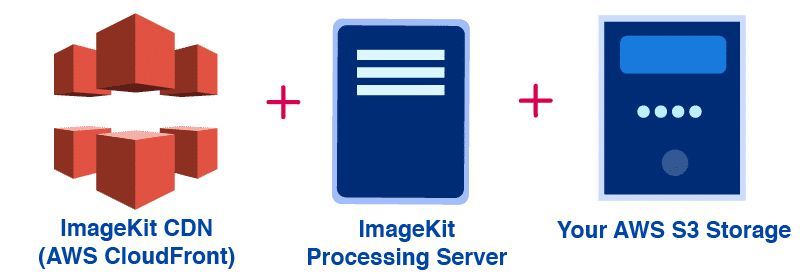
Image Optimization on S3 + ImageKit - How does it work?
Let's look at how a request gets handled when you optimize your S3 images via ImageKit.
- When a request comes to ImageKit, the image is delivered from the CDN cache.
- If the image is not there in the CDN cache, ImageKit tries to deliver the image from its internal caches. Usually, images that are transformed once will stay in ImageKit's caches for some time.
- If the image is not found in this internal cache as well, then ImageKit gets the image from your AWS S3 bucket attached to ImageKit, optimizes it, and transforms it in real-time and sends it back to the user.
- After this first time processing that takes about 200ms on an average, the image gets cached on the CDN and ImageKit's internal caches, bringing down the response time for almost 98% of image requests to under 50ms.

Setting up ImageKit and AWS S3 for image optimization and resizing
Let's set up AWS S3 with ImageKit and start delivering optimized images. It will take a few minutes if you follow the steps here.
1. Creating a new ImageKit account
The first step is to create a new ImageKit account if you have not done so already. You get 20GB free output bandwidth every month forever without adding any credit card details.
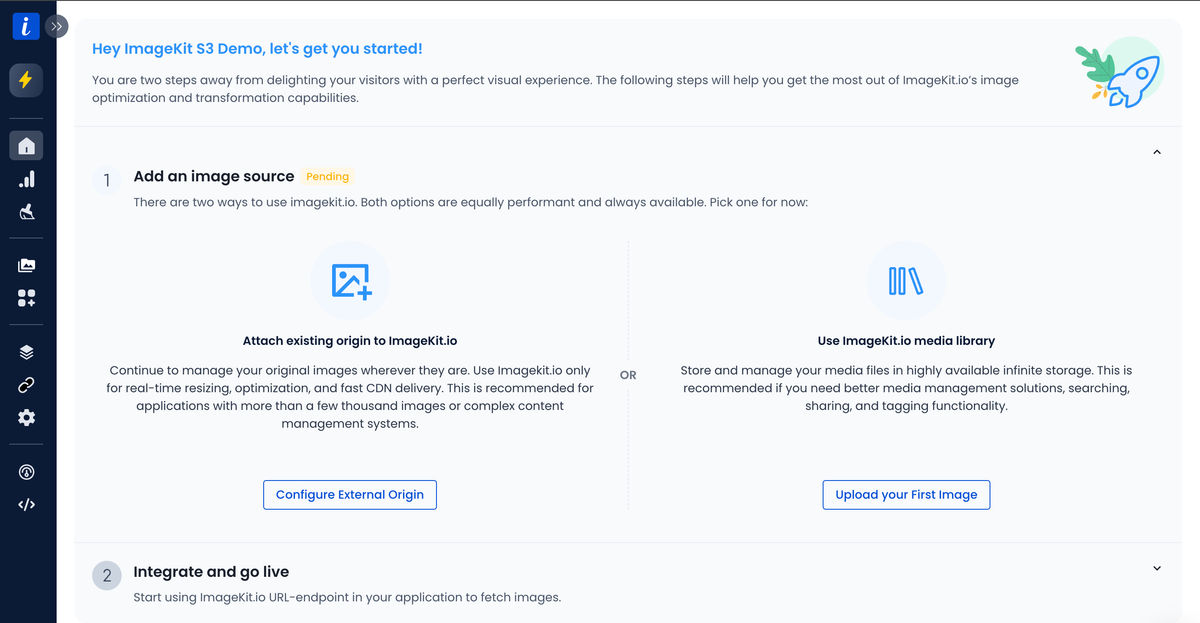
ImageKit has seven regions for processing the images. During account setup, please select a region that is the same as your S3 bucket or is close to it.
2. Creating a new user in AWS
ImageKit only needs a read-only or, more specifically, the GetObject access to your S3 bucket. It is recommended that you create a separate user in AWS for use in ImageKit.
You can create a new user by going to the AWS IAM console. For this demo, we have created a user called imagekit-s3-demo-integration with Programmatic access, i.e. access using keys, enabled.
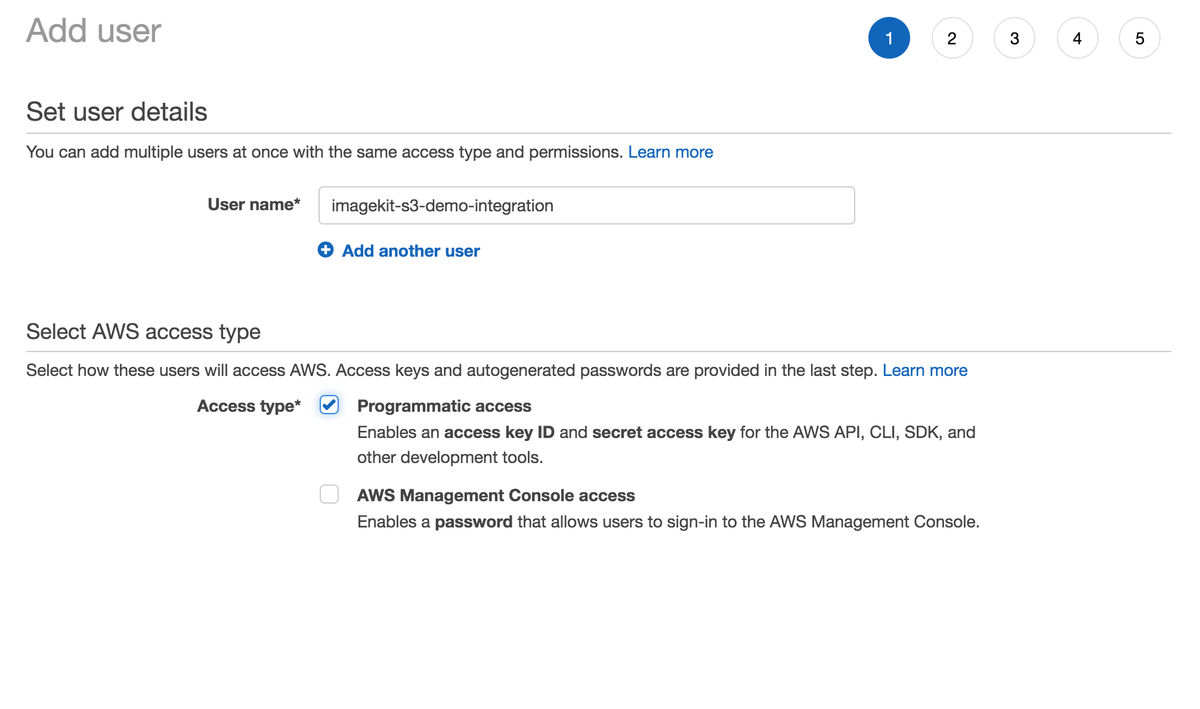
You just need to create a new user as of now. Don't worry about the access you grant to this user. We will be doing that in the next section.
Once the user is created, copy its access key and secret key as we will use it later to integrate with ImageKit.

3. Assigning access to the bucket
We have a bucket named imagekit-s3-demo-integration for this demo with a couple of images in it.

The above bucket is private, but the steps here will be the same, even for a public bucket. We need to provide GetObject access on this bucket to the newly created user.
a. To do this, click on the "Add Permissions" button for this user. Select "Attach existing policies directly" and then click on "Create Policy."


b. Select the JSON creator option for the policy and use the following JSON to create the policy that provides the GetObject access to our demo bucket. Note, that you need to change the bucket name to that of your bucket.
{
    "Version": "2012-10-17",
    "Statement": [
        {
            "Sid": "VisualEditor0",
            "Effect": "Allow",
            "Action": "s3:GetObject",
            "Resource": [
                "arn:aws:s3:::imagekit-s3-demo-integration",
                "arn:aws:s3:::imagekit-s3-demo-integration/*"
            ]
        }
    ]
}
Policy that provides GetObject Access to the bucket
We named our policy ImageKitS3DemoIntegration. Once you save the policy, it looks like this -

c. Attach this newly created policy to the user and confirm that the user in IAM panel has this policy attached.
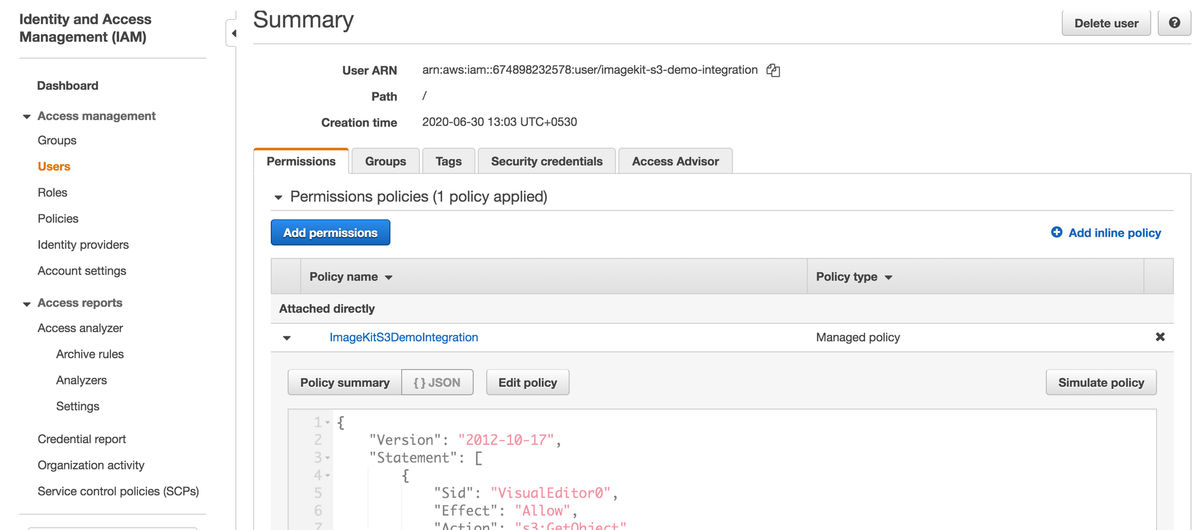
4. Adding access in ImageKit
We will now use the access and secret keys for the new user that we created in AWS to enable ImageKit to access the S3 bucket. The documentation for the same can also be found here - Documentation.
In ImageKit, go to the Origins section under External Storage and then click on the "Add New" button. Change the "Origin type" to "Amazon S3" and add the values in the corresponding fields.

Once we save this, if this is the first origin that you added in your ImageKit account, it will automatically get mapped against a URL endpoint. If this does not happen automatically, you can always go to the URL endpoints section and add this new S3 origin in the origin preference sequence.

Let's access the optimized image via ImageKit
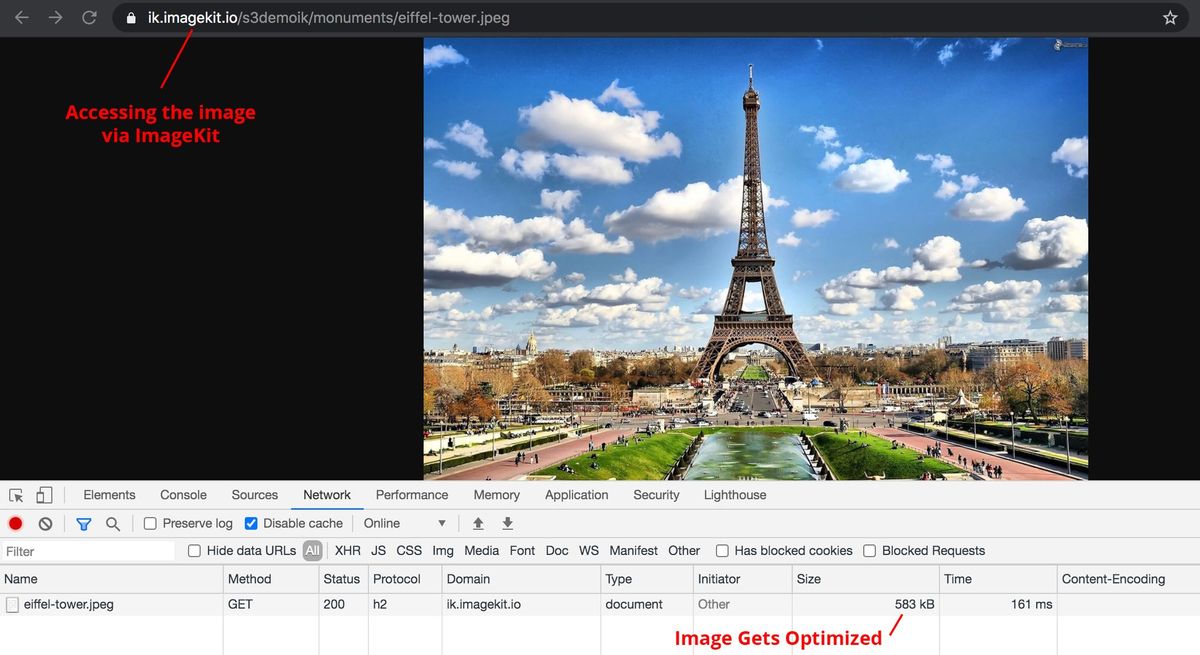
Our sample bucket has an image at the path monuments/eiffel-tower.jpeg. The image eiffel-tower.jpeg is 938kb initially in size.

As indicated under the URL Endpoint inside your ImageKit dashboard, to access this image using ImageKit, you need to append the URL endpoint from your ImageKit dashboard with the path of the image in the bucket.
https://ik.imagekit.io/s3demoik/monuments/eiffel-tower.jpegPath for accessing the AWS S3 image. URL Endpoint is
And voila!
Without adding any other parameter to the URL, the image is now down to 583KB in size and is also automatically converted to WebP image format in supported browsers.
Resizing and other transforms on AWS S3 images with ImageKit
Not just automatic optimization, you can also resize and transform the images in your S3 bucket in real-time. You just need to specify the right transformation in your image URL
Here is the above image resized to a width of 300px -
https://ik.imagekit.io/s3demoik/monuments/eiffel-tower.jpeg?tr=w-300
We can also specify both height and width to get a square thumbnail of this image.
https://ik.imagekit.io/s3demoik/monuments/eiffel-tower.jpeg?tr=w-300,h-300
There are many other transformations in ImageKit. All of them can be used with the images in the AWS S3 bucket. You can use the smart crop feature to center the image's subject in the output thumbnail automatically. Or you could use overlays to create dynamic banners, control how thee image aspect ratio and cropping are handled, and so on.
Here is a video demonstrating the use of some of these transformations on the image.
Real-time image optimization for AWS S3 without writing any code
And just like that, optimizing and resizing images in your AWS S3 bucket becomes really simple. Easy integration and you start delivering optimized images in minutes.
If you use some metrics like Google Lighthouse to monitor the images on your website, then you would be able to check off all the image-related points from that list using ImageKit with minimal effort.
Get started with ImageKit now!
ImageKit comes with a forever free account that gives you access to all the image optimization and transformation related features for use with your S3 bucket. And you get 20GB free delivery bandwidth every month.
Sign up now and start delivering perfectly optimized images on your websites and apps.