Delivering a seamless video streaming experience online is a non-negotiable for modern web applications. The key to this is Adaptive Bitrate Streaming (ABR), a technology that automatically adjusts video quality to match a user's network conditions.
In this guide, we'll demonstrate-
- An actual working VideoJS component for React using VideoJS 8+
- Code to use this Video.js player component to deliver YouTube-like Adaptive Bitrate Streaming videos with HLS protocol (m3u8 manifest file) on your websites and apps.
- Setting up HLS Quality selector to display quality options and the current stream quality being played by VideoJS.
- Setting up playback rates like 1x, 2x, etc. for the player.
We have a working repository of HLS Streaming with VideoJS here. All the code samples in this article are from the same repository.
So let's get started.
Understanding the core technologies
What is HLS?
HTTP Live Streaming (HLS) is the leading ABR protocol. It works by breaking a video into a series of small, short chunks. It then provides an index file, or a manifest file ( with .m3u8 extension), that lists playlists of renditions of varying bitrate and resolution such as 360p, 720p, 1080p, etc. via links. Each child playlist link then lists the different chunks of that specific rendition. The video player's job is to read this manifest and intelligently switch between different quality levels in real-time, downloading the corresponding video chunks to ensure smooth playback without buffering.
Why use Video.js?
Video.js is a popular, open-source HTML5 video player framework. It provides a consistent API across different browsers, allowing you to use a single player for various video formats.
For extended functionality, video.js uses plugins.
Since version 7, Video.js also bundles the videojs-http-streaming (VHS) plugin. This plugin handles HLS streaming on browsers like Chrome and Firefox, where it is not native, while gracefully falling back to native browser support on browsers like Safari. This fallback mechanism ensures broad compatibility with minimal effort on your part.
In this guide, we are using Video.js 8+, which automatically includes videojs-http-streaming (VHS).
Getting started with HLS streaming with Video.js
Step 1: Getting Your HLS Stream from ImageKit
Before you can play an HLS stream, you need one. Suppose you have an MP4 video, you will need to process it to convert it to an HLS stream with the manifest file in M3U8 format. Your original video will be encoded at different bitrates corresponding to 360p, 480p, or other desired resolutions, and the video at each bitrate will then be split into multiple smaller segments. All of these would be put into the M3U8 manifest file that will be supplied to the video player.
While there are several ways in which you can do this, including ffmpeg or other third-party tools, we will use ImageKit's video API for the adaptive streaming feature. It is free to use for a small amount of video processing every month and very easy to use with any video file in your own object storage, like S3, or if you upload files to the integrated Media Library. You can sign up for it here.
You can download the original video file used in this guide from here and upload it to your ImageKit Media Library, or whichever service you are using for HLS encoding.
Assuming your video is available via ImageKit at the following path (the ImageKit ID 'ikmedia' will change for your account)
https://ik.imagekit.io/ikmedia/example_video_train.mp4You can create the HLS manifest for this video in 360p, 480p, 720p, and 1080p resolutions by appending /ik-master.m3u8?tr=sr-360_480_720_1080 to the end of the URL.
The ik-master.m3u8 instructs ImageKit to create an HLS manifest (m3u8 extension), and the tr=sr- parameter indicates the different video resolutions that should be a part of this manifest.
So our final HLS manifest URL is
https://ik.imagekit.io/ikmedia/example_video_train.mp4/ik-master.m3u8?tr=sr-360_480_720_1080This single, transformed URL is all you need to play your adaptive stream.
Step 2: Setting Up the Video.js Player in React
For React applications, we need to encapsulate the Video.js player within a React component. It will allow you to manage the player's lifecycle and options using React hooks.
We'll use the following component from our repository: src/components/VideoJS.jsx. The code of the same is copied below as well.
This component handles the following things -
- The core logic of initializing and disposing of the Video.js player ensures it integrates cleanly with React's lifecycle.
- It accepts the
sourcesoption, which is where we will pass the HLS stream. - Other options, such as
autoplay,preload,muted,poster, and more, are configured to control player behavior and combined correctly usingbuildVideoOptions. In this guide, we won't discuss all the options, but only the ones relevant for HLS video streaming in the next section. - It initializes the HLS quality selector and playback speed selector to show or switch the current stream resolution and playback speed, respectively.
The code for this component is quite long. It handles React-specific cases well to become your go-to component for the future to load any HLS streaming videos.
'use client';
import { useEffect, useRef } from "react";
import videojs from "video.js";
import "video.js/dist/video-js.css";
// To provide quality control option in HLS Video
import 'videojs-hls-quality-selector/src/plugin'
/**
* React wrapper for Video.JS player with HLS streaming support
* This version creates the video element dynamically to avoid DOM issues
*/
export default function VideoJS({ options, onReady }) {
const containerRef = useRef(null);
const playerRef = useRef(null);
// Build video options
const buildVideoOptions = () => ({
controls: options?.controls ?? true,
autoplay: options?.autoplay ?? false,
preload: options?.preload ?? 'metadata',
height: options?.height ?? 400,
width: options?.width ?? '100%',
fluid: options?.fluid ?? true,
responsive: options?.responsive ?? true,
aspectRatio: options?.aspectRatio ?? '16:9',
muted: options?.muted ?? true,
playsinline: true,
poster: options?.poster,
sources: options?.sources,
html5: {
vhs: {
enableLowInitialPlaylist: true
}
},
playbackRates: options?.playbackRates || [0.5, 1, 1.25, 1.5, 2],
});
// Initialize player effect
useEffect(() => {
// Only initialize if we don't have a player and container exists
if (!playerRef.current && containerRef.current) {
const containerElement = containerRef.current;
// Create video element dynamically
const videoElement = document.createElement("video");
videoElement.classList.add('video-js');
videoElement.classList.add('vjs-big-play-centered');
// Append to container
containerElement.appendChild(videoElement);
try {
// Initialize Video.js player
const player = videojs(videoElement, buildVideoOptions(), () => {
// Initialize quality selector plugin
if (player.hlsQualitySelector) {
  player.hlsQualitySelector({
    displayCurrentQuality: true
  });
}
// Call onReady callback
if (onReady && typeof onReady === 'function') {
onReady(player);
}
});
// Store player reference
playerRef.current = player;
} catch (error) {
console.error('VideoJS: Failed to initialize player', error);
}
}
// Update existing player if options changed
else if (playerRef.current) {
const player = playerRef.current;
const newOptions = buildVideoOptions();
try {
// Update source if changed
const currentSrc = player.currentSrc();
const newSrc = newOptions.sources[0].src;
if (newSrc && newSrc !== currentSrc) {
player.src(newOptions.sources);
}
// Update other properties
player.muted(newOptions.muted);
player.autoplay(newOptions.autoplay);
player.poster(newOptions.poster);
} catch (error) {
console.error('VideoJS: Error updating player', error);
}
}
}, [options, onReady]);
// Cleanup effect
useEffect(() => {
return () => {
if (playerRef.current && !playerRef.current.isDisposed()) {
try {
playerRef.current.dispose();
} catch (error) {
console.error('VideoJS: Error during cleanup', error);
} finally {
playerRef.current = null;
}
}
};
}, []);
return (
<div
ref={containerRef}
className="video-container"
style={{
width: '100%',
maxWidth: options?.maxWidth || '100%',
backgroundColor: '#000',
minHeight: options?.height || 150
}}
data-testid="videojs-container"
/>
);
}Step 3: Integrating the Video.js component on a page
Now, let's use our VideoJS component on a page. In our example repository, we use it within src/pages/HlsVideoJsStreaming.jsx.
This is where we define the specific options to pass to our player, including the HLS manifest source URL we obtained from ImageKit. The Video.js component has correct default values set for all options; we only have to pass the options we want to modify.
Since we are only covering HLS streaming in this guide, we are passing only a small number of options; however, you have the flexibility to configure more, such as poster, aspect ratio, and others. Some of the more essential options being passed to the component are:
sourceshelps pass the M3U8 manifest file from ImageKit to the component. It is an array of objects with two properties - one is the HLS stream itself, and the other is the content type'application/x-mpegURL'which helps indicate to Video.js that the src is a HLS stream- The
controlsparameter ensures that the player will show the seekbar, play/pause, fullscreen buttons, and more. autoplayandmutedhelp automatically start the video playback on page load. Modern browsers only autoplay when muted. On iOS, an additionalplaysinline : truemight be needed to avoid full-screen takeovers. Whether or not to automatically start the video playback will depend on your business requirements.- The
responsiveandfluidoptions ensure the player scales correctly on different screen sizes. - The final JSX markup to render the Video.js component on the page
If you use some other service for your HLS stream processing, you just need to change the HLS_SRC URL that is provided to the Video.js component.

The entire page can be found here.
import React from 'react'
import VideoJS from '../components/VideoJS.jsx'
const HLS_SRC = 'https://ik.imagekit.io/ikmedia/example_video_train.mp4/ik-master.m3u8?tr=sr-360_480_720_1080'
export default function HlsVideoJsStreaming() {
const videoJsOptions = {
controls: true,
autoplay: true,
muted: true,
preload: 'auto',
responsive: true,
fluid: true,
sources: [{
src: HLS_SRC,
type: 'application/x-mpegURL'
}]
}
return (
<main style={{ maxWidth: 960, width: '100%', margin: '2rem auto' }}>
<h1 style={{fontSize: '1.25rem', marginBottom: '1rem'}}>HLS Streaming with Video.js and ImageKit for HLS ABR transformation</h1>
<VideoJS options={videoJsOptions} />
</main>
)
}
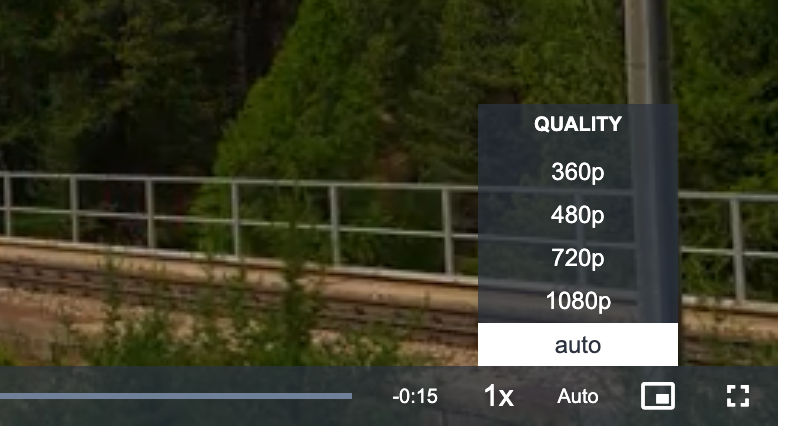
Showing quality levels using HLS Quality Selector
You are likely familiar with the YouTube interface, which displays the video stream in the bottom right corner of the player.
By default, Video.js does not show the quality of the stream that is currently playing. To get that functionality, we use the videojs-hls-quality-selector plugin. Version 1.2+ of this plugin is compatible with Video.js 8+. You can see that this plugin is imported in the beginning of the Video.js React component and is then initialized in the same component. The code for initialization has been repeated below, but it is already present in the main Video.js component.
if (player.hlsQualitySelector) {
player.hlsQualitySelector({
displayCurrentQuality: true
});
}Upon adding this plugin, we start seeing the different stream options available to the player, the one currently playing, and allow the user to switch between streams manually if needed.
💡
Note on Safari: Since Safari natively supports HLS streaming, it doesn't use the plugin videojs-http-streaming (VHS) for the same. Therefore, the plugin for HLS quality selector, which relies on videojs-http-streaming and the quality levels exposed by VHS, doesn't display any quality levels on Safari.
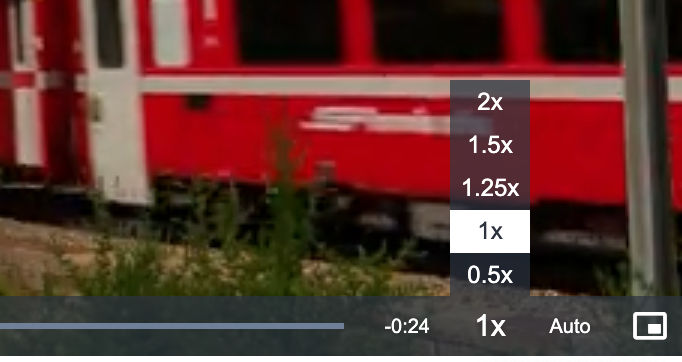
Setting up the Playback Rate in the player
Streaming platforms such as YouTube allow videos to be sped up or slowed down. We can implement a similar functionality with Video.js using the playbackRates option.
//From the main Video.js component
playbackRates: options?.playbackRates || [0.5, 1, 1.25, 1.5, 2],
In our code above, this can be passed either as an option to the component or the defaults of 0.5x, 1x, 1.25x, 1.5x, 2x, get rendered using the default values used in our component.
Testing if Adaptive Streaming is working or not with Video.js?
Now is the time to test of the streaming works as expected or not.
Open the Network tab of Chrome Dev Tools, and use Network Throttling to throttle the network to 'Slow 4G'. The player should automatically start loading a lower bitrate variant like 480p or 360p. When the throttling is removed, the player should return to a more suitable variant.

The above results are a clear indication that our Video.js player with the HLS manifest is correctly adapting to the user's network and device.
Final Thoughts
A functional player we have achieved above is a great start. Adaptive bitrate streaming automatically monitors the user's network to make the best decision for a smooth experience. However, there is more to improving streaming performance, especially when a video begins to stream.
We can further optimize video start time and streaming performance by making a few key configurations, such as controlling the resolution used at the beginning of the video, adjusting the amount of video to buffer, deciding whether to preload video metadata, enabling lazy loading, loading only the video poster and waiting for user interaction to start the video, and more. The right combination of these options can significantly reduce initial video load time, especially for users on slower connections.
You can read more about these settings from the Video.js HTTP Streaming documentation or from the video optimization guide. You can also learn more about ImageKit's Video API here.