In today's digital age, the speed at which a website loads is crucial. A slow-loading website can lead to higher bounce rates, lower user engagement, and can negatively impact your site’s SEO rankings. One of the main culprits of slow loading times is the use of large, unoptimized images.
JPEG (Joint Photographic Experts Group), one of the most popular image formats, is widely used due to its effective compression, which results in faster download times. However, even within JPEGs, there are two types of compression formats:
- Baseline or Standard JPEG (also known as Non-Progressive JPEG)
- Progressive JPEG (PJPEG).
In the Baseline format, the image loads from top to bottom and from left to right, processing the data as it downloads from the network. This can lead to a delay in the complete rendering of the image, especially for users with slower internet connections.
On the other hand, Progressive JPEGs initially appear blurry or pixelated, becoming sharper as more bytes are downloaded from the server. This means that users get a full, albeit lower quality, view of the image almost immediately, which then progressively improves in quality. This behavior makes PJPEGs an effective solution to the problem of slow-loading heavy file-size images, enhancing the user experience on your website.
Could the key to a seamless user experience lie in Progressive JPEGs? Let’s find out more about this technology, how they differ from the regular JPEGs you know and love, and how ImageKit can help you convert all your source images to Progressive JPEG without any encoding on your part.
Progressive JPEG and Baseline JPEG: How are They Different?
Image compression using the JPEG algorithm, also known as Baseline JPEG, is a widely supported technique used by various devices and software. It performs lossy compression on image data – dividing the image into non-overlapping 8x8 blocks, then using chroma subsampling, followed by DCT (Discrete Cosine Transform) quantization – to reduce the number of bits in storage needed to represent it (with an acceptable loss in accuracy), thus making the image faster to download and easier to share.
Progressive JPEG, while using fundamentally the same compression technique as Baseline JPEG, differs in the DCT quantization stage. Instead of one pass, it performs quantization in multiple passes or “scans” (usually 10) using two possible techniques: Spectral Selection and Successive Approximation.
Spectral Selection is a method where an image’s frequency information is organized into successive “bands”, with each such frequency band representing a different level of detail – with lower-frequency bands being sent first.
During the encoding process, instead of going through an image and encoding every block in its entirety, you encode each block’s coefficients selectively – all the DC coefficients (average color information) on the first scan, some low-frequency AC coefficients on the next few scans, and finally the high-frequency AC coefficients.
This takes advantage of the fact that the human eye perceives low-frequency (transitions and average color) more than high-frequency (texture and fine detail).
Successive Approximation, on the other hand, is a method where data is first sent with lower precision and then refined. Initially, a coarse (i.e., lower precision) quantization is applied, resulting in a lower-quality representation.
Successive approximation then refines the quantization, allowing for finer details and better image quality in subsequent scans. Each iteration refines the approximation, enhancing the visual quality until the final image is formed.
💡
Both spectral selection and successive approximation require that the encoder and decoder traverse the image multiple times. Each iteration is called a scan. Typically, encoding a progressive JPEG takes about 10 scans, which is why, during decoding, an image transitions from being blurry to being sharp after about 10 refinement steps.
Upon decompression/render, whichever method is used, Progressive JPEGs load the lower-quality passes first, displaying a quick, albeit low-quality image. Subsequent passes load more detail, enhancing the image quality over time. This means that a full (though initially blurry) image is visible right away and becomes sharper as more data is downloaded.
In summary, while both Baseline and Progressive JPEGs use similar compression techniques, the key difference lies in their rendering process and the multi-pass approach to compression used by Progressive JPEGs.
Here is an illustration that demonstrates how Baseline and Progressive JPEG images are processed on the web:

Here’s a comparison table that outlines the differences between Baseline JPEG and Progressive JPEG based on various metrics:
Baseline Vs. Progressive JPEG Compared
| Baseline JPEG | Progressive JPEG | |
|---|---|---|
| Bandwidth Usage | The bandwidth usage of a baseline JPEG aligns with its file size since the entire image needs to be loaded at once. | Progressive JPEG uses less network bandwidth on initial load, so viewers get to see something on screen right away, even if it is low detail/blurry. This tangibly contributes to faster first contentful paint (FCP). |
| Encoding and Decoding | Line-by-line encoding and decoding, top to bottom; Encoding time is faster due to a single-pass approach. | Multiple passes, starts from low quality and progressively improves; Encoding time is slower due to multiple passes. |
| Resource Usage | Requires less CPU and memory resources due to one-pass, and no buffer required. | Requires more CPU and memory resources (a buffer is used to store the image data temporarily as each scan progressively refines the image quality) and time due to the multi-pass approach. This is a trade-off between time/resources and user experience. |
| Load Time and User Experience | Slower initial load time, displays top to bottom; may leave blank space while loading | Faster perceived load time, displays full image preview while progressively rendering. However, note that for full quality, Progressive JPEGs may take longer than Baseline JPEGs to decode fully because of how it works. |
| Compatibility and Support | Widely supported on all devices, browsers, and image editing software. It's the default JPEG format and can be displayed by virtually any device that can handle images. | Generally well-supported by modern web browsers and image software. But some older browsers or devices might not display progressive JPEGs optimally – or may render them as if they were standard JPEGs, displaying the image only after the entire file has been downloaded. |
Why should your website use Progressive JPEG?
Progressive JPEGs are a good option for the web because of how they are rendered in the browser. Depending on your role as a developer, content creator, or eCommerce business owner, you might notice some of these benefits more clearly than others.
Here are some things to consider:
- Perceived Faster Page Loading: Progressive JPEGs can make a webpage feel faster. They load in layers, providing a full-image preview quickly, even if it's in lower quality initially. This can be particularly beneficial on slower connections where the top-to-bottom loading of Baseline JPEGs might feel sluggish as parts of the image are rendered sequentially.
- Enhanced User Experience: By avoiding blank spaces during loading, Progressive JPEGs can make your website appear more responsive and engaging. Users are not left waiting for a blank image to load, which can help keep their attention and reduce bounce rates on slower connections.
- SEO Benefits: Faster perceived load times and better user engagement can indirectly benefit SEO. Search engines like Google use page loading speed and user engagement as ranking signals. By potentially reducing bounce rates and increasing dwell time, Progressive JPEGs can contribute positively to a site's SEO performance.
- Broader Compatibility and Future-Proofing: Although Baseline JPEGs are universally supported, Progressive JPEGs are compatible with most modern browsers and devices. By adopting Progressive JPEGs, you are future-proofing your website as technology trends move towards faster and more efficient web experiences.
While Progressive JPEGs offer numerous benefits, there are a few considerations to keep in mind:
- Resource Usage: Progressive JPEGs require more computational resources and time to encode compared to Baseline JPEGs. This is due to the multiple passes required for their progressive rendering process.
- Image Size: For smaller images that would load quickly anyway, the benefits of Progressive JPEGs might not be as noticeable. Therefore, it’s not always beneficial to apply Progressive JPEGs to all your assets blindly.
- Initial Scans: The initial scans of a Progressive JPEG might appear glitchy due to the coarse-grained Discrete Cosine Transform (DCT) quantization on the first few passes. This is a quirk of the format and something to be aware of when deciding to use Progressive JPEGs.
If you’re considering converting your images to Progressive JPEGs, here’s the easiest way to do it.
How to Convert JPEGs to Progressive JPEGs?
ImageKit is by far the easiest option to convert and deliver PJPEGs from your existing assets, all without any encoding infrastructure on your part.
Imagekit is a complete media management, optimization, and delivery solution for websites and apps. It provides intelligent real-time image format conversion, optimization, resizing, cropping, and fast CDN delivery. With Imagekit, you can organize your assets better and find them faster with your own taxonomy.
Here’s how you can convert a JPEG into a PJPEG using ImageKit’s easy-to-use REST-based API.
Step 1: Create an ImageKit Account
Before you can start converting images, you’ll need to create an account with ImageKit. ImageKit offers a free tier that includes 20GB of bandwidth, 20GB of media storage, and access to a complete set of image, video, and media management features. This makes it an excellent starting point for developers, content creators, or eCommerce business owners looking to enhance their website’s performance and user experience.
Step 2: Upload Your Image
Once you’ve created your account, you can start uploading images. To do this, navigate to the “Media Library” tab on your dashboard. Here, you’ll find the “File Upload” button which allows you to select and upload images from your device.

ImageKit also allows bulk uploads. This means you can select multiple images at once, saving you time if you have a large number of images. Once uploaded, ImageKit makes it easy for you to locate and manage your assets from the media library.

Step 3: Convert Your Image
After uploading your image to ImageKit, you can convert it into a PJPEG using a URL-based transformation parameter. URL-based transformations are a powerful ImageKit feature that allows you to manipulate images in real-time using URL parameters. This means you can resize, crop, and even change the format of an image just by modifying the URL, all without affecting your source image.
Simply add the pr-true parameter to your image’s public URL to request a progressively encoded JPEG.
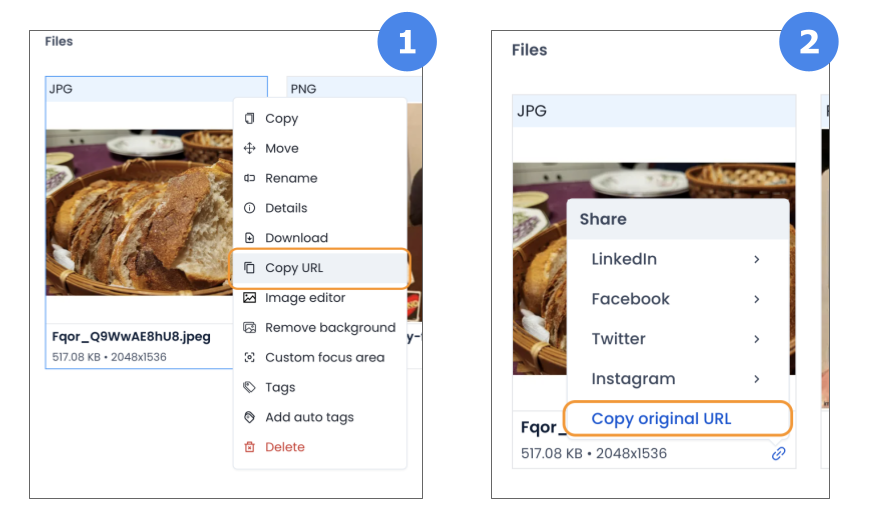
To get the image URL, navigate to the 'Media Library' tab on your ImageKit dashboard. Find the image you want to use and copy the URL using either of the following steps:
- Right-click on the image to show the available menu options, then click on the 'Copy URL' menu option.
- Hover over the bottom of the image you want to use, move your mouse over the link icon that appears at the bottom right of the image, and click on 'Copy original URL'.
Here’s an example of what your URL should look like to serve images in PJPEG format using ImageKit:
https://ik.imagekit.io/your_imagekit_id/tr:w-300,f-jpg,pr-true/your-image.jpgLet’s break down the parts:
https://ik.imagekit.io/your_imagekit_id/is your URL endpoint. Replaceyour_imagekit_idwith your own.tr:w-300,f-jpg,pr-trueis the transformation parameter. This particular one instructs ImageKit to first resize the image to a width of 300 pixels (w-300) and then output it as a progressive JPEG (pr-true).your-image.jpgis the actual image path.
These are path parameters, but you could also specify transformations as query parameters instead. In this case, your URL will look like this:
https://ik.imagekit.io/your_imagekit_id/your-image.jpg?tr:w-300,f-jpg,pr-true
That’s it! Using ImageKit, you’ve successfully converted your JPEG into a PJPEG, and you don’t have to encode it yourself or invest in any image editing software.
For more detailed information and advanced options, please refer to the ImageKit technical documentation.
Conclusion
In this article, we’ve explored how Progressive JPEGs can enhance your website’s user experience, boost page loading speed, and improve overall SEO. We have also seen that serving Progressive JPEGs to your visitors doesn’t have to be a daunting task if you use ImageKit. Not only does ImageKit convert your baseline JPEGs to Progressive JPEGs on the fly without affecting your source image (which can even be in another format), but it also streamlines the process of transforming and optimizing your images, as, when, and how you need it.
Coupled with the increasing demand for fast and efficient web experiences, we can anticipate a promising future for Progressive JPEGs. However, while Progressive JPEGs have their advantages, it’s also important to consider the emergence of newer image formats like WEBP and AVIF. These formats are designed to offer significant improvements over traditional formats like JPEG, using advanced compression techniques to provide smaller file sizes for the same image quality.
ImageKit supports all of these, keeping your options open and helping you adopt the format that best suits your needs.
Sign up for a free Imagekit account to try out these features yourself!