





The HTML5 specification, officially recommended by the W3C in 2014, provided native support for video content on the web. It introduced and standardized the <video> element, enabling native embedding, playback, and manipulation of video content in the browser.
Before HTML5, third-party plugins like Adobe Flash and Microsoft Silverlight (or, less commonly, QuickTime/Windows Media Player) were needed for web video. This had numerous problems – external plugin dependencies, compatibility issues across browsers, complex web development because of fragmentation – and crashes and slowdowns were common.
HTML5 video revolutionized multimedia delivery and the overall user experience across devices and platforms for consumers and developers alike. This article will explore the HTML5 video API, looking at its features and benefits.
Let's dive in!
How does the HTML5 video API work?
The HTML5 video API provides a set of methods and properties that allow developers to control and manipulate video elements in web pages. Here's a general overview:
1. Introducing the element
HTML5 provides a <video> tag to embed video in web pages, much like the familiar <img> element was for embedding images.
This element serves as a container for video, providing a browser native video player – without needing JavaScript – letting you specify a path for the video file you want to embed, define its attributes, and customize playback behavior. Also, like any other HTML tag, you can customize its appearance and behavior with CSS.
To create and set up a simple <video> element, use it in your HTML markup like so:
<video src="path/to/your-video.mp4">
Your browser does not support the video tag.
</video>
Within the opening and closing <video> tags, you can include a fallback message that is shown if the user’s browser does not support the <video> element.
You can customize the <video> element’s appearance and behavior using various attributes. Some commonly used attributes include:
width and height: These attributes define the video player’s dimensions on the web page. It’s always a good idea to explicitly specify the width and height for<video>elements to avoid layout flickering (cumulative layout shift) when the video is loaded in.autoplay: Indicates whether the video should start playing automatically when the page loads. However, note that some browsers limit autoplay functionality to prevent unwanted playback.controls: Displays the default set of video controls (play/pause, volume, seek bar, etc.). This allows users to interact with and control video playback.loop: Specifies that the video should start again from the beginning once it reaches the end. This is useful for creating looping background videos or continuous playback scenarios.poster: Defines an image that is displayed before the video is loaded or when the video is paused. This is how you add thumbnails for your videos.preload: Specifies whether the video should be preloaded completely when the page loads. The possible values are "auto" (default), "metadata", and "none". Battery saving modes on some devices will default this to ‘none’ to use as few resources as possible.muted: When the muted attribute is present, the video is muted by default. This is often used in conjunction with autoplay, for when the video is actually intended to play without sound, such as those in the background or in decorative elements like a banner.
Putting it all together, let’s demonstrate the creation of an <video> element that incorporates these attributes:
<video src="your-video.mp4"
    width="640"
    height="360"
    autoplay
    controls
    loop
    poster="path/to/your-thumbnail.jpg"
    preload="auto"
>
    Your browser does not support the video tag.
</video>
In the above example:
- We’re creating a
<video>element that has a width of 640 pixels and a height of 360 pixels. - The
autoplayattribute enables the video to start playing automatically. - The
controlsattribute adds default video controls (play, pause, stop, volume buttons, and the seek bar), while theloop, andmutedattributes control the playback behavior (making the video loop back to the beginning once it reaches the end, and making sure it starts muted by default). - The
posterattribute specifies the URL to an image (your-thumbnail.jpg) to display before the video loads, or when it is paused. - The
preloadattribute is set to "auto", indicating that the video should be preloaded when the page loads. - The
<source>tags provide multiple video sources in different formats for browser compatibility, and if none of them are available or supported, it’ll show the “Your browser does not support the<video>tag” text.
Now that we know the basics of using the <video> element, let’s explore some advanced concepts.
2. Controlling video playback programmatically
Let’s talk about the key methods available to developers via the HTMLVideoElement interface, for controlling video playback using JavaScript.
play()
HTMLMediaElement.play() Starts the playback of the video, returning a Promise that is resolved when playback has successfully started, rejecting it otherwise. It initiates video playback from the current play head position, or from the beginning by default. Does nothing if the video is already playing.
const video = document.querySelector('video');
video.play();
pause()
The HTMLMediaElement.pause() method halts the video playback at the current position. Does nothing if the video is already paused.
const video = document.querySelector('video');
video.pause();
load()
The HTMLMediaElement.load() method is used to reinitialize the video element and reload the video source(s), whether using src or <source> tags. It can be handy when you want to dynamically change the list of video sources, and start playback again. Note that since this triggers a rescan and re-fetch, the <video> element's preload attribute will determine how much data is actually fetched again.
const video = document.querySelector('video');
video.src = 'new-video.mp4';
video.load();
video.play();
canPlayType(type)
The HTMLMediaElement.canPlayType(type) method checks if the browser supports a specific video format. It takes a video MIME type and returns 3 possible values – “probably,” “maybe,” or an empty string. This is helpful for providing alternative content for unsupported video formats. Here’s an example of using canPlayType() to check for MP4 support:
const video = document.createElement('video');
if (video.canPlayType('video/mp4') === 'probably') {
    // MP4 format is supported
    // Add video source and start playback
  } else {
    // MP4 format is not supported
    // Provide alternative content or formats
}
currentTime
The HTMLMediaElement.currentTime property returns the current playback time, in seconds. If you set it to a new value, it’ll seek the video to the new timestamp automatically. Very useful for providing ‘chapters’ or timestamps for relevant content that your viewers can quickly jump to.
const video = document.querySelector('video');
video.currentTime = 30;
addTextTrack()
The addTextTrack() method, part of the TextTrack interface, adds a text track to the video dynamically. Text tracks are used for subtitles, captions, or other textual content related to the video. You can specify the language, kind (e.g., subtitles, captions), and label for the text track. Here’s an example of adding a subtitles track to a video:
const video = document.querySelector('video');
const track = video.addTextTrack('subtitles', 'English', 'en');
track.src = 'subtitles.vtt';
These are a few examples of methods in the HTML5 Video API for programmatically controlling video playback, enabling developers to create custom controls, implement advanced features, and enhance the user experience with web video content.
3. Adding custom controls
The browser's native video player offers basic functionality (play, pause, seek, volume controls), but sometimes you require more customization, and/or additional features.
Fortunately, the HTML5 API lets you design custom controls as a solution. By creating your own video player with the <video> tag, and custom controls with standard HTML elements like buttons and inputs, styling them with CSS, and bringing it all together with JavaScript, you can tailor the video player’s behavior according to your needs.
Let’s see how you could build your own HTML5 video player this way. Our end result will be something like this…
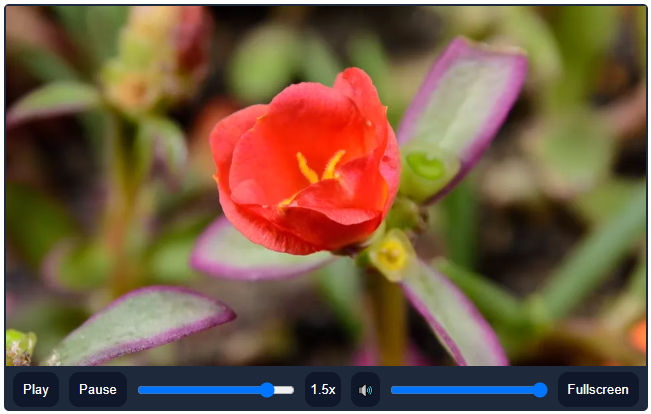
…and you can see it in action on this Codepen here.
Step 1: Hiding Default Controls
Before we do anything at all, hide the default controls by setting the “controls” attribute of the <video> element to “false” or omitting it. This grants you complete control over the video player’s appearance and behavior.
<video id="my-video" src="video.mp4" controls="false"></video>Step 2: Adding your own Controls
Next, we’ll add custom buttons, triggers, and elements to control video playback. We’ll include the basics – play/pause, a seek bar, a volume bar, and mute/unmute – and add custom controls for adjusting playback speed, and toggling fullscreen (using the Fullscreen API).
Our HTML is pretty simple, we just use buttons for all controls, and the range input slider for our seek bar and volume bar.
<div class="video-container">
  <!-- video -->
  <div id="video">
    <video width="640" height="360" id="my-video" src="https://interactive-examples.mdn.mozilla.net/media/cc0-videos/flower.webm"></video>
  </div>
  <!-- video controls -->
  <div id="video-controls">
    <button id="play-btn">Play</button>
    <button id="pause-btn">Pause</button>
    <input type="range" id="seek-bar" value="0">
    <button id="speed-btn">1x</button>
    <button id="mute-btn">🔊</button>
    <input type="range" id="volume-bar" min="0" max="1" step="0.1" value="1">
    <button type="button" id="full-screen-btn">Fullscreen</button>
  </div>

  <script src="script.js"></script>
</div>
In the above example, we have added:
- Play, pause, playback speed, and mute buttons - all self-explanatory.
- Two inputs, of the range type, for our seek bar and volume bar respectively, and we’ve set their initial values to 0.
Next, we will associate event listeners with these buttons to implement their functionality.
Step 3: Adding JavaScript to Custom Controls
Here’s the functionality we’ll need for our custom video player:
- Basic play/pause functionality,
- A Seek bar that auto-updates its position with video playback, and one the user can manipulate and drag around to jump back and forth in the video
- A basic mute button that sets the volume to zero, as well as a volume slider that the user can manipulate to adjust the volume
- A button to adjust video playback speed (let’s stick with three steps – 1x, 1.5x, and 2x)
- A fullscreen button.
const video = document.getElementById('my-video');
const playBtn = document.getElementById('play-btn');
const pauseBtn = document.getElementById('pause-btn');
const seekBar = document.getElementById('seek-bar');
const volumeBar = document.getElementById('volume-bar');
const muteBtn = document.getElementById('mute-btn');
const speedBtn = document.getElementById('speed-btn');
const fullscreenButton = document.getElementById('full-screen-btn');

// Play/Pause Functionality
playBtn.addEventListener('click', () => {
  video.play();
});

pauseBtn.addEventListener('click', () => {
  video.pause();
});

// Seek functionality
seekBar.addEventListener('input', () => {
  const seekTime = (video.duration / 100) * seekBar.value;
  video.currentTime = seekTime;
});

// Update seek bar as video plays
video.addEventListener('timeupdate', () => {
  const currentTime = video.currentTime;
  const duration = video.duration;
  const progress = (currentTime / duration) * 100;
  seekBar.value = progress;
});

// Volume functionality
volumeBar.addEventListener('input', () => {
  video.volume = volumeBar.value;
});

// Mute functionality
muteBtn.addEventListener('click', () => {
  if (video.volume === 0) {
    // Unmute
    video.volume = 1;
    muteBtn.textContent = 'Mute';
  } else {
    // Mute
    video.volume = 0;
    muteBtn.textContent = 'Unmute';
  }
});

// Playback speed functionality
speedBtn.addEventListener('click', () => {
  const currentSpeed = video.playbackRate;
  if (currentSpeed === 1) {
    // Set playback speed to 1.5x
    video.playbackRate = 1.5;
    speedBtn.textContent = 'Speed: 1.5x';
  } else if (currentSpeed === 1.5) {
    // Set playback speed to 2x
    video.playbackRate = 2;
    speedBtn.textContent = 'Speed: 2x';
  } else {
    // Set playback speed to 1x (default)
    video.playbackRate = 1;
    speedBtn.textContent = 'Speed: 1x';
  }
});

// Fullscreen functionality
fullscreenButton.addEventListener('click', () => {
  if (video.requestFullscreen) {
    video.requestFullscreen();
  } else if (video.mozRequestFullScreen) {
    video.mozRequestFullScreen();
  } else if (video.webkitRequestFullscreen) {
    video.webkitRequestFullscreen();
  } else if (video.msRequestFullscreen) {
    video.msRequestFullscreen();
  }
});
In the code above we’re adding event listeners to each of our video control element:
- The Play and Pause buttons trigger the
HTMLMediaElement.play()andHTMLMediaElement.pause()methods respectively, and are self-explanatory. - The Seek bar input sets the HTMLMediaElement.currentTime property to a new value that is a percentage of the video’s length, based on the input range’s value.
- At the same time, the Seek bar’s position (value) is updated in the UI for each second of video playback.
- The Mute button sets the HTMLMediaElement.volume property to 0, while the input range slider for the Volume sets it to a percentage-based value.
- The Speed button toggles between 1x, 1.5x, and 2x speeds, setting the HTMLMediaElement.playbackRate property accordingly. The normal playback rate is multiplied by this value to obtain the current rate, so a value of 1.0 indicates normal speed.
- The Fullscreen button calls the Fullscreen API’s requestFullScreen method to trigger fullscreen mode for the video, but only if the user’s device permits it to.
Step 4: Adding CSS to our custom video player
Finally, while this is optional, here’s the CSS we’re using for our customized HTML5 video player.
.video-container {
  width: 640px;
  margin: 0 auto;
  padding: 2px;
  text-align: center;
  background-color: #1e293b;
  border-radius: 5px;
}

#video-controls {
  display: flex;
  justify-content: center;
  align-items: center;
  padding: 2px;
  background-color: #1e293b;
}

#video-controls button,
#video-controls input[type="range"] {
  margin: 0 5px;
  border-radius: 10px;
}

button {
  padding: 10px;
  border: none;
  background-color: #0f172a;
  color: #ffffff;
  cursor: pointer;
}
button[id="mute-btn"] {
  height: 35px;
  width: 35px;
  padding: 2px;
}
button[id="speed-btn"] {
  height: 35px;
  width: 45px;
  padding: 2px;
}
button:hover {
  background-color: #020617;
}

input[type="range"] {
  width: 200px;
}
Supporting multiple video formats
An HTML video player is a versatile tool that enables the playback of video content directly within a web page. It provides a standardized way to embed and control videos, enhancing the user experience and enabling seamless multimedia playback.
But there are numerous video file formats available (MP4, WEBM, and OGG being the most common), each with its own advantages and limitations.To ensure that a video can be played on all browsers, it is necessary to support multiple video formats as fallback options.
That’s where the <source> tag comes into play.
Incorporating the Nested Tag
We’ve looked at how the simplest implementation for the <video> element is something like this:
<video src="your-video.mp4"
>
    Your browser does not support the video tag.
</video>
To provide multiple variants of the same video – in different formats – the HTML5 spec lets you use one or more <source> elements within the <video> tags, to specify different file formats for the same video, and including these fallback options ensures compatibility across browsers and platforms.
Here’s what that same <video> element will look like, with nested <source> tags.
<video>
  <source src="path/to/your-video.mp4" type="video/mp4">
  <source src="path/to/your-video.webm" type="video/webm">
  <source src="path/to/your-video.ogv" type="video/ogg">
  Your browser does not support the video tag.
</video>
For each of these tags, the src attribute indicates the path to the video file, and the type attribute specifies the MIME type of the video format.
In the above example, we have specified three different video sources with their respective formats: MP4, WebM, and OGG. The browser will automatically select the appropriate source based on its compatibility with the user’s device and browser.
Best Practices for Choosing Video Formats and Codecs
So you now know that you should provide multiple variants of the same video, in different formats to ensure broadest compatibility. But how do you know you’re using the right ones?
When choosing video formats and codecs, consider the following best practices to optimize your video – striking a balance between size and quality, and ensure smooth playback:
- Use video formats that offer good compression efficiency while maintaining acceptable video quality.
- Compress videos using appropriate codecs to reduce file size without significant loss of visual fidelity.
- Consider the target audience and their commonly used browsers to prioritize video formats that are widely supported.
- Test video playback across different devices and browsers to ensure compatibility and smooth performance.
- Provide multiple video sources in different formats to accommodate varying browser capabilities.
- Optimize videos for streaming by encoding them with a suitable keyframe interval and bitrate for smooth delivery over the internet.
As a general guideline, these 3 format/codec combinations have near-universal compatibility and should be safe bets.
MP4 (H.264): The MP4 format with the H.264 video codec is widely supported across browsers and devices, making it an ideal choice for maximum compatibility. It provides efficient video compression and delivers good video quality.
WebM (VP9): WebM format with the VP9 video codec is an open-source alternative that offers high-quality video compression and is supported by modern web browsers, including Chrome and Firefox.
Ogg (Theora): The Ogg format with the Theora video codec is another option, though its browser support is more limited compared to MP4 and WebM. It is commonly used as a fallback for older browsers and is worth it in some edge cases. For example, Firefox on Android supports OGG with Theora natively with hardware acceleration, but it has no hardware acceleration for MP4 with H.264, leading to unexpectedly worse performance with the latter.
Working with captions and subtitles
Captions and subtitles are crucial for accessibility, comprehension, and expanding audience reach. Captions provide a text representation of audio content, allowing viewers to read along if they have auditory disabilities or are just in an environment where they can’t watch unless they mute the video (the library, for example). Subtitles can even offer translations or transcriptions in various languages.
In HTML5, the <track> element is used as a catch-all to add captions and subtitles to videos. Let’s explore how to add captions and subtitles using the <track> element with code snippets.
Step 1: Creating Caption/Subtitle Files
To add captions or subtitles, create separate caption files in supported formats like WebVTT (.vtt) or SubRip (.srt). These files contain text and timing information for captions/subtitles. Before uploading your video or the subtitle, test locally to make sure the caption files include the timing information and the text content for each caption or subtitle and are accurately synchronized with the video.
For our example, a stock video file provided by the Mozilla Foundation, we’ll create this very basic subtitle file, and save it as captions.vtt
WEBVTT

00:00:02.000 --> 00:00:05.000 line:80%
[Wind rustling]
Step 2: Adding the <track> Element:
Within the <video> element, you can include one or more <track> elements to specify the caption or subtitle sources. The <track> element has attributes like src to specify the file source, kind to indicate the type of text track (e.g., captions, subtitles), and srclang to specify the language of the track.
<video controls>
  <source src="video.mp4" type="video/mp4">
  <track src="captions.vtt" kind="captions" srclang="en" label="English">
</video>
In the above code snippet, we have a <video> element with a source file (video.mp4) specified using the <source> element. The <track> element is used to add the caption or subtitle track. The src attribute specifies the file path of the caption or subtitle file (captions.vtt), the kind attribute specifies the kind of track (in this case, captions), the srclang attribute specifies the language of the captions, and the label attribute simply provides a human-readable label for the track.
What if video and subtitle files are on different domains?
Make sure both your video and subtitle files are on the same domain. Otherwise, you’ll need to:
- Enable CORS on the server serving the subtitles,
- Add CORS headers to your video files themselves,
- Add the crossorigin attribute to the video element.
<video controls crossorigin="anonymous">
  <source src="domain//path/to/video.mp4" type="video/mp4">
  <track src="some-other-domain//path/to/captions.vtt" kind="captions" srclang="en" label="English">
</video>
Step 3: Enabling Captions/Subtitles:
By default, captions/subtitles may not be displayed. Users can enable them through the video player’s controls. However, you can programmatically enable captions/subtitles by adding the default attribute to the <track> element.
<video controls>
  <source src="video.mp4" type="video/mp4">
  <track src="captions.vtt" kind="captions" srclang="en" label="English"   default>
</video>
What’s changed? We’ve added the default attribute in the <track> element. This will make the captions/subtitles appear by default when the video starts playing.
Step 4: Styling Captions/Subtitles:
To style the appearance of captions/subtitles, you can use CSS. The visual design can be customized by targeting the <track> element and its related CSS selectors.
<style>
  video::cue {
    background-color: rgba(0, 0, 0, 0.8);
    color: #fff;
    font-size: 16px;
    padding: 4px;
  }
</style>
In the above CSS snippet, video::cue targets the caption/subtitle elements and applies the styling. Adjust the CSS properties to achieve the desired visual appearance.
That’s it! Again, make sure that your caption/subtitle files are accurate and well-timed to provide an inclusive and accessible viewing experience for your audience.
Working with Picture-in-Picture
In the HTML5 specification, the Picture-in-Picture (PiP) feature allows you to display a video element in a small, resizable, and movable window that floats above the other content on a web page (always on top). This window can be positioned anywhere on the screen, enabling users to multitask – they can watch the video while simultaneously interacting with other content (or even other apps) on their device.
Enabling PiP is pretty simple, and the HTMLVideoElement interface provides the requestPictureInPicture() method to accomplish this in a simple way.
Take any existing <video> element you have, and include this in its JavaScript as an added event listener.
 <script>
    const video = document.querySelector('video');

    // Enable Picture-in-Picture when the video is clicked
    video.addEventListener('click', () => {
      if (video !== document.pictureInPictureElement) {
        video.requestPictureInPicture();
      } else {
        document.exitPictureInPicture();
      }
    });
  </script>
Any time the video is clicked, it’ll request the browser to enable Picture-in-Picture mode, turning the video into a floating, resizable window out of the way in the corner of the screen, allowing the user to multitask without interrupting video playback.
This being a simple event listener, you can even attach this to a custom <button> in the <video> controls, instead. That way, you’ll have a dedicated PiP button.
Picture-in-Picture mode offers several benefits, including, but not limited to:
- Enhanced Productivity: Users can continue watching a video while simultaneously working on other tasks or browsing through different apps/web pages. Using PiP, you can add multitasking to the user experience.
- Boosted User Engagement: PiP inherently encourages longer engagement, by allowing users to keep video content visible while scrolling through the page, reading articles, or participating in discussions, leading to a more immersive and interactive experience on your website.
- Responsiveness that is customizable: PiP is responsive by nature, automatically adapting to different screen sizes and orientations. It ensures that the video remains visible and accessible regardless of the device being used, without any extra CSS on your part, and users can even adjust the size and position of the window according to their preference. This gives them a viewing experience tailored to their screen real estate.
Use Cases for the HTML5 Video API
Video Streaming Platforms: The HTML5 video API enables smooth, native, customizable video playback with cross-compatibility between desktops, laptops, smartphones, and tablets. It supports closed captioning, and advanced JavaScript-based players (like Video.js) built on top of it add even more functionality like adaptive streaming, and security, ensuring a consistent web video experience. All of this makes the HTML5 API a boon to streaming platforms like Netflix.
e-learning and online courses: The HTML5 video API integrates seamlessly with standard browser APIs like WebGL, Canvas, WebAudio, etc., allowing devs to combine the power of these APIs to create rich, interactive, multimedia experiences like quizzes for gamified learning, interactive 360-degree videos, augmented reality (AR) experiences, and synchronized transcripts, enhancing engagement and facilitating effective learning experiences.
Social Media and Content Sharing Platforms: Social media platforms can integrate video playback, uploads, and live streaming. Users can view, share, and interact with videos directly within the platform, promoting engagement and content virality.
Advertising and Marketing Campaigns: Advertisers and marketers can create impactful video ads and interactive campaigns. Advanced HTML5 video players (like Video.js) support features like pre-roll, mid-roll, or post-roll ads, customizable player controls, and analytics integration, enabling precise targeting, measurement, and engagement tracking.
Easier Web Development: HTML5 has revolutionized web development by simplifying the integration of videos as background decorations, banners, hero sections, and other prominent elements on webpages. Using the <video> element, developers can easily incorporate lightweight videos into their UI/UX design without relying on plugins.
Video Conferencing: With the HTML5 video API’s support for webcam and microphone access through the MediaStream API, developers can leverage the getUserMedia() function to obtain user permission and access their webcam and microphone devices, allowing for seamless video and audio streaming in web-based conferencing applications in conjunction with WebRTC.
ImageKit’s Role in Streamlining the Use of HTML5 Video
ImageKit is a versatile cloud-based image and video optimization, transformation, and digital asset management platform that can streamline the use of HTML5 video, clearing up existing pain points, and allowing you to leverage advanced features to create captivating and interactive video experiences.
ImageKit’s video capabilities include:
Automatic format conversion
Imagekit makes sure the best-fit version of a source video is served to any user, anywhere, anytime. For example, if the user’s browser doesn't support MP4, ImageKit will automatically serve WEBM or any other version their browser supports.
No need for creating, storing, and linking to multiple variants of the video within nested <source> tags; just turn on Automatic Format Conversion in the ImageKit dashboard and provide the ImageKit link to the video in your video tag's src attribute (you don't even need source tags), and you're done.
Automatic video quality optimization
ImageKit employs cutting-edge video compression techniques to optimize video files to a version that strikes a good enough balance between file size and visual quality by default, while still letting you tune it.
This results in quicker start-up times and smoother playback across different devices and network conditions. So there is no need to use FFmpeg or other encoders or do the optimization yourself. All you have to do is turn on Automatic Quality Optimization from the ImageKit dashboard.
Dynamic Video Transformation
With ImageKit’s URL-based API, developers can perform real-time video transformations, such as resizing, cropping, trimming, and more, to suit their requirements.
Adaptive Bitrate Streaming
Adaptive bitrate streaming (ABR) is a powerful feature that significantly improves the viewing experience of HTML5 video by dynamically adjusting the video quality based on the viewer's network conditions and device capabilities.
It ensures faster start-up times, smoother playback, improved video quality, and compatibility across various devices. By efficiently utilizing bandwidth, it allows more viewers to stream videos simultaneously without network congestion.
Setting up ABR is complex, but ImageKit streamlines the process. By simply requesting the ABR version of a source video with ImageKit’s URL-based API, different video variants or renditions are generated automatically for you without the need for manual generation and storage.
This eliminates the complexities of managing multiple video versions and setting up complex pipelines. Then, you’ll only need to embed a single video URL in an HTML5-compatible video player for ABR.
Creating Video Overlays
ImageKit's overlay feature is a powerful tool that allows developers to add overlay elements to videos (using layers) without the need for complex coding or manual editing. With ImageKit, you can place images, logos, watermarks, or any other graphical elements on top of videos, and it also supports various positioning options, such as specifying coordinates or aligning the overlay relative to the parent video.
The overlays themselves are also highly customizable, allowing developers to control the opacity, size, and blending modes to achieve the desired visual effect.
The overlays feature in ImageKit offers significant benefits. You can add branding, display subtitles, captions, or other textual information, improving accessibility and user engagement. Watermarks can also be easily applied to prevent unauthorized use and ensure content security.
CDN for faster delivery
ImageKit streamlines the use of HTML5 video by providing a built-in Cloudfront CDN (Content Delivery Network). This CDN ensures the fastest delivery of videos by serving them from locations closest to each user or viewer. With ImageKit, developers can rely on efficient and optimized video delivery, reducing buffering time and improving the overall viewing experience.
To learn more about harnessing the power of the HTML5 API through ImageKit and exploring its potential, you can refer to the ImageKit documentation on video transformation.
Conclusion
In conclusion, the HTML5 Video API has played a significant role in advancing web development by simplifying video integration and providing developers with the necessary tools for creating compelling video experiences.
As technology continues to evolve, the HTML5 Video API and tools like ImageKit will continue to shape the future of web-based video content, enabling developers to deliver engaging and immersive experiences to users across different platforms and devices. With ImageKit, working with HTML5 video has never been easier. With it, developers can further streamline their web video pipeline from storage to delivery, optimize the videos they deliver to users, and customize the experience they want to offer.
Sign up for our forever free trial to learn how ImageKit can improve the video experience in your web applications.