










This blog covers how to do the following in React applications using ImageKit.io - a free image CDN. ImageKit.io does all image processing, and your frontend React application gets the image in optimum dimension, quality, and format with a few lines of code.
Here is what we will cover:
- Basic image resizing in React - height & width manipulation and different cropping options.
- React image cropping & face detection.
- Smart cropping - Detecting an object of interest while generating a small thumbnail and cropping around that.
Bonus areas covered:
- Image overlay - Adding an image over an image (watermark).
- Text overlay - Adding text over an image. It can be used for creating personalized promotional banners on the fly.
- Meaningful placeholders - Loading a blurred low-quality placeholder image.
- Lazy loading images.
- Automatically converting image format to WebP or AVIF based on the user device.
- File upload - Allowing direct secure file upload from client-side to ImageKit.io media storage.
Quick examples of what is possible
Before getting into fine details, let's quickly understand how easy it is to manipulate and optimize images in React application using IKImage component provided by ImageKit SDK.
Height and width manipulation
Simply specify the height and width value in transformation prop:
<IKImage
  path="default-image.jpg"
  transformation={[{
    height: 200,
    width: 200
  }]}
/>
It will render an img element.
<img src="https://ik.imagekit.io/<YOUR_IMAGEKIT_ID>/tr:h-200,w-200/default-image.jpg?ik-sdk-version=react-1.x.x"
     path="default-image.jpg"
     alt="">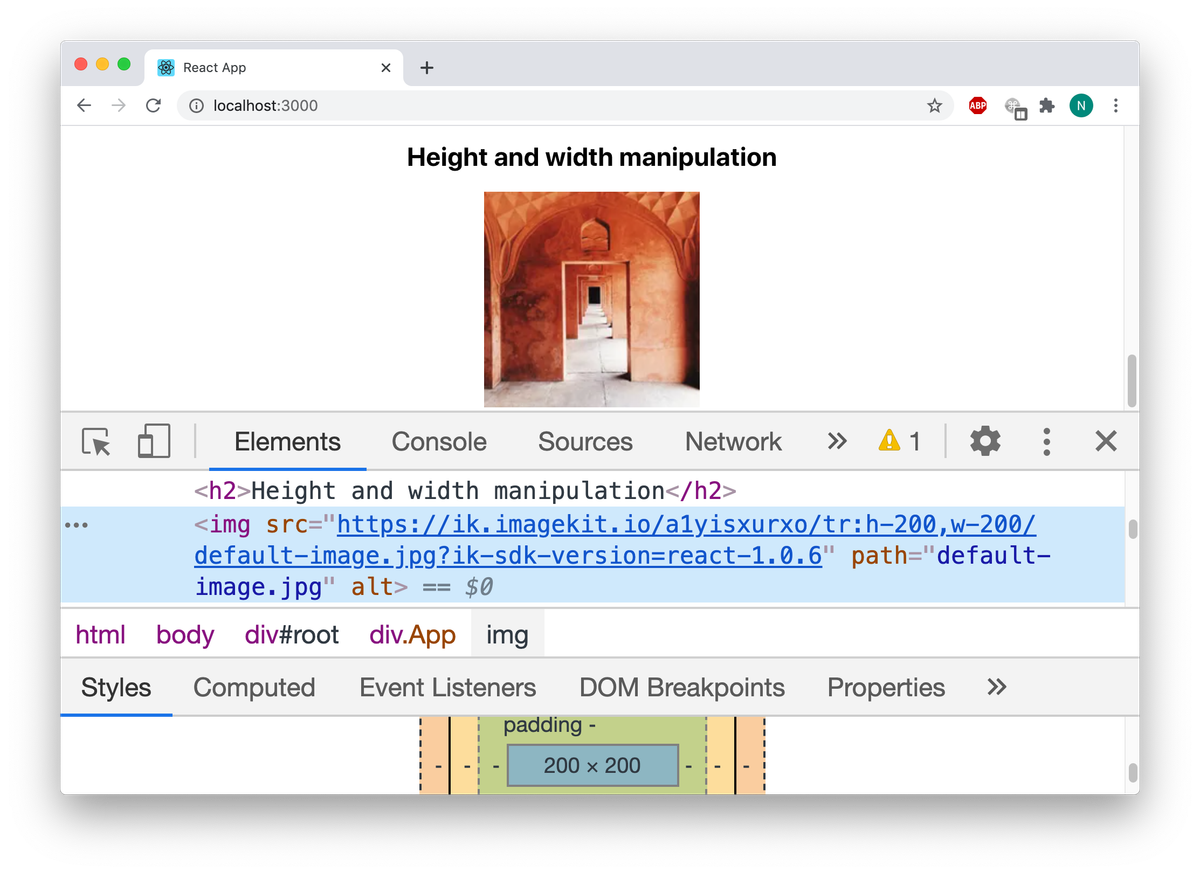
Adding overlays to images
ImageKit.io allows you to add text and image overlay dynamically using layers.
For example, the following will add a text ImageKit on the image.
<IKImage
  path="default-image.jpg"
  transformation={[{
    height: 300,
    width: 300,
    raw: "l-text,i-ImageKit,fs-50,co-0651D5,l-end"
  }]}
/>
It will render the following img element.
<img src="https://ik.imagekit.io/<YOUR_IMAGEKIT_ID>/tr:h-300,w-300,l-text,i-ImageKit,fs-50,co-0651D5,l-end/default-image.jpg"
  path="default-image.jpg"
  alt="">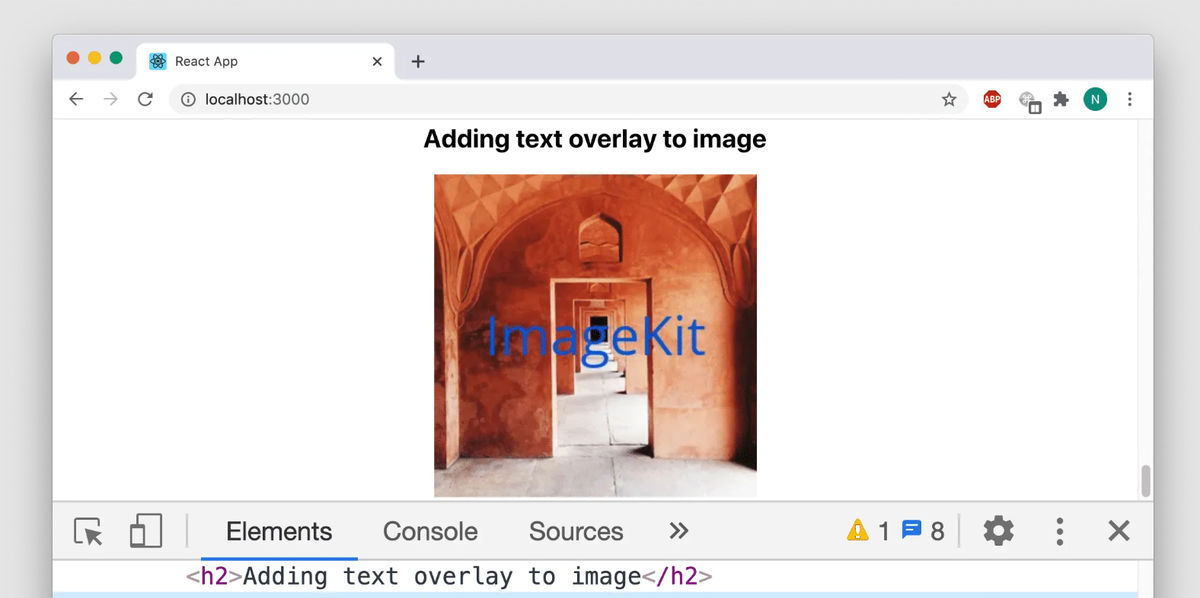
That is pretty straightforward. Let's cover different possibilities and how you can start resizing & optimizing images in your React apps.
To make it easy for you, we have published a React quick start guide along with sample quick start application on Github.
Create a free account
This demo requires you to have an ImageKit account. You can create one for free - https://imagekit.io/registration. This forever free plan has generous limits, which is good enough for many small and medium scale web applications.
A basic React application
First thing first, let's create a new React app using the create-react-app CLI utility provided by React:
npx create-react-app imagekit-react-appNavigate to the project directory:
cd imagekit-react-app/Open up the project in your text editor of choice, and navigate to src/App.js. This is where we will do most of our work. It should look like this:
import React from 'react';
import logo from './logo.svg';
import './App.css';

function App() {
  return (
    <div className="App">
      <header className="App-header">
        <img src={logo} className="App-logo" alt="logo" />
        <p>
          Edit <code>src/App.js</code> and save to reload.
        </p>
        <a
          className="App-link"
          href="https://reactjs.org"
          target="_blank"
          rel="noopener noreferrer"
        >
          Learn React
        </a>
      </header>
    </div>
  );
}

export default App;
Now run the app:
npm startIn your web browser, navigate to http://localhost:3000/
You should see the dummy app created by React CLI.
Setting up ImageKit.io SDK
Now that we have the dummy app working let's configure the ImageKit.io React SDK. The SDK simplifies image URL generation, applying different transformations and file uploading.
Installing the ImageKit React SDK in our app is pretty simple:
npm install --save imagekitio-reactBefore the SDK can be used, let's learn about and obtain the requisite initialization parameters:
urlEndpointis a required parameter. This can be obtained from the URL-endpoint section or the developer section on your ImageKit dashboard.publicKeyandauthenticationEndpointparameters are optional and only needed if you want to use the SDK for client-side file upload. These can be obtained from the developer section on your ImageKit dashboard.
// required parameter to fetch images
const urlEndpoint = '<YOUR_IMAGEKIT_URL_ENDPOINT>';

// optional parameters (needed for client-side upload)
const publicKey = '<YOUR_IMAGEKIT_PUBLIC_KEY>';
const authenticationEndpoint = 'https://www.your-server.com/auth';
Note: Do not include your API private key in any client-side code, including this SDK or its initialization. If you pass the _privateKey_ parameter while initializing this SDK, it will throw an error.
Components:
This SDK provides 3 components:
IKImagefor image resizing. This renders a<img>tag.IKUploadfor client-side file uploading. This renders a<input type="file">tag.IKContextfor defining options likeurlEndpoint,publicKeyorauthenticationEndpointto all children elements. This component does not render anything.
You can import components individually:
import { IKImage, IKContext, IKUpload } from 'imagekitio-react';Configure the app for ImageKit:
It is not necessary to specify the urlEndpoint in every instance of IKImage. This can be managed much more easily with the IKContext component.
IKContext is a wrapper that can be configured with your SDK initialization parameters. Pass your urlEndpoint to it as a prop, and you're good to go!
This is how your App.js file should look:
import React from 'react';
import './App.css';
import { IKContext, IKImage } from 'imagekitio-react';

const urlEndpoint = '<YOUR_IMAGEKIT_URL_ENDPOINT>';

function App() {
  return (
    <div className="App">
      <IKContext urlEndpoint={urlEndpoint}>
        <h1>ImageKit React quick start</h1>
        <IKImage path="default-image.jpg" width="400" />

        <h2>Loading image from an absolute path</h2>
        <IKImage
          src="https://ik.imagekit.io/demo/default-image.jpg"
          width="400"
        />
      </IKContext>
    </div>
  );
}

export default App;
From now on, we will only mention IkImage and different props without repeating IKContext.
Resizing and cropping images in React applications
You can manipulate the height and width of an image using simple URL parameters. Your backend can generate these URLs in Java or in the frontend itself.
For example, the original image is 1280x853px.
https://ik.imagekit.io/ikmedia/woman.jpg
To get a 200px wide image, use tr=w-200 query parameter
https://ik.imagekit.io/ikmedia/woman.jpg?tr=w-200
ImageKit React SDK simplifies this URL generation by providing IKImage component which accepts different transformations using easy-to-remember names.
To fetch a 200×200 image, specify the height and width value in transformation prop:
<IKImage
  path="default-image.jpg"
  transformation={[{
    height: 200,
    width: 200
  }]}
/>
It will render an img element.
<img src="https://ik.imagekit.io/<YOUR_IMAGEKIT_ID>/tr:h-200,w-200/default-image.jpg?ik-sdk-version=react-1.x.x"
     path="default-image.jpg"
     alt="">
Cropping images in react while preserving the aspect ratio during resize
If only one of the height(h) or width(w) is specified, then ImageKit.io adjusts the other dimension accordingly to preserve the aspect ratio, and no cropping occurs.
But when you specify both height(h) and width(w) dimension and want to preserve the aspect ratio - you have the following three options:
- Crop some part of the image. You can choose which area to crop, where to focus etc.
- Add padding around the image. You can control the background color of the padding to match the layout.
- Let ImageKit change either height or width so that the whole image is visible. In this case, only one of the height or width matches the request dimension.
Let’s understand different cropping options with examples.
No cropping, force-fit image in requested dimensions
If you need an image in exact dimension as requested even if the aspect ratio is not preserved, use forced crop strategy. We will use c-force parameter.
<IKImage
  path="default-image.jpg"
  transformation={[{
    height: 200,
    width: 200,
    crop: "force"
  }]}
/>
It will render
<img src="https://ik.imagekit.io/<YOUR_IMAGEKIT_ID>/tr:h-200,w-200,c-force/default-image.jpg?ik-sdk-version=react-1.x.x"
     path="default-image.jpg"
     alt="">
Default center cropping while resizing
If you don’t choose any cropping strategy, ImageKit.io will crop the edges by default and show the center of the image.
Fit inside the container (no cropping)
If you want the image to fit inside the container as per the requested height and width, we have to use c-at_max. In this case, the full image content is preserved i.e. no cropping happens, the aspect ratio is maintained, but the resulting height & width might differ from what is requested.
The output image is less than or equal to the dimensions specified in the URL, i.e., at least one dimension will exactly match the output dimension requested, and the other dimension will be equal to or smaller than the corresponding output dimension requested.
It is equivalent to object-fit:contain or background-size:contain CSS properties.
https://ik.imagekit.io/ikmedia/woman.jpg?tr=w-400,h-200,c-at_max
In React app, you can do:
<IKImage
  path="default-image.jpg"
  transformation={[{
    height: 200,
    width: 200,
    crop: "at_max"
  }]}
/>
It will render
<img src="https://ik.imagekit.io/<YOUR_IMAGEKIT_ID>/tr:h-200,w-200,c-at_max/default-image.jpg?ik-sdk-version=react-1.x.x"
     path="default-image.jpg"
     alt="">
Fill container (no cropping) while resizing in React
If you want the image to cover the whole container as per the requested height and width, use c-at_least. The entire image content is preserved i.e. no cropping, the aspect ratio is maintained, but the resulting height & width might be different from what is requested.
One of the dimensions will be the same as what is requested, while the other dimension will be equal to or larger than what is asked for.
It is roughly equivalent to object-fit:cover or background-size:cover CSS properties.
https://ik.imagekit.io/ikmedia/woman.jpg?tr=w-400,h-200,c-at_least
In React app, it becomes
<IKImage
  path="default-image.jpg"
  transformation={[{
    height: 200,
    width: 200,
    crop: "at_least"
  }]}
/>
It will render
<img src="https://ik.imagekit.io/<YOUR_IMAGEKIT_ID>/tr:h-200,w-200,c-at_least/default-image.jpg?ik-sdk-version=react-1.x.x"
     path="default-image.jpg"
     alt="">
No cropping, add padding around the image
If you don’t want the image to be cropped while maintaining the aspect ratio, you can add padding around the edges to get the desired dimension. You can also control the background color of this padding.
https://ik.imagekit.io/ikmedia/woman.jpg?tr=w-200,h-100,cm-pad_resize,bg-DDDDDD
In React app, we will use cropMode option to define cm transformation parameter and background for bg parameter.
<IKImage
  path="default-image.jpg"
  transformation={[{
    height: 100,
    width: 200,
    cropMode: "pad_resize",
    background: "DDDDDD"
  }]}
/>
It will render,
<img src="https://ik.imagekit.io/<YOUR_IMAGEKIT_ID>/tr:h-100,w-200,cm-pad_resize,bg-DDDDDD/default-image.jpg?ik-sdk-version=react-1.x.x"
     path="default-image.jpg"
     alt="">
Smart cropping in React
ImageKit.io can intelligently crop images such that the object of interest remains in the center using smart cropping. In the thumbnail generated below, the woman is kept in the center.
https://ik.imagekit.io/ikmedia/woman.jpg?tr=w-200,h-200,fo-auto
In React app, we will use the focus option with value auto to specify fo-auto transformation parameter.
<IKImage
  path="default-image.jpg"
  transformation={[{
    height: 100,
    width: 200,
    focus: "auto",
  }]}
/>
It will render,
<img src="https://ik.imagekit.io/<YOUR_IMAGEKIT_ID>/tr:h-100,w-200,fo-auto/default-image.jpg?ik-sdk-version=react-1.x.x"
     path="default-image.jpg"
     alt="">
Face cropping
If you would like to crop images in your react application such that only the human face in the image is in focus you can do the same by using fo-face parameter.

In React app, we will use the focus option with value face to specify the fo-face transformation parameter.
<IKImage
  path="default-image.jpg"
  transformation={[{
    height: 100,
    width: 200,
    focus: "face"
  }]}
/>
It will render,
<img src="https://ik.imagekit.io/<YOUR_IMAGEKIT_ID>/tr:h-100,w-200,fo-face/default-image.jpg?ik-sdk-version=react-1.x.x"
     path="default-image.jpg"
     alt="">
Object-aware cropping
An extension of smart and face-cropping, object-aware cropping can single out a specific named object from a multi-object image.
ImageKit lets you choose from a variety of 80+ objects ranging from food, drink, animals, everyday essentials, and more to crop around, by simply adding the parameter fo-<object name> in your URL.
For example, suppose you have an image of a living room in your React application. In that case, you can crop around the couch or the chair by specifying the focus parameter as couch or chair in the URL transformation, respectively.
In the React app, we will use the focus option with value as the name of the object we want to crop around. The different supported values can be found in ImageKit's object-aware cropping documentation. Let's try cropping around the couch in the example below.
<IKImage
  path="furniture.jpg"
  transformation={[{
    focus: "couch"
  }]}
/>
It will render,
<img src="https://ik.imagekit.io/<YOUR_IMAGEKIT_ID>/tr:fo-couch/furniture.jpg?ik-sdk-version=react-1.x.x"
     path="furniture.jpg"
     alt="">
The original image of the living room is shown below:

The resulting image after cropping around the couch will be:

Add watermark in images in React Apps
You can protect your images by adding your logo to them.
With ImageKit, it is straightforward to add a watermark in images in React applications. Let’s say we want to put our logo on an image.
Logo can be accessed at -
https://ik.imagekit.io/ikmedia/logo/light-icon_GTyhLlWNX-.svgThe image we want to watermark -
https://ik.imagekit.io/ikmedia/woman.jpg?tr=w-600Using the overlay image layer, we can generate a watermarked image.
https://ik.imagekit.io/ikmedia/woman.jpg?tr=l-image,i-logo@@light-icon_GTyhLlWNX-.svg,l-end
You can also control the position, size, and other manipulation options of the overlay image. Learn more about the layers from the docs.
In React application, we will use the raw transformation to specify the image layer. Inside the image layer, we will use width and border transformation. Here you can find the complete list of all supported transformations in image layer.
ioption to specify the path of overlay image.woption to control width of the overlay imagelxoption to specify the top left corner in input image where you want overlay to be placed.boption to specify the border width and color.
You can learn more about React SDK specific options here - https://github.com/imagekit-developer/imagekit-react#list-of-supported-transformations
<IKImage
  path="default-image.jpg"
  transformation={[{
    height: 300,
    width: 300,
    raw: "l-image,i-default-image.jpg,w-100,b-10_CDDC39,lx-0,l-end" // 10px border of color CDDC39
  }]}
/>
It will render,
<img src="https://ik.imagekit.io/<YOUR_IMAGEKIT_ID>/tr:w-300,h-300,l-image,i-default-image.jpg,w-100,b-10_CDDC39,lx-0,l-end/default-image.jpg?ik-sdk-version=vuejs-1.0.8"
     alt="">
Adding text over images in React Apps
You can add text over images in React application using ImageKit.io text overlay layer. You can create engaging visuals using URL-based parameters to add watermark and text on images dynamically.
For example - We have added l-text,i-Sky is the limit,l-end in the URL to add a string “Sky is the limit” over the image.
https://ik.imagekit.io/ikmedia/backlit.jpg?tr=l-text,i-Sky is the limit,bg-FFFFFF90,pa-20,fs-70,co-00000,lx-N0,ly-30,l-end
You can generate photo collage in React using the same methods. Learn more about how to create a photo collage using ImageKit.
In React application, we will use the raw transformation to specify the text layer. Inside the text layer, we can specify font size, font family and text color of the text. Here you can find the complete list of all supported transformations in a text layer.
ioption to specify the text.fsoption to control the font size of overlay text.ffto control font family.coto specify the text color.
You can learn more about React SDK specific options here - https://github.com/imagekit-developer/imagekit-react#list-of-supported-transformations
<IKImage
  path="default-image.jpg"
  transformation={[{
    height: 300,
    width: 300,
    raw: "l-text,i-ImageKit,fs-50,co-0651D5,l-end"
  }]}
/>
It will render,
<img src="https://ik.imagekit.io/<YOUR_IMAGEKIT_ID>/tr:h-300,w-300,l-text,i-ImageKit,fs-50,co-0651D5,l-end/default-image.jpg"
  path="default-image.jpg"
  alt="">
Rendering blurred low-quality placeholders
To improve user experience, you can use a low-quality blurred variant of the original image as a placeholder while the original image is being loaded in the background. Once the loading of the original image is finished, the placeholder is replaced with the original image.
ImageKit React SDK makes it easy for you to implement this by providing lqip option.
// Loading a blurred low quality image placeholder
// while the original image is being loaded
<IKImage
path="default-image.jpg"
lqip={{ active: true, quality: 20 }}
width="400"
/>
Combining lazy loading with low-quality placeholders
You have the option to lazy-load the original image only when the user scrolls near them. Until then, only a low-quality placeholder is loaded. This saves a lot of network bandwidth if the user never scrolls further down.
// Loading a blurred low quality image placeholder
// and lazy-loading original when user scrolls near them
<IKImage
path="default-image.jpg"
transformation={[{ height:300, width:400 }]}
lqip={{ active:true }}
loading="lazy"
height="300"
width="400"
/>Converting image format in React
ImageKit also offers features such as automatic best format selection, quality optimization, and metadata manipulation out of the box. This reduces the final size of the output image and improves your website's image load time while maintaining visual quality.
This means by default, the image is converted to WebP or AVIF format based on the user device without you having to make any change in your application.
However, if you wish, you can easily convert image format using URL based transformation.
For example - The actual format of the following image is JPG.
https://ik.imagekit.io/ikmedia/woman.jpgYou can convert it to PNG using tr=f-png transformation.
https://ik.imagekit.io/ikmedia/woman.jpg?tr=f-pngYou can covert it to WebP using tr=f-webp
https://ik.imagekit.io/ikmedia/woman.jpg?tr=f-webpIn React application, we will use a format option like this:
<IKImage
  path="default-image.jpg"
  transformation={[{
    height: 300,
    width: 200,
    format: 'png',
  }]}
/>
It will render,
<img src="https://ik.imagekit.io/<YOUR_IMAGEKIT_ID>/tr:h-300,w-200,f-png/default-image.jpg"
  path="default-image.jpg"
  alt="">
File upload in React
Using ImageKit, your React application can directly upload files to the cloud without you having to manage storage, infrastructure, and security. File upload is not completely serverless, it does require you to generate a secure authentication signature on the server-side. But that's it! The actual file uploading is handled by ImageKit.io servers. Don't worry, we will show you how to do it.
The client-side file upload API needs an authentication parameter to ensure that the upload request is valid. This authentication parameter should be generated by your backend server using your ImageKit account's private API key.
This quick start project hosted on Github has all the necessary frontend and backend code for you to start.
Let's understand it one by one. First, the React application code.
For this, we will use the IKUpload component. Let's import it from the SDK into our App.js file:
import { IKContext, IKImage, IKUpload } from 'imagekitio-react';Add the IKUpload component nested within IKContext, as well as a couple of event handlers for upload error and success, onError and onSuccess respectively like this:
import React from 'react';
import './App.css';
import { IKContext, IKImage, IKUpload } from 'imagekitio-react';

const publicKey = '<YOUR_IMAGEKIT_PUBLIC_KEY>';
const urlEndpoint = '<YOUR_IMAGEKIT_URL_ENDPOINT>';
const authenticationEndpoint = 'http://localhost:3001/auth';

const onError = err => {
  console.log("Error", err);
};

const onSuccess = res => {
  console.log("Success", res);
};

function App() {
  return (
    <div className="App">
      <h1>ImageKit React quick start</h1>
      <IKContext
        publicKey={publicKey}
        urlEndpoint={urlEndpoint}
        authenticationEndpoint={authenticationEndpoint}
      >
        <p>Upload an image</p>
        <IKUpload
          fileName="test-upload.png"
          onError={onError}
          onSuccess={onSuccess}
        />
      </IKContext>
      {/* ...other SDK components added previously */}
    </div>
  );
}

export default App;
This is how it looks in the UI:
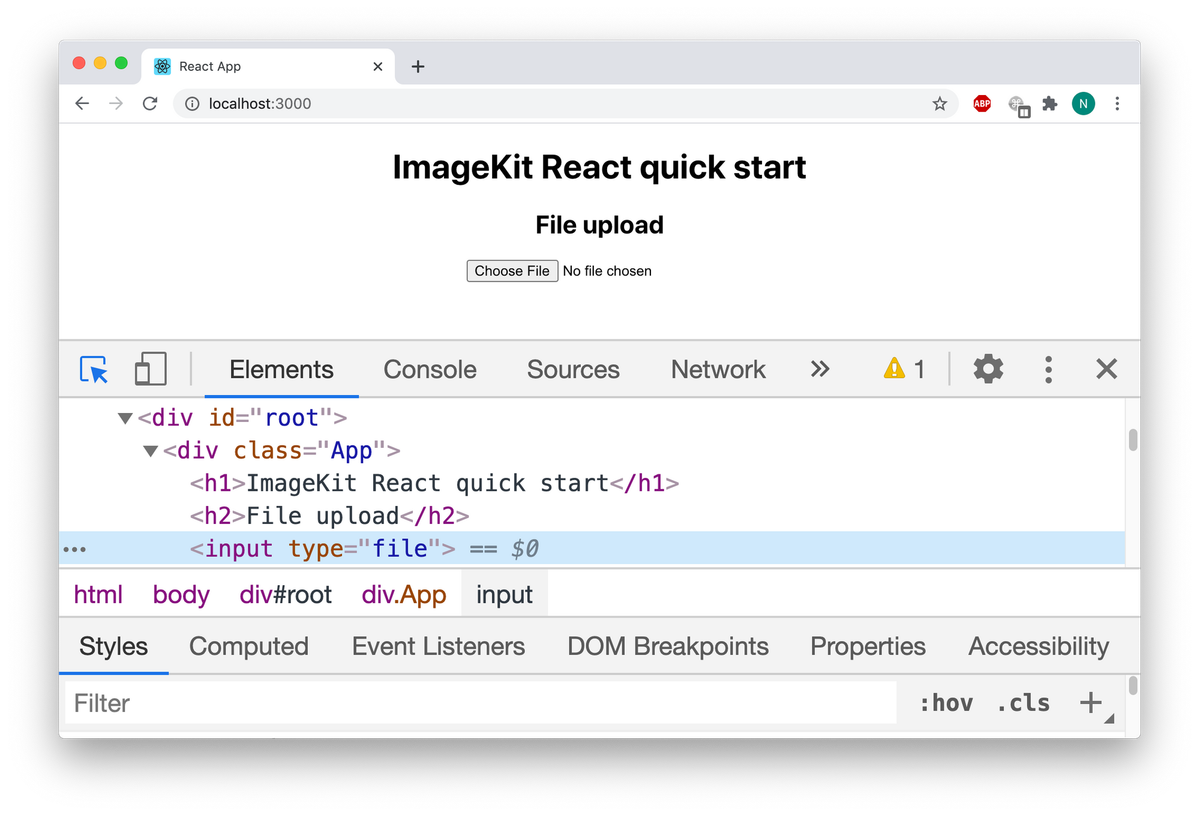
For it to work, we have to implement a GET http://localhost:3001/auth which returns the authentication parameters required by the SDK. The SDK makes an HTTP GET request to this endpoint and expects a JSON response with three fields i.e. signature, token, and expire.
{
    token: "1bab386f-45ea-49e1-9f0d-6afe49a5b250",
    expire: 1580372696,
    signature: "0f9d5a45e97c24fa9200a9d5543c9af1e2c45a54"
}
You can use ImageKit Node.js SDK to generate these authentication parameters on the server-side.
/*
  This is our backend server.
  Replace YOUR_IMAGEKIT_URL_ENDPOINT, YOUR_IMAGEKIT_PUBLIC_KEY,
  and YOUR_IMAGEKIT_PRIVATE_KEY with actual values
*/
const express = require('express');
const app = express();
const ImageKit = require('imagekit');

const imagekit = new ImageKit({
  urlEndpoint: '<YOUR_IMAGEKIT_URL_ENDPOINT>',
  publicKey: '<YOUR_IMAGEKIT_PUBLIC_KEY>',
  privateKey: '<YOUR_IMAGEKIT_PRIVATE_KEY>'
});

// allow cross-origin requests
app.use(function(req, res, next) {
  res.header("Access-Control-Allow-Origin", "*");
  res.header("Access-Control-Allow-Headers",
    "Origin, X-Requested-With, Content-Type, Accept");
  next();
});

app.get('/auth', function (req, res) {
  var result = imagekit.getAuthenticationParameters();
  res.send(result);
});

app.listen(3001, function () {
  console.log('Live at Port 3001');
});
Now, let’s upload an image by selecting a file from the file input.
When you choose a file, the file is immediately uploaded. You can pass optional onSuccess and onError callback functions as props.
You can verify that file was successfully uploaded by checking the browser console. In case of success, it should print a success message, like this:
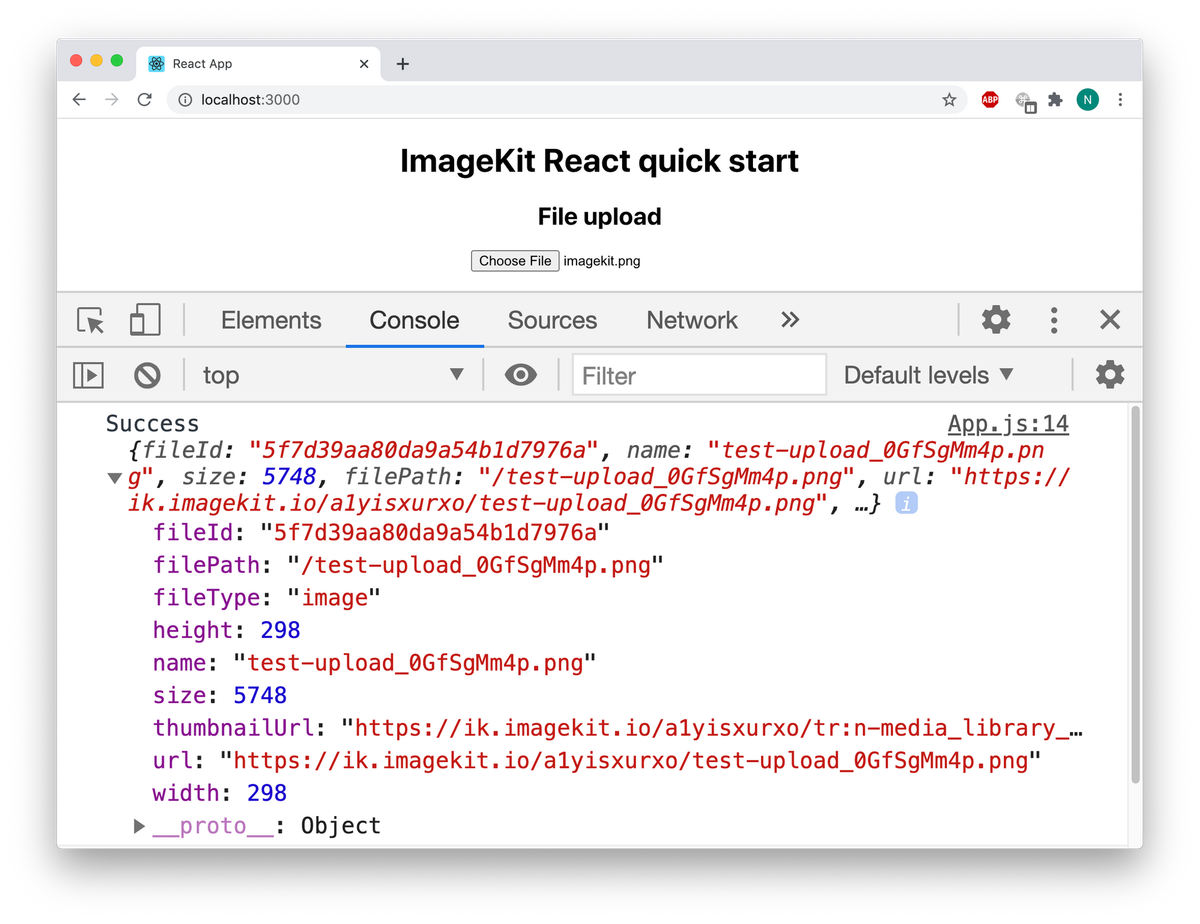
The response object would look similar to this (values may vary):
{
  fileId: "5f7d39aa80da9a54b1d7976a",
  filePath: "/test-upload_0GfSgMm4p.png",
  fileType: "image",
  height: 298,
  name: "test-upload_0GfSgMm4p.png",
  size: 5748,
  thumbnailUrl: "https://ik.imagekit.io/<YOUR_IMAGEKIT_ID>/tr:n-media_library_thumbnail/test-upload_0GfSgMm4p.png",
  url: "https://ik.imagekit.io/<YOUR_IMAGEKIT_ID>/test-upload_0GfSgMm4p.png",
  width: 298,
}
After a successful upload, you should see the newly uploaded image in the Media Library section of your ImageKit dashboard.
If you don't see the image, check if there are any errors in the browser console log. Then verify whether the API private key has been configured correctly in the server app and if the server app is running.
Summary
Here is what you need to know:
- You can resize and crop images in React application using a few lines of code.
- ImageKit.io servers handle all image processing. You don't have to install any libraries or manage backend infrastructure on your end.
- You can dynamically add images and text over images to create personalized promotional banners, all with a few lines of code.
- Images are delivered in the latest supported format, e.g., WebP or AVIF. Learn more about AVIF optimization in ImageKit.io.
- You can upload files directly from the client-side to the ImageKit media library using ImageKit React SDK.
- Quickly get started with this sample project hosted on Github - https://github.com/imagekit-samples/quickstart/tree/master/react.
If you face any problems during integration, please reach out to us at support@imagekit.io or leave a comment.