


Google Cloud Platform (GCP) is the cloud computing offering from Google. It has emerged as a solid competitor to the cloud platforms offered by AWS and Microsoft Azure. One of the services in GCP is the object storage called Cloud Storage. It is similar to the offering from AWS S3 and helps you store your files in the cloud, and provides an instant, high availability storage with practically infinite scale.
Cloud Storage provides enterprise-grade object storage features and is available in multiple regions across the globe. A lot of companies use it to store images on the cloud. However, it has some drawbacks -
- Cloud Storage does not provide image optimization features like format conversion to WebP or AVIF.
- It cannot compress your images to make them suitable for delivery on the web.
- It does not offer real-time image manipulations to allow the delivery of responsive images across different devices.

With so many different user devices and users coming to expect nothing but high-quality experiences, real-time image optimizations and transformations are essential for every online business. Businesses try to work around these shortcomings by building solutions in-house.
But, let's be honest, as a business, you might not have the time and resources to dedicate to image delivery and optimization, amongst all the other product features.
This is where ImageKit comes in. It can integrate with your Google Cloud Storage and help you deliver perfectly optimized, responsive images across devices in minutes. You can get started for free on the forever free plan on ImageKit! Read on to see how you can do this.
What is ImageKit?
ImageKit is a cloud-based end-to-end image management and delivery service. It comes with its own storage and delivery CDN, along with more than 50 image and video transformations that can be performed in real-time.
Note: ImageKit comes with AWS CloudFront as its CDN out of the box. If you prefer using your own CDN like Google Cloud CDN with ImageKit, you can do so on its enterprise plan with assistance provided by ImageKit's support team. The features and integration with Cloud Storage demonstrated in this post remain the same, regardless of the CDN you choose.
The best part about ImageKit is that it is not necessary to use ImageKit's storage to use its optimization and transformation features. It can be integrated with any external storage, including Google Cloud Storage, to help you deliver lighter images in no time.
Over 35,000 developers and 600 companies use ImageKit to deliver billions of optimized images and videos every day.
Let's look at how you can use it with your Google Cloud storage.
Request flow for optimized images in Cloud Storage with ImageKit
- After attaching your Google Cloud Storage to ImageKit, you can access the image in it using the ImageKit URL endpoint.
- If ImageKit has a cached version of its CDN or other internal caches, it delivers the image from there. Such images get delivered in low double-digit milliseconds.
- Suppose ImageKit does not have the optimized and transformed image in its cache. In that case, ImageKit gets the original image from the storage attached to ImageKit, does all the processing in real-time, and sends back the right image to the user. This takes about 100-200ms on average, depending on the input image.
- Subsequent requests for the same image get served from ImageKit's CDN (or if you are using a custom CDN).

Let's look at the steps you need to follow to optimize and resize the images in your Cloud Storage via ImageKit.
Considering the rapidly changing features in both ImageKit and Google Cloud, always refer to the current technical documentation for this integration here.
We have created a new bucket in Cloud Storage for this article called test-imagekit-bucket and uploaded a few images to it. The bucket and the objects inside the bucket are Private, but the steps remain the same even if the objects are Public.
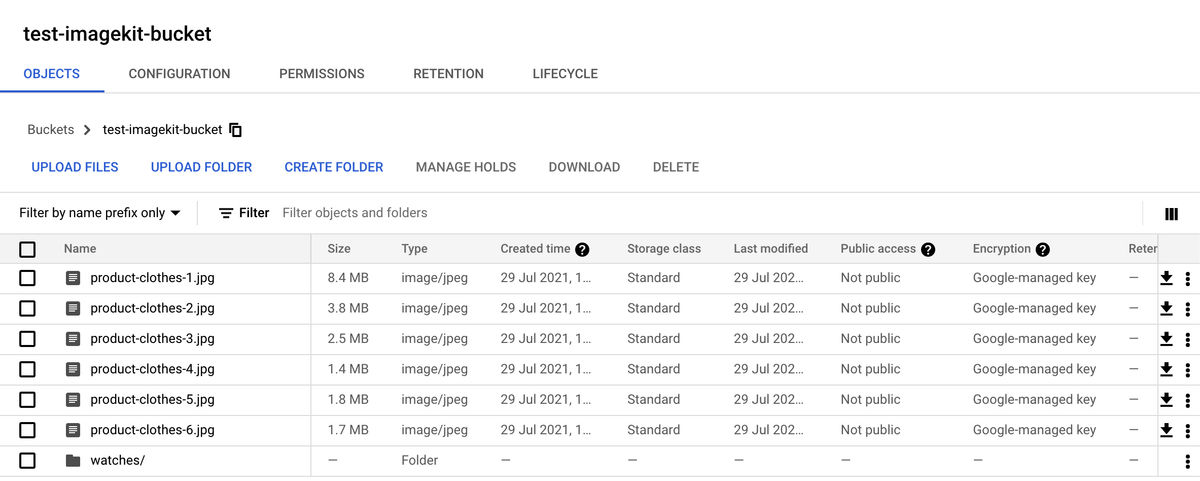
By the end of this article, we would be able to deliver high-quality, responsive images across devices using the original image stored in this storage.
1. Create an ImageKit Account
The first step, of course, is to create an ImageKit account. ImageKit offers a fully-featured, forever free account with 20GB of delivery bandwidth every month. This is usually more than enough for websites up to a few thousand page views in a month. You can go for higher plans if your delivery bandwidth requirement is higher than 20GB in a month.
ImageKit offers seven processing regions across the globe for optimization. You should choose the one that is geographically closest to your Cloud Storage bucket location.
2. Creating access keys to access the objects in the bucket
Since the images added to our Cloud Storage are private, we cannot access them via the object's URL. We need to create access keys in Google Cloud that will have access to read the files in our test bucket.
Note: If the objects in your bucket are public, i.e., you can access them via their URL, you can also use ImageKit's Web Server origin integration to attach your Cloud Storage to ImageKit.
a. Creating a Service Account in GCP
First, we need to create a new service account in Google Cloud. A service account is a special type of account created in Google Cloud to allow applications (in this case ImageKit), and not people, to access resources.
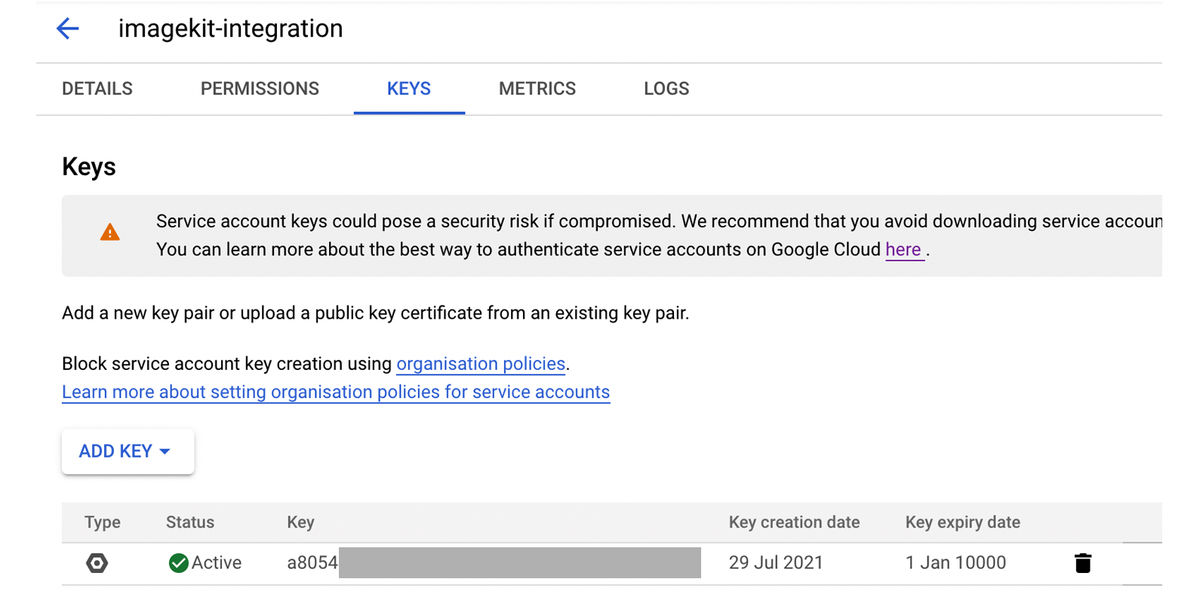
On the service accounts page, we created a new account with the name imagekit-integration
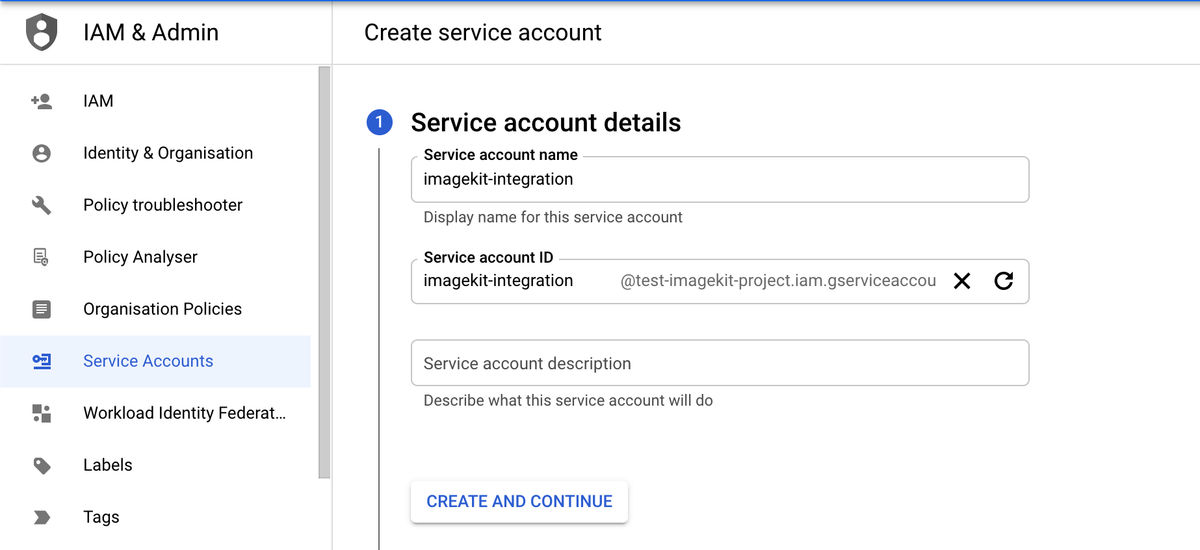
In the next step of creating the service account, attach the role "Storage Object Viewer" to the service account.
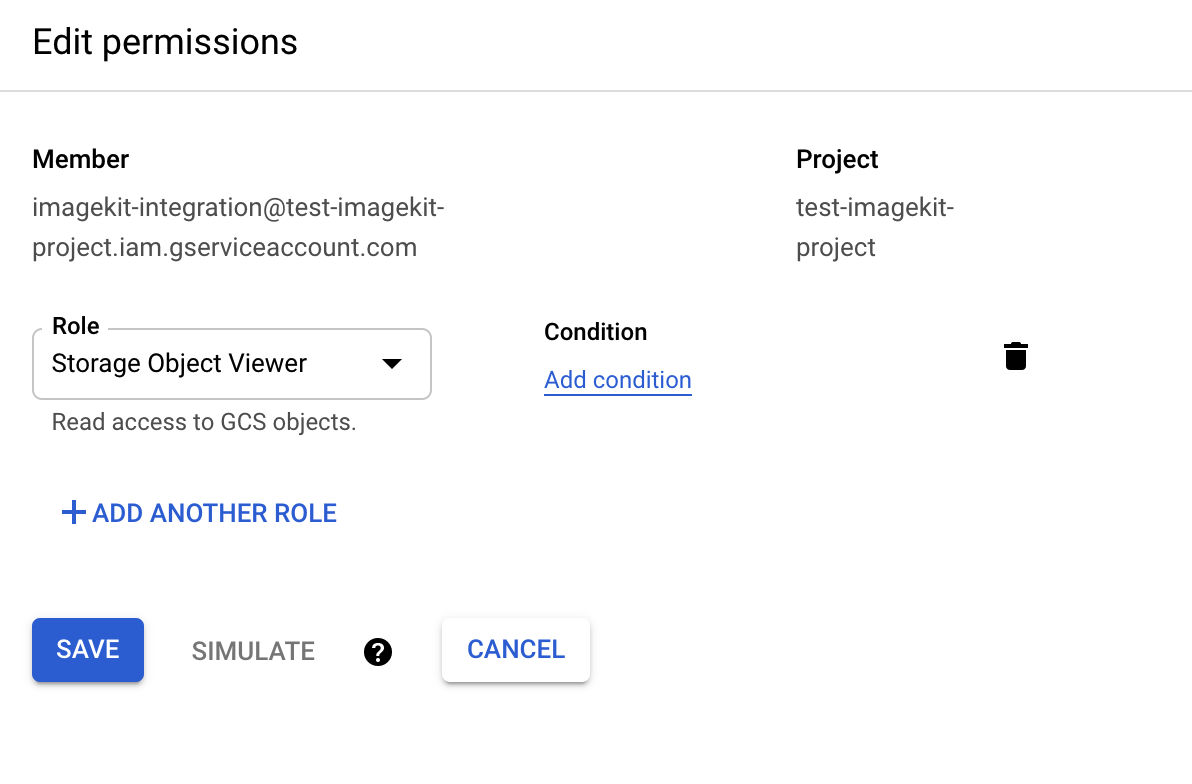
We can then save this service account.
b. Creating keys for the service account
Now that we have a service account in place, we need to create its keys, which we will then use to integrate the storage with ImageKit. To do this, go to the Keys section of the newly created service account. Click on "Add Key" and generate a JSON-type key. Once done, a JSON file containing the key will get downloaded to our system. Store this file securely as it contains the access keys to the bucket.
ImageKit supports integration directly via this JSON file, and we will use it in the next step.
3. Attaching your Cloud Storage to ImageKit
The next step is to attach your Cloud Storage bucket to ImageKit. This will allow ImageKit to access the original images from your bucket when needed.
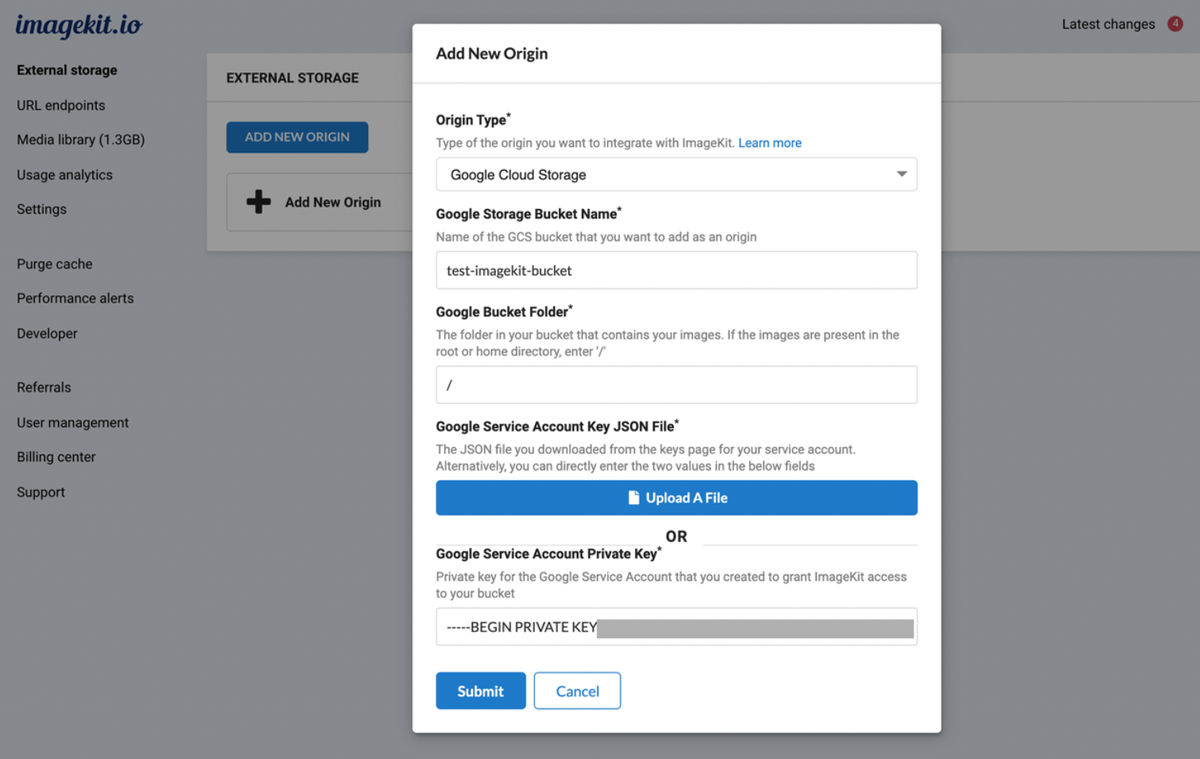
To do this, go to “External Storage” in the ImageKit dashboard and click on the “Add New Origin” button. In the modal that opens up, select the “Origin Type" as “Google Cloud Storage”.
You can now fill up all the other fields in this modal like the Bucket Name, Bucket Folder (the folder you want to access in the bucket, we will use / because we want to access the entire bucket. Upload the JSON file containing the keys that we just downloaded.
ImageKit will automatically parse the file and fill in the fields for "Google Service Account Private Key" and "Google Service Account Client E-Mail", as shown below. Once done, click on "Submit" to add this bucket to ImageKit
ImageKit does not start copying the objects from your bucket after this step. ImageKit accesses an object in your bucket only when you request it via its ImageKit URL.
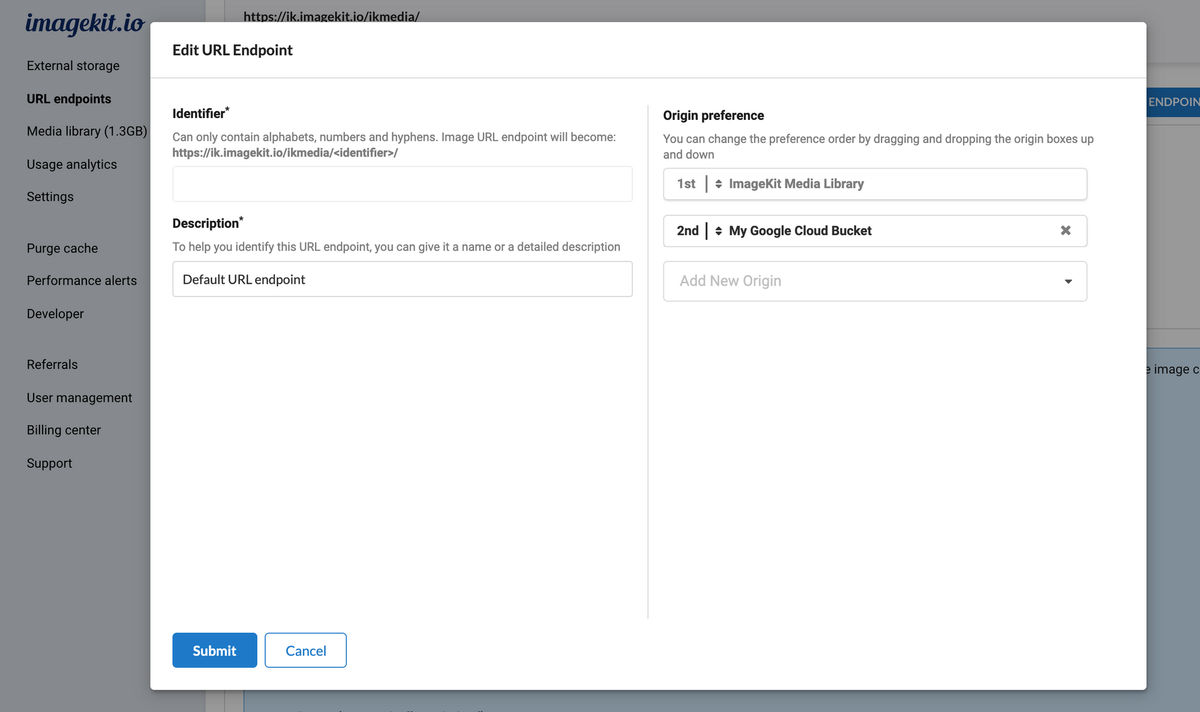
Now head over to the “URL Endpoints” section in the ImageKit dashboard. Your newly added Cloud Storage origin will appear under the Default URL Endpoint. If not, you can always click on Edit URL Endpoint, and add this origin to your ImageKit URL Endpoint.
That's it! The setup is now complete.
We can now start accessing the images in our Cloud Storage bucket via ImageKit. We provided access to the entire storage (using Bucket Folder as /), so we just need to replace the cloud storage URL endpoint with the ImageKit URL endpoint.
https://storage.cloud.google.com/test-imagekit-bucket/product-clothes-3.jpgThe Cloud Storage object URL from our bucket
gets changed to
https://ik.imagekit.io/ikmedia/product-clothes-3.jpgURL using ImageKit URL endpoint
For an image that is inside a folder in the bucket, we need to retain the folder path in the ImageKit URL as well. For example, if the original image URL is this
https://storage.cloud.google.com/test-imagekit-bucket/watches/product-watch-1.jpgthen its ImageKit URL is
https://ik.imagekit.io/ikmedia/watches/product-watch-1.jpgAutomatic image optimization for Google Cloud Storage
ImageKit automatically determines the formats supported on the requesting device and converts your images to the best format, like WebP or AVIF (if enabled on your account). It also compresses the image using the default quality optimization setting in your ImageKit dashboard.
These automatic optimizations help us serve the right image on every device without worrying about its technicalities.
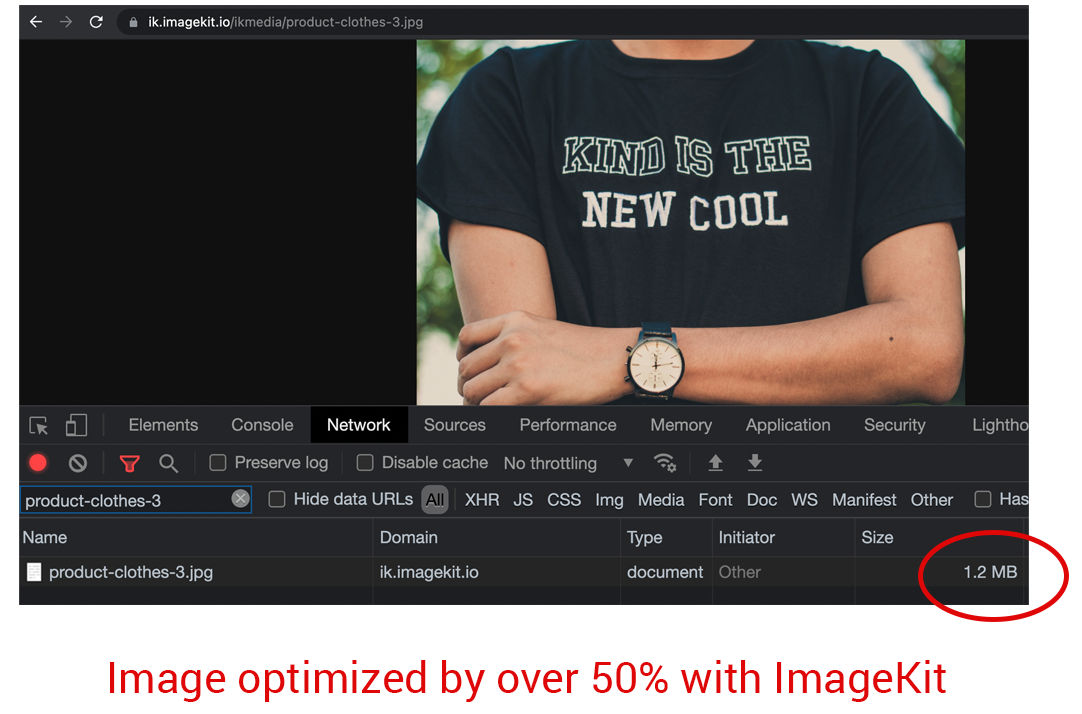
For example, the original image product-clothes-3.jpg in the storage was 2.5MB in size.
When we access it via ImageKit, the image is converted to WebP on a supported browser, and the size comes down to 1.2MB. That's over a 50% reduction in size without making any other change to the URL!
Real-time image resizing and other transformations for Cloud Storage
With ImageKit, we can also transform our images in real-time by specifying the parameters in the URL.
For example, if we have to resize the above image to width 300px, we just need to add tr=w-300 as a query parameter in our URL.
https://ik.imagekit.io/ikmedia/product-clothes-3.jpg?tr=w-300
Need a 300 x 400 image? It should not be a problem with ImageKit's resizing parameters.
https://ik.imagekit.io/ikmedia/product-clothes-3.jpg?tr=w-300,h-400
Like the examples above, ImageKit offers over 50 different transformations, from simple cropping and resizing to more complex ones like watermarking, smart crop, blurring, background change, etc.
These transformations help us deliver responsive images to your users, ensuring excellent performance across devices.
<img srcset="https://ik.imagekit.io/ikmedia/product-clothes-3.jpg?tr=w-300 300w,
	  https://ik.imagekit.io/ikmedia/product-clothes-3.jpg?tr=w-600 600w,
          https://ik.imagekit.io/ikmedia/product-clothes-3.jpg?tr=w-900 900w"
     sizes="(max-width: 480px) 300px, 50vw" />
Example of a responsive image tag
We can also use some of the advanced transformations and go a step further.
Using image and text overlays, we can build rich contextual images and dynamic banners in real-time. Because we can now create a theoretically infinite number of variations in real-time, we can use them for retargeting our users on social media or e-mail.
Here is an example.
In the image below, we have added the company logo and the product's price as text on an image of a shoe using URL parameters to create an image that provides more context to the users. Here, you can check the transformed image URL.

Here is a video demonstrating some of the transformations available in ImageKit.
Improving Lighthouse score for images in Google Cloud Storage
All popular web performance measurement tools, including Lighthouse, PageSpeed, Web Page Test, etc., have items related to image optimization and delivery in their reports. If not resolved, these negatively impact your website's performance and therefore, the SEO and UX on your web page.
With ImageKit, the images in your storage get automatically optimized to the right format, right compression level, and you get the flexibility to resize and transform them to the exact size needed for your UI. The integrated CDN delivers the images in milliseconds to every user across the globe, which helps improve the load time.
These features help you resolve all the image-related issues in web performance reports. A better score, as a result of it, helps you improve your SEO rankings and the user experience you deliver to your customers.
Resize your Images right away!
ImageKit provides a Forever Free plan with 20GB of output bandwidth every month absolutely free.
It can be integrated with your Cloud Storage bucket as shown above and has all the image optimization and transformation features you need to deliver the right images across devices.
Sign up now and start delivering perfectly optimized images on your websites and apps.