


This article is also available in Chinese 简体中文.
ggml is a machine learning (ML) library written in C and C++ with a focus on Transformer inference. The project is open-source and is being actively developed by a growing community. ggml is similar to ML libraries such as PyTorch and TensorFlow, though it is still in its early stages of development and some of its fundamentals are still changing rapidly.
Over time, ggml has gained popularity alongside other projects like llama.cpp and whisper.cpp. Many other projects also use ggml under the hood to enable on-device LLM, including ollama, jan, LM Studio, GPT4All.
The main reasons people choose to use ggml over other libraries are:
However, ggml also comes with some disadvantages that you need to keep in mind when using it (this list may change in future versions of ggml):
In this article, we will focus on the fundamentals of ggml for developers looking to get started with the library. We do not cover higher-level tasks such as LLM inference with llama.cpp, which builds upon ggml. Instead, we'll explore the core concepts and basic usage of ggml to provide a solid foundation for further learning and development.
Great, so how do you start?
For simplicity, this guide will show you how to compile ggml on Ubuntu. In reality, you can compile ggml on virtually any platform (including Windows, macOS, and BSD).
# Start by installing build dependencies
# "gdb" is optional, but is recommended
sudo apt install build-essential cmake git gdb

# Then, clone the repository
git clone https://github.com/ggerganov/ggml.git
cd ggml

# Try compiling one of the examples
cmake -B build
cmake --build build --config Release --target simple-ctx

# Run the example
./build/bin/simple-ctx
Expected output:
mul mat (4 x 3) (transposed result):
[ 60.00 55.00 50.00 110.00
 90.00 54.00 54.00 126.00
 42.00 29.00 28.00 64.00 ]
If you see the expected result, that means we're good to go!
Before diving deep into ggml, we should understand some key concepts. If you're coming from high-level libraries like PyTorch or TensorFlow, these may seem challenging to grasp. However, keep in mind that ggml is a low-level library. Understanding these terms can give you much more control over performance:
ggml_backend. For example, if you want to perform calculations on a GPU, you need to allocate memory on the GPU via buffer_type (usually abbreviated as buft).buffer_type. Remember: a buffer can hold the data of multiple tensors.In this example, we'll go through the steps to replicate the code we ran in Getting Started. We need to create 2 matrices, multiply them and get the result. Using PyTorch, the code looks like this:
import torch

# Create two matrices
matrix1 = torch.tensor([
  [2, 8],
  [5, 1],
  [4, 2],
  [8, 6],
])
matrix2 = torch.tensor([
  [10, 5],
  [9, 9],
  [5, 4],
])

# Perform matrix multiplication
result = torch.matmul(matrix1, matrix2.T)
print(result.T)
With ggml, the following steps must be done to achieve the same result:
ggml_context to store tensor dataggml_cgraph for mul_mat operationNOTE: In this example, we will allocate the tensor data inside the ggml_context for simplicity. In practice, memory should be allocated as a device buffer, as we'll see in the next section.
To get started, let's create a new directory examples/demo
cd ggml # make sure you're in the project root

# create C source and CMakeLists file
touch examples/demo/demo.c
touch examples/demo/CMakeLists.txt
The code for this example is based on simple-ctx.cpp
Edit examples/demo/demo.c with the content below:
#include "ggml.h"
#include "ggml-cpu.h"
#include <string.h>
#include <stdio.h>

int main(void) {
    // initialize data of matrices to perform matrix multiplication
    const int rows_A = 4, cols_A = 2;
    float matrix_A[rows_A * cols_A] = {
        2, 8,
        5, 1,
        4, 2,
        8, 6
    };
    const int rows_B = 3, cols_B = 2;
    float matrix_B[rows_B * cols_B] = {
        10, 5,
        9, 9,
        5, 4
    };

    // 1. Allocate `ggml_context` to store tensor data
    // Calculate the size needed to allocate
    size_t ctx_size = 0;
    ctx_size += rows_A * cols_A * ggml_type_size(GGML_TYPE_F32); // tensor a
    ctx_size += rows_B * cols_B * ggml_type_size(GGML_TYPE_F32); // tensor b
    ctx_size += rows_A * rows_B * ggml_type_size(GGML_TYPE_F32); // result
    ctx_size += 3 * ggml_tensor_overhead(); // metadata for 3 tensors
    ctx_size += ggml_graph_overhead(); // compute graph
    ctx_size += 1024; // some overhead (exact calculation omitted for simplicity)

    // Allocate `ggml_context` to store tensor data
    struct ggml_init_params params = {
        /*.mem_size   =*/ ctx_size,
        /*.mem_buffer =*/ NULL,
        /*.no_alloc   =*/ false,
    };
    struct ggml_context * ctx = ggml_init(params);

    // 2. Create tensors and set data
    struct ggml_tensor * tensor_a = ggml_new_tensor_2d(ctx, GGML_TYPE_F32, cols_A, rows_A);
    struct ggml_tensor * tensor_b = ggml_new_tensor_2d(ctx, GGML_TYPE_F32, cols_B, rows_B);
    memcpy(tensor_a->data, matrix_A, ggml_nbytes(tensor_a));
    memcpy(tensor_b->data, matrix_B, ggml_nbytes(tensor_b));


    // 3. Create a `ggml_cgraph` for mul_mat operation
    struct ggml_cgraph * gf = ggml_new_graph(ctx);

    // result = a*b^T
    // Pay attention: ggml_mul_mat(A, B) ==> B will be transposed internally
    // the result is transposed
    struct ggml_tensor * result = ggml_mul_mat(ctx, tensor_a, tensor_b);

    // Mark the "result" tensor to be computed
    ggml_build_forward_expand(gf, result);

    // 4. Run the computation
    int n_threads = 1; // Optional: number of threads to perform some operations with multi-threading
    ggml_graph_compute_with_ctx(ctx, gf, n_threads);

    // 5. Retrieve results (output tensors)
    float * result_data = (float *) result->data;
    printf("mul mat (%d x %d) (transposed result):\n[", (int) result->ne[0], (int) result->ne[1]);
    for (int j = 0; j < result->ne[1] /* rows */; j++) {
        if (j > 0) {
            printf("\n");
        }

        for (int i = 0; i < result->ne[0] /* cols */; i++) {
            printf(" %.2f", result_data[j * result->ne[0] + i]);
        }
    }
    printf(" ]\n");

    // 6. Free memory and exit
    ggml_free(ctx);
    return 0;
}
Write these lines in the examples/demo/CMakeLists.txt file you created:
set(TEST_TARGET demo)
add_executable(${TEST_TARGET} demo)
target_link_libraries(${TEST_TARGET} PRIVATE ggml)
Edit examples/CMakeLists.txt, add this line at the end:
add_subdirectory(demo)
Compile and run it:
cmake -B build
cmake --build build --config Release --target demo

# Run it
./build/bin/demo
Expected result:
mul mat (4 x 3) (transposed result):
[ 60.00 55.00 50.00 110.00
 90.00 54.00 54.00 126.00
 42.00 29.00 28.00 64.00 ]
"Backend" in ggml refers to an interface that can handle tensor operations. Backend can be CPU, CUDA, Vulkan, etc.
The backend abstracts the execution of the computation graphs. Once defined, a graph can be computed with the available hardware by using the respective backend implementation. Note that ggml will automatically reserve memory for any intermediate tensors necessary for the computation and will optimize the memory usage based on the lifetime of these intermediate results.
When doing a computation or inference with backend, common steps that need to be done are:
ggml_backendggml_context to store tensor metadata (we don't need to allocate tensor data right away)ggml_backend_buffer to store all tensorsggml_cgraph for mul_mat operationggml_gallocr for cgraph allocationggml_backend_schedThe code for this example is based on simple-backend.cpp
#include "ggml.h"
#include "ggml-alloc.h"
#include "ggml-backend.h"
#ifdef GGML_USE_CUDA
#include "ggml-cuda.h"
#endif

#include <stdlib.h>
#include <string.h>
#include <stdio.h>

int main(void) {
    // initialize data of matrices to perform matrix multiplication
    const int rows_A = 4, cols_A = 2;
    float matrix_A[rows_A * cols_A] = {
        2, 8,
        5, 1,
        4, 2,
        8, 6
    };
    const int rows_B = 3, cols_B = 2;
    float matrix_B[rows_B * cols_B] = {
        10, 5,
        9, 9,
        5, 4
    };

    // 1. Initialize backend
    ggml_backend_t backend = NULL;
#ifdef GGML_USE_CUDA
    fprintf(stderr, "%s: using CUDA backend\n", __func__);
    backend = ggml_backend_cuda_init(0); // init device 0
    if (!backend) {
        fprintf(stderr, "%s: ggml_backend_cuda_init() failed\n", __func__);
    }
#endif
    // if there aren't GPU Backends fallback to CPU backend
    if (!backend) {
        backend = ggml_backend_cpu_init();
    }

    // Calculate the size needed to allocate
    size_t ctx_size = 0;
    ctx_size += 2 * ggml_tensor_overhead(); // tensors
    // no need to allocate anything else!

    // 2. Allocate `ggml_context` to store tensor data
    struct ggml_init_params params = {
        /*.mem_size   =*/ ctx_size,
        /*.mem_buffer =*/ NULL,
        /*.no_alloc   =*/ true, // the tensors will be allocated later by ggml_backend_alloc_ctx_tensors()
    };
    struct ggml_context * ctx = ggml_init(params);

    // Create tensors metadata (only there shapes and data type)
    struct ggml_tensor * tensor_a = ggml_new_tensor_2d(ctx, GGML_TYPE_F32, cols_A, rows_A);
    struct ggml_tensor * tensor_b = ggml_new_tensor_2d(ctx, GGML_TYPE_F32, cols_B, rows_B);

    // 4. Allocate a `ggml_backend_buffer` to store all tensors
    ggml_backend_buffer_t buffer = ggml_backend_alloc_ctx_tensors(ctx, backend);

    // 5. Copy tensor data from main memory (RAM) to backend buffer
    ggml_backend_tensor_set(tensor_a, matrix_A, 0, ggml_nbytes(tensor_a));
    ggml_backend_tensor_set(tensor_b, matrix_B, 0, ggml_nbytes(tensor_b));

    // 6. Create a `ggml_cgraph` for mul_mat operation
    struct ggml_cgraph * gf = NULL;
    struct ggml_context * ctx_cgraph = NULL;
    {
        // create a temporally context to build the graph
        struct ggml_init_params params0 = {
            /*.mem_size   =*/ ggml_tensor_overhead()*GGML_DEFAULT_GRAPH_SIZE + ggml_graph_overhead(),
            /*.mem_buffer =*/ NULL,
            /*.no_alloc   =*/ true, // the tensors will be allocated later by ggml_gallocr_alloc_graph()
        };
        ctx_cgraph = ggml_init(params0);
        gf = ggml_new_graph(ctx_cgraph);

        // result = a*b^T
        // Pay attention: ggml_mul_mat(A, B) ==> B will be transposed internally
        // the result is transposed
        struct ggml_tensor * result0 = ggml_mul_mat(ctx_cgraph, tensor_a, tensor_b);

        // Add "result" tensor and all of its dependencies to the cgraph
        ggml_build_forward_expand(gf, result0);
    }

    // 7. Create a `ggml_gallocr` for cgraph computation
    ggml_gallocr_t allocr = ggml_gallocr_new(ggml_backend_get_default_buffer_type(backend));
    ggml_gallocr_alloc_graph(allocr, gf);

    // (we skip step 8. Optionally: schedule the cgraph using `ggml_backend_sched`)

    // 9. Run the computation
    int n_threads = 1; // Optional: number of threads to perform some operations with multi-threading
    if (ggml_backend_is_cpu(backend)) {
        ggml_backend_cpu_set_n_threads(backend, n_threads);
    }
    ggml_backend_graph_compute(backend, gf);

    // 10. Retrieve results (output tensors)
    // in this example, output tensor is always the last tensor in the graph
    struct ggml_tensor * result = ggml_graph_node(gf, -1);
    float * result_data = malloc(ggml_nbytes(result));
    // because the tensor data is stored in device buffer, we need to copy it back to RAM
    ggml_backend_tensor_get(result, result_data, 0, ggml_nbytes(result));
    printf("mul mat (%d x %d) (transposed result):\n[", (int) result->ne[0], (int) result->ne[1]);
    for (int j = 0; j < result->ne[1] /* rows */; j++) {
        if (j > 0) {
            printf("\n");
        }

        for (int i = 0; i < result->ne[0] /* cols */; i++) {
            printf(" %.2f", result_data[j * result->ne[0] + i]);
        }
    }
    printf(" ]\n");
    free(result_data);

    // 11. Free memory and exit
    ggml_free(ctx_cgraph);
    ggml_gallocr_free(allocr);
    ggml_free(ctx);
    ggml_backend_buffer_free(buffer);
    ggml_backend_free(backend);
    return 0;
}
Compile and run it, you should get the same result as the last example:
cmake -B build
cmake --build build --config Release --target demo

# Run it
./build/bin/demo
Expected result:
mul mat (4 x 3) (transposed result):
[ 60.00 55.00 50.00 110.00
 90.00 54.00 54.00 126.00
 42.00 29.00 28.00 64.00 ]
The ggml_cgraph represents the computational graph, which defines the order of operations that will be executed by the backend. Printing the graph can be a helpful debugging tool, especially when working with more complex models and computations.
You can add ggml_graph_print to print the cgraph:
...

// Mark the "result" tensor to be computed
ggml_build_forward_expand(gf, result0);

// Print the cgraph
ggml_graph_print(gf);
Run it:
=== GRAPH ===
n_nodes = 1
 -   0: [     4,     3,     1]          MUL_MAT
n_leafs = 2
 -   0: [     2,     4]     NONE           leaf_0
 -   1: [     2,     3]     NONE           leaf_1
========================================
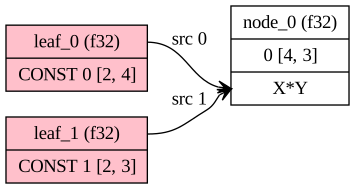
Additionally, you can draw the cgraph as graphviz dot format:
ggml_graph_dump_dot(gf, NULL, "debug.dot");
You can use the dot command or this online website to render debug.dot into a final image:
This article has provided an introductory overview of ggml, covering the key concepts, a simple usage example, and an example using a backend. While we've covered the basics, there is much more to explore when it comes to ggml.
In upcoming articles, we'll dive deeper into other ggml-related subjects, such as the GGUF format, quantization, and how the different backends are organized and utilized. Additionally, you can visit the ggml examples directory to see more advanced use cases and sample code. Stay tuned for more ggml content in the future!
此内容由惯性聚合(RSS阅读器)自动聚合整理,仅供阅读参考。 原文来自 — 版权归原作者所有。