


惯性聚合 高效追踪和阅读你感兴趣的博客、新闻、科技资讯
阅读原文 在惯性聚合中打开

推荐订阅源

V2EX - 技术
V2EX - 技术
博客园 - Franky
The GitHub Blog
The GitHub Blog
Y
Y Combinator Blog
MongoDB | Blog
MongoDB | Blog
C
Check Point Blog
P
Proofpoint News Feed
雷峰网
雷峰网
F
Fortinet All Blogs
酷 壳 – CoolShell
酷 壳 – CoolShell
I
InfoQ
H
Help Net Security
T
Tailwind CSS Blog
博客园 - 聂微东
博客园 - 【当耐特】
S
Schneier on Security
The Hacker News
The Hacker News
I
Intezer
博客园 - 三生石上(FineUI控件)
量子位
AWS News Blog
AWS News Blog
T
The Exploit Database - CXSecurity.com
腾讯CDC
Hugging Face - Blog
Hugging Face - Blog
P
Palo Alto Networks Blog
P
Privacy International News Feed
V
Vulnerabilities – Threatpost
NISL@THU
NISL@THU
宝玉的分享
宝玉的分享
Cyberwarzone
Cyberwarzone
cs.AI updates on arXiv.org
T
Threat Research - Cisco Blogs
Microsoft Azure Blog
B
Blog
T
The Blog of Author Tim Ferriss
Security Latest
Security Latest
H
Hacker News: Front Page
Vercel News
Vercel News
A
Arctic Wolf
L
LINUX DO - 热门话题
G
GRAHAM CLULEY
Simon Willison's Weblog
Google Online Security Blog
W
WeLiveSecurity
Scott Helme
Scott Helme
Hacker News - Newest:
Hacker News - Newest: "LLM"
O
OpenAI News
TaoSecurity Blog
TaoSecurity Blog
Jina AI
Jina AI
爱范儿
爱范儿

NetBird - Networking Knowledge Hub - RSS Feed

NetBird Is Now on the Vultr Marketplace Native NetBird on the GL.iNet Comet Pro (GL-RM10) NetBird v0.71 - IPv6 Overlay Addressing NetBird Exit Nodes - Appear at Home, or Anywhere Else Reporting Bugs and Requesting Features in NetBird Setup and Use Local AdGuard Home Anywhere with NetBird DNS How to Set Up NetBird on PiKVM for Secure Remote KVM Access NetBird v0.69 - CrowdSec IP Reputation for the Reverse Proxy Cloudflare Mesh vs NetBird vs Tailscale: Performance Compared Self-Hosting Nextcloud with Docker and NetBird Implementing Zero Trust with NetBird NetBird v0.67 - Layer 4 Proxy Support for TCP, UDP, and TLS Solwr Enhances Remote Connectivity with NetBird Self-Hosting NetBird with Authentik Jellyfin Media Server - Self-Host Your Movies, TV, and Music Cloudflare Tunnels vs. NetBird Reverse Proxy INFITX Builds Zero-Touch Kubernetes Networking with NetBird NetBird v0.66 - Expose Local Services to the Internet from the CLI Pangolin vs. NetBird Home Assistant Setup Guide with EASY Remote Access NetBird v0.65 - Built-in Reverse Proxy with Custom Domains Docker for Beginners - Everything You Need to Get Started NetBird for SOC 2 Compliance NetBird v0.63 - Custom DNS Zones for Private Network Resolution Vibecode This in a Weekend and Take 5% of the Company NetBird v0.62 - Built-in Local Users with Optional IdP Integration NetBird v0.61.0 - Granular SSH Access Control and Automatic Updates Top 5 Alternatives to OpenVPN Top 5 Open Source Alternatives to Tailscale Top 5 Alternatives to ZeroTier How to Set Up ZeroByte and REST Server for Backups with NetBird How to Install n8n v2.0 with NPM and PM2 ZeroTier vs. NetBird The Ultimate Immich Guide - Ditch Google and Amazon Photos for Good NetBird as Your Help with ISO 27001 Compliance NetBird and Huntress - Secure Network Access for MSPs How to Access Windows Shares from Anywhere with NetBird netgo Relies on Modern ZTNA with NetBird NetBird SSH - A New, Identity-Aware Approach The AI Mega Mesh: How to Connect 30+ GPU Cloud Providers Connect Multiple Ollama GPUs to OpenWebUI with NetBird Top 5 Tailscale Alternatives SSH and RDP, now in your browser NetBird–Acronis Integration: Empowering MSPs for Advanced Ransomware and Threat Defense Introducing the Control Center - Remote Access, Beautifully Visualized NetBird at MSP Global 2025 Understanding Overlay Networks - The Basics NetBird and SentinelOne Singularity™ - Automate Threat Response NetBird and Microsoft Intune - Enforcing Device Compliance for Zero Trust Rethinking Zero Trust Security with NetBird and pfSense Improving Unidirectional Access Control Proxmox VE for Beginners Guide with NetBird LXC Stronger Security: NetBird + GitHub Secure Open Source Fund NetBird's MSP Partner Program Signicat Enhances Cross-Cloud Accessibility with NetBird SonicWall SSL VPN NetExtender vs. NetBird NetBird Is Embracing the AGPLv3 License NetBird Profiles Have Landed - Manage Multiple Accounts Effortlessly Rethinking Access Control to Secure Your On-Premises SharePoint Servers Sport Alliance Increases Efficiency with Zero Trust Networking at Scale Rethinking Network Access: qwertiko Goes Zero Trust with NetBird Optimizing Network Efficiency with NetBird's Lazy Connections Use Port Ranges in Access Control Policies Generic HTTP Endpoint for Network Events Streaming NetBird’s Response to Spear-Phishing Campaign Targeting Financial Executives Zero-Trust Access to Internal Resources Without Installing Agents Enhance Network Visibility with NetBird’s Traffic Events Logging TrueNAS Made Easy - Install, Set Up, and Access From Anywhere Top 5 Alternatives for WireGuard Jump Hosts. Gateways for Remote Access NetBird Network Routes and Exit Nodes Security for All - SSO and MFA for Free Enhancing Network Access Control with NetBird's Identity Provider Feature Twingate vs. NetBird Limit Network Access Based on Running Applications FortiClient ZTNA vs. NetBird OpenVPN vs. NetBird Tailscale vs. NetBird Getting Started with an Azure Site-to-Site VPN Getting Started with an On-premise-to-AWS Site-to-Site VPN Secure Remote Access to VPCs, LANs, and Offices regreSSHion - A New OpenSSH Server Remote Code Execution Vulnerability Evolve Bank & Trust Data Breach. What Happened? What Is a Site-to-Site VPN? IPSec Tunneling Demystified. Enhancing Data Security Across Networks Understanding IPSec Tunnel and Transport Modes Understanding the Differences Between IKEv1 and IKEv2 Understanding the IKEv1 Protocol in IPSec ZeroTier versus NetBird - Which Should You Choose? AWS Lambda Serverless Security. Mistakes, Oversights, and Potential Vulnerabilities Using NetBird for Kubernetes Access Serverless Security Vulnerabilities and Best Practices to Mitigate Them Security Best Practices for Serverless Azure Functions A Guide to Remote Access Security for SMEs IoT Security Essentials. How to Achieve Secure Remote Access Open Source Zero Trust Networking Using SSH for Secure Remote Access How We Integrated Rosenpass in NetBird The First Quantum-Resistant Mesh VPN Using eBPF and XDP to Share Default DNS Port Between Multiple Resolvers
Connect to Your Homelab from Anywhere with a Raspberry Pi
Written byBrandon Hopkins · 2025-11-28 · via NetBird - Networking Knowledge Hub - RSS Feed

What We're Doing and Why

Setting up secure remote access to your homelab shouldn't require complex VPN configurations, port forwarding, or exposing services to the internet. In this guide, we'll use a Raspberry Pi as a NetBird routing peer that provides secure, zero-trust access to your entire homelab network from anywhere in the world.

This approach eliminates exposed ports entirely while giving you granular access control over exactly which devices and services are accessible. All traffic runs through WireGuard encrypted tunnels without the complexity of managing WireGuard configurations, and the mesh networking architecture means you get direct peer-to-peer connections whenever possible, avoiding single points of failure.
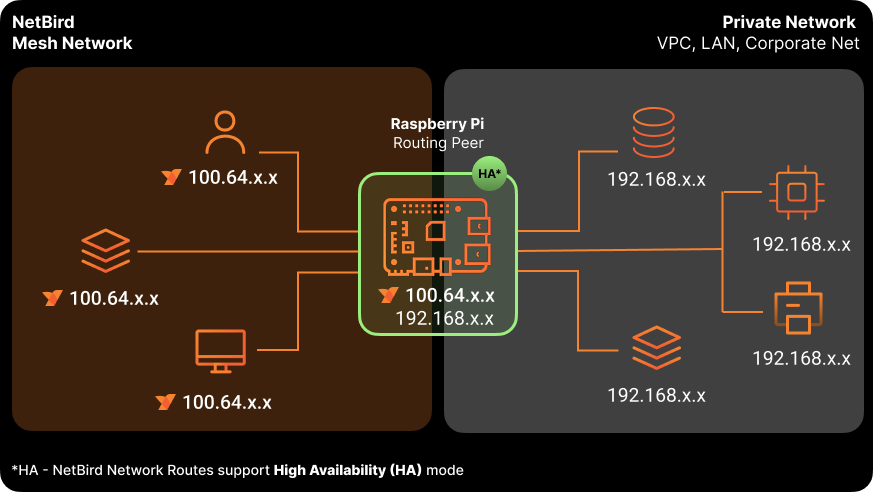
Raspberry Pi as Routing Peer

Why a Raspberry Pi?

We're using a Raspberry Pi for this guide because it's affordable, energy-efficient, and widely available. However, this exact same setup works on virtually any Linux-based system including other single-board computers like Orange Pi or ODROID, mini PCs from Intel NUC to Minisforum, NAS devices, virtual machines on Proxmox or VMware, old laptops, or even routers such as pfSense and OPNsense .

The Raspberry Pi is perfect for this use case because it consumes minimal power at just 5-15W, runs silently 24/7, and takes up virtually no space in your rack or network closet. For less than $100, you get a complete setup with excellent community support that can handle routing for most home networks without issue.

Setting Up the Raspberry Pi with Ubuntu Server

Why Ubuntu Server?

While this guide works with any Pi distribution whether that's Raspberry Pi OS, DietPi, or other Linux distros, we're using Ubuntu Server because it's headless by default with no GUI overhead wasting resources. It's the same Ubuntu you'll find in enterprise deployments, which means consistent tooling and excellent ARM64 support with regular security updates. Most importantly, if you're familiar with using Linux, you already know Ubuntu.

Installation with Raspberry Pi Imager

Start by downloading Raspberry Pi Imager for your operating system and inserting a microSD card with at least 8GB of capacity, though 32GB is recommended for breathing room.
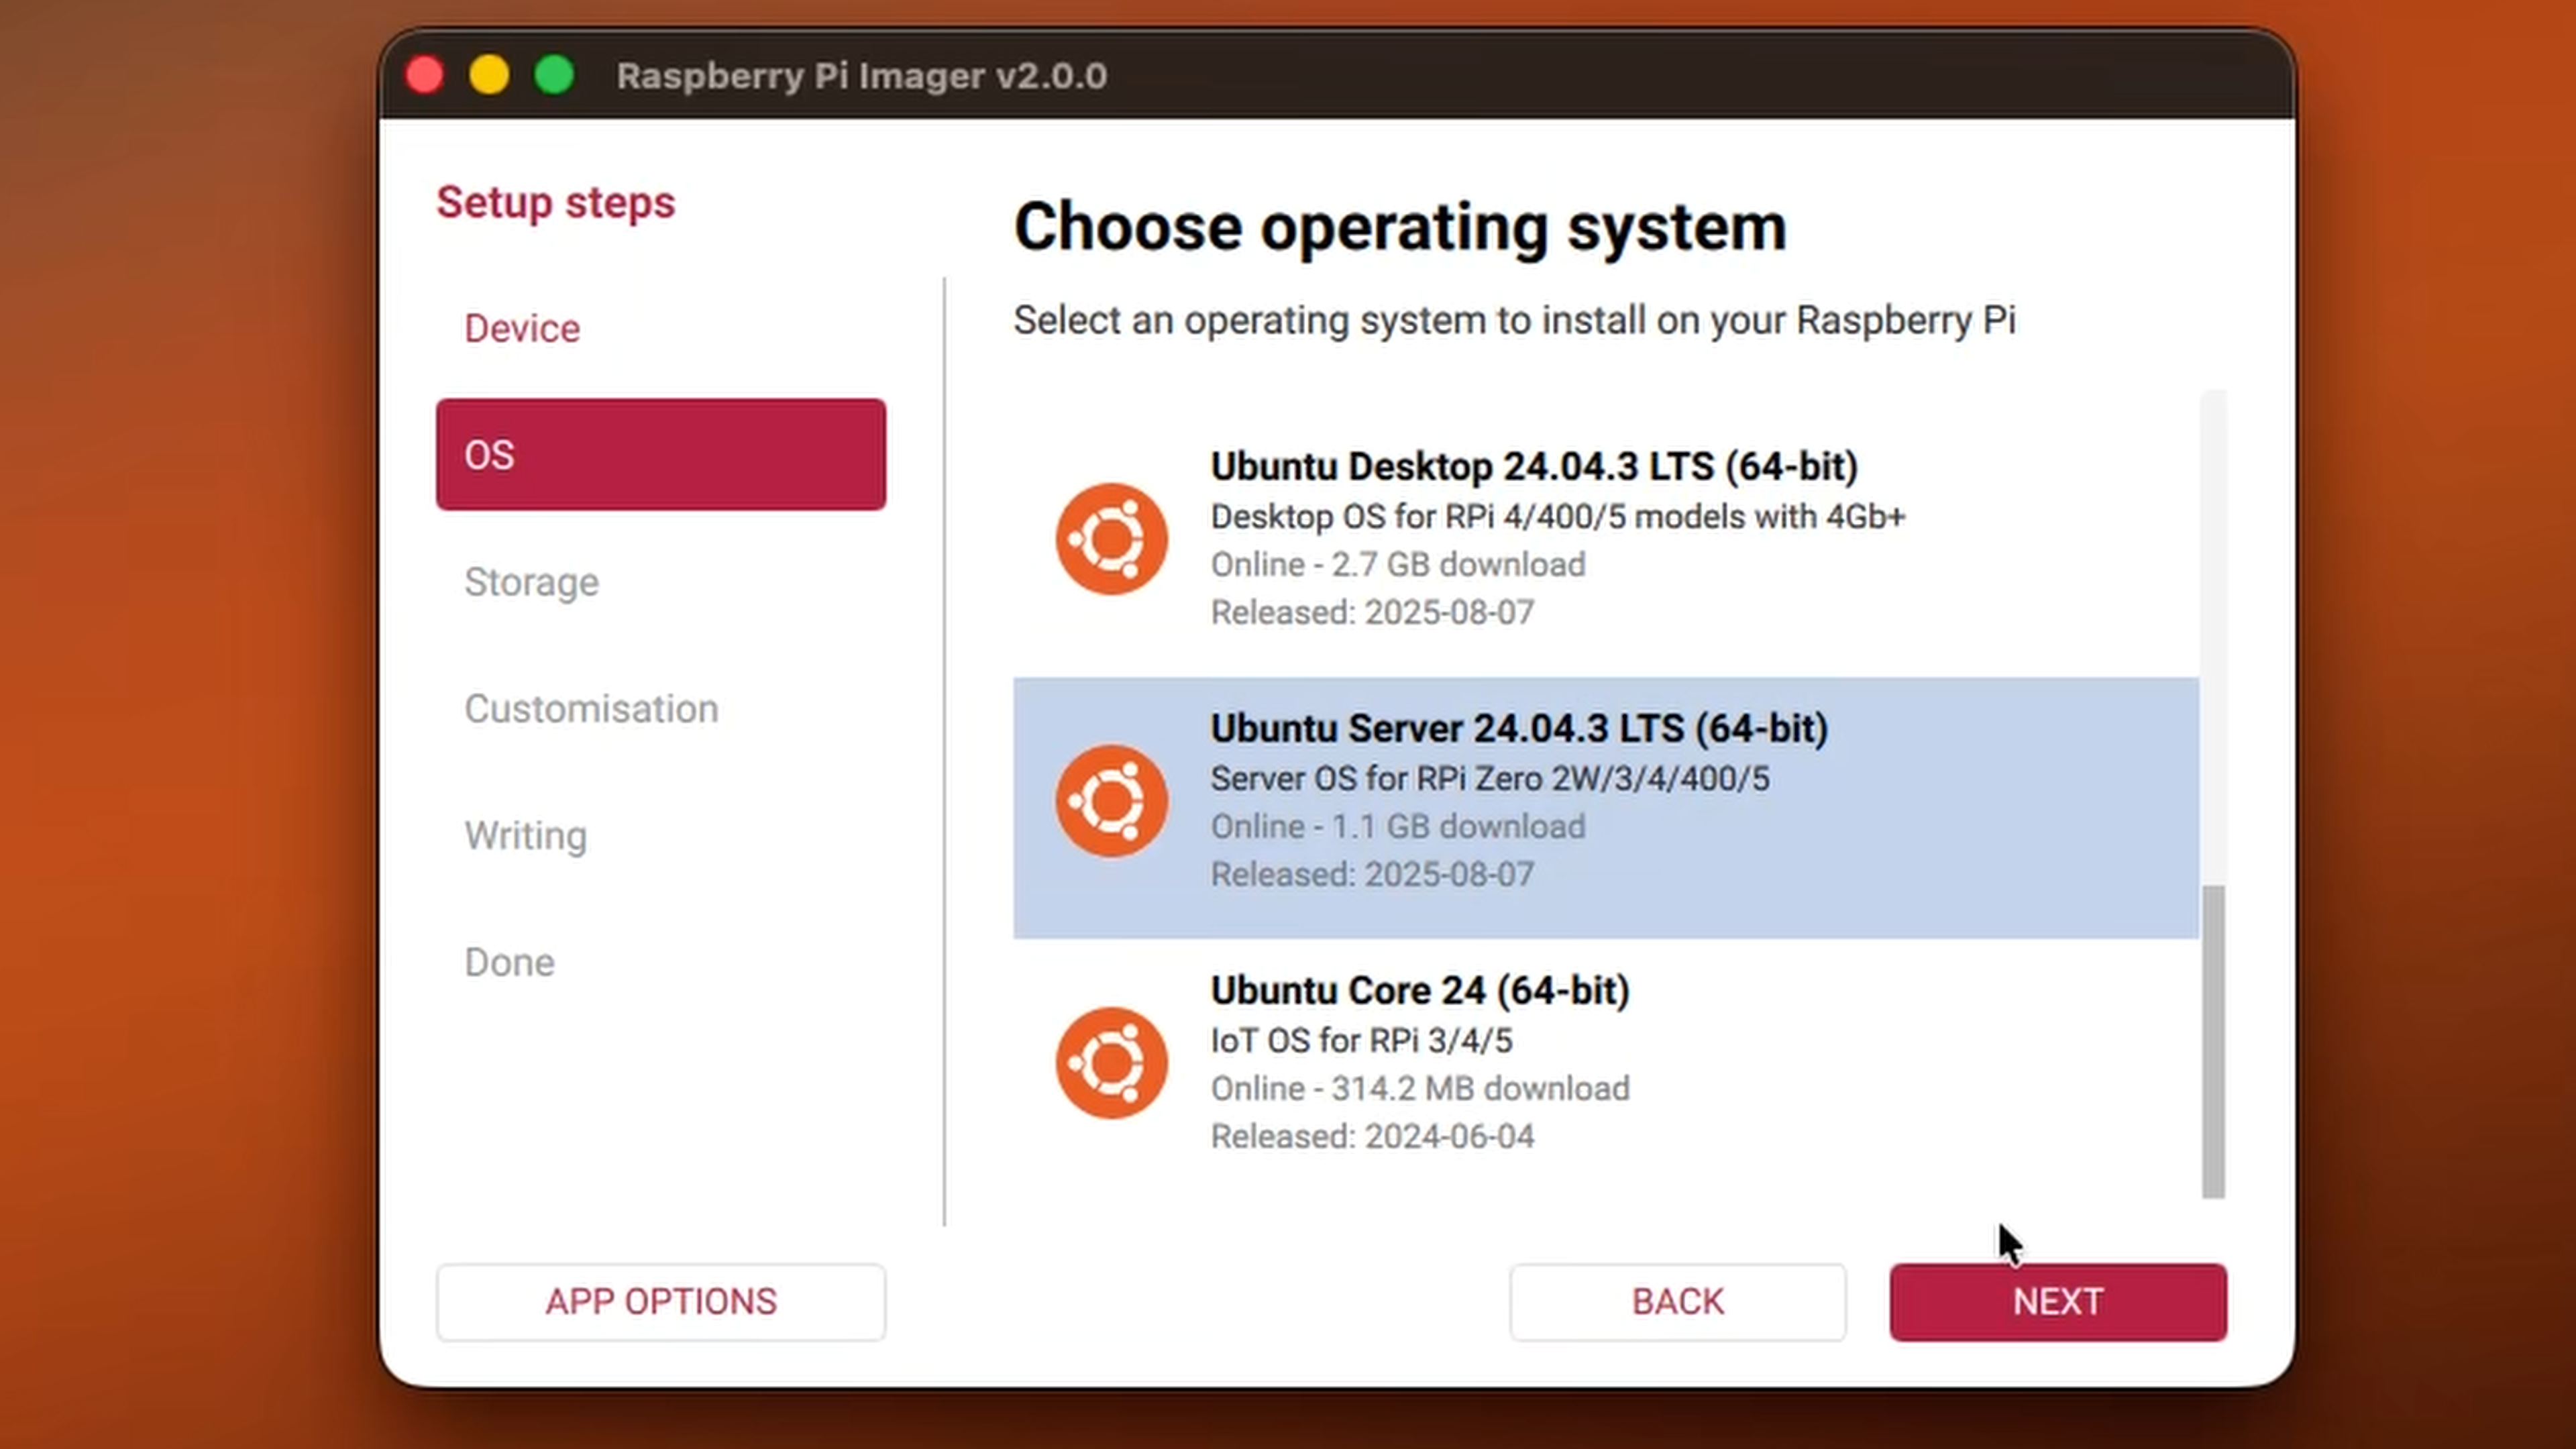
Raspberry Pi Imager

Open Raspberry Pi Imager and choose Ubuntu Server 24.04 LTS (64-bit) from the "Other general-purpose" OS section under Ubuntu. Select your microSD card as the storage destination, then click the gear icon to configure the advanced options. Here you'll set your hostname to something memorable like , enable SSH with password authentication, and configure your username and password. If you're not using Ethernet, add your WiFi credentials here as well, along with your locale and timezone settings.

Write the image to the card, insert it into your Pi, and power it on. It may take a couple minutes to complete its first boot sequence.

NOTE: Raspberry Pi has many many supported add-ons and accessories. For example, I have what is called a HAT for my Raspberry Pi 5. This HAT give me the ability to add a NVMe SSD, substantially increasing performance, and the option to use PoE for a single-cable setup.

Post-Install Setup and NetBird Installation

Initial Connection

Once your Pi boots, which typically takes 2-3 minutes on first run, connect via SSH using either the hostname you configured or the IP address assigned by your router:


System Updates

First, ensure your system is up to date:


Install NetBird with One Command

NetBird provides a simple one-line installation script that detects your system architecture, adds the NetBird repository, installs the latest stable version, and configures the service to start on boot:


Connect to Your NetBird Network

Run the following to authenticate and join your network:


This will present you with an Authentication URL. Open it in your browser, log in with your NetBird account, and approve the device. Alternatively, you can authenticate with a setup key. Learn more about generating setup key, learn more about that here .

Once the device is connected it should show up under the Peers page on the NetBird dashboard. Here we can quickly assign the Raspberry Pi a group. Within the Groups column click the pencil to edit and add the peer to a new group, this can be something like “RaspberryPi”.

Configuring NetBird as a Connector

Define Your Homelab Network as a Resource

Log into the NetBird Control Center and navigate to Networks. Click Add Network and give it a descriptive name like "Homelab Network". Then click the option that will come up automatically that says Add Resource. Give it a name and define the address with your homelab subnet such as . On this same dialog set a Destination Group this is the group your give users access so they can connect to the subnet, this can be something like “Homelab Subnet”. Select your Raspberry Pi as the routing peer and choose which distribution groups can access this route.
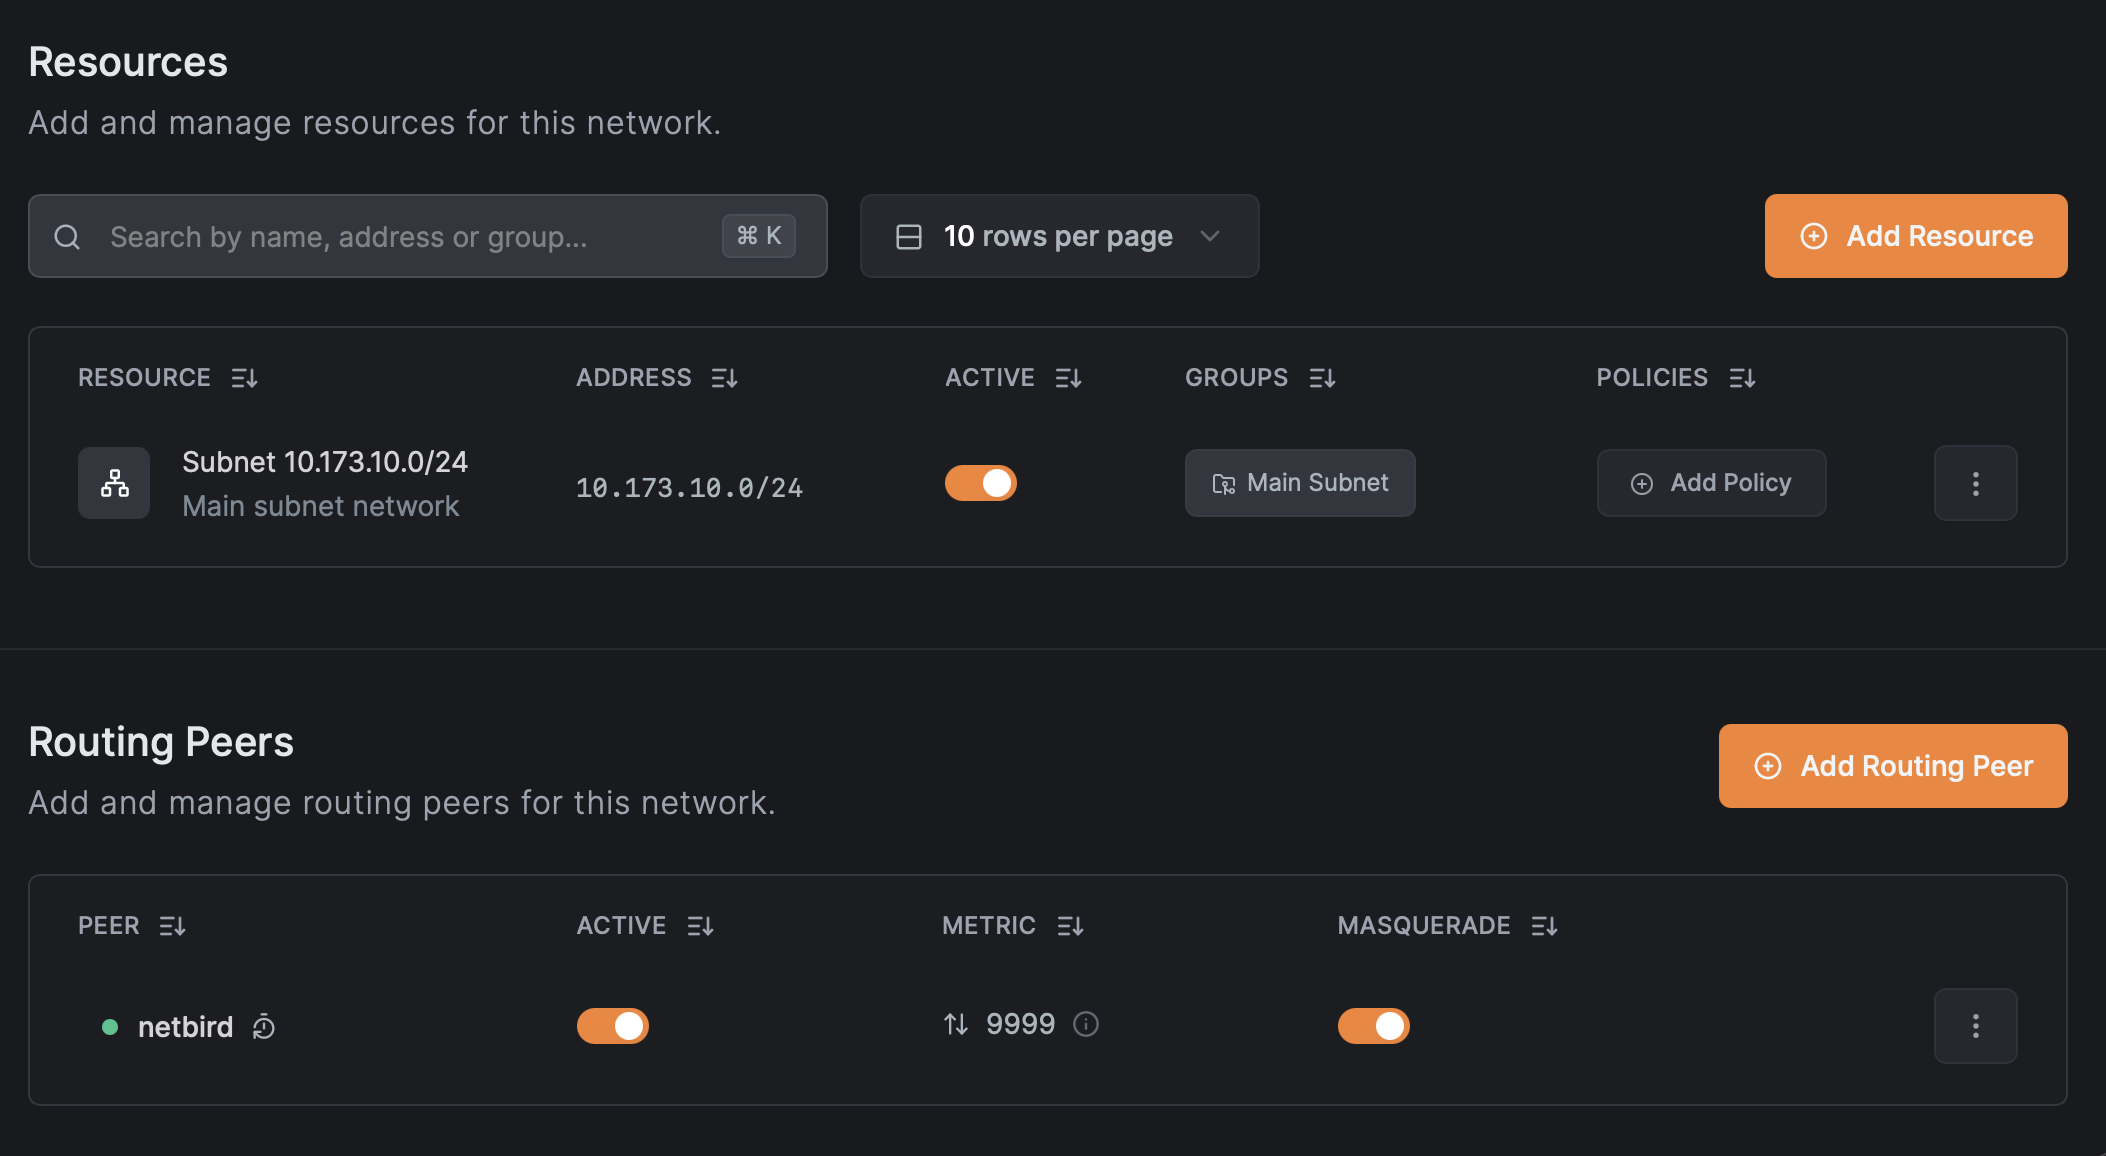
NetBird Networks

For more granular control, you can define specific IPs as resources instead of the entire network. For example, creating a route for just  with the name "Proxmox Server" and its own Destination Group allows you to grant access to specific services rather than blanket access to everything.

Creating Access Control Policies

Navigate to Access Controls to define who can access what. You might create a "Full Homelab Access" policy that allows your Admin group to reach the entire Homelab Network route, or a more restrictive "Web Services Only" policy that grants your Family group access to specific IPs on ports 80 and 443 only.

Testing Your Setup

From any device with NetBird installed and authenticated, you can verify the route is available with  from a client device, test connectivity to homelab devices with a simple ping, and access services directly using their internal IP addresses. Your Proxmox web UI, NAS admin panel, and other services are now accessible as if you were sitting at home.

Next Steps

  • Consider setting up DNS for internal hostnames to avoid remembering IP addresses.
  • Configure additional peers as backup gateways for redundancy.
  • Implement network segmentation with multiple routes for different security zones.
  • Add monitoring with NetBird's activity logs.
  • Explore NetBird's new SSH features.

This setup transforms your homelab into a securely accessible private cloud without the complexity of traditional VPN solutions or the security risks of port forwarding. The beauty of NetBird's approach is that it scales effortlessly - add more peers, define more routes, and create sophisticated access policies all from the central control panel.