











A site-to-site virtual private network (VPN) provides secure remote connectivity between private networks over public connections like the internet. This connectivity could be between two branches or data centers, or it could be from an on-premise network to a cloud network.
The Azure site-to-site VPN is one of the quickest methods to achieve secure remote connectivity between your on-premise network and Azure resources hosted in a virtual network. This is in comparison with a physical cross-connect using Azure ExpressRoute or a VPN based on a network virtual appliance (NVA).
In this article, you'll learn how to set up an Azure site-to-site VPN to provide secure remote connectivity between your on-premise network and a virtual network using the Azure portal. During this process, you'll create a virtual network, gateway subnet, VPN gateway, and a local network gateway. Then, you'll configure your VPN devices, create and verify those VPN connections, and finally, connect to a virtual machine.
Azure site-to-site VPN is an encrypted connection from an Azure VPN Gateway to a remote VPN device that supports IP security (IPsec) as a tunneling protocol. An Azure VPN Gateway is a Microsoft Azure platform-as-a-service (PaaS) offering that provides reliable, redundant, and high-performance connectivity between an Azure virtual network and remote sites:
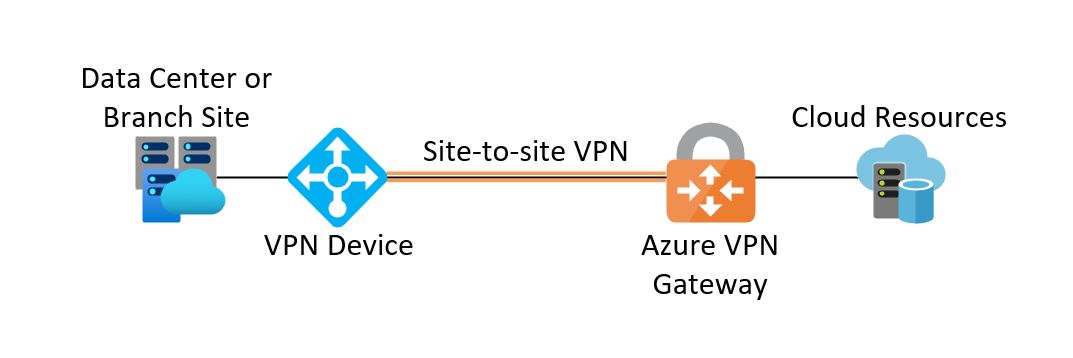
When configuring a site-to-site VPN over the internet, the VPN Gateway requires its own dedicated subnet and a public IP address. Azure offers multiple SKUs to facilitate specific performance and capacity requirements. As with most public cloud services, Azure site-to-site VPN incurs a cost for consumption that varies based on the SKU. Once the VPN Gateway is configured for an Azure site-to-site VPN, the Azure portal can produce a configuration template for the remote VPN device to simplify the on-premise part of the deployment.
In an Azure classic deployment model , each cloud resource exists independently, ungrouped, and unrelated from other resources. However, in its updated resource manager model , resource groups gather related resources. This latter model is recommended for all new deployments.
Before configuring an Azure site-to-site VPN, you need the following:
Once you have your prerequisites in place, it's time to create a virtual network (VNet) to connect the site-to-site VPN to private Azure resources. The virtual network contains subnets where you can deploy networking services, including the Azure VPN Gateway.
The following values are used in this guide, but you can adjust these values as needed:
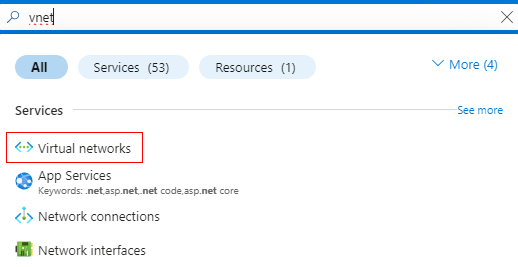
Log in to the Azure portal, type "vnet" in the search bar, and select Virtual networks to open its menu:
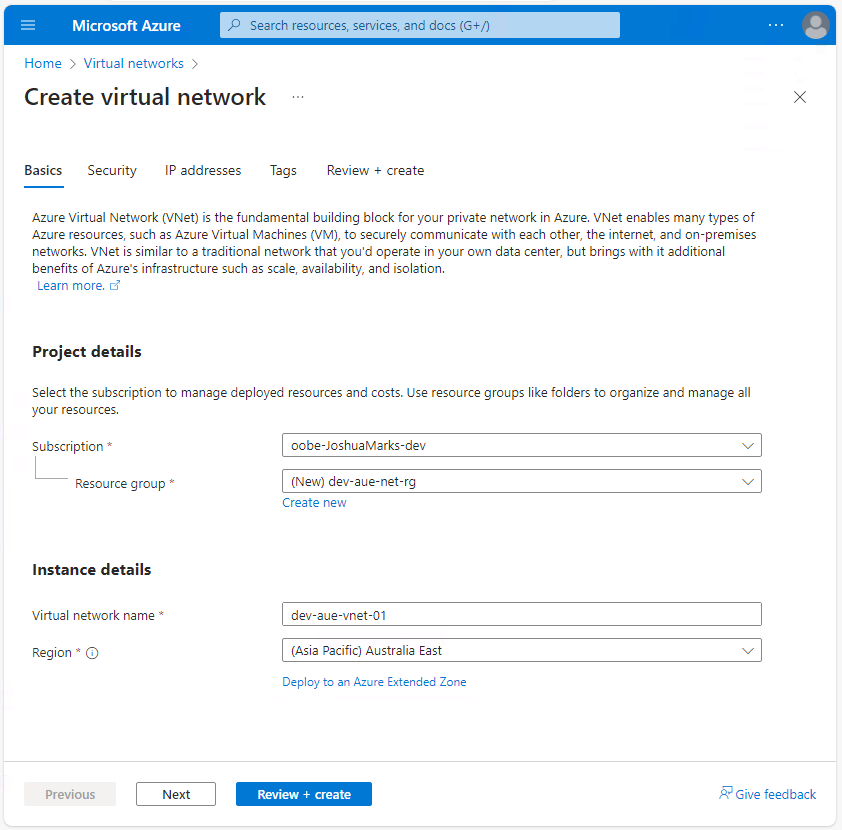
Select Create to enter the virtual network creation workflow. In the Basics tab, enter the required values and create a new resource group if necessary. Click Next at the bottom of the page after completing this step:
In the Security tab, enter any required configuration or leave the default values. Then click Next when done.
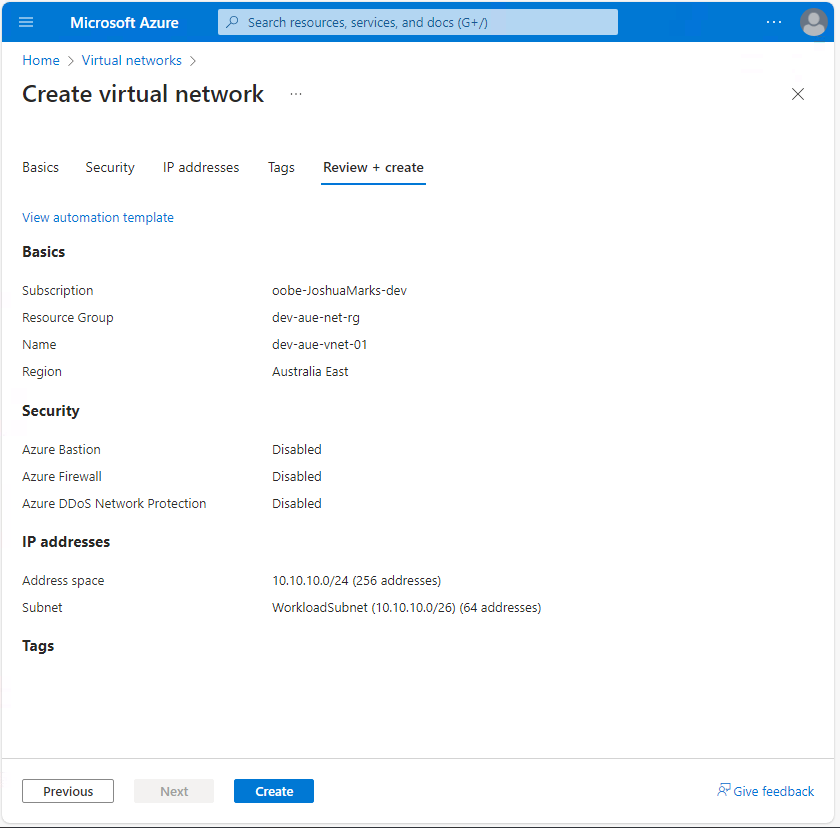
In the IP addresses tab, enter the allocated VNet IP address space and create the subnet (ie WorkloadSubnet). This subnet hosts the virtual machine that connects to the Azure site-to-site VPN:
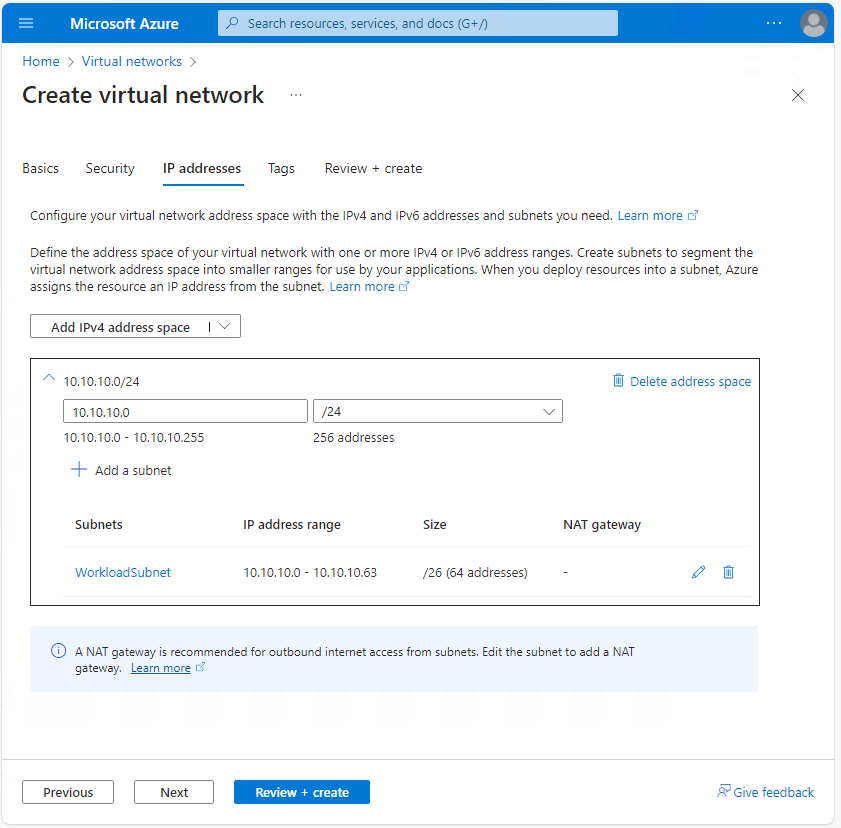
When complete, click Review + create. Review the workflow configuration summary and select Create to deploy the virtual network:
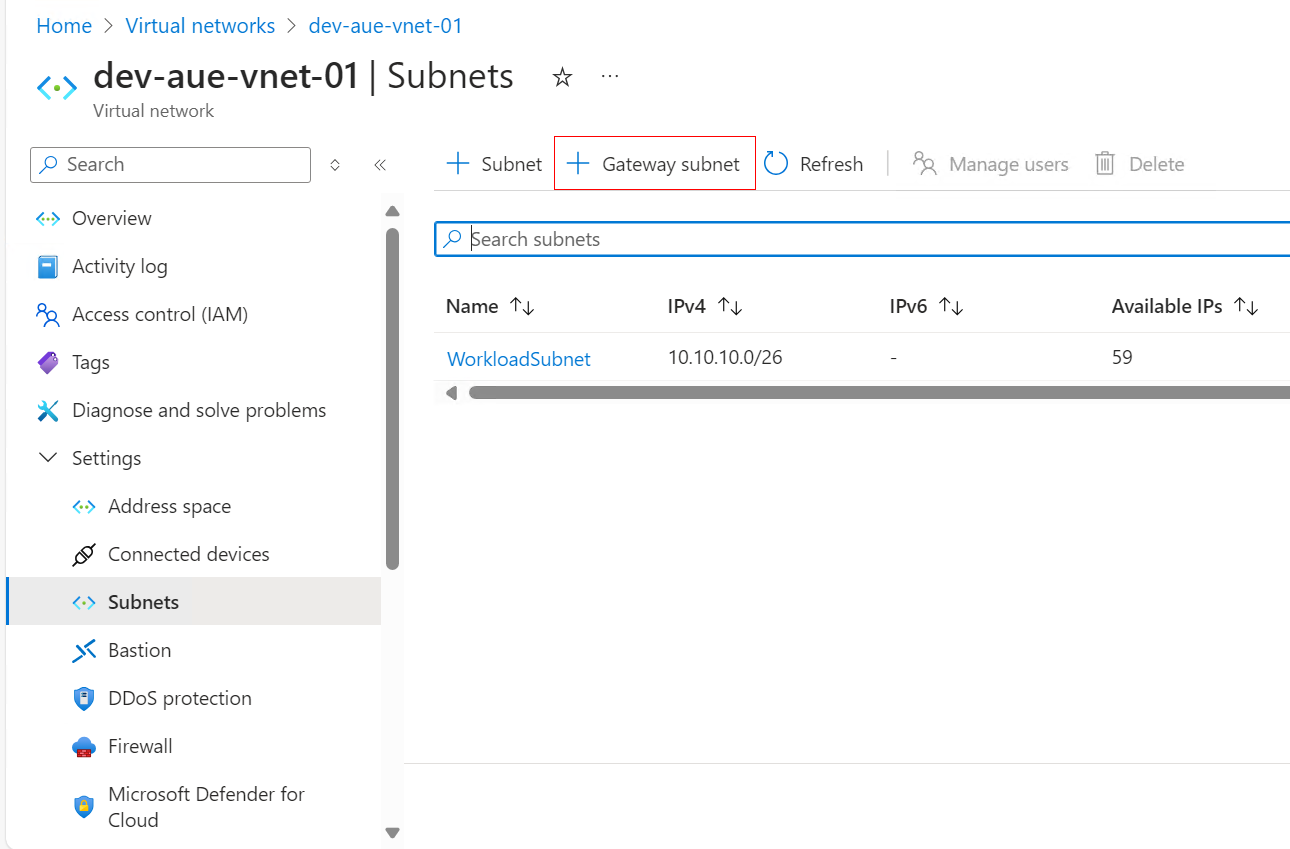
Before deploying a VPN Gateway, you need to create a gateway subnet to host it. Within your newly created virtual network, navigate to Settings > Subnets and select the + Gateway subnet button at the top of the page to enter the subnet creation flow:
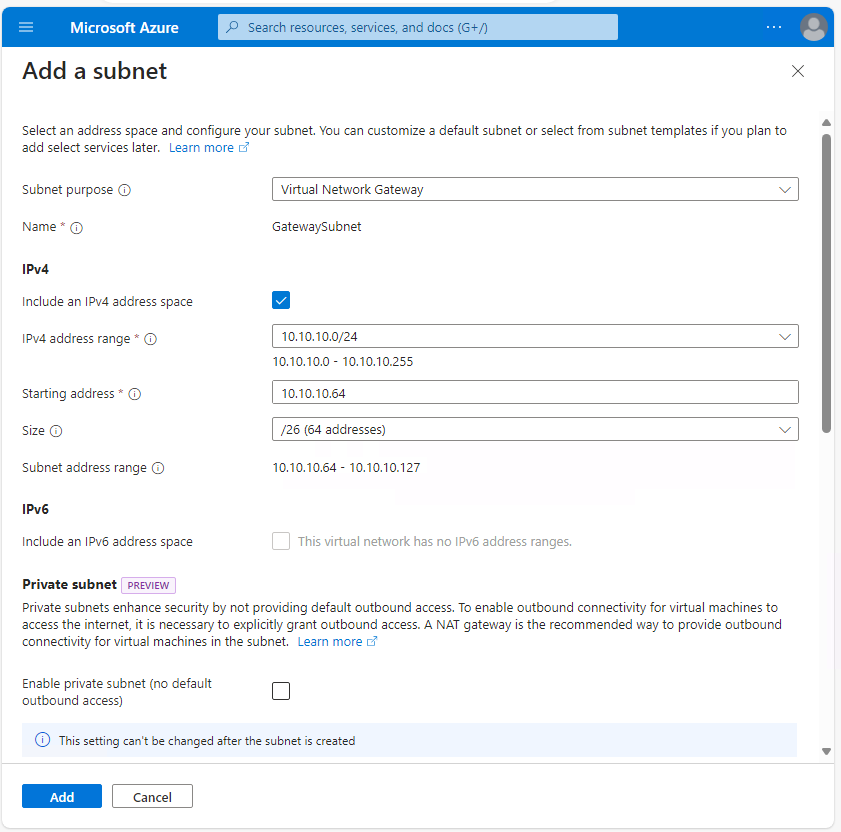
The Subnet purpose should be set to Virtual Network Gateway. Make sure you don't change this setting. Note that the subnet is automatically named GatewaySubnet. This is required for it to be dedicated to a VPN Gateway.
Enter the subnet allocation for the gateway subnet in the IPv4 section, ensuring that the Size field matches the desired subnet mask as this cannot be changed once the VPN Gateway has been deployed in the subnet. The subnet mask must be a /27 at minimum to support Azure VPN Gateway. A /26 is used in this example to allow for expansion for future use cases.
You haven't specified IPv6 for this virtual network, so the IPv6 section is grayed out, and you don't need to worry about the remainder of the subnet options. Once complete, select Add to create the Gateway subnet:
With a VNet and dedicated subnet created, it's time to deploy the VPN Gateway to host the Azure site-to-site VPN.
In the Azure portal search bar, type "virtual network gateway" and select the Virtual network gateway icon in the results. Hit Create to enter the virtual network gateway creation flow.
You'll use the following values in this tutorial, but you can adjust the values based on your own requirements:
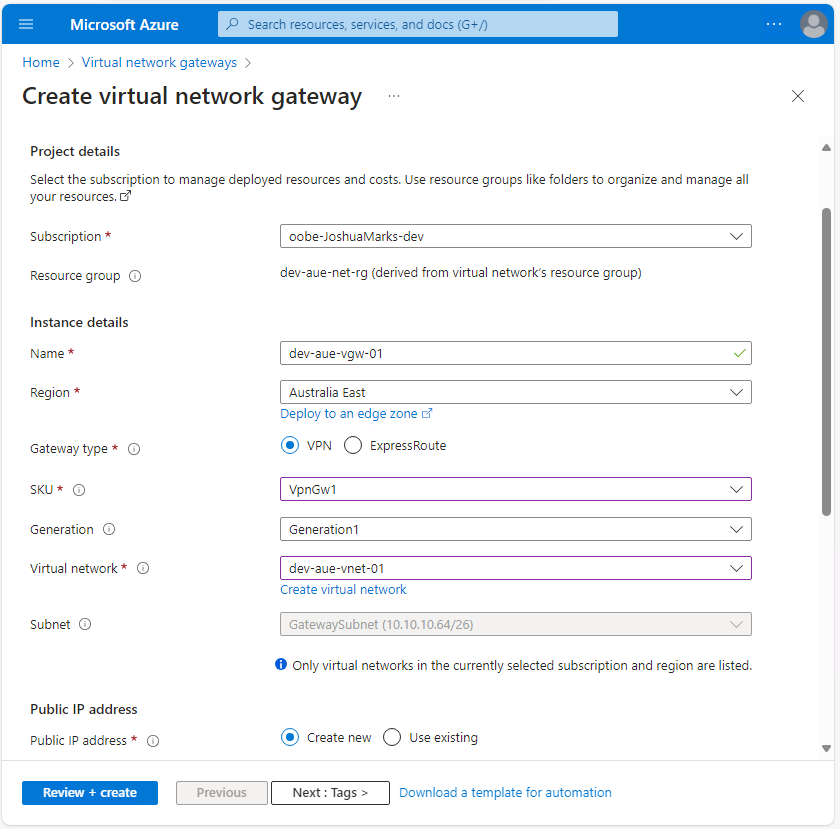
In the Public IP address section, select Create new and name the new Azure public IP address to be assigned to the VPN Gateway. In this example, the remaining options have been disabled; however, if you wish to utilize an active-active mode VPN Gateway or explicitly require Border Gateway Protocol (BGP), you can enable them and complete the configuration:
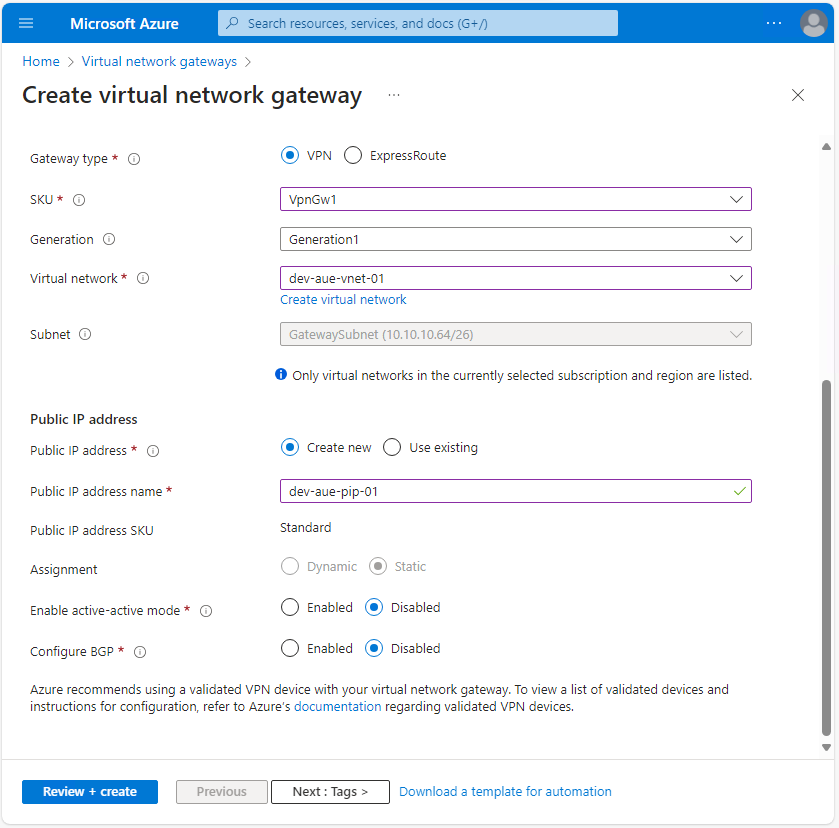
Once complete, hit Review + create, validate your configuration settings, and select Create to deploy the VPN Gateway. Take note that the deployment of a VPN Gateway can take a while—nearly twenty minutes for this example and up to forty-five minutes according to the Microsoft documentation :
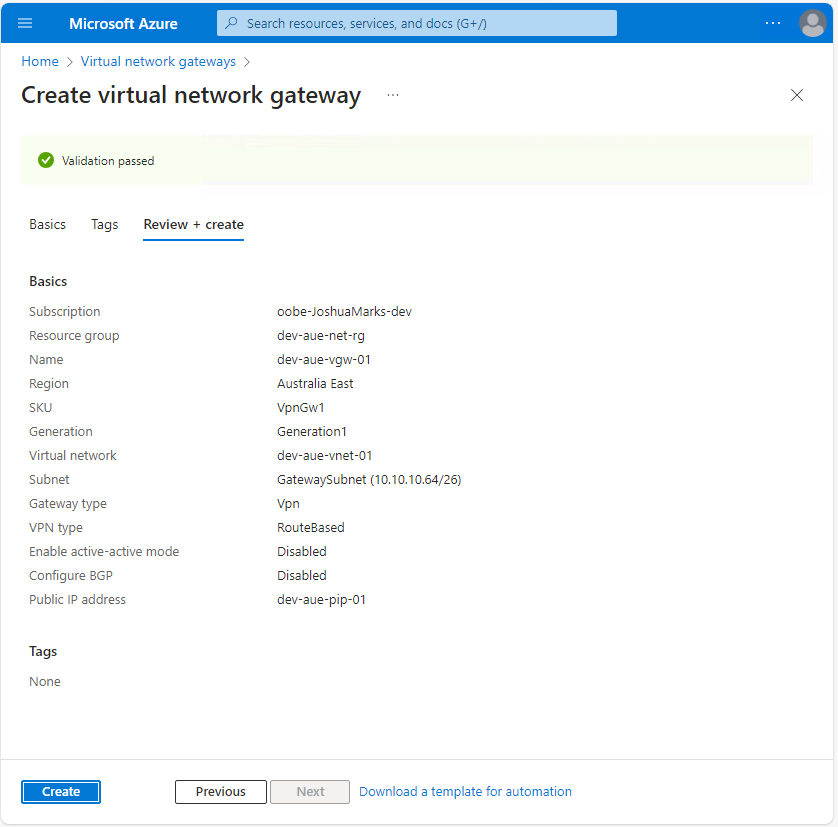
A local network gateway represents the network properties of the on-premise VPN device, which connects to the Azure site-to-site VPN. You need to configure this so the VPN Gateway knows where to send IPsec connection traffic and what network destinations can be reached over the Azure site-to-site VPN.
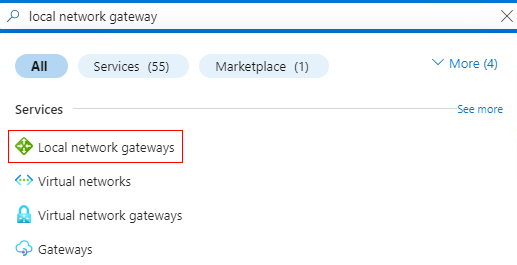
In the Azure portal search bar, type "local network gateway" and select the Local network gateways icon in the results:
Hit Create and enter the following details for the local network gateway creation flow:
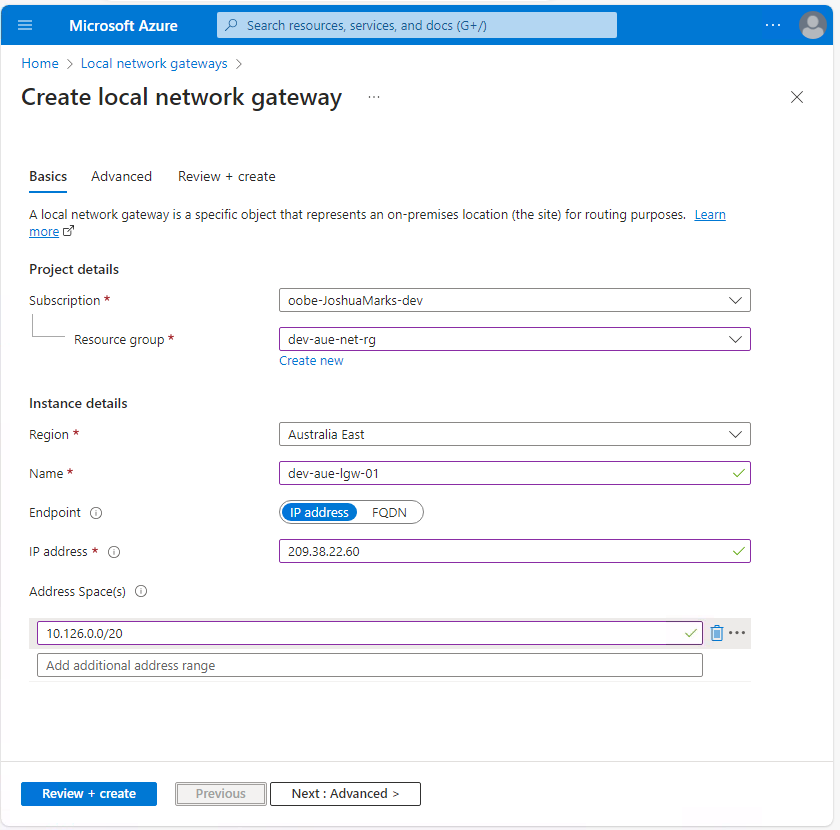
If BGP routing is required, hit the Next: Advanced button to configure BGP settings. Since you're not using BGP routing in this example, hit Review + create, validate your configuration settings, and select Create to deploy the local network gateway:
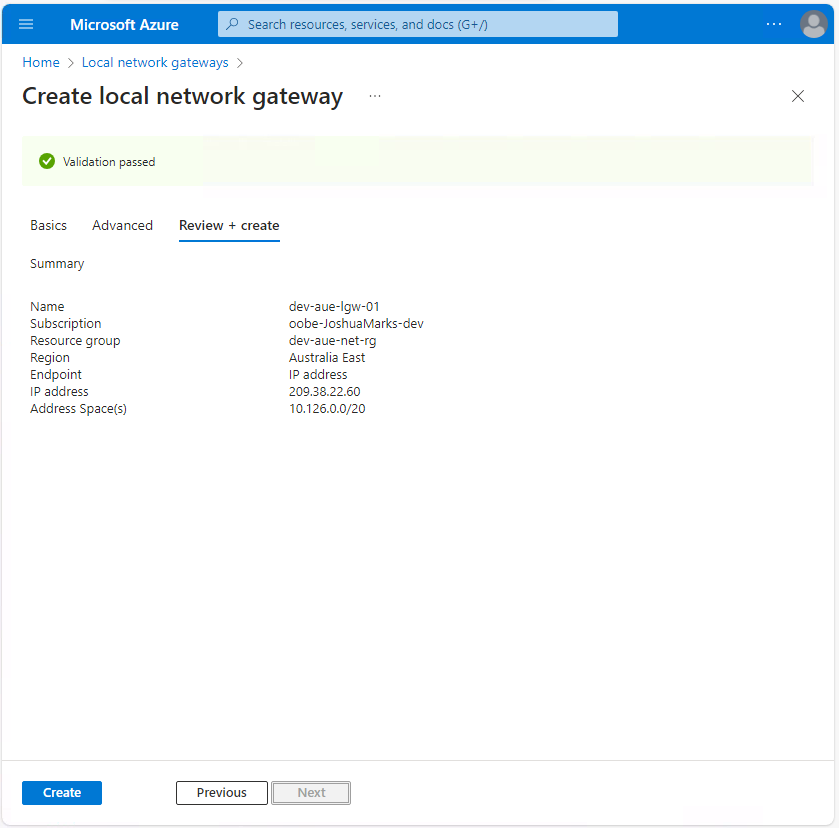
At this point, you've created all the dependencies, and it's time to deploy the Azure site-to-site VPN using a connection between the VPN Gateway and the on-premise VPN device.
Navigate to the VPN Gateway you deployed previously and select the Connections tab. Hit Add to enter the VPN connection creation workflow.
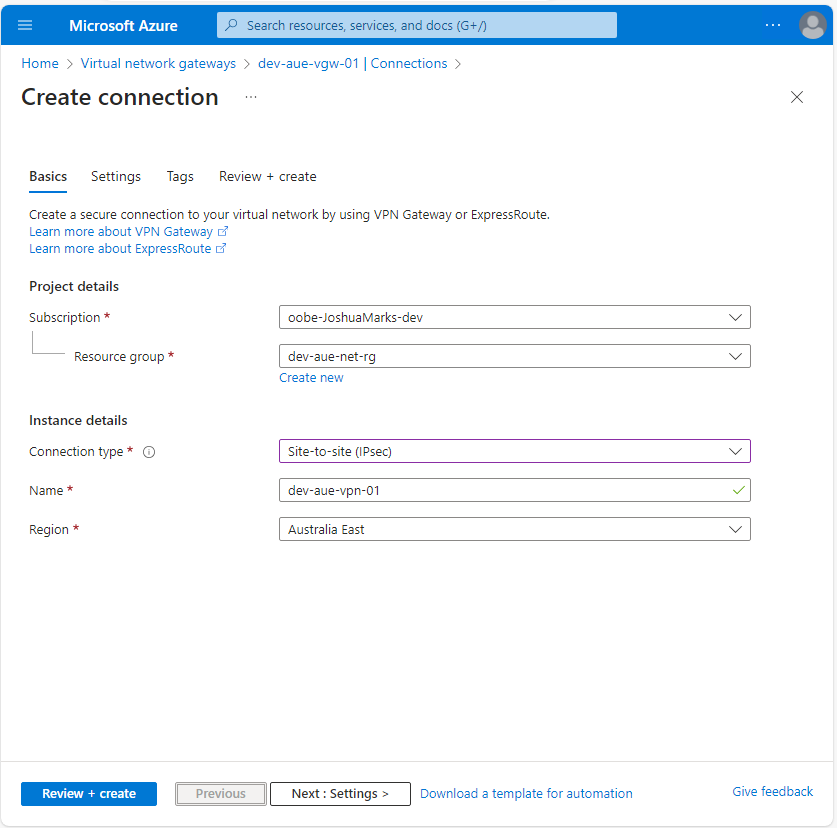
On the Basics page, enter the following required project details and instance details:
Then, select the Next: Settings button to configure the VPN connection settings:
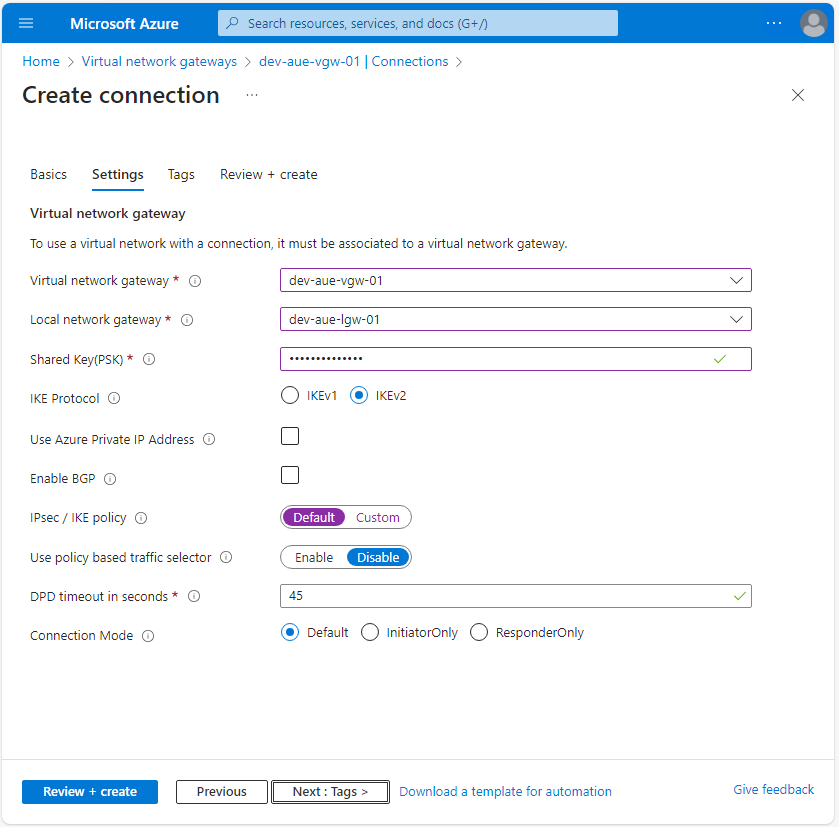
On the Settings page, enter the required VPN details as follows:
Once the settings page is configured, select Review + create, validate your configuration settings, and select Create to deploy the VPN connection:
Now that the Azure side of the site-to-site VPN is configured, you need to set a matching VPN configuration on the on-premise VPN device. When you configure the on-premise VPN device, you have to use the same preshared key (PSK) that was configured on the VPN connection. The Azure VPN Gateway public IP address is configured as the remote tunnel address on the on-premise VPN device. Additionally, the IPsec parameters must match for tunnel negotiation to succeed.
Microsoft provides guidance to configure the VPN device for all enterprise networking vendors . On-premise VPN devices from some vendors can have a configuration template generated within the Azure portal to simplify the deployment process.
To download a configuration template, navigate to the site-to-site VPN connection created previously. Then, in the Overview tab, select the Download configuration button:
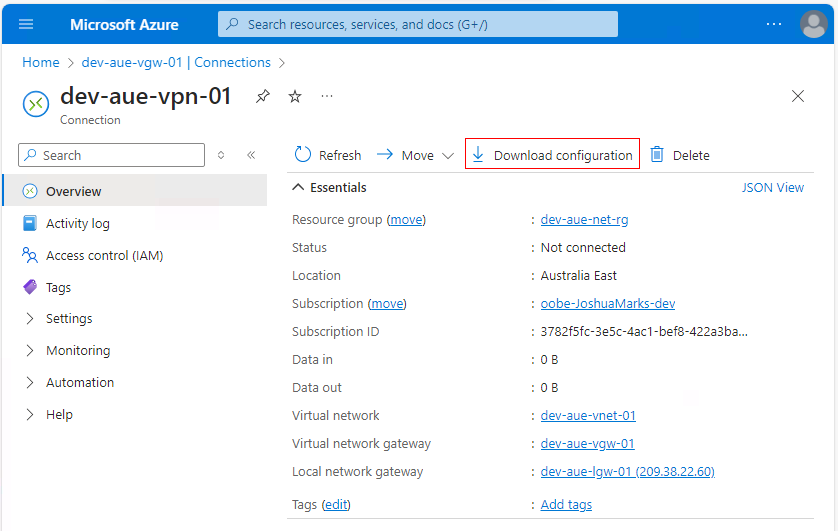
Enter the VPN device details and download the configuration. You can then replace any generic configuration and apply the template to your on-premise VPN device:
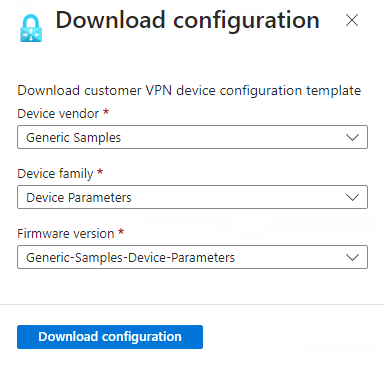
In this guide, you are configuring a remote VPN device to connect to the Azure VPN Gateway using the configuration guide provided by Microsoft in the "Validated VPN devices and device configuration guides."
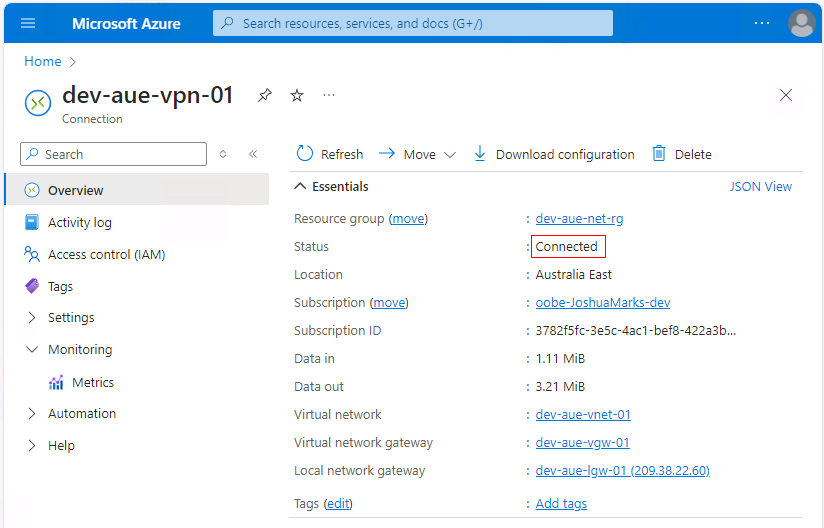
After configuring your VPN device, you need to use the Azure portal to verify the VPN connection before attempting to consume the site-to-site VPN. Once the on-premise VPN device is configured, navigate back to the VPN connection you created previously, and in the Overview tab, confirm that the status shows Connected:
Now that the Azure site-to-site VPN is configured and established, you need to connect to a preexisting Windows Server VM in Azure over the VPN using Remote Desktop Protocol (RDP). In this example, you connect from a Linux desktop, but similar steps apply to a Windows desktop :
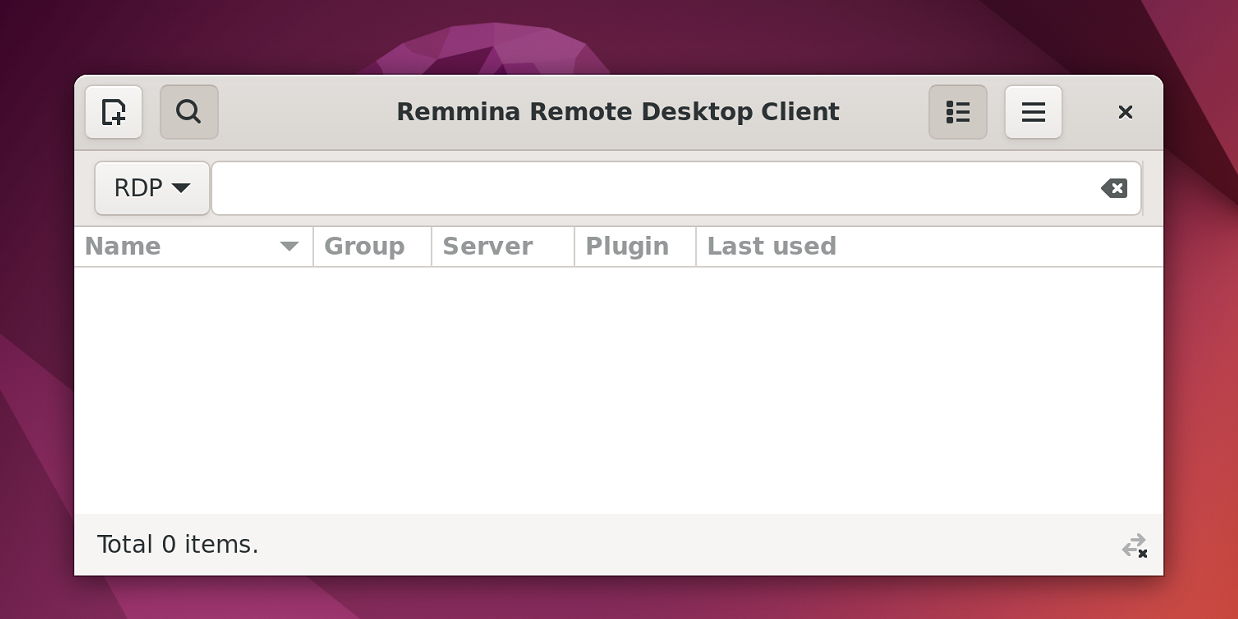
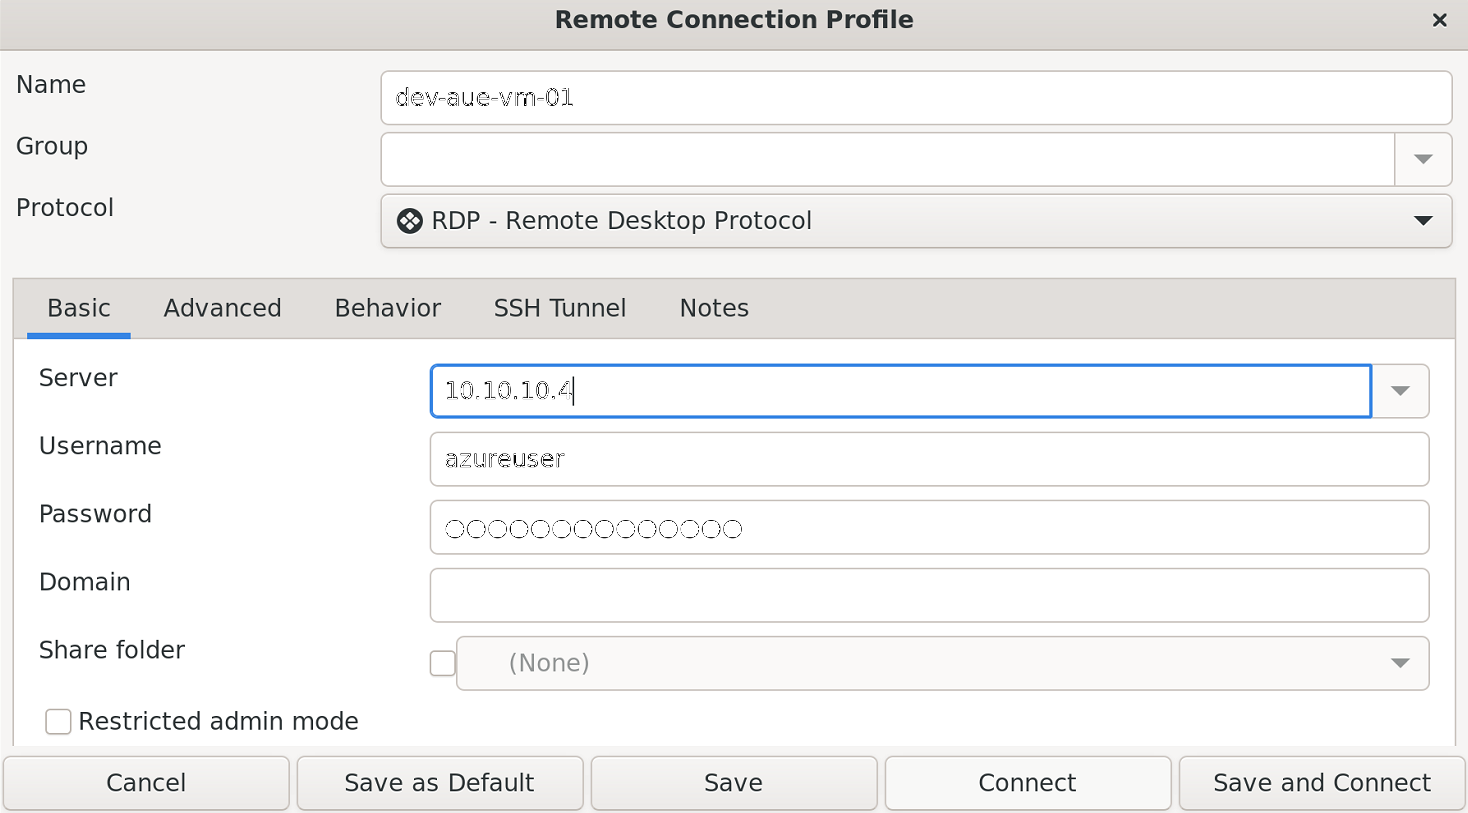
Use the remote desktop client to specify the connection parameters to an Azure VM using its private IP address. This ensures the RDP connection traverses the Azure site-to-site VPN. Connect to the Azure VM using the Connect button:
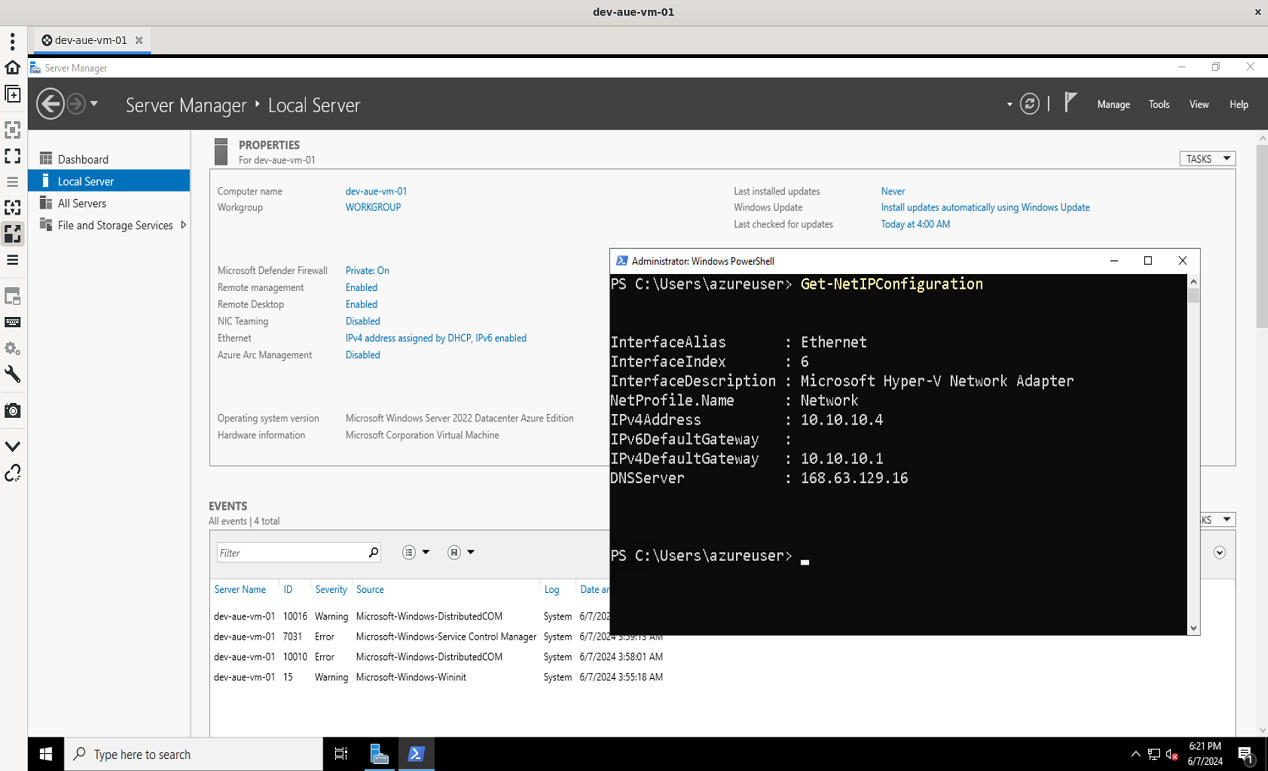
If your Azure site-to-site VPN works, you will see a remote desktop session open to the Azure VM. PowerShell was used to confirm that the VM has a private IP address only. Open the Start menu, type "Windows PowerShell," and select Windows PowerShell. Type and hit the Enter key to view the Azure VM network information:
In this tutorial, you used the Azure portal to configure Azure site-to-site VPN with an on-premise VPN device, and you connected to an Azure VM from on-premise over the site-to-site VPN.
While the Azure site-to-site VPN is effective for on-premise-to-Azure connectivity, you should consider using NetBird as an alternative method of remote connectivity as it is simpler, easier, and more scalable. NetBird uses lightweight client software to connect machines securely and directly without the need for a VPN device. By installing the client software on individual machines, you're not required to connect the entire network like with a traditional site-to-site VPN.
However, NetBird still provides the capability to connect on-premise devices to an entire Azure VNet and, in reverse, uses network routes . This provides a similar experience to Azure site-to-site VPN by installing the client on a device in the cloud or on-premise and advertising the target network to which all machines with the client installed can connect.
If you enjoyed reading this guide and want to learn how to use NetBird for more remote access use cases, check out this article that shows you how to use NetBird for Kubernetes Access .
此内容由惯性聚合(RSS阅读器)自动聚合整理,仅供阅读参考。 原文来自 — 版权归原作者所有。