惯性聚合 高效追踪和阅读你感兴趣的博客、新闻、科技资讯
阅读原文 在惯性聚合中打开

推荐订阅源

V2EX - 技术
V2EX - 技术
Threat Intelligence Blog | Flashpoint
T
Threat Research - Cisco Blogs
T
The Exploit Database - CXSecurity.com
S
Schneier on Security
S
Securelist
P
Privacy & Cybersecurity Law Blog
Scott Helme
Scott Helme
T
Threatpost
C
Cybersecurity and Infrastructure Security Agency CISA
L
LINUX DO - 热门话题
Cyberwarzone
Cyberwarzone
Cisco Talos Blog
Cisco Talos Blog
量子位
博客园 - Franky
cs.CL updates on arXiv.org
Latest news
Latest news
T
Troy Hunt's Blog
N
News | PayPal Newsroom
Google Online Security Blog
Apple Machine Learning Research
N
Netflix TechBlog - Medium
小众软件
小众软件
P
Palo Alto Networks Blog
Spread Privacy
Spread Privacy
C
Cyber Attacks, Cyber Crime and Cyber Security
C
Check Point Blog
aimingoo的专栏
aimingoo的专栏
WordPress大学
WordPress大学
L
Lohrmann on Cybersecurity
L
LINUX DO - 最新话题
D
Darknet – Hacking Tools, Hacker News & Cyber Security
钛媒体:引领未来商业与生活新知
钛媒体:引领未来商业与生活新知
The Last Watchdog
The Last Watchdog
S
Security @ Cisco Blogs
P
Privacy International News Feed
Last Week in AI
Last Week in AI
Microsoft Security Blog
T
Tailwind CSS Blog
博客园_首页
云风的 BLOG
云风的 BLOG
V
Vulnerabilities – Threatpost
D
DataBreaches.Net
Recent Announcements
酷 壳 – CoolShell
酷 壳 – CoolShell
CTFtime.org: upcoming CTF events
罗磊的独立博客
Engineering at Meta
Engineering at Meta
Forbes - Security
Forbes - Security
T
Tenable Blog

NetBird - Networking Knowledge Hub - RSS Feed

NetBird Is Now on the Vultr Marketplace Native NetBird on the GL.iNet Comet Pro (GL-RM10) NetBird v0.71 - IPv6 Overlay Addressing NetBird Exit Nodes - Appear at Home, or Anywhere Else Reporting Bugs and Requesting Features in NetBird Setup and Use Local AdGuard Home Anywhere with NetBird DNS How to Set Up NetBird on PiKVM for Secure Remote KVM Access NetBird v0.69 - CrowdSec IP Reputation for the Reverse Proxy Cloudflare Mesh vs NetBird vs Tailscale: Performance Compared Self-Hosting Nextcloud with Docker and NetBird Implementing Zero Trust with NetBird NetBird v0.67 - Layer 4 Proxy Support for TCP, UDP, and TLS Solwr Enhances Remote Connectivity with NetBird Self-Hosting NetBird with Authentik Jellyfin Media Server - Self-Host Your Movies, TV, and Music Cloudflare Tunnels vs. NetBird Reverse Proxy INFITX Builds Zero-Touch Kubernetes Networking with NetBird NetBird v0.66 - Expose Local Services to the Internet from the CLI Pangolin vs. NetBird Home Assistant Setup Guide with EASY Remote Access NetBird v0.65 - Built-in Reverse Proxy with Custom Domains Docker for Beginners - Everything You Need to Get Started NetBird for SOC 2 Compliance NetBird v0.63 - Custom DNS Zones for Private Network Resolution Vibecode This in a Weekend and Take 5% of the Company NetBird v0.62 - Built-in Local Users with Optional IdP Integration NetBird v0.61.0 - Granular SSH Access Control and Automatic Updates Top 5 Alternatives to OpenVPN Top 5 Open Source Alternatives to Tailscale Top 5 Alternatives to ZeroTier How to Install n8n v2.0 with NPM and PM2 ZeroTier vs. NetBird The Ultimate Immich Guide - Ditch Google and Amazon Photos for Good NetBird as Your Help with ISO 27001 Compliance NetBird and Huntress - Secure Network Access for MSPs How to Access Windows Shares from Anywhere with NetBird netgo Relies on Modern ZTNA with NetBird Connect to Your Homelab from Anywhere with a Raspberry Pi NetBird SSH - A New, Identity-Aware Approach The AI Mega Mesh: How to Connect 30+ GPU Cloud Providers Connect Multiple Ollama GPUs to OpenWebUI with NetBird Top 5 Tailscale Alternatives SSH and RDP, now in your browser NetBird–Acronis Integration: Empowering MSPs for Advanced Ransomware and Threat Defense Introducing the Control Center - Remote Access, Beautifully Visualized NetBird at MSP Global 2025 Understanding Overlay Networks - The Basics NetBird and SentinelOne Singularity™ - Automate Threat Response NetBird and Microsoft Intune - Enforcing Device Compliance for Zero Trust Rethinking Zero Trust Security with NetBird and pfSense Improving Unidirectional Access Control Proxmox VE for Beginners Guide with NetBird LXC Stronger Security: NetBird + GitHub Secure Open Source Fund NetBird's MSP Partner Program Signicat Enhances Cross-Cloud Accessibility with NetBird SonicWall SSL VPN NetExtender vs. NetBird NetBird Is Embracing the AGPLv3 License NetBird Profiles Have Landed - Manage Multiple Accounts Effortlessly Rethinking Access Control to Secure Your On-Premises SharePoint Servers Sport Alliance Increases Efficiency with Zero Trust Networking at Scale Rethinking Network Access: qwertiko Goes Zero Trust with NetBird Optimizing Network Efficiency with NetBird's Lazy Connections Use Port Ranges in Access Control Policies Generic HTTP Endpoint for Network Events Streaming NetBird’s Response to Spear-Phishing Campaign Targeting Financial Executives Zero-Trust Access to Internal Resources Without Installing Agents Enhance Network Visibility with NetBird’s Traffic Events Logging TrueNAS Made Easy - Install, Set Up, and Access From Anywhere Top 5 Alternatives for WireGuard Jump Hosts. Gateways for Remote Access NetBird Network Routes and Exit Nodes Security for All - SSO and MFA for Free Enhancing Network Access Control with NetBird's Identity Provider Feature Twingate vs. NetBird Limit Network Access Based on Running Applications FortiClient ZTNA vs. NetBird OpenVPN vs. NetBird Tailscale vs. NetBird Getting Started with an Azure Site-to-Site VPN Getting Started with an On-premise-to-AWS Site-to-Site VPN Secure Remote Access to VPCs, LANs, and Offices regreSSHion - A New OpenSSH Server Remote Code Execution Vulnerability Evolve Bank & Trust Data Breach. What Happened? What Is a Site-to-Site VPN? IPSec Tunneling Demystified. Enhancing Data Security Across Networks Understanding IPSec Tunnel and Transport Modes Understanding the Differences Between IKEv1 and IKEv2 Understanding the IKEv1 Protocol in IPSec ZeroTier versus NetBird - Which Should You Choose? AWS Lambda Serverless Security. Mistakes, Oversights, and Potential Vulnerabilities Using NetBird for Kubernetes Access Serverless Security Vulnerabilities and Best Practices to Mitigate Them Security Best Practices for Serverless Azure Functions A Guide to Remote Access Security for SMEs IoT Security Essentials. How to Achieve Secure Remote Access Open Source Zero Trust Networking Using SSH for Secure Remote Access How We Integrated Rosenpass in NetBird The First Quantum-Resistant Mesh VPN Using eBPF and XDP to Share Default DNS Port Between Multiple Resolvers
How to Set Up ZeroByte and REST Server for Backups with NetBird
Written byBrandon Hopkins · 2025-12-16 · via NetBird - Networking Knowledge Hub - RSS Feed

What is ZeroByte?

ZeroByte is a modern backup automation platform for self-hosters built on top of Restic. It provides a web-based interface for managing backups with support for multiple protocols and storage backends. ZeroByte offers automated backups with flexible scheduling, allowing you to set up custom backup frequencies and times. All backups are protected with end-to-end encryption through Restic, ensuring your data remains secure both in transit and at rest. The platform's multi-protocol support makes it versatile for various network environments and storage setups.
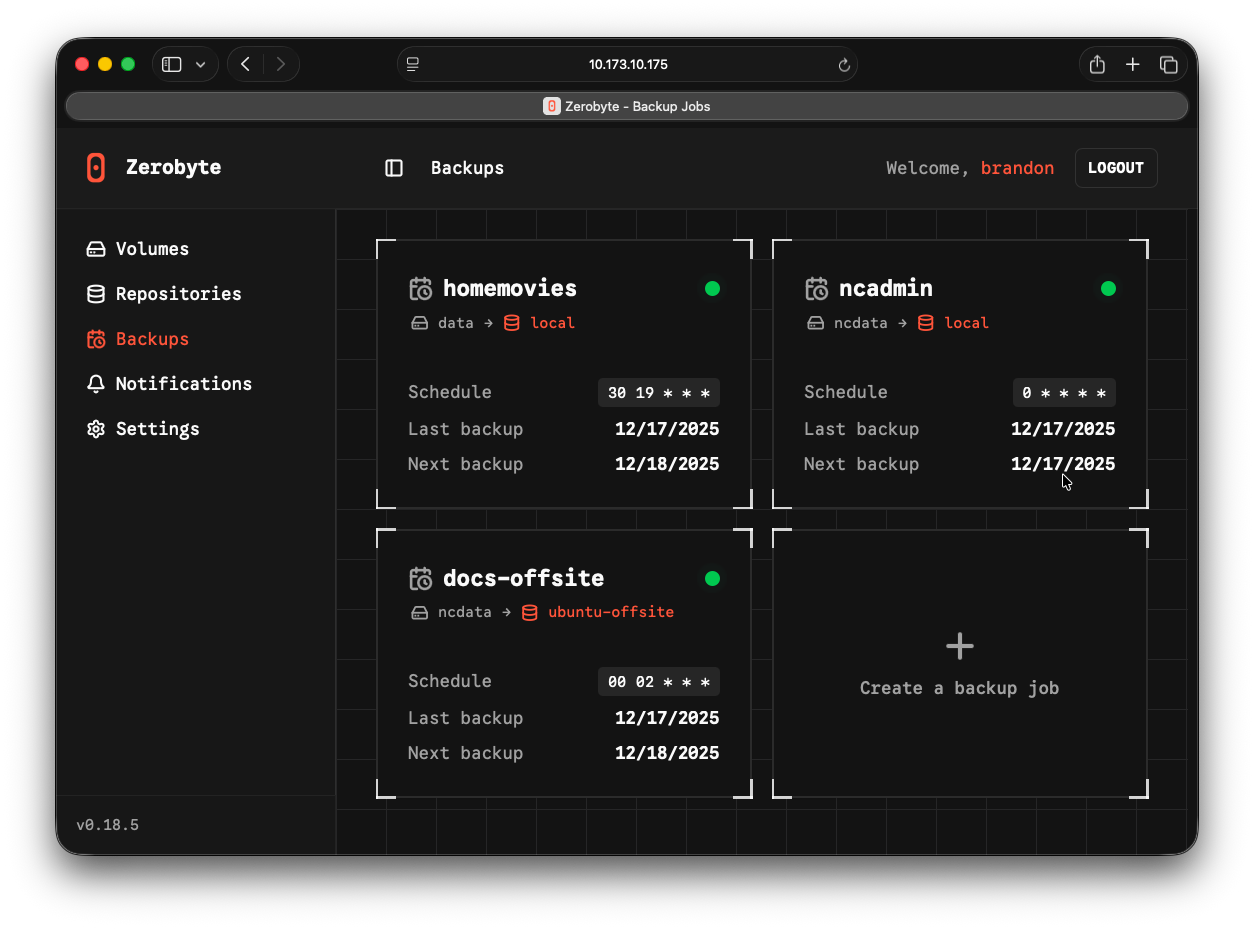
ZeroByte Backup Jobs Interface

ZeroByte supports a wide variety of volume types (the data you want to back up):

  • NFS shares
  • SMB/CIFS shares
  • WebDAV servers
  • rclone remotes
  • Local directories

For repositories (where backups are stored), ZeroByte supports:

  • S3-compatible storage (Amazon S3, MinIO, Wasabi, DigitalOcean Spaces, etc.)
  • Google Cloud Storage
  • Azure Blob Storage
  • SFTP servers
  • REST servers (restic rest-server)
  • rclone remotes (40+ cloud providers including Google Drive, Dropbox, OneDrive, Box, Hetzner, and more)
  • Local directories

The platform includes retention policies for efficient storage management, helping you maintain the right balance between backup history and storage usage. ZeroByte's web-based restore functionality makes it easy to recover files and directories from any backup snapshot directly through the interface. Built-in health checks and monitoring capabilities help ensure your backups are running smoothly and alert you to any issues.

Note: ZeroByte is currently in active development. While it's already quite functional, there may be significant changes between versions. Until there's a stable release, it's recommended to use ZeroByte as part of a multi-tier backup strategy rather than your sole backup solution.

Installing ZeroByte

ZeroByte runs as a Docker container, making installation straightforward. If you don't already have Docker installed, you can install it with the following commands:


Add your user to the docker group.


Once Docker is installed, create a file with the following configuration:


Note: If you encounter issues mounting shares, you may need to uncomment the line in the configuration above. This is not mentioned in the official ZeroByte documentation and may work fine for you without it. This may be addressed in a future version.

Key configuration points:
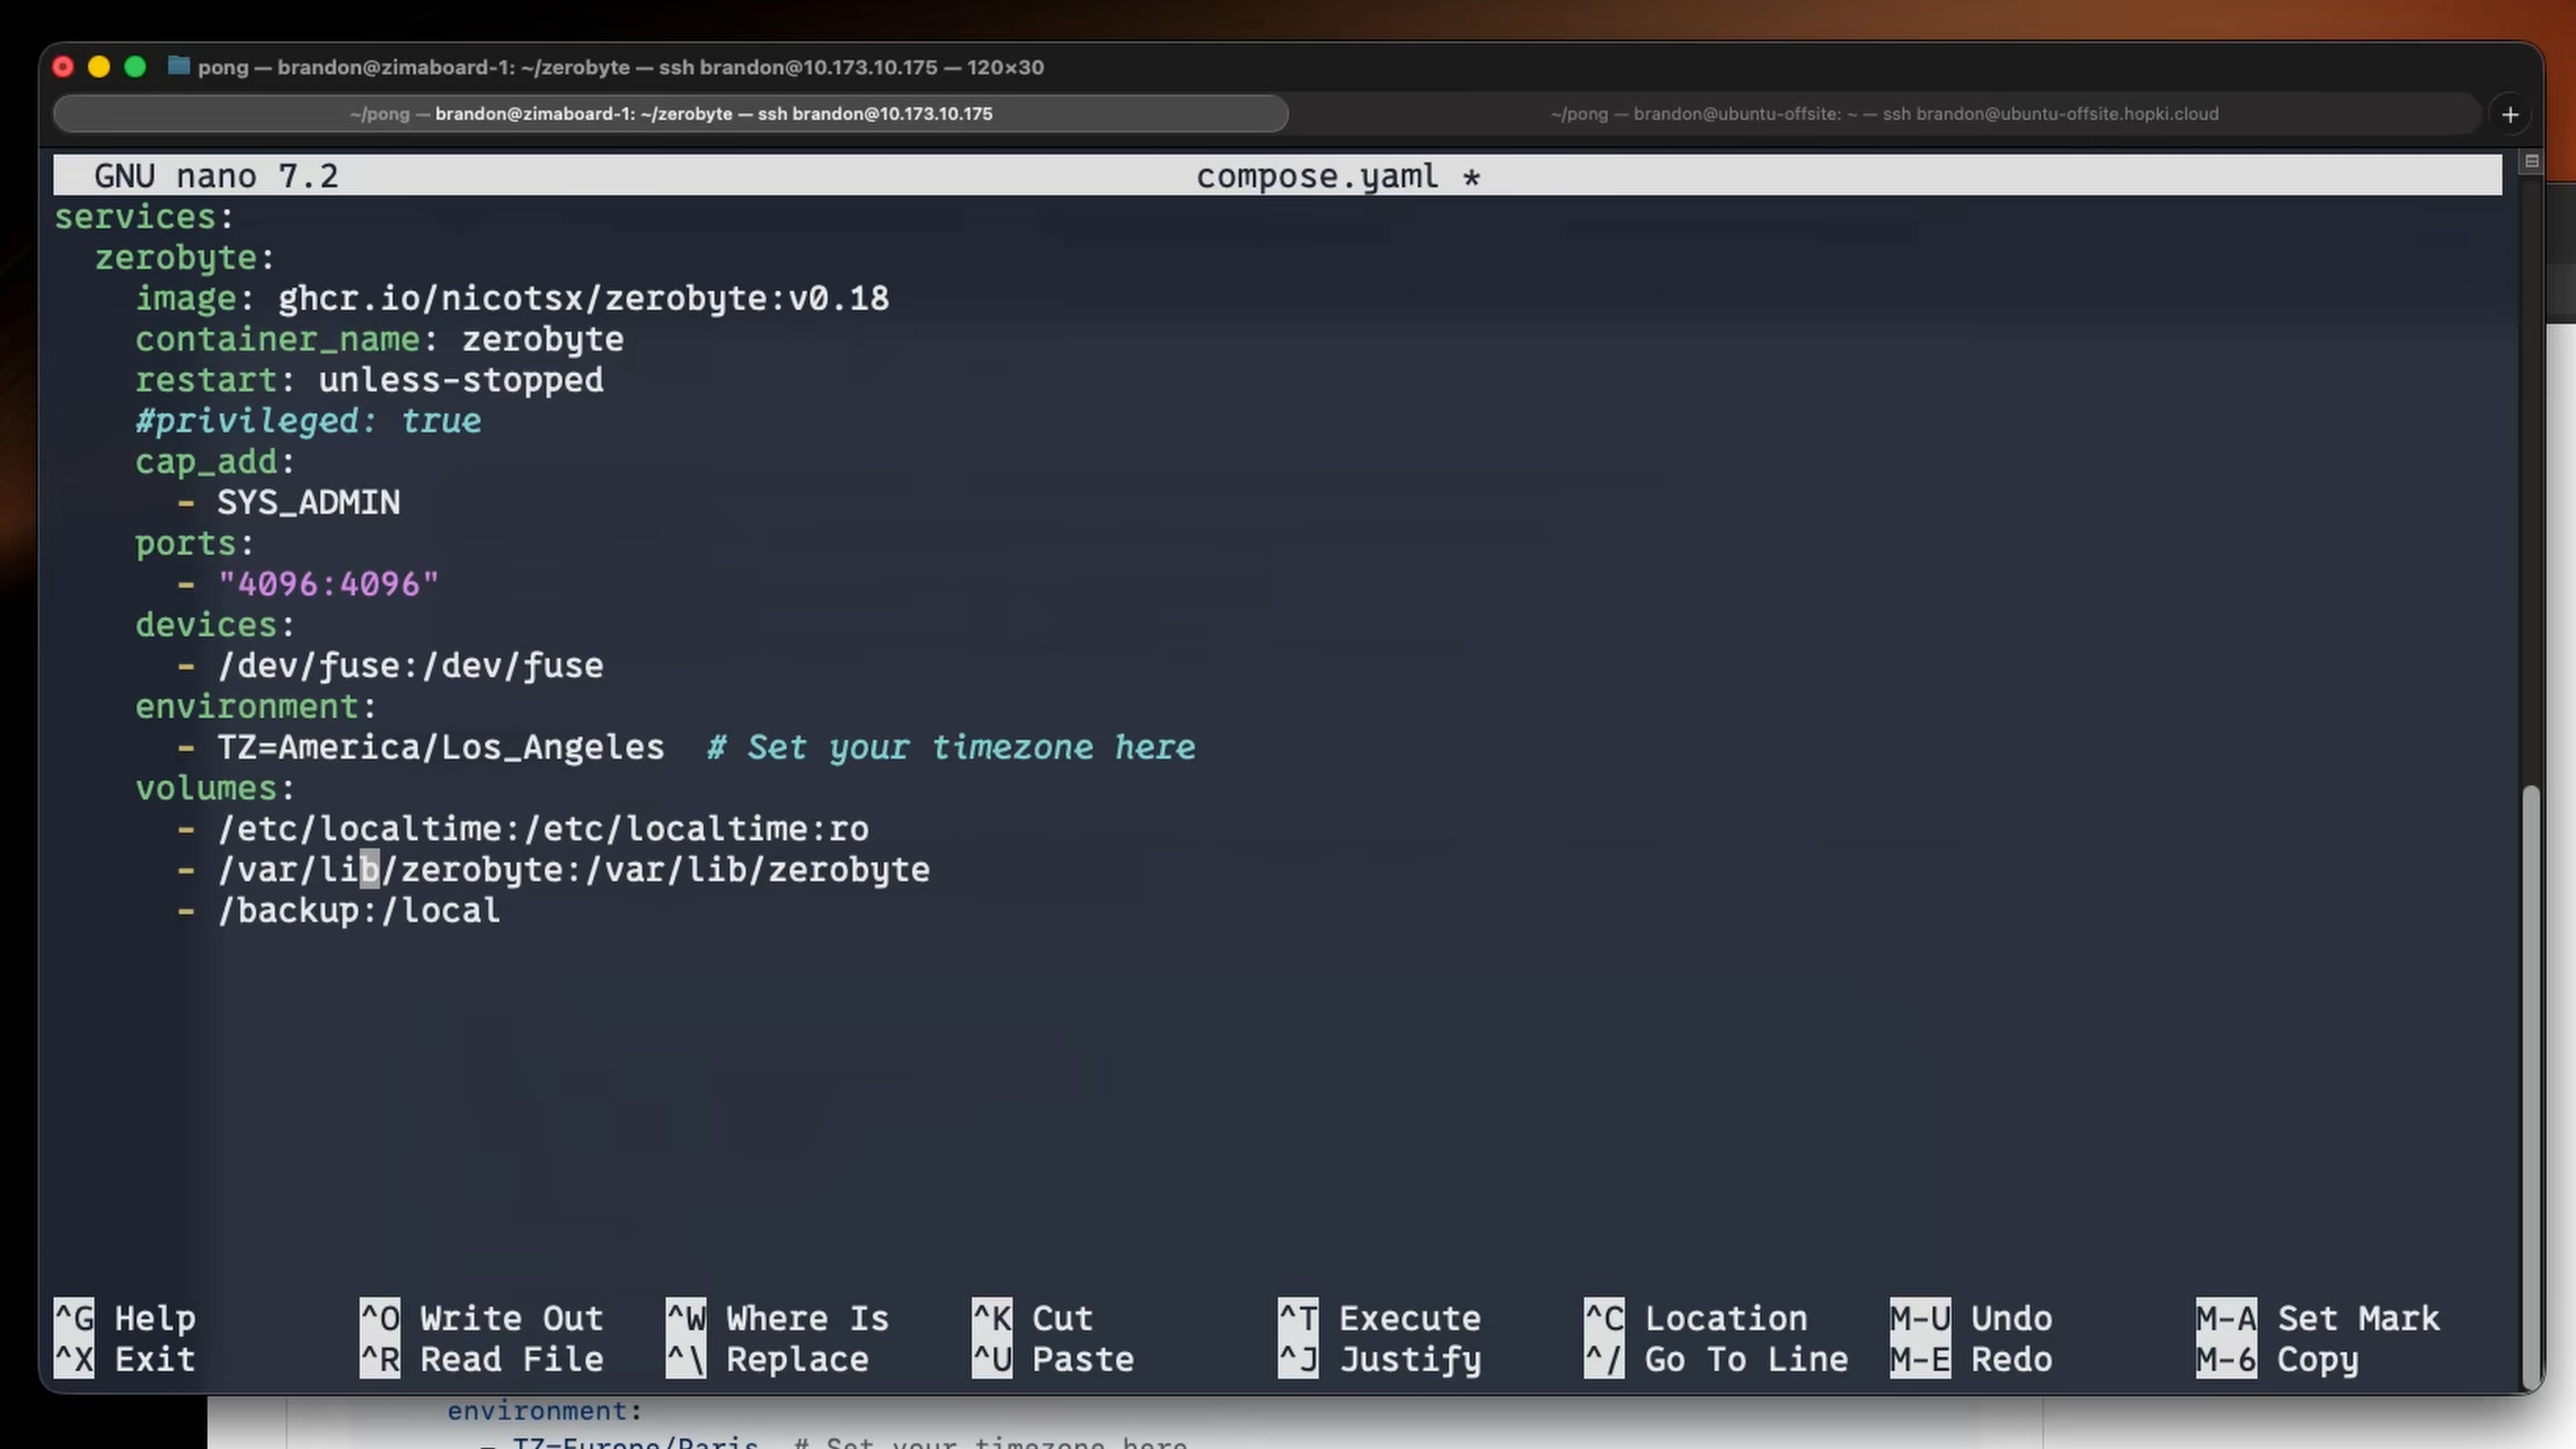
  • Port 4096: The web interface will be accessible at
  • SYS_ADMIN capability and FUSE device: Required for mounting remote shares (NFS, SMB, WebDAV)
  • Timezone: Set your timezone for proper backup scheduling
  • Volumes: Mount local directories if you need to back them up

ZeroByte Docker Compose Configuration

Start ZeroByte with:


Once the container is running, access the web interface at .

Using ZeroByte

Adding Volumes

Volumes represent the source data you want to back up. To add a volume:

  1. Navigate to the Volumes section in the web interface
  2. Click Create volume
  3. Fill in the required details:
    • Volume name
    • Volume type (SMB, NFS, WebDAV, Directory, etc.)
    • Connection settings (credentials, paths, etc.)

For local directories, you'll need to mount them into the ZeroByte container first by adding a volume mapping in your , then select "Directory" as the volume type in the web interface.
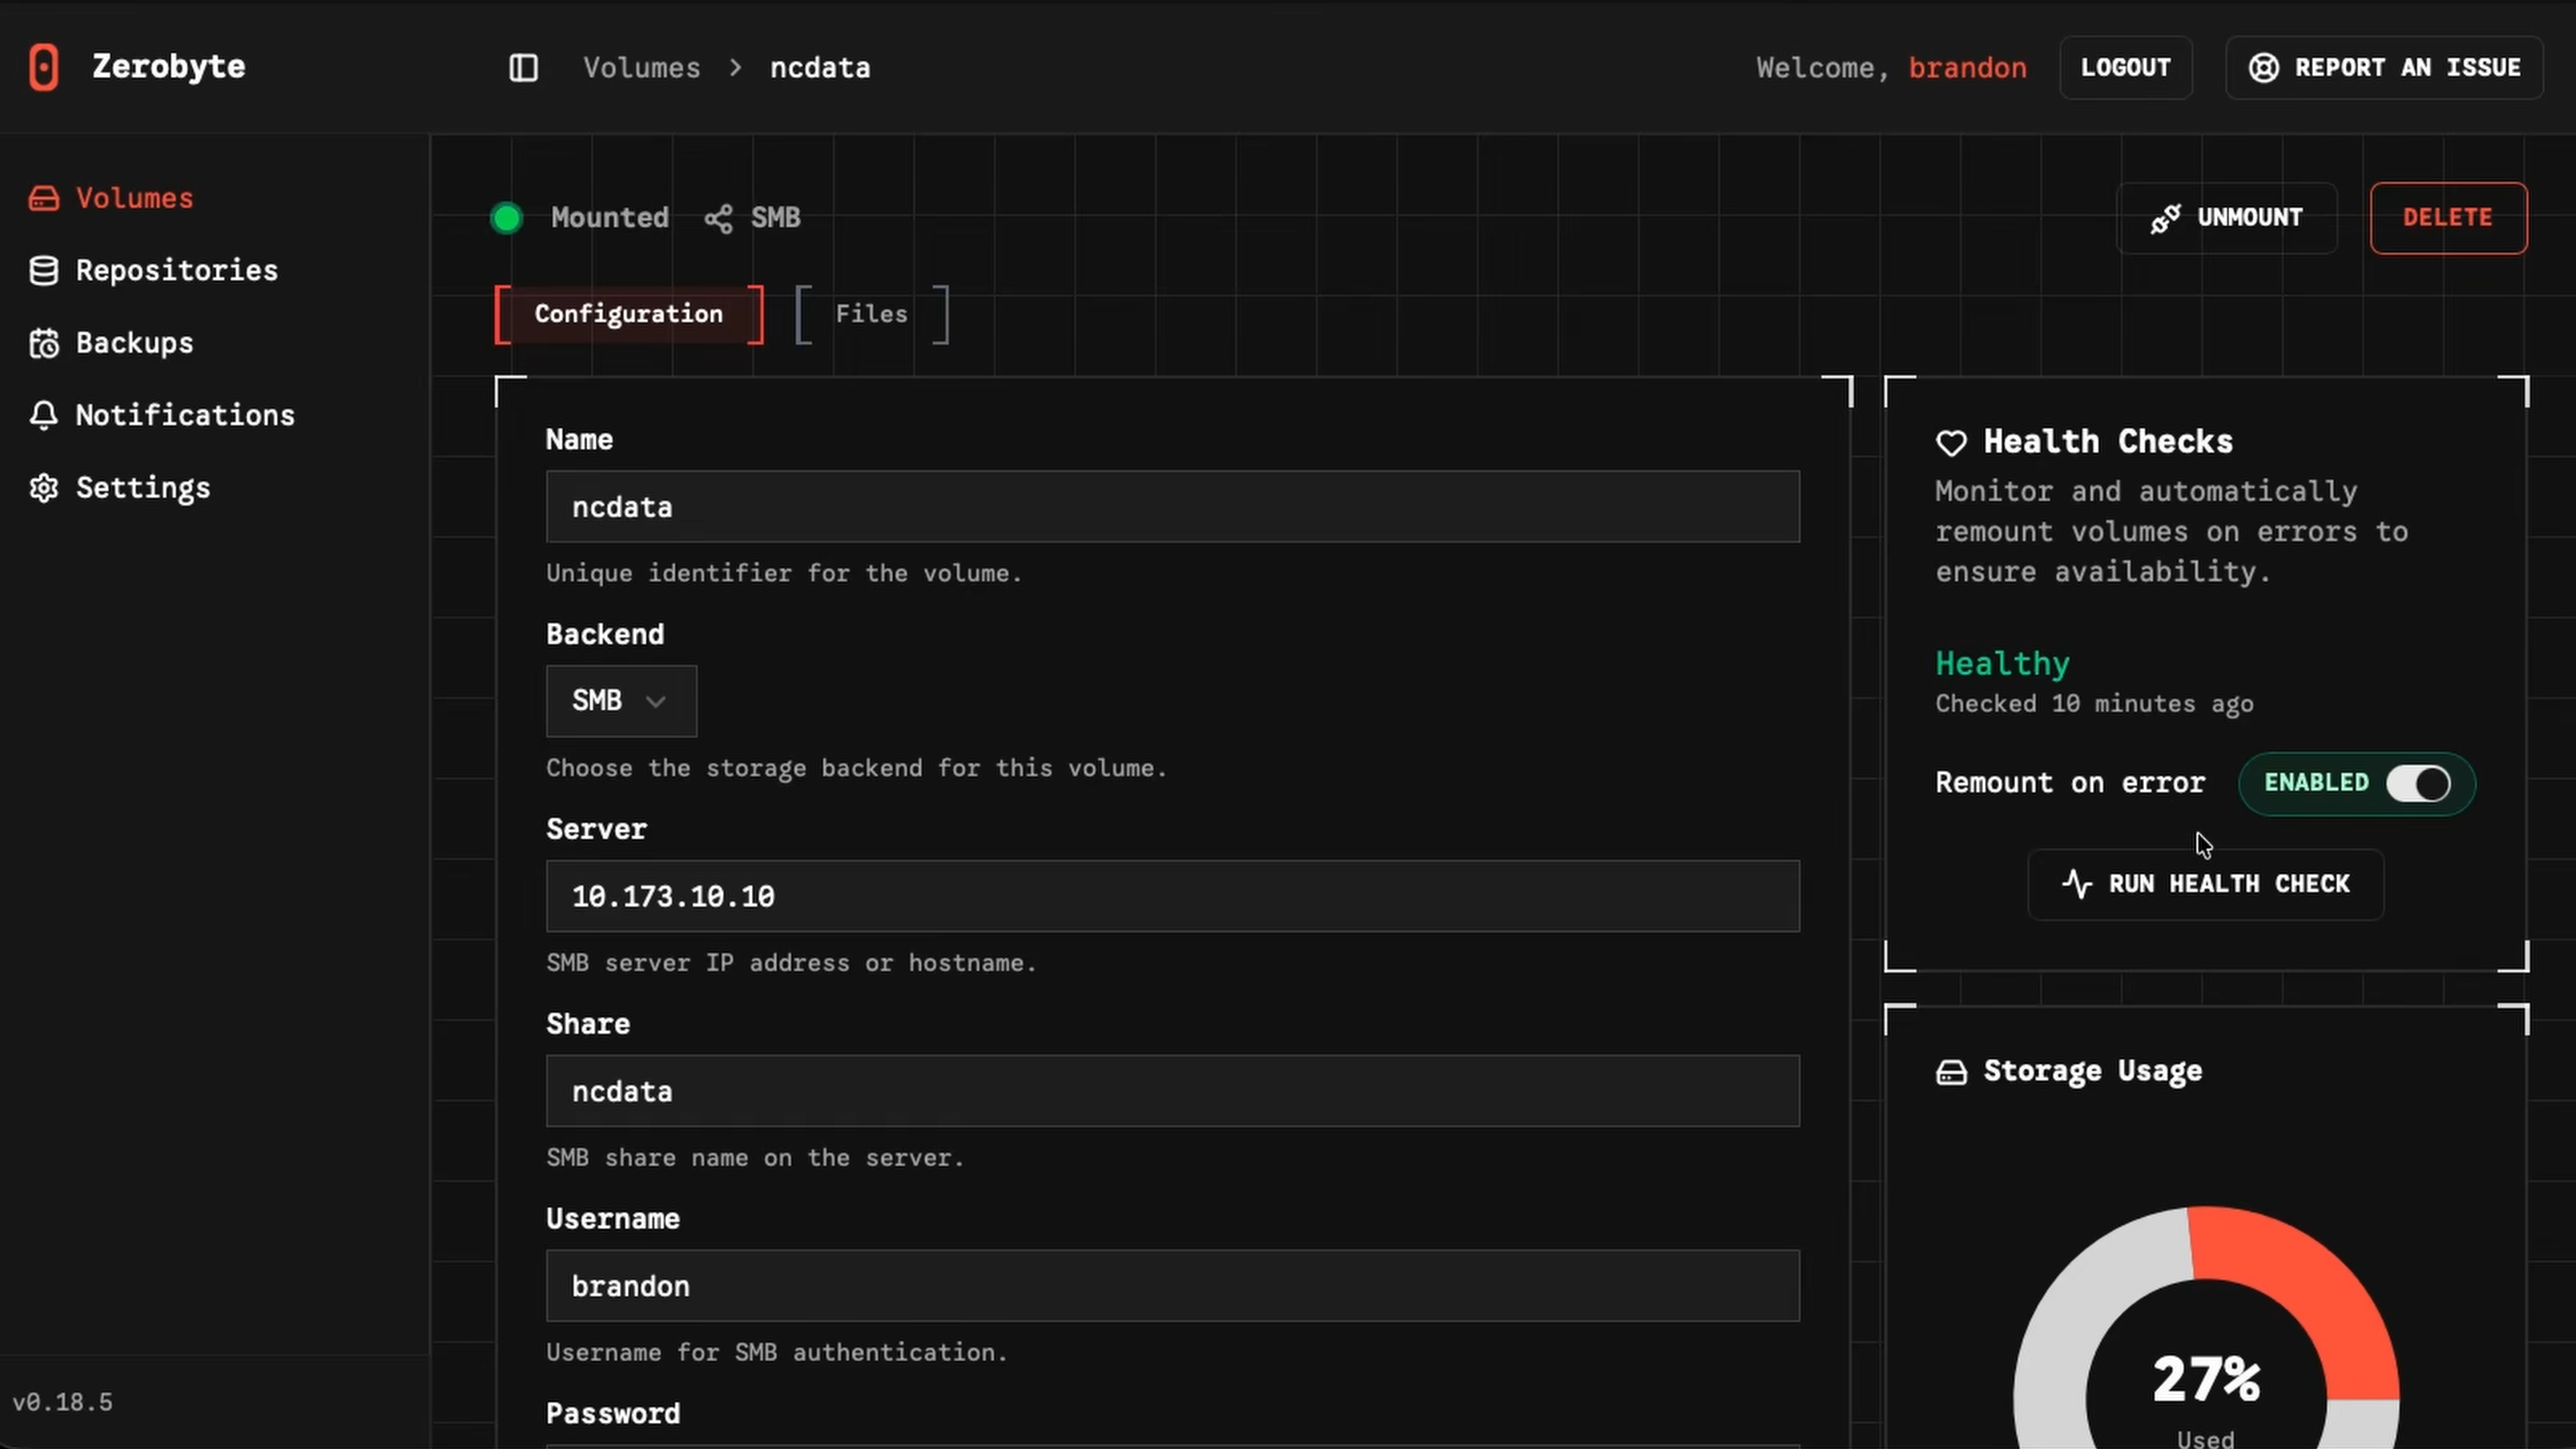
Adding a Volume in ZeroByte

You can test connections, view storage usage, run health checks, and browse files directly from the ZeroByte interface.

Creating Repositories

Repositories are where your encrypted backups will be stored. To create a repository:
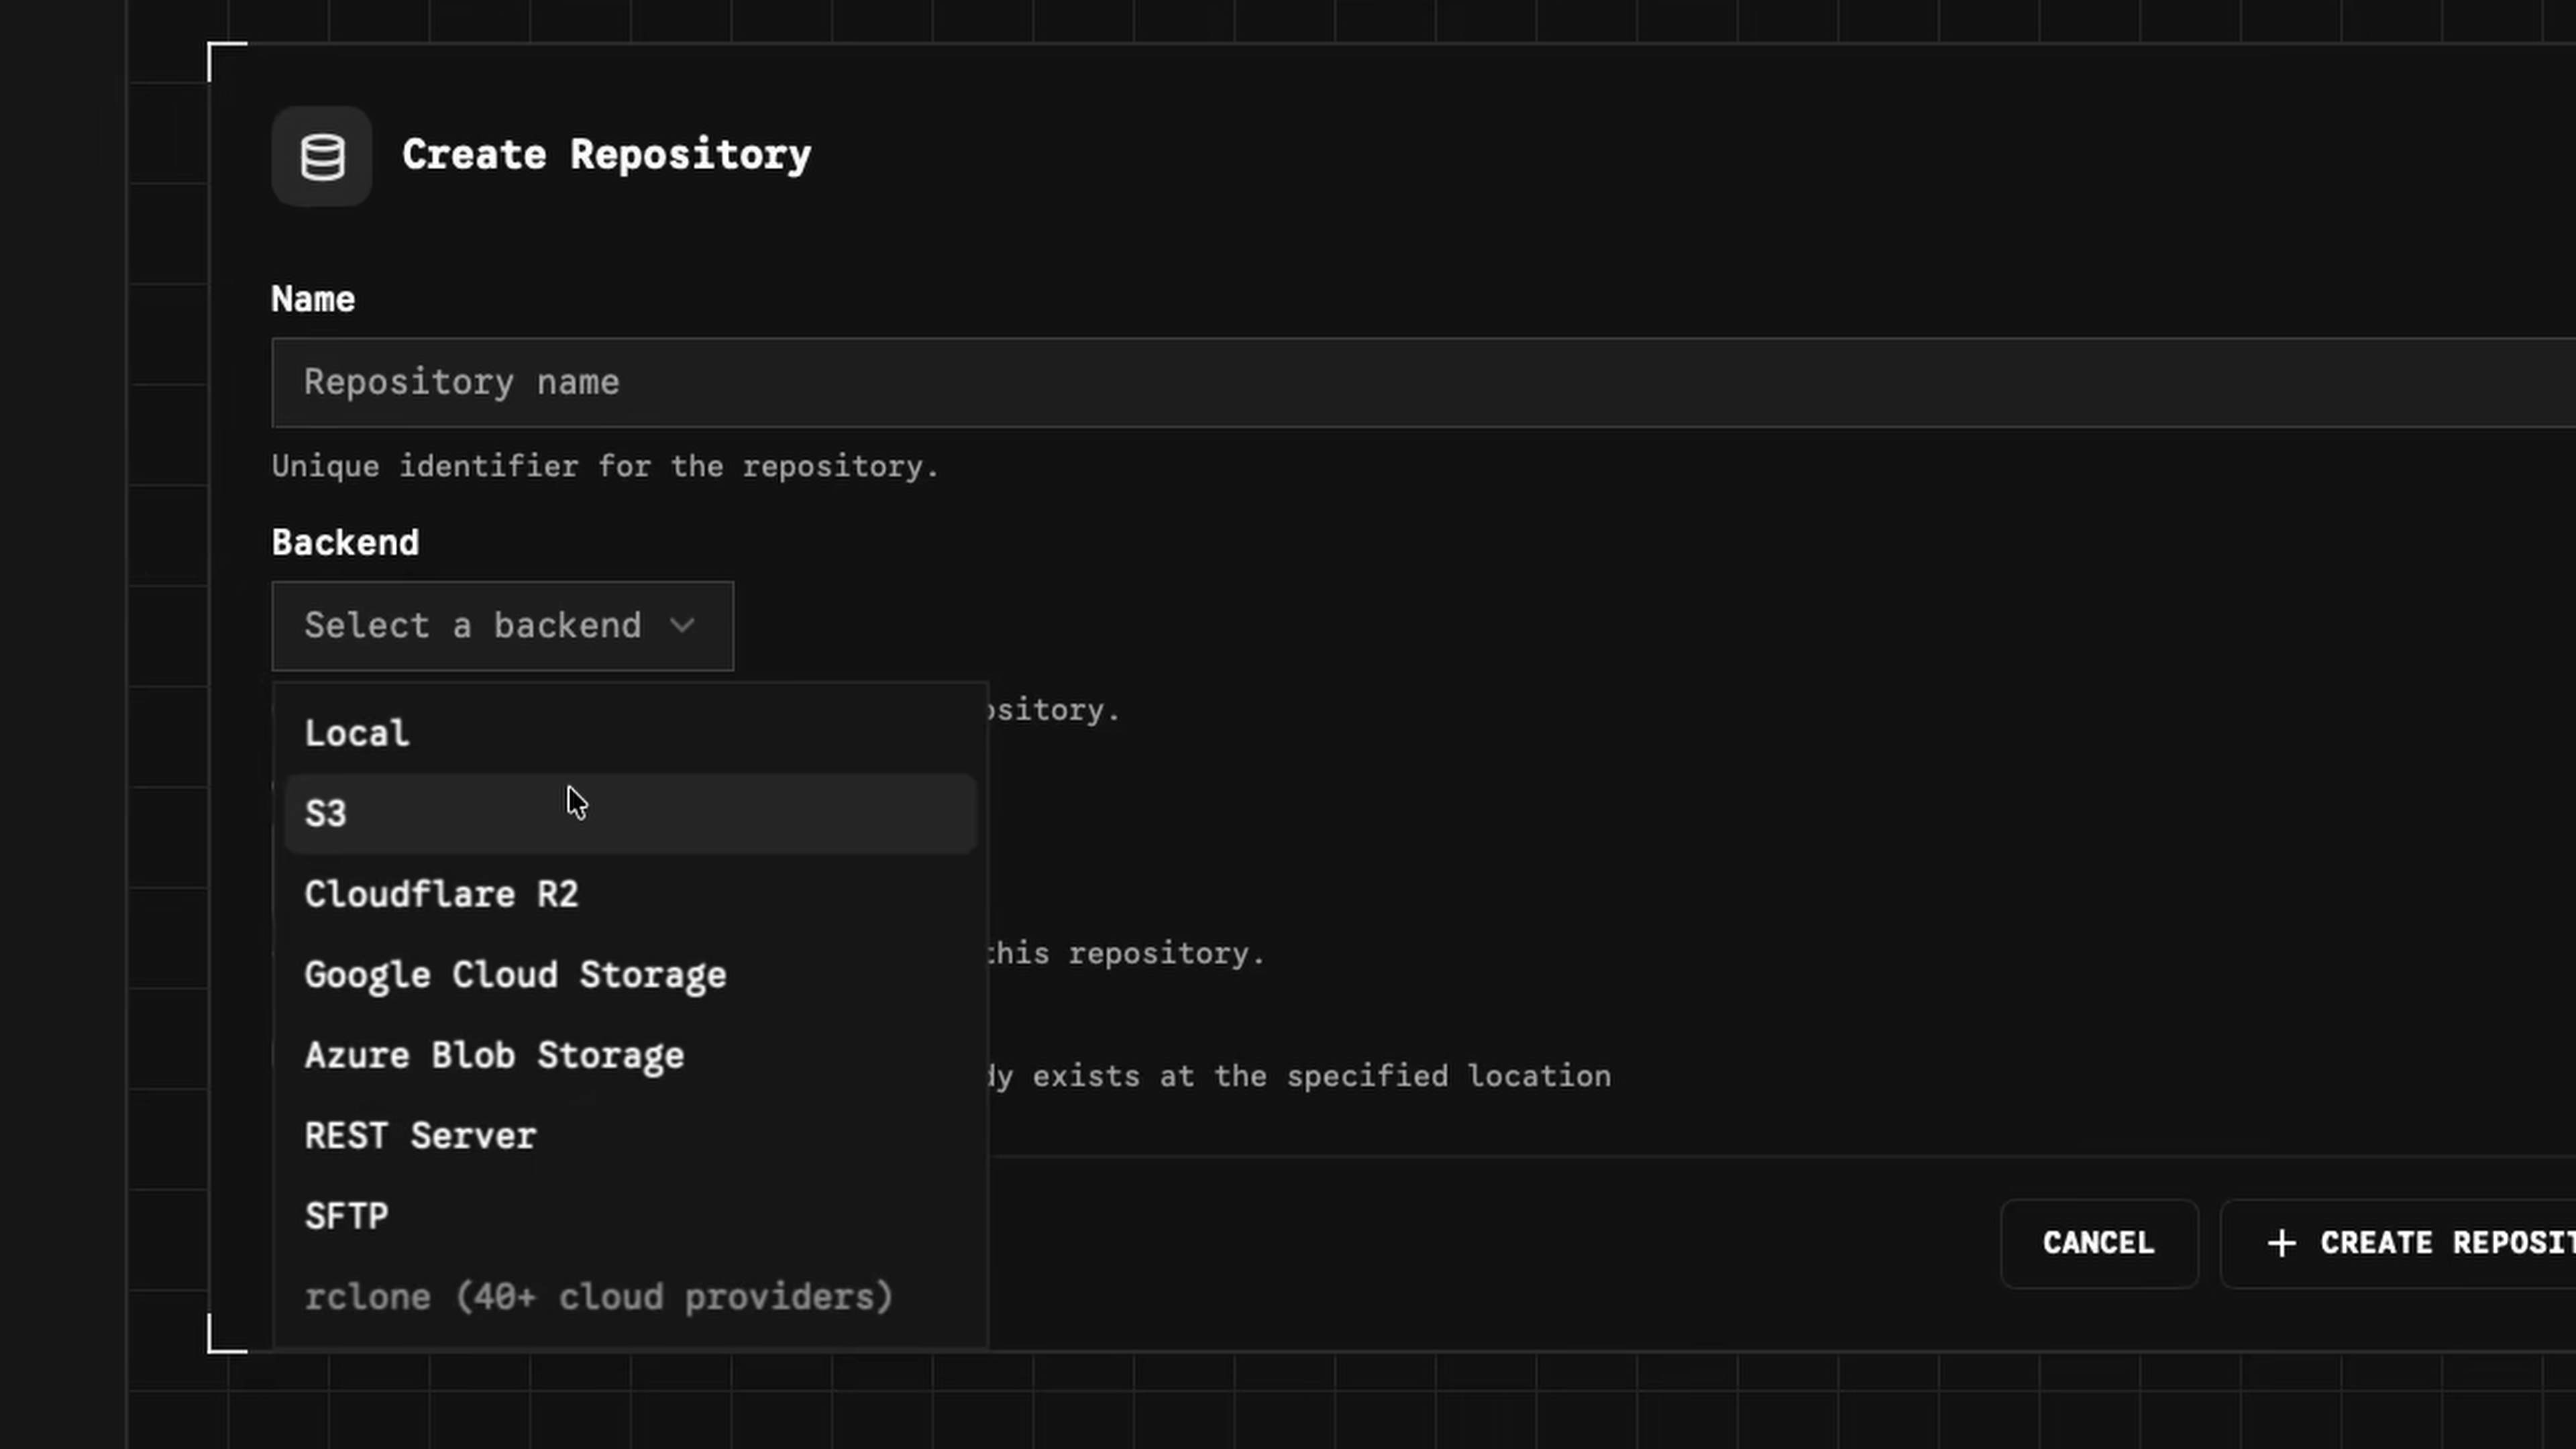
  1. Navigate to the Repositories section
  2. Click Create repository
  3. Select the backend type (Local, S3, REST, rclone, etc.)
  4. Configure connection settings

Configuring Retention Policy in ZeroByte

Repositories leverage Restic's deduplication and encryption features for efficient, secure storage.

Creating Backup Jobs

Once you have volumes and repositories configured, you can create backup jobs:

  1. Navigate to the Backups section
  2. Click Create backup job
  3. Configure:
    • Volume: Select the volume to back up
    • Repository: Select where to store the backup
    • Schedule: Set frequency (daily, weekly, etc.) and time
    • Paths: Specify which files or directories to include
    • Retention Policy: Configure snapshot retention (e.g., keep last 10 snapshots, 5 dailies, 3 weeklies, 2 monthlies)
    • Exclude patterns: Optionally exclude specific files or patterns

Backup jobs will run automatically according to your schedule. You can also trigger manual backups using the "Backup Now" button.

Restoring Data

To restore data from a backup:

  1. Navigate to the Backups section
  2. Select the backup job
  3. Choose a snapshot
  4. Browse files and select what to restore
  5. Choose restore location (original location or custom)
  6. Configure restore options (overwrite mode, etc.)

ZeroByte makes it easy to restore individual files or entire directories from any snapshot.

Restic REST Server Setup on Ubuntu

In this section, we'll set up a REST server on a VPS to serve as an offsite backup destination. ZeroByte running on your local server will connect to this REST server to store backups. We'll establish the secure connection between your local server and the VPS using NetBird in the steps that follow. Note that this is just one example of how you could use NetBird with ZeroByte, and there are many other network configurations and backup strategies you could implement.

Installation

Download the latest release from GitHub on your offsite server:


Create the backup directory:


Replace with your own username in all paths and configuration files.

Option 1: No Authentication (Private Networks Only)

Use this only on trusted networks or when access is controlled by other means (VPN, firewall, NetBird, etc.).
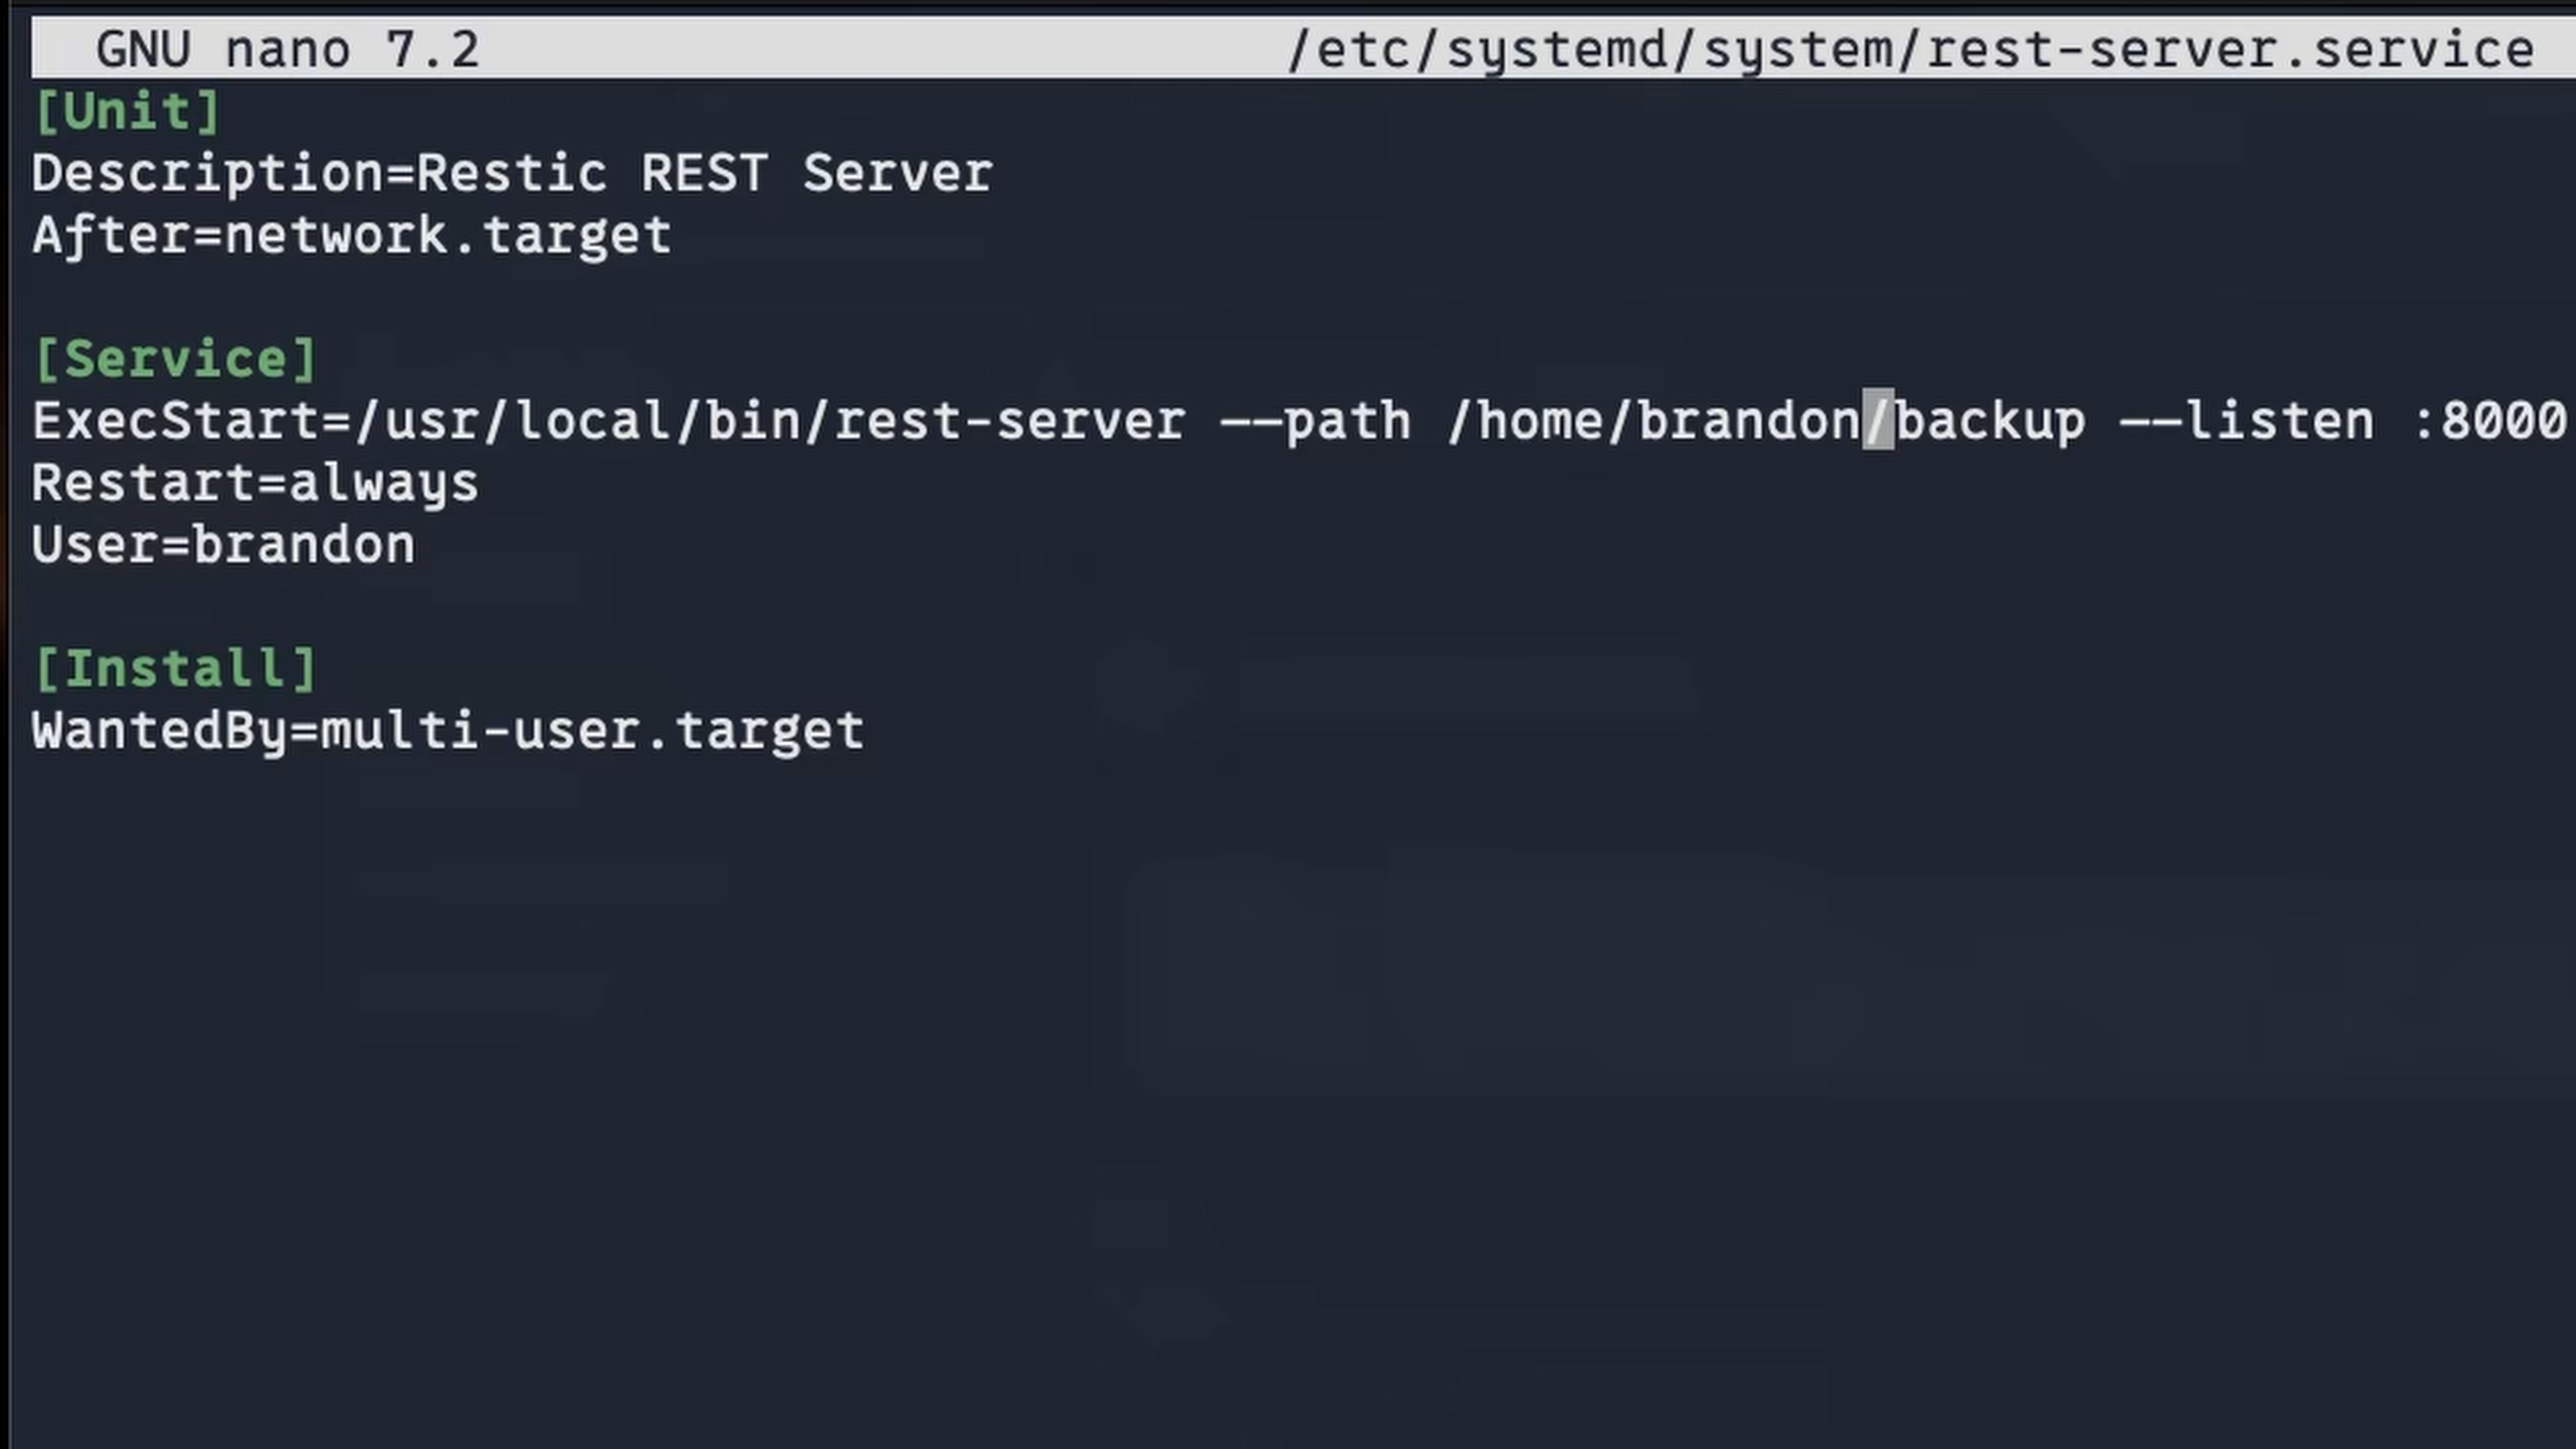
REST Server Systemd Configuration

Create the systemd service at :


Enable and start:


Connect from client:


Option 2: Basic Authentication

Use this option for any network where you want an additional layer of security.

Install htpasswd utility:


Create credentials file in the backup directory:


To add additional users (omit flag):


Update the systemd service (remove ):


Reload and restart:


Connect from client with credentials:


To avoid passwords in shell history, use environment variables:


Additional Security Options

FlagDescription
Prevents deletion of backups (ransomware protection)
Users can only access repos matching their username
Enable HTTPS with and
Bind to localhost only (use with reverse proxy)

Example with append-only mode:


Common issues:

  • Permission denied: Ensure the backup directory is owned by the service user
  • 217/USER error: The user specified in the service file doesn't exist
  • Tilde not expanding: Always use absolute paths in systemd service files
  • 500 errors: Check server logs for the actual error message

Verify It's Running


Integrating ZeroByte with NetBird for Offsite Backups

NetBird provides a secure, peer-to-peer encrypted connection between your machines without needing to expose ports or configure complex firewall rules. This makes it ideal for securely connecting your ZeroByte instance to a remote REST server for offsite backups.

Step 1: Install NetBird on Both Machines

On your offsite server (where REST server is running), install NetBird:


On your ZeroByte server, install NetBird using a setup key from the NetBird dashboard:

  1. Go to the NetBird dashboard → Setup Keys
  2. Create a new setup key (e.g., "ZeroByte Server")
  3. Add it to a group (e.g., "zerobyte")
  4. Copy the installation command and run it on your ZeroByte server
  5. Do the same for your offsite REST server

After installation, run to connect.

Step 2: Create NetBird Policy

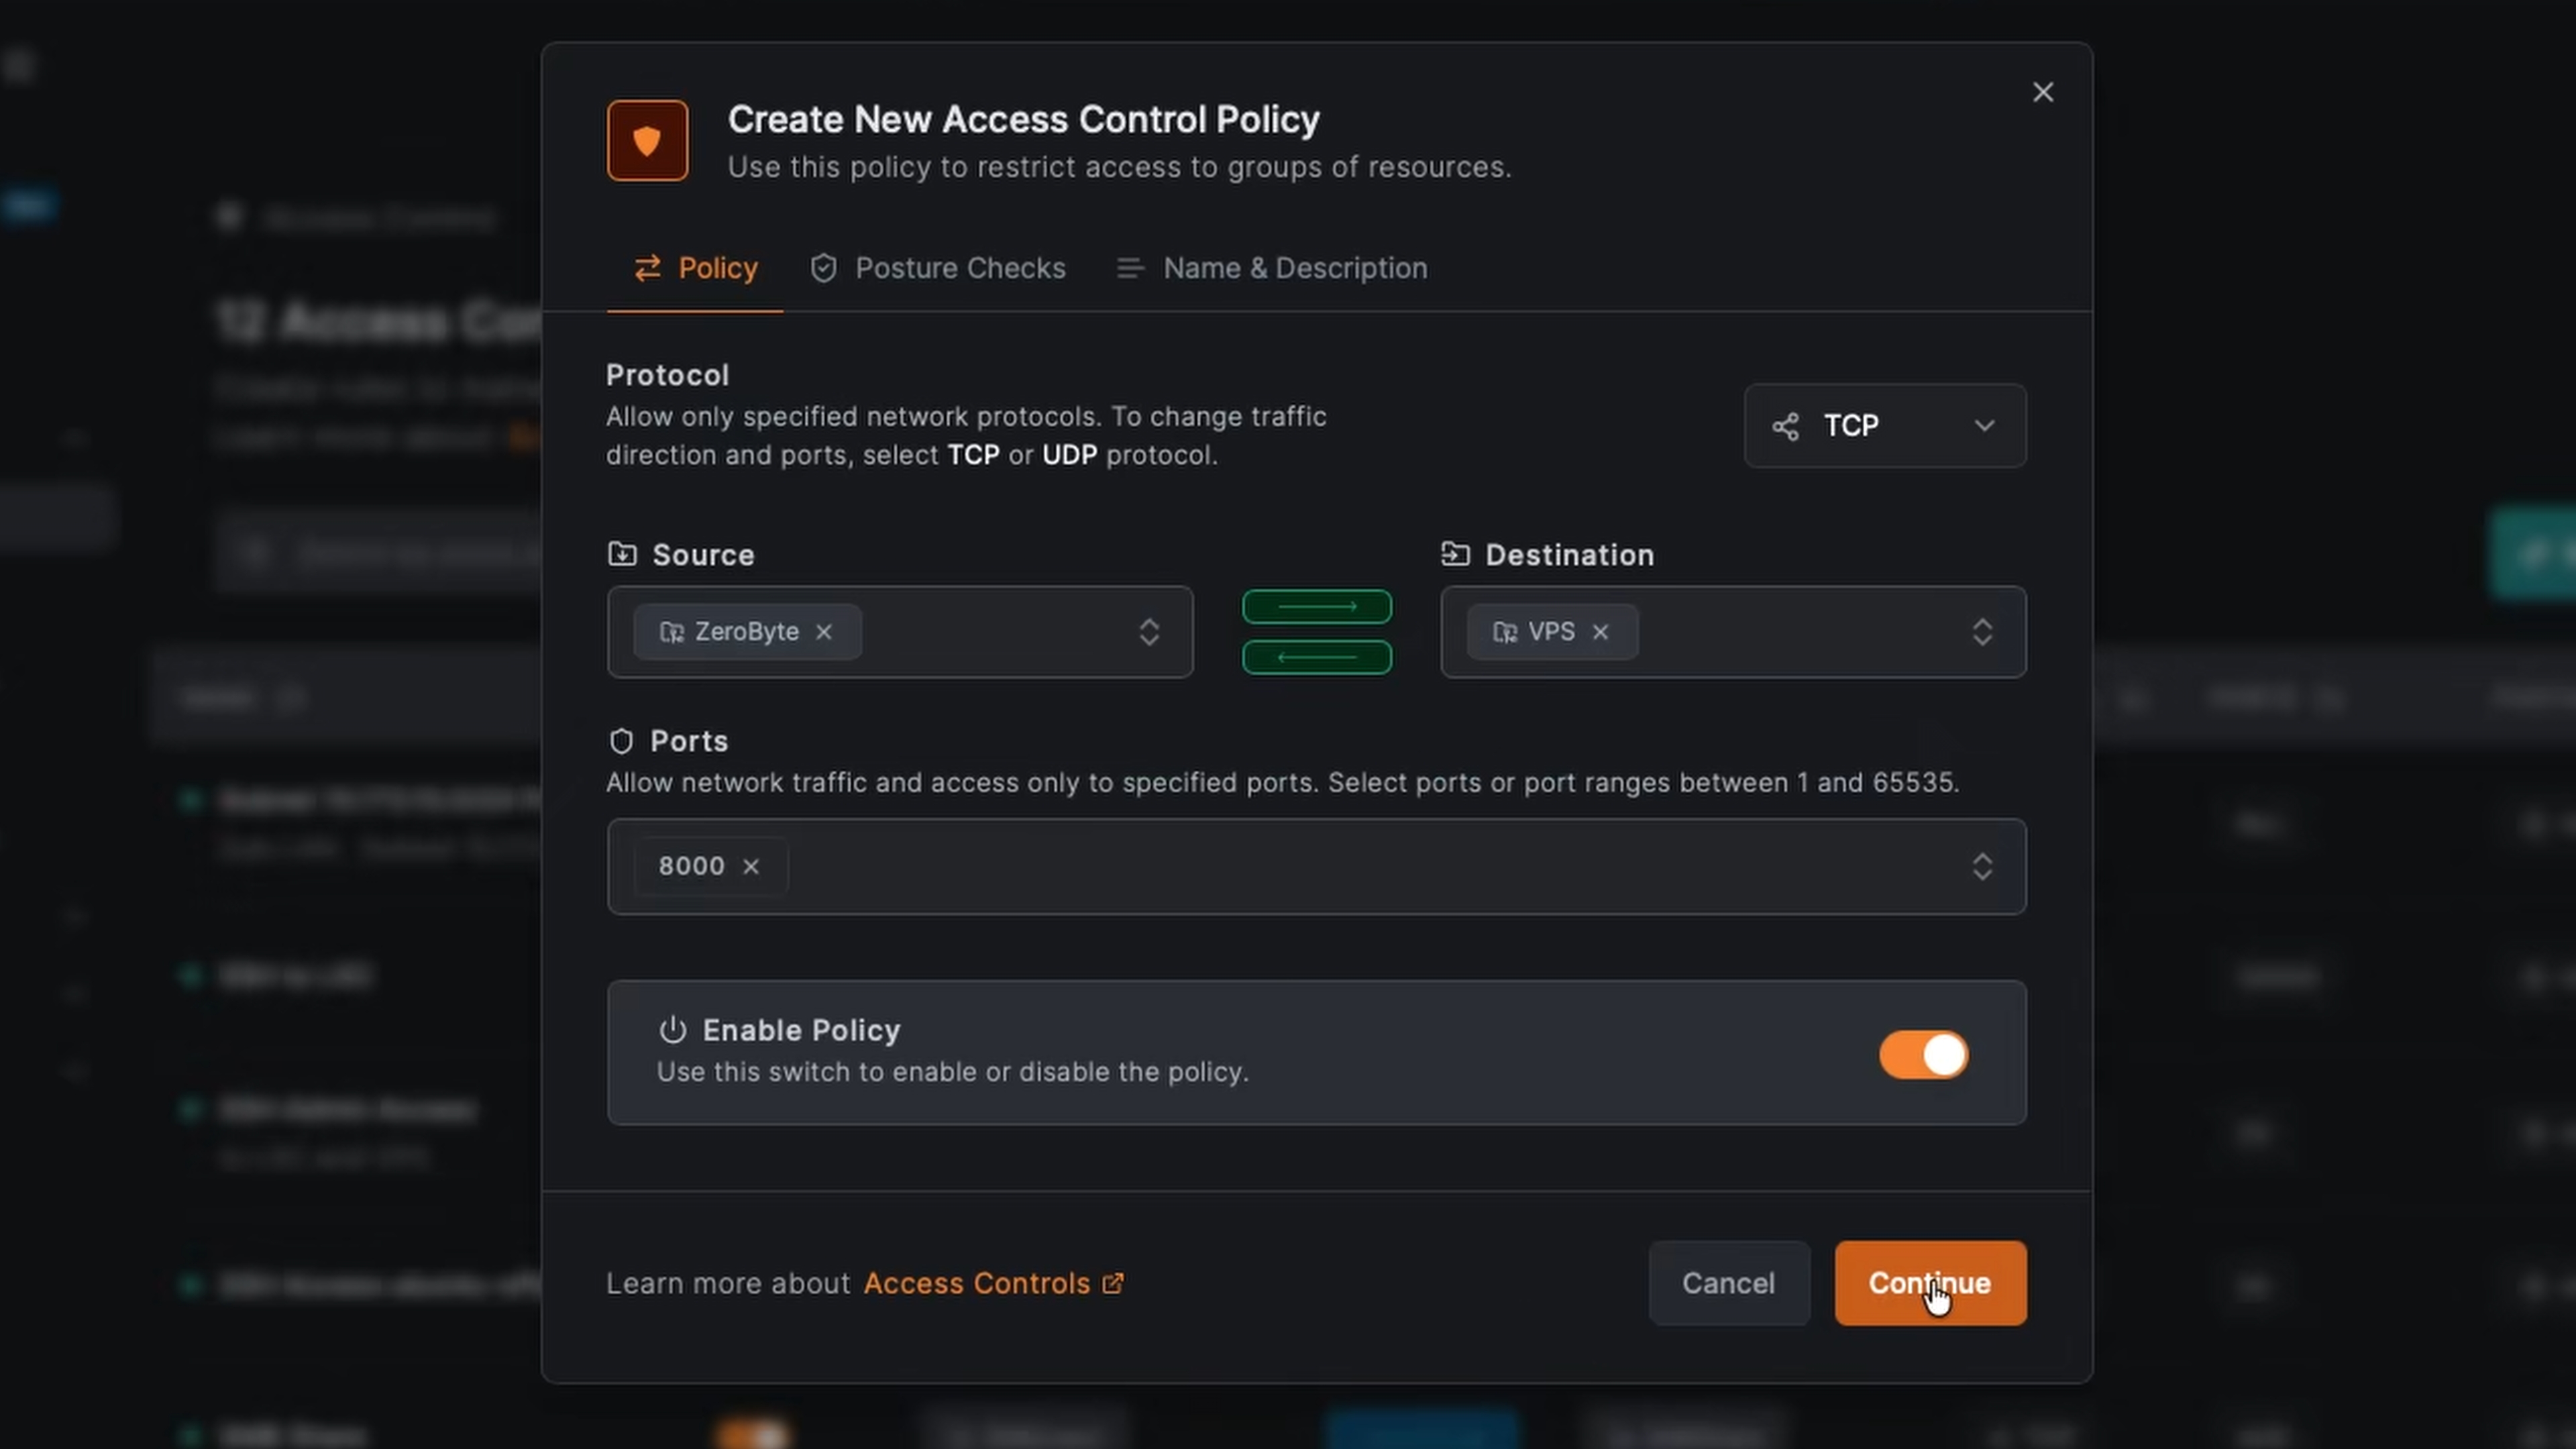
In the NetBird dashboard:

  1. Navigate to Policies
  2. Click Add Policy
  3. Configure:
    • Source: Select your ZeroByte group or peer
    • Destination: Select your offsite server group or peer
    • Protocol: TCP
    • Port: 8000 (or the port your REST server uses)
  4. Save the policy (e.g., "ZeroByte to VPS")

Creating NetBird Policy for ZeroByte

This allows your ZeroByte server to communicate with the REST server on your offsite machine through the NetBird VPN connection.

Step 3: Create REST Repository in ZeroByte

  1. In ZeroByte, navigate to Repositories
  2. Click Create repository
  3. Select REST as the backend type
  4. Configure:
    • Name: e.g., "Ubuntu Offsite"
    • REST URL: Use the NetBird DNS name (e.g., )
    • Repository Path: Leave empty for root, or specify a path
    • Username/Password: Leave empty if using , or provide credentials if using authentication

The repository should now show as healthy and connected through the NetBird VPN.

Step 4: Create Offsite Backup Job

  1. Navigate to Backups in ZeroByte
  2. Click Create backup job
  3. Configure:
    • Volume: Select the volume you want to back up
    • Repository: Select your REST repository (e.g., "Ubuntu Offsite")
    • Schedule: Set your desired frequency (e.g., daily at 12:30 PM)
    • Paths: Select specific directories to back up
    • Retention Policy: Configure snapshot retention (e.g., last 10 snapshots, 5 dailies, 3 weeklies, 2 monthlies)
  4. Save the backup job

You can trigger a manual backup immediately using the "Backup Now" button, or wait for the scheduled backup to run.

Benefits of This Setup

This configuration provides several advantages:

  1. No Open Ports: The REST server doesn't need to be exposed to the internet. NetBird handles the secure connection.
  2. Encrypted Connection: NetBird provides peer-to-peer encrypted VPN connectivity between your machines.
  3. End-to-End Encryption: Restic encrypts your backup data, providing an additional layer of security.
  4. 3-2-1 Backup Strategy: This setup supports the 3-2-1 backup methodology:
    • 3 copies of your data
    • 2 different media types
    • 1 offsite backup (your offsite REST server via NetBird)
  5. Easy Management: ZeroByte's web interface makes it simple to manage backups, schedules, and restores.

For production use, remember to:

  • Enable authentication on your REST server
  • Consider using HTTPS/TLS for additional security
  • Implement proper retention policies
  • Monitor backup job status regularly
  • Test restore procedures periodically
  • Use ZeroByte in addition to another backup platform as it is in early stages of development

Additional Resources