

惯性聚合 高效追踪和阅读你感兴趣的博客、新闻、科技资讯
阅读原文 在惯性聚合中打开

推荐订阅源

Google Online Security Blog
freeCodeCamp Programming Tutorials: Python, JavaScript, Git & More
Stack Overflow Blog
Stack Overflow Blog
GbyAI
GbyAI
Microsoft Azure Blog
I
InfoQ
F
Fortinet All Blogs
N
Netflix TechBlog - Medium
Martin Fowler
Martin Fowler
腾讯CDC
C
CERT Recently Published Vulnerability Notes
博客园 - 聂微东
L
LINUX DO - 热门话题
Y
Y Combinator Blog
H
Hackread – Cybersecurity News, Data Breaches, AI and More
Threat Intelligence Blog | Flashpoint
OSCHINA 社区最新新闻
OSCHINA 社区最新新闻
钛媒体:引领未来商业与生活新知
钛媒体:引领未来商业与生活新知
Microsoft Security Blog
cs.CL updates on arXiv.org
WordPress大学
WordPress大学
C
Cisco Blogs
A
Arctic Wolf
Latest news
Latest news
Jina AI
Jina AI
P
Proofpoint News Feed
博客园 - 叶小钗
Vercel News
Vercel News
T
Threat Research - Cisco Blogs
博客园 - 三生石上(FineUI控件)
K
Kaspersky official blog
C
Check Point Blog
H
Heimdal Security Blog
博客园 - Franky
小众软件
小众软件
The Register - Security
Application and Cybersecurity Blog
Google DeepMind News
AWS News Blog
AWS News Blog
The Hacker News
The Hacker News
T
The Exploit Database - CXSecurity.com
aimingoo的专栏
aimingoo的专栏
Project Zero
Project Zero
G
GRAHAM CLULEY
爱范儿
爱范儿
奇客Solidot–传递最新科技情报
奇客Solidot–传递最新科技情报
Scott Helme
Scott Helme
让小产品的独立变现更简单 - ezindie.com
Exploit-DB.com RSS Feed
NISL@THU
NISL@THU

NetBird - Networking Knowledge Hub - RSS Feed

NetBird Is Now on the Vultr Marketplace Native NetBird on the GL.iNet Comet Pro (GL-RM10) NetBird v0.71 - IPv6 Overlay Addressing NetBird Exit Nodes - Appear at Home, or Anywhere Else Reporting Bugs and Requesting Features in NetBird Setup and Use Local AdGuard Home Anywhere with NetBird DNS How to Set Up NetBird on PiKVM for Secure Remote KVM Access NetBird v0.69 - CrowdSec IP Reputation for the Reverse Proxy Cloudflare Mesh vs NetBird vs Tailscale: Performance Compared Self-Hosting Nextcloud with Docker and NetBird Implementing Zero Trust with NetBird NetBird v0.67 - Layer 4 Proxy Support for TCP, UDP, and TLS Solwr Enhances Remote Connectivity with NetBird Self-Hosting NetBird with Authentik Jellyfin Media Server - Self-Host Your Movies, TV, and Music Cloudflare Tunnels vs. NetBird Reverse Proxy INFITX Builds Zero-Touch Kubernetes Networking with NetBird NetBird v0.66 - Expose Local Services to the Internet from the CLI Pangolin vs. NetBird Home Assistant Setup Guide with EASY Remote Access NetBird v0.65 - Built-in Reverse Proxy with Custom Domains Docker for Beginners - Everything You Need to Get Started NetBird for SOC 2 Compliance NetBird v0.63 - Custom DNS Zones for Private Network Resolution Vibecode This in a Weekend and Take 5% of the Company NetBird v0.62 - Built-in Local Users with Optional IdP Integration NetBird v0.61.0 - Granular SSH Access Control and Automatic Updates Top 5 Alternatives to OpenVPN Top 5 Open Source Alternatives to Tailscale Top 5 Alternatives to ZeroTier How to Set Up ZeroByte and REST Server for Backups with NetBird How to Install n8n v2.0 with NPM and PM2 ZeroTier vs. NetBird The Ultimate Immich Guide - Ditch Google and Amazon Photos for Good NetBird as Your Help with ISO 27001 Compliance NetBird and Huntress - Secure Network Access for MSPs How to Access Windows Shares from Anywhere with NetBird netgo Relies on Modern ZTNA with NetBird Connect to Your Homelab from Anywhere with a Raspberry Pi NetBird SSH - A New, Identity-Aware Approach The AI Mega Mesh: How to Connect 30+ GPU Cloud Providers Connect Multiple Ollama GPUs to OpenWebUI with NetBird Top 5 Tailscale Alternatives SSH and RDP, now in your browser NetBird–Acronis Integration: Empowering MSPs for Advanced Ransomware and Threat Defense Introducing the Control Center - Remote Access, Beautifully Visualized NetBird at MSP Global 2025 Understanding Overlay Networks - The Basics NetBird and SentinelOne Singularity™ - Automate Threat Response NetBird and Microsoft Intune - Enforcing Device Compliance for Zero Trust Rethinking Zero Trust Security with NetBird and pfSense Improving Unidirectional Access Control Stronger Security: NetBird + GitHub Secure Open Source Fund NetBird's MSP Partner Program Signicat Enhances Cross-Cloud Accessibility with NetBird SonicWall SSL VPN NetExtender vs. NetBird NetBird Is Embracing the AGPLv3 License NetBird Profiles Have Landed - Manage Multiple Accounts Effortlessly Rethinking Access Control to Secure Your On-Premises SharePoint Servers Sport Alliance Increases Efficiency with Zero Trust Networking at Scale Rethinking Network Access: qwertiko Goes Zero Trust with NetBird Optimizing Network Efficiency with NetBird's Lazy Connections Use Port Ranges in Access Control Policies Generic HTTP Endpoint for Network Events Streaming NetBird’s Response to Spear-Phishing Campaign Targeting Financial Executives Zero-Trust Access to Internal Resources Without Installing Agents Enhance Network Visibility with NetBird’s Traffic Events Logging TrueNAS Made Easy - Install, Set Up, and Access From Anywhere Top 5 Alternatives for WireGuard Jump Hosts. Gateways for Remote Access NetBird Network Routes and Exit Nodes Security for All - SSO and MFA for Free Enhancing Network Access Control with NetBird's Identity Provider Feature Twingate vs. NetBird Limit Network Access Based on Running Applications FortiClient ZTNA vs. NetBird OpenVPN vs. NetBird Tailscale vs. NetBird Getting Started with an Azure Site-to-Site VPN Getting Started with an On-premise-to-AWS Site-to-Site VPN Secure Remote Access to VPCs, LANs, and Offices regreSSHion - A New OpenSSH Server Remote Code Execution Vulnerability Evolve Bank & Trust Data Breach. What Happened? What Is a Site-to-Site VPN? IPSec Tunneling Demystified. Enhancing Data Security Across Networks Understanding IPSec Tunnel and Transport Modes Understanding the Differences Between IKEv1 and IKEv2 Understanding the IKEv1 Protocol in IPSec ZeroTier versus NetBird - Which Should You Choose? AWS Lambda Serverless Security. Mistakes, Oversights, and Potential Vulnerabilities Using NetBird for Kubernetes Access Serverless Security Vulnerabilities and Best Practices to Mitigate Them Security Best Practices for Serverless Azure Functions A Guide to Remote Access Security for SMEs IoT Security Essentials. How to Achieve Secure Remote Access Open Source Zero Trust Networking Using SSH for Secure Remote Access How We Integrated Rosenpass in NetBird The First Quantum-Resistant Mesh VPN Using eBPF and XDP to Share Default DNS Port Between Multiple Resolvers
Proxmox VE for Beginners Guide with NetBird LXC
Written byBrandon Hopkins · 2025-09-24 · via NetBird - Networking Knowledge Hub - RSS Feed

Proxmox is a free and open operating system based on Debian Linux that provides a web-based interface to manage virtual machines (KVM) and containers (LXC) on a single server or a cluster of servers. It has grown rapidly in popularity by those with home servers and businesses alike. In fact, NetBird uses Proxmox almost daily for testing and development.

In this article we are going to cover the basics of getting Proxmox up and running, setting up a LXC container with NetBird for remote connectivity, and diving into some more advanced tips and tricks such as setting up a ZFS pool and enabling IOMMU for GPU passthrough.

Installing Proxmox

You'll need a computer/server that will act as your node with at least 2GB RAM (4GB+ recommended), 32GB+ storage space (SSD recommended), an 8GB+ USB drive, stable internet connection, and another computer to create the bootable USB.

Download Proxmox VE ISO

Visit the official Proxmox website at https://www.proxmox.com/en/downloads and download the latest Proxmox VE ISO file. You can verify the checksum if desired to ensure file integrity.
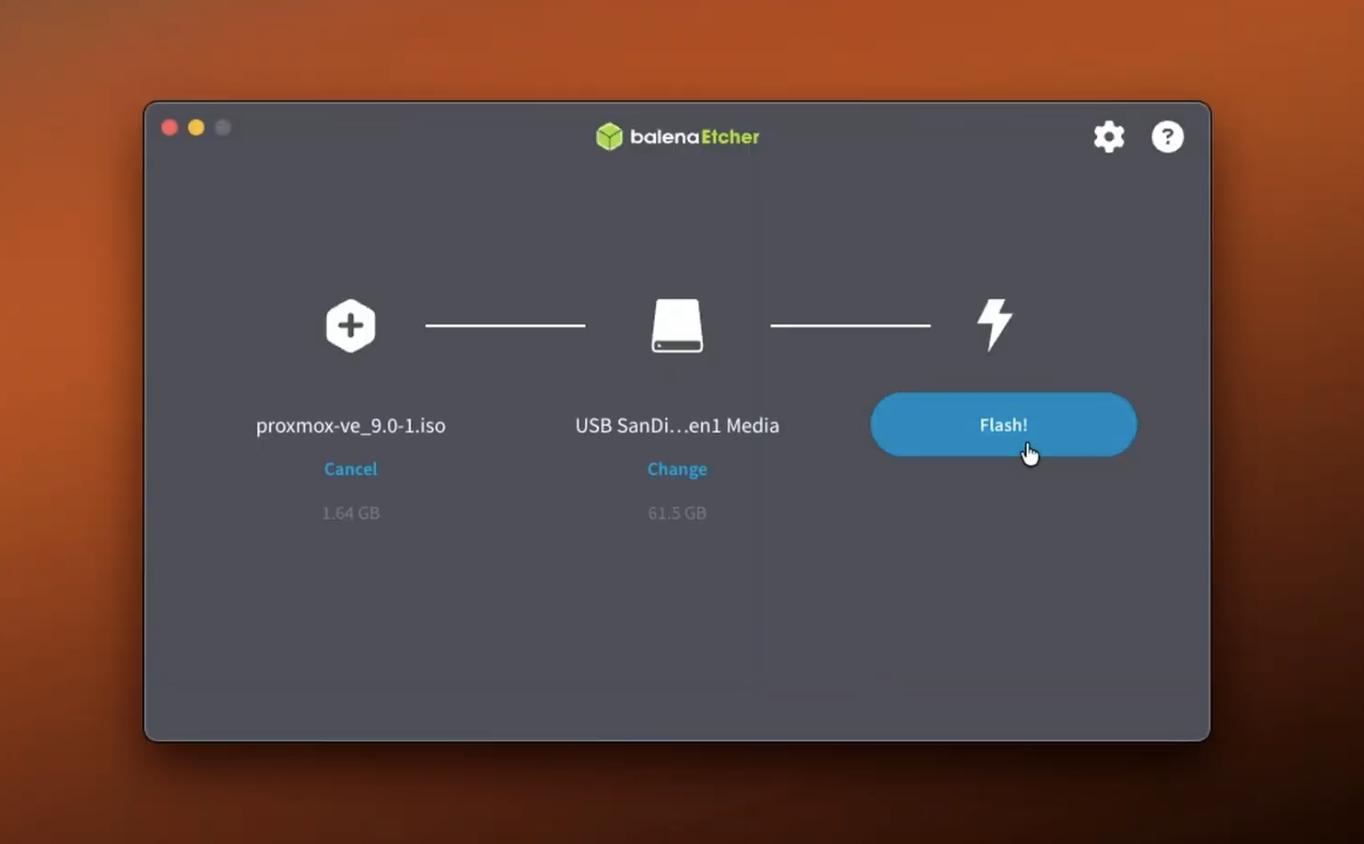
Create Bootable USB Drive

Proxmox USB Flash

Using Rufus (Windows): Download Rufus from https://rufus.ie/ , insert your USB drive, and launch Rufus as Administrator. Select your USB drive as the device, click "SELECT" to choose the Proxmox ISO, set the partition scheme to GPT, then click "START" and wait for completion.

Using Balena Etcher (Cross-platform): Download Balena Etcher from https://www.balena.io/etcher/ , install and launch it, click "Flash from file" to select the Proxmox ISO, click "Select target" to choose your USB drive, then click "Flash!" and wait for the process to complete.

Boot from USB

Enter BIOS/UEFI setup by pressing F2, F12, Delete, or ESC during boot (the exact key varies by manufacturer, so watch for boot messages showing the correct key). In the BIOS settings, disable Secure Boot if present and set the USB drive as the first boot priority.
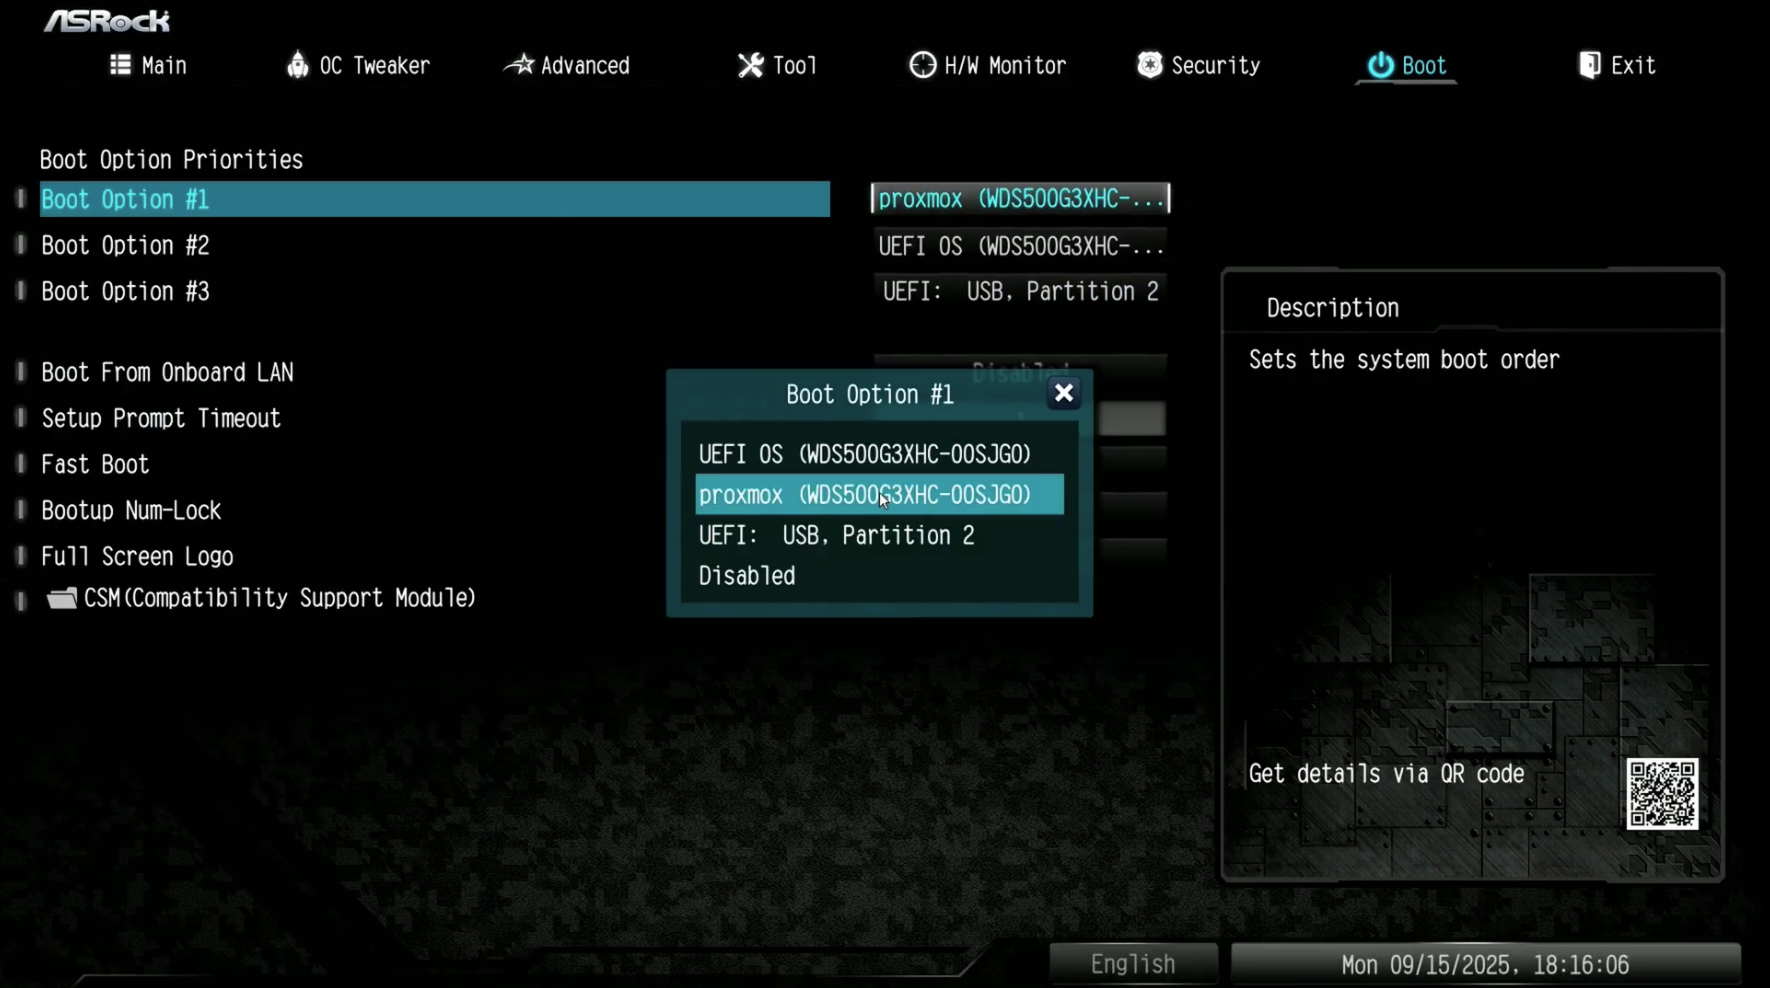
Proxmox USB Boot

Save settings and exit, then the system should boot to the Proxmox VE installer.

Proxmox VE Installation

When the boot screen appears, select "Install Proxmox VE" and press Enter to continue. Read and accept the End User License Agreement by clicking "I agree".

For the target hard disk selection, choose your installation drive (note that this will erase all data on the selected drive). If you click "Options" for advanced settings, you can choose between ZFS (recommended) or ext4 (simpler) filesystems. For ZFS, you can select RAID levels like RAID1 for multiple drives or single for one drive, while ext4 uses standard partitioning. Swap size is usually auto-calculated but can be customized.

Next, select your country, time zone, and keyboard layout. Create a strong root password that you'll use to log in, confirm it, and enter a valid email address for notifications.

For management network configuration, the interface is usually auto-detected as eth0. Enter a hostname like . Choose between DHCP for automatic IP assignment (easier for beginners) or static IP for more control. If using static IP, enter values like for IP address, your router's IP (e.g., ) for gateway, and your router or public DNS (e.g., ) for DNS server.
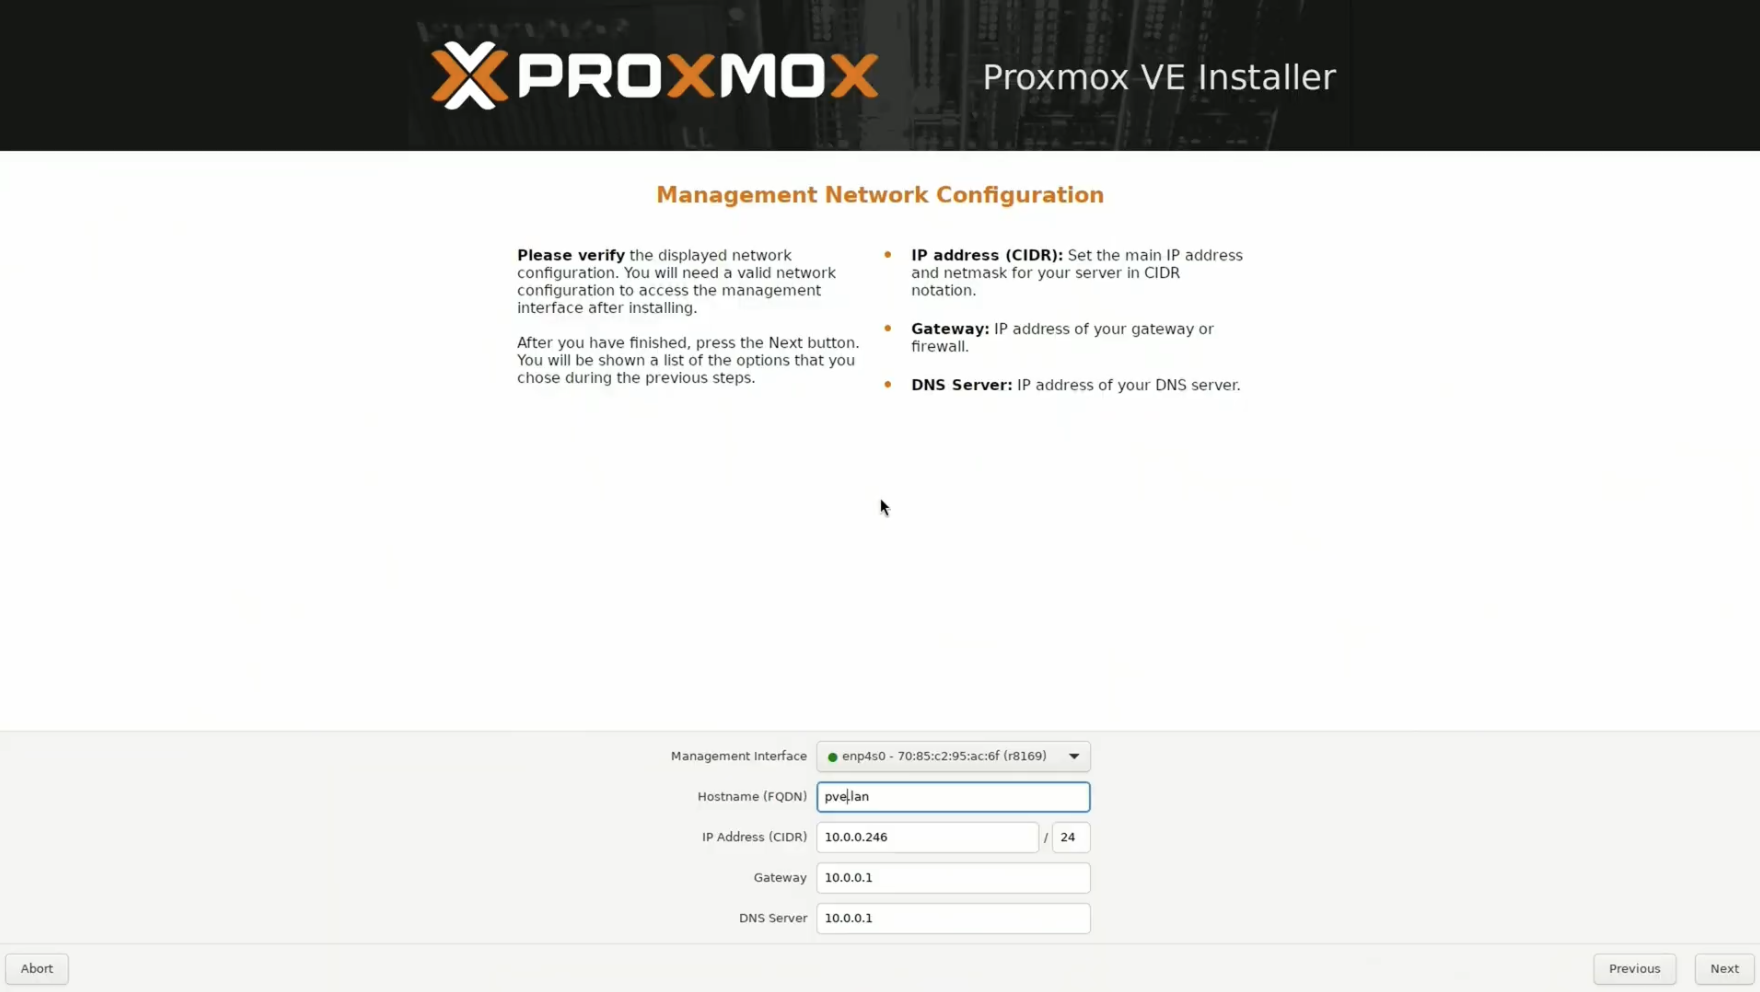
Proxmox Installation

Review all settings carefully in the installation summary, then click "Install" to begin the installation process.

First Boot and Login

When installation completes, remove the USB drive when prompted and click "Reboot" so the system restarts from the hard drive. During the first boot, you'll see Linux boot messages, followed by a console login prompt, and the system will display network information including the IP address.

To access the web interface, open a web browser on another computer on the same network and navigate to (for example, ). Accept the self-signed certificate security warning that appears. Log in using as the username, the password you set during installation, and as the realm.

You'll see a subscription notice which is normal for home use - just click "OK" to continue.
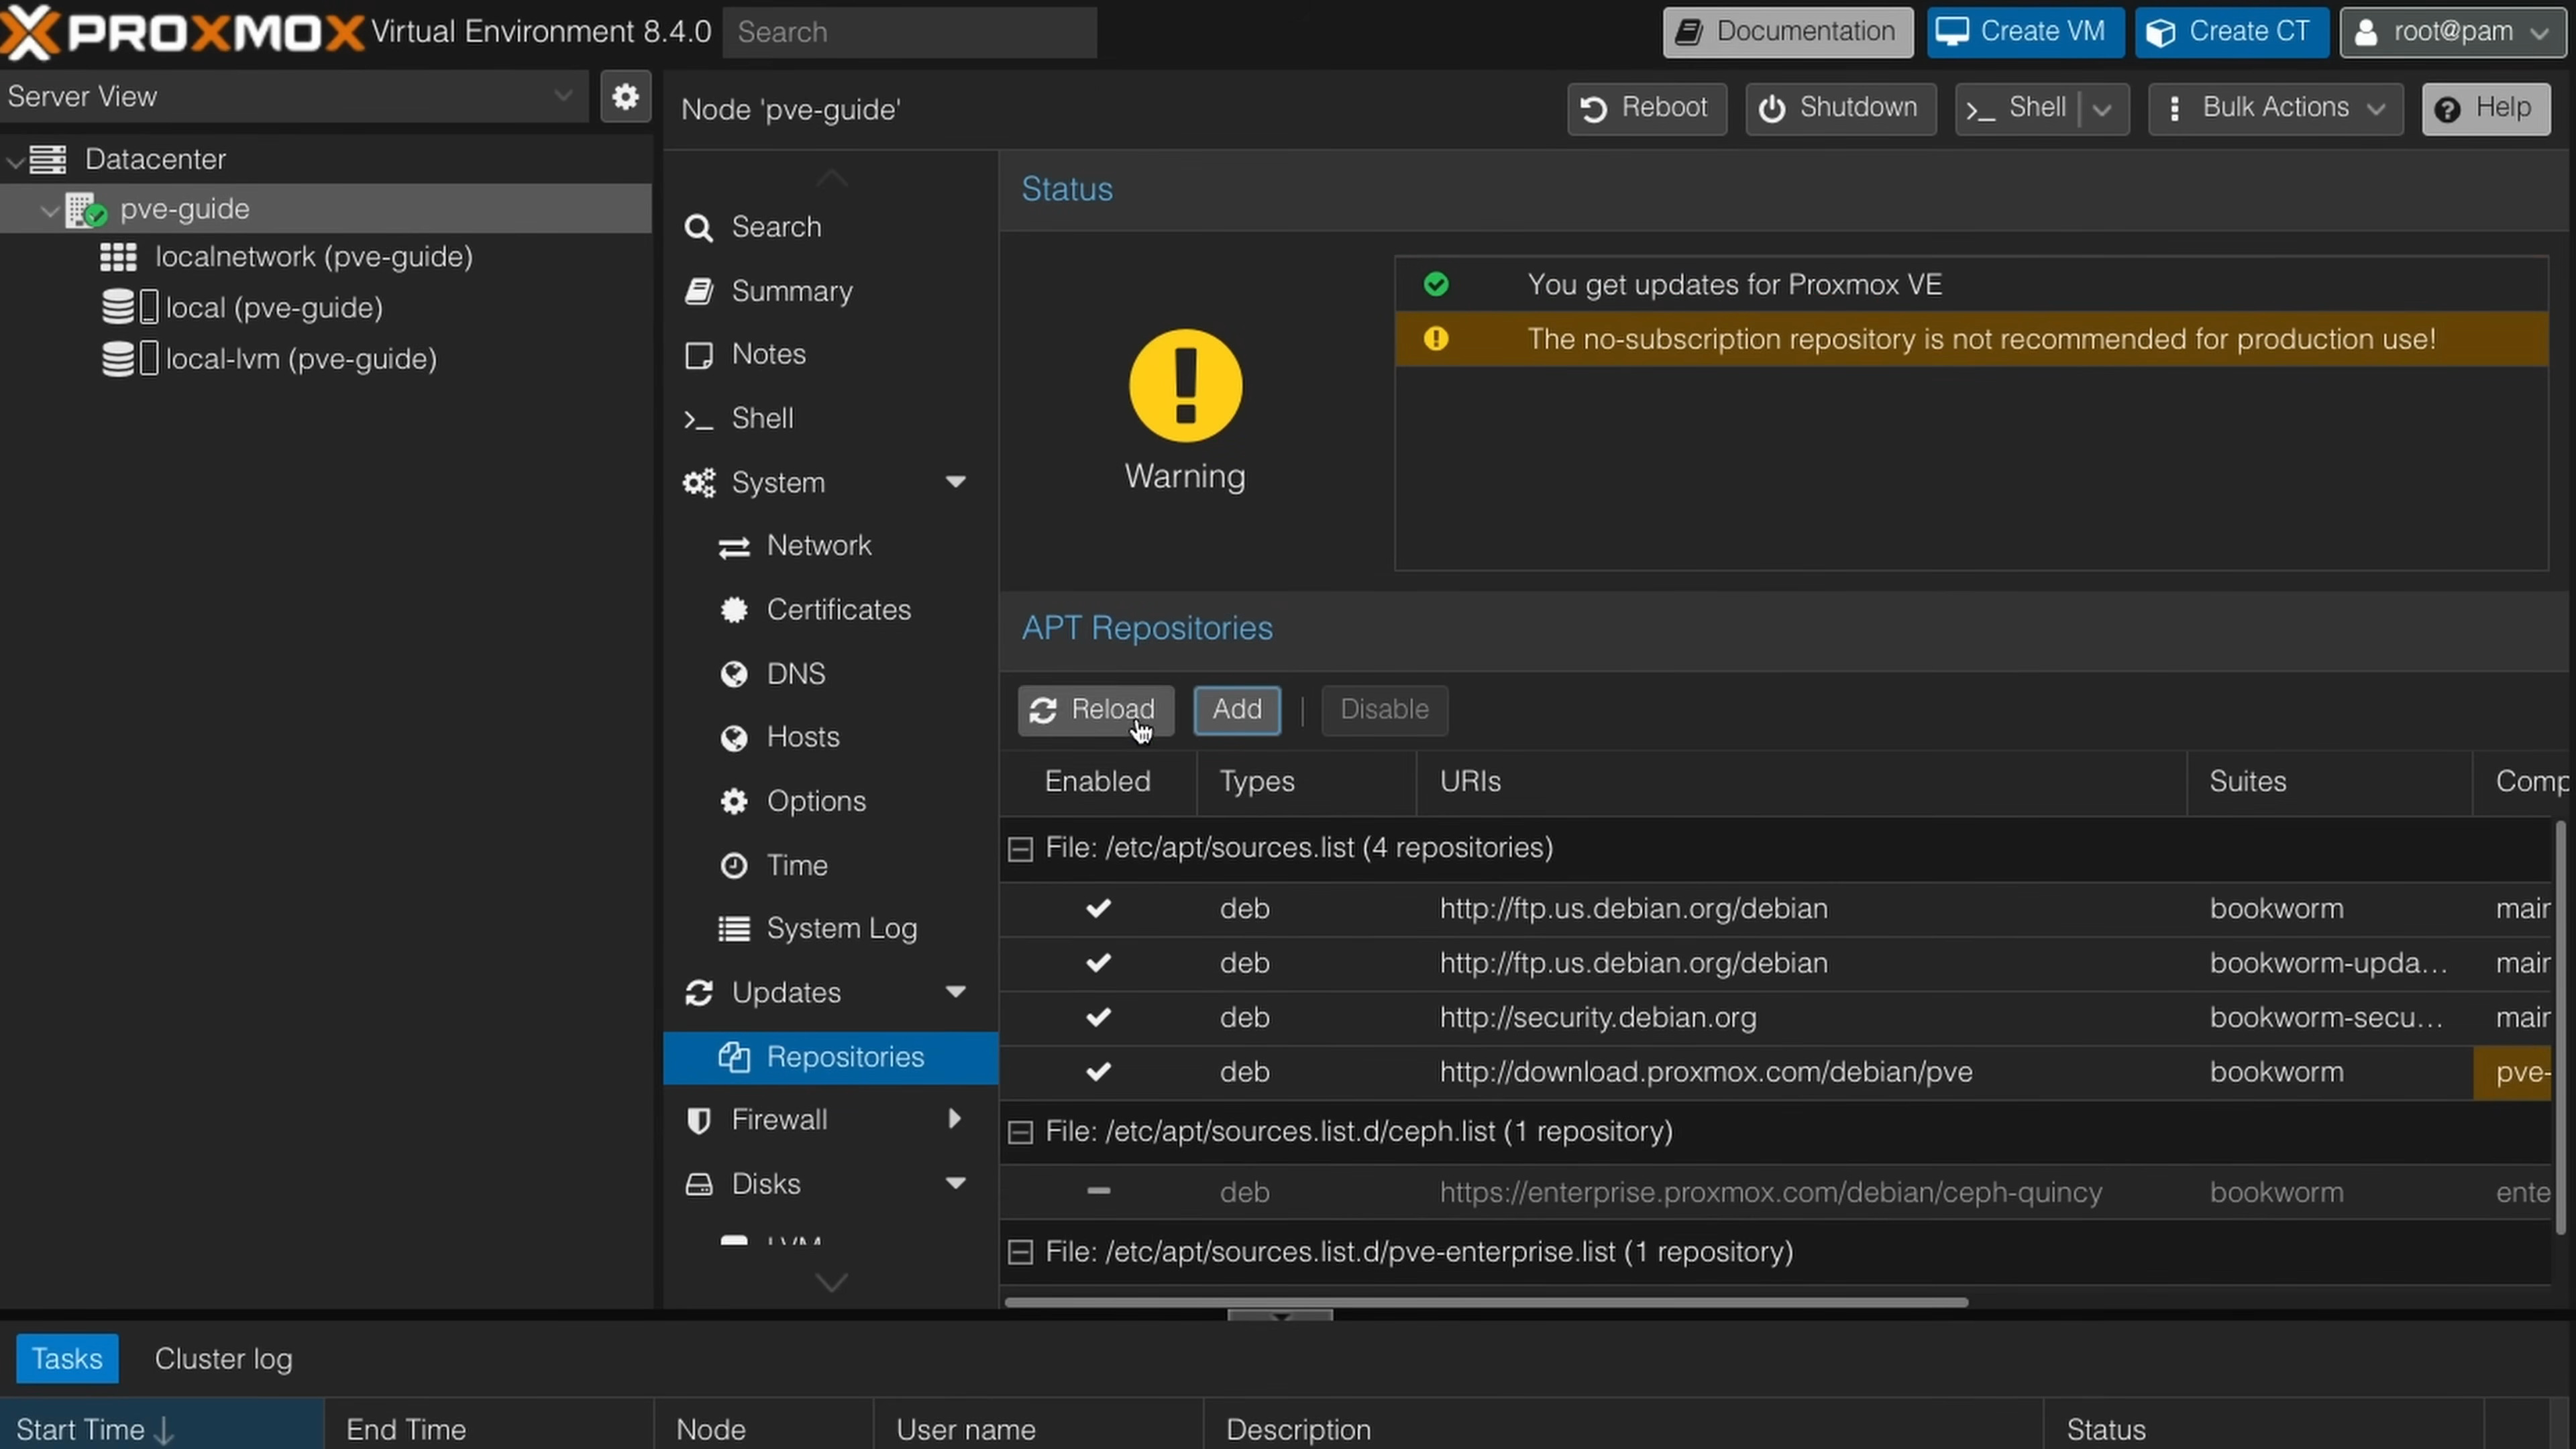
Post-Install Steps

Disable Enterprise Repositories

  1. Navigate to Node > Repositories. Disable the enterprise repositories.
  2. Now click Add and enable the no-subscription repository. Finally, go to Updates > Refresh.
  3. Upgrade your system by clicking Upgrade above the repository settings page.

Proxmox Free Repos

Delete local-lvm and Resize local (read warning)

Warning: This assumes a fresh installation without advanced storage settings during the installation, such as ZFS. These steps are only recommended if you have a small boot drive and you need to reclaim space.

The boot drive in this machine is small and I run all my containers and virtual machine disks on a separate storage pool. So the LVM partition is not necessary for me and goes unused. If you're running everything off the same boot drive for fast storage, skip this. Also, you should check out this video to learn more about LVM before doing anything.

  1. Delete local-lvm manually from web interface under Datacenter > Storage.
  2. Run the following commands within Node > Shell.

Check to ensure your local storage partition is using all available space. Reassign storage for containers and VM if needed.

Ensure IOMMU is enabled

IOMMU will need to be enabled within the BIOS on your system. Each motherboard manufacturer has a slightly different layout, but in general AMD motherboards will have the setting under AMD CBS and NBIO Settings and Intel boards will have it under VT-d under the CPU options.

Enable IOMMU in grub configuration within Node > Shell.


You will see the line with , all you need to do is add or depending on your chipset.


Next run the following commands and reboot your system.


Now check to make sure everything is enabled.


If you plan on using GPU passthrough with virtual machines or if you want to learn about enabling PCI Passthrough in general, check out their docs here .

Create ZFS Pools

In the video, I added two additional 4TB disk drives for more storage. Proxmox makes creating ZFS pools for your additional drives super easy and adding storage this way adds redundancy, so if a drive fails you have the opportunity to prevent data loss.

First, check out your disks and make sure that they're all there. Find this under Node > Disks. Make sure you wipe all the disks you plan on using and do note this will wipe any data on the disks, so make sure there is no important data on them and back up if needed.
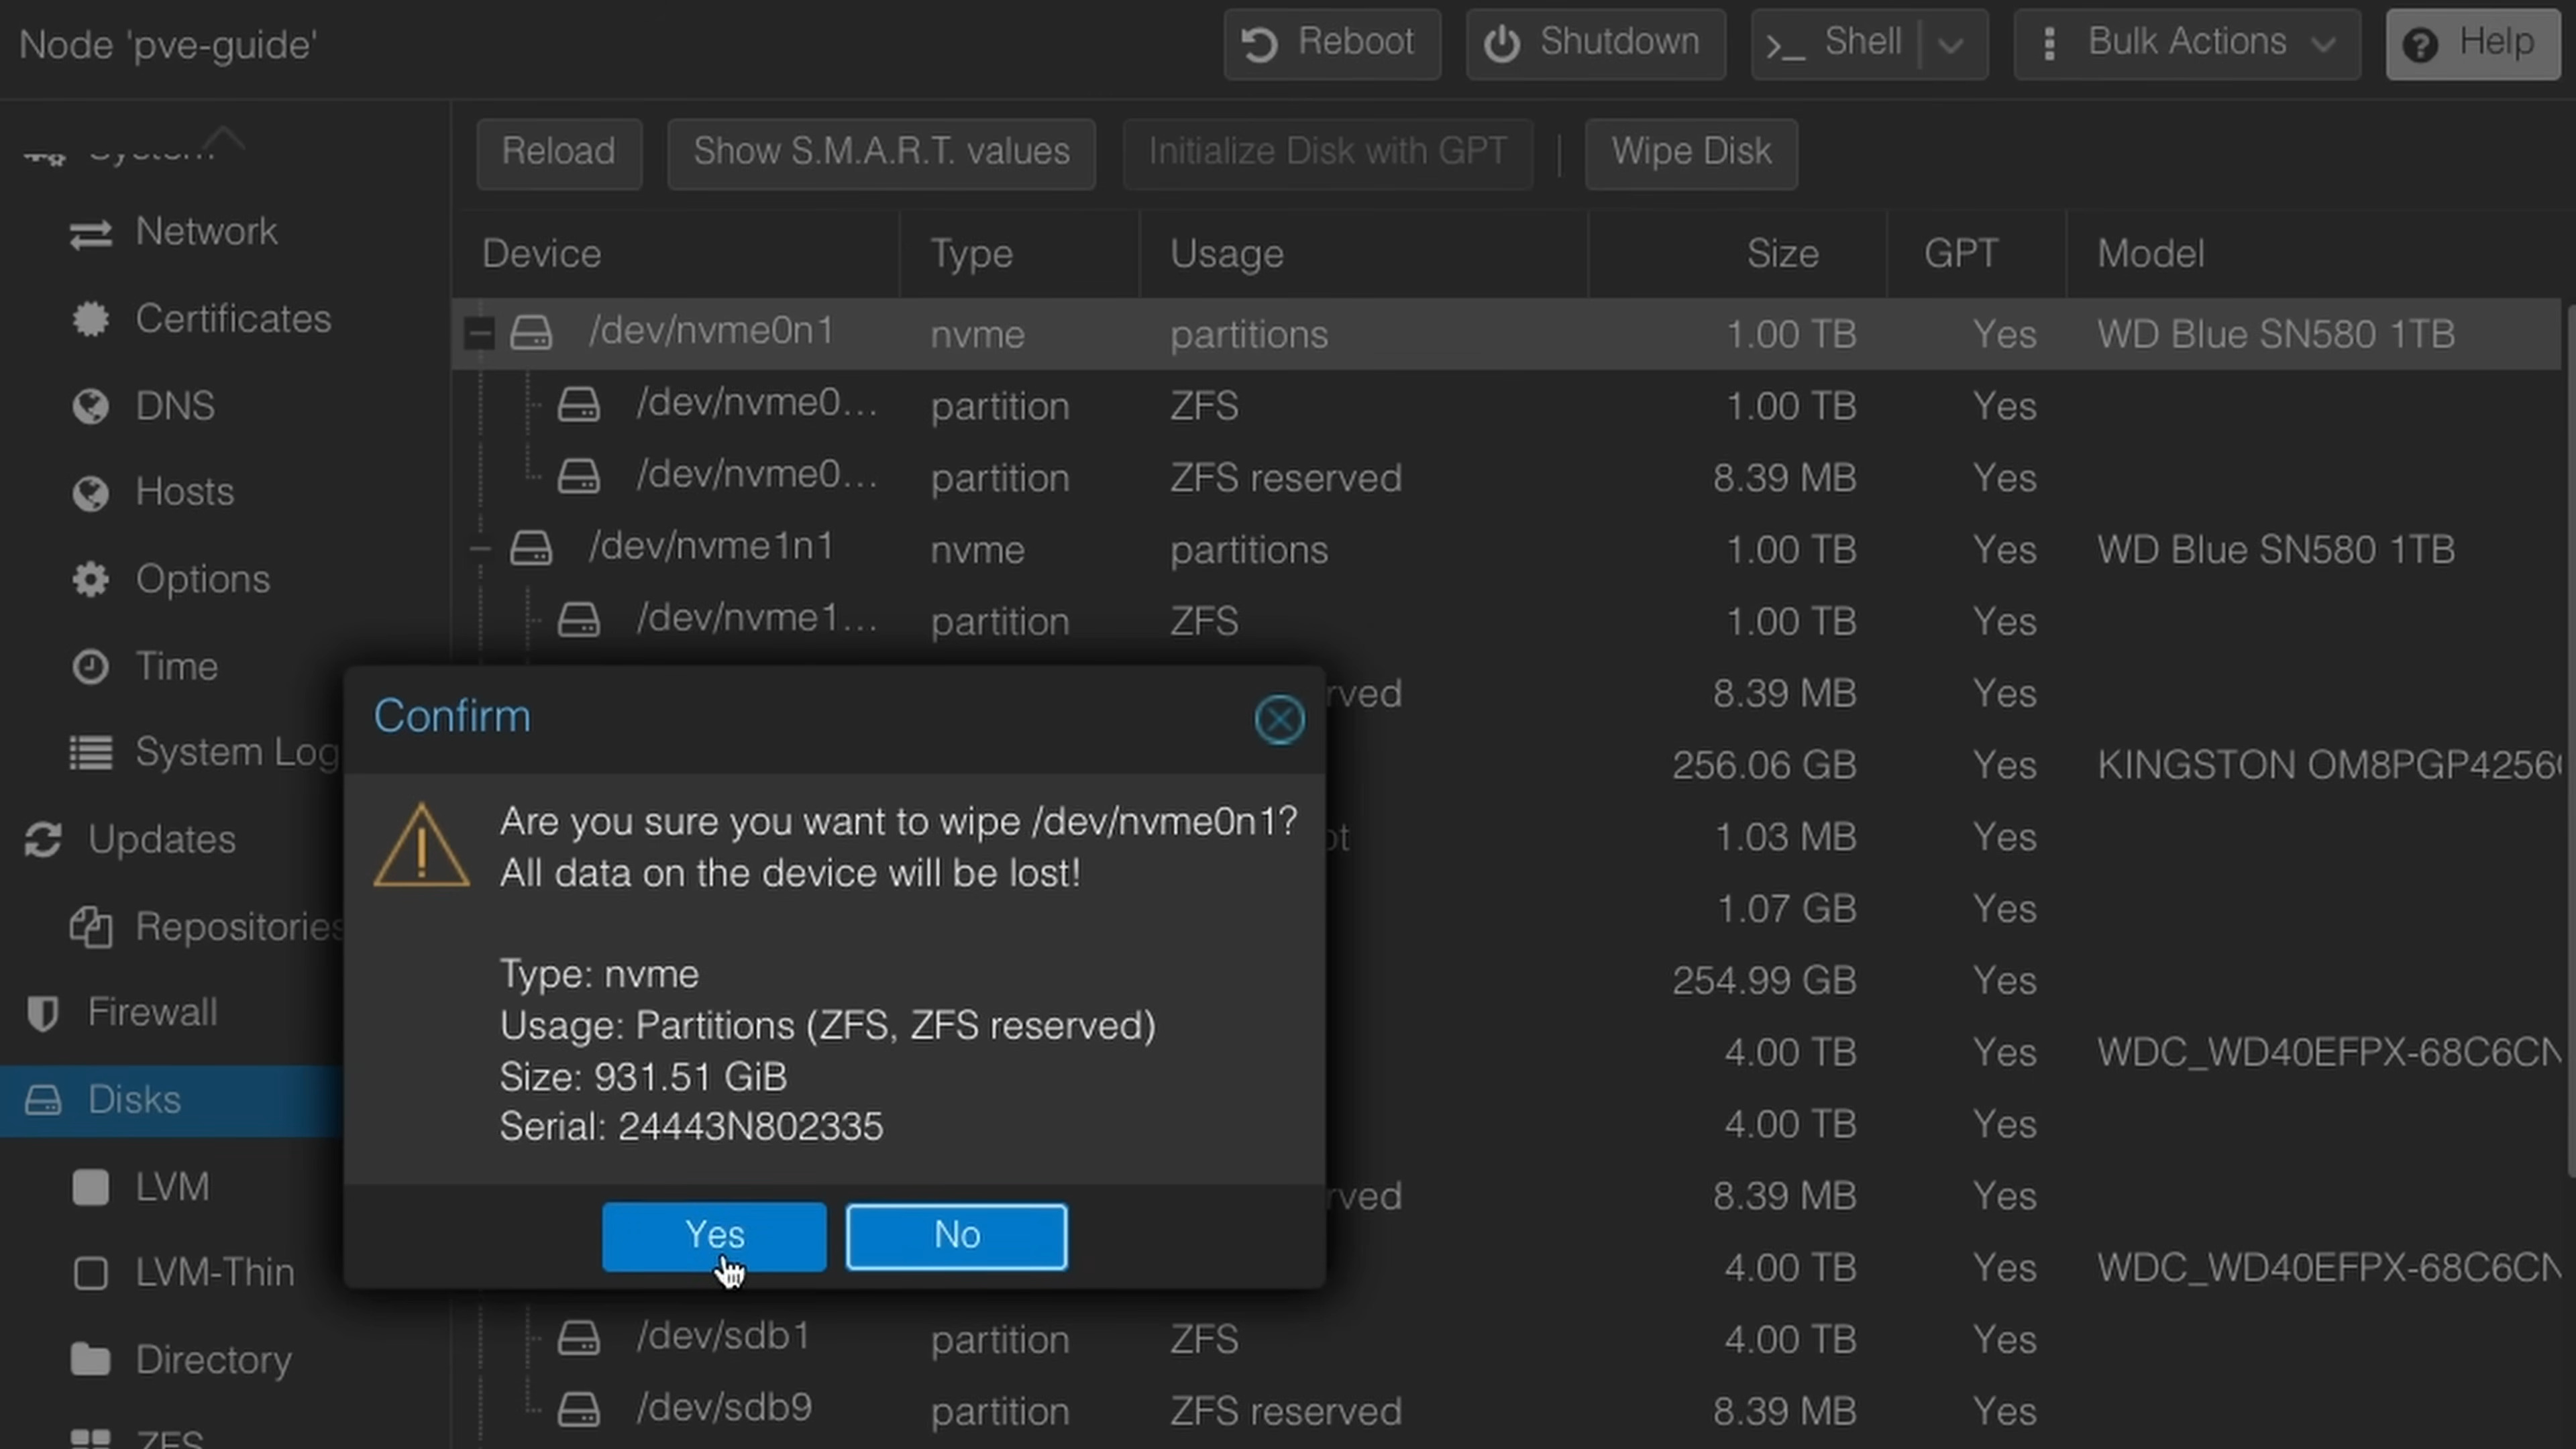
Proxmox Whipe Disk

Now, on the Proxmox sidebar for your datacenter, go to Disks > ZFS > Create: ZFS. This will display the screen to create a ZFS pool.

From this screen, it should show all of your drives, so select the ones you want in your pool, and select your RAID level (in the video, I selected mirror since it's only two drives.) and compression. Make sure you check the box that says Add to Storage. This will make the pools immediately available for use within virtual machines (VM) and containers (LXC).
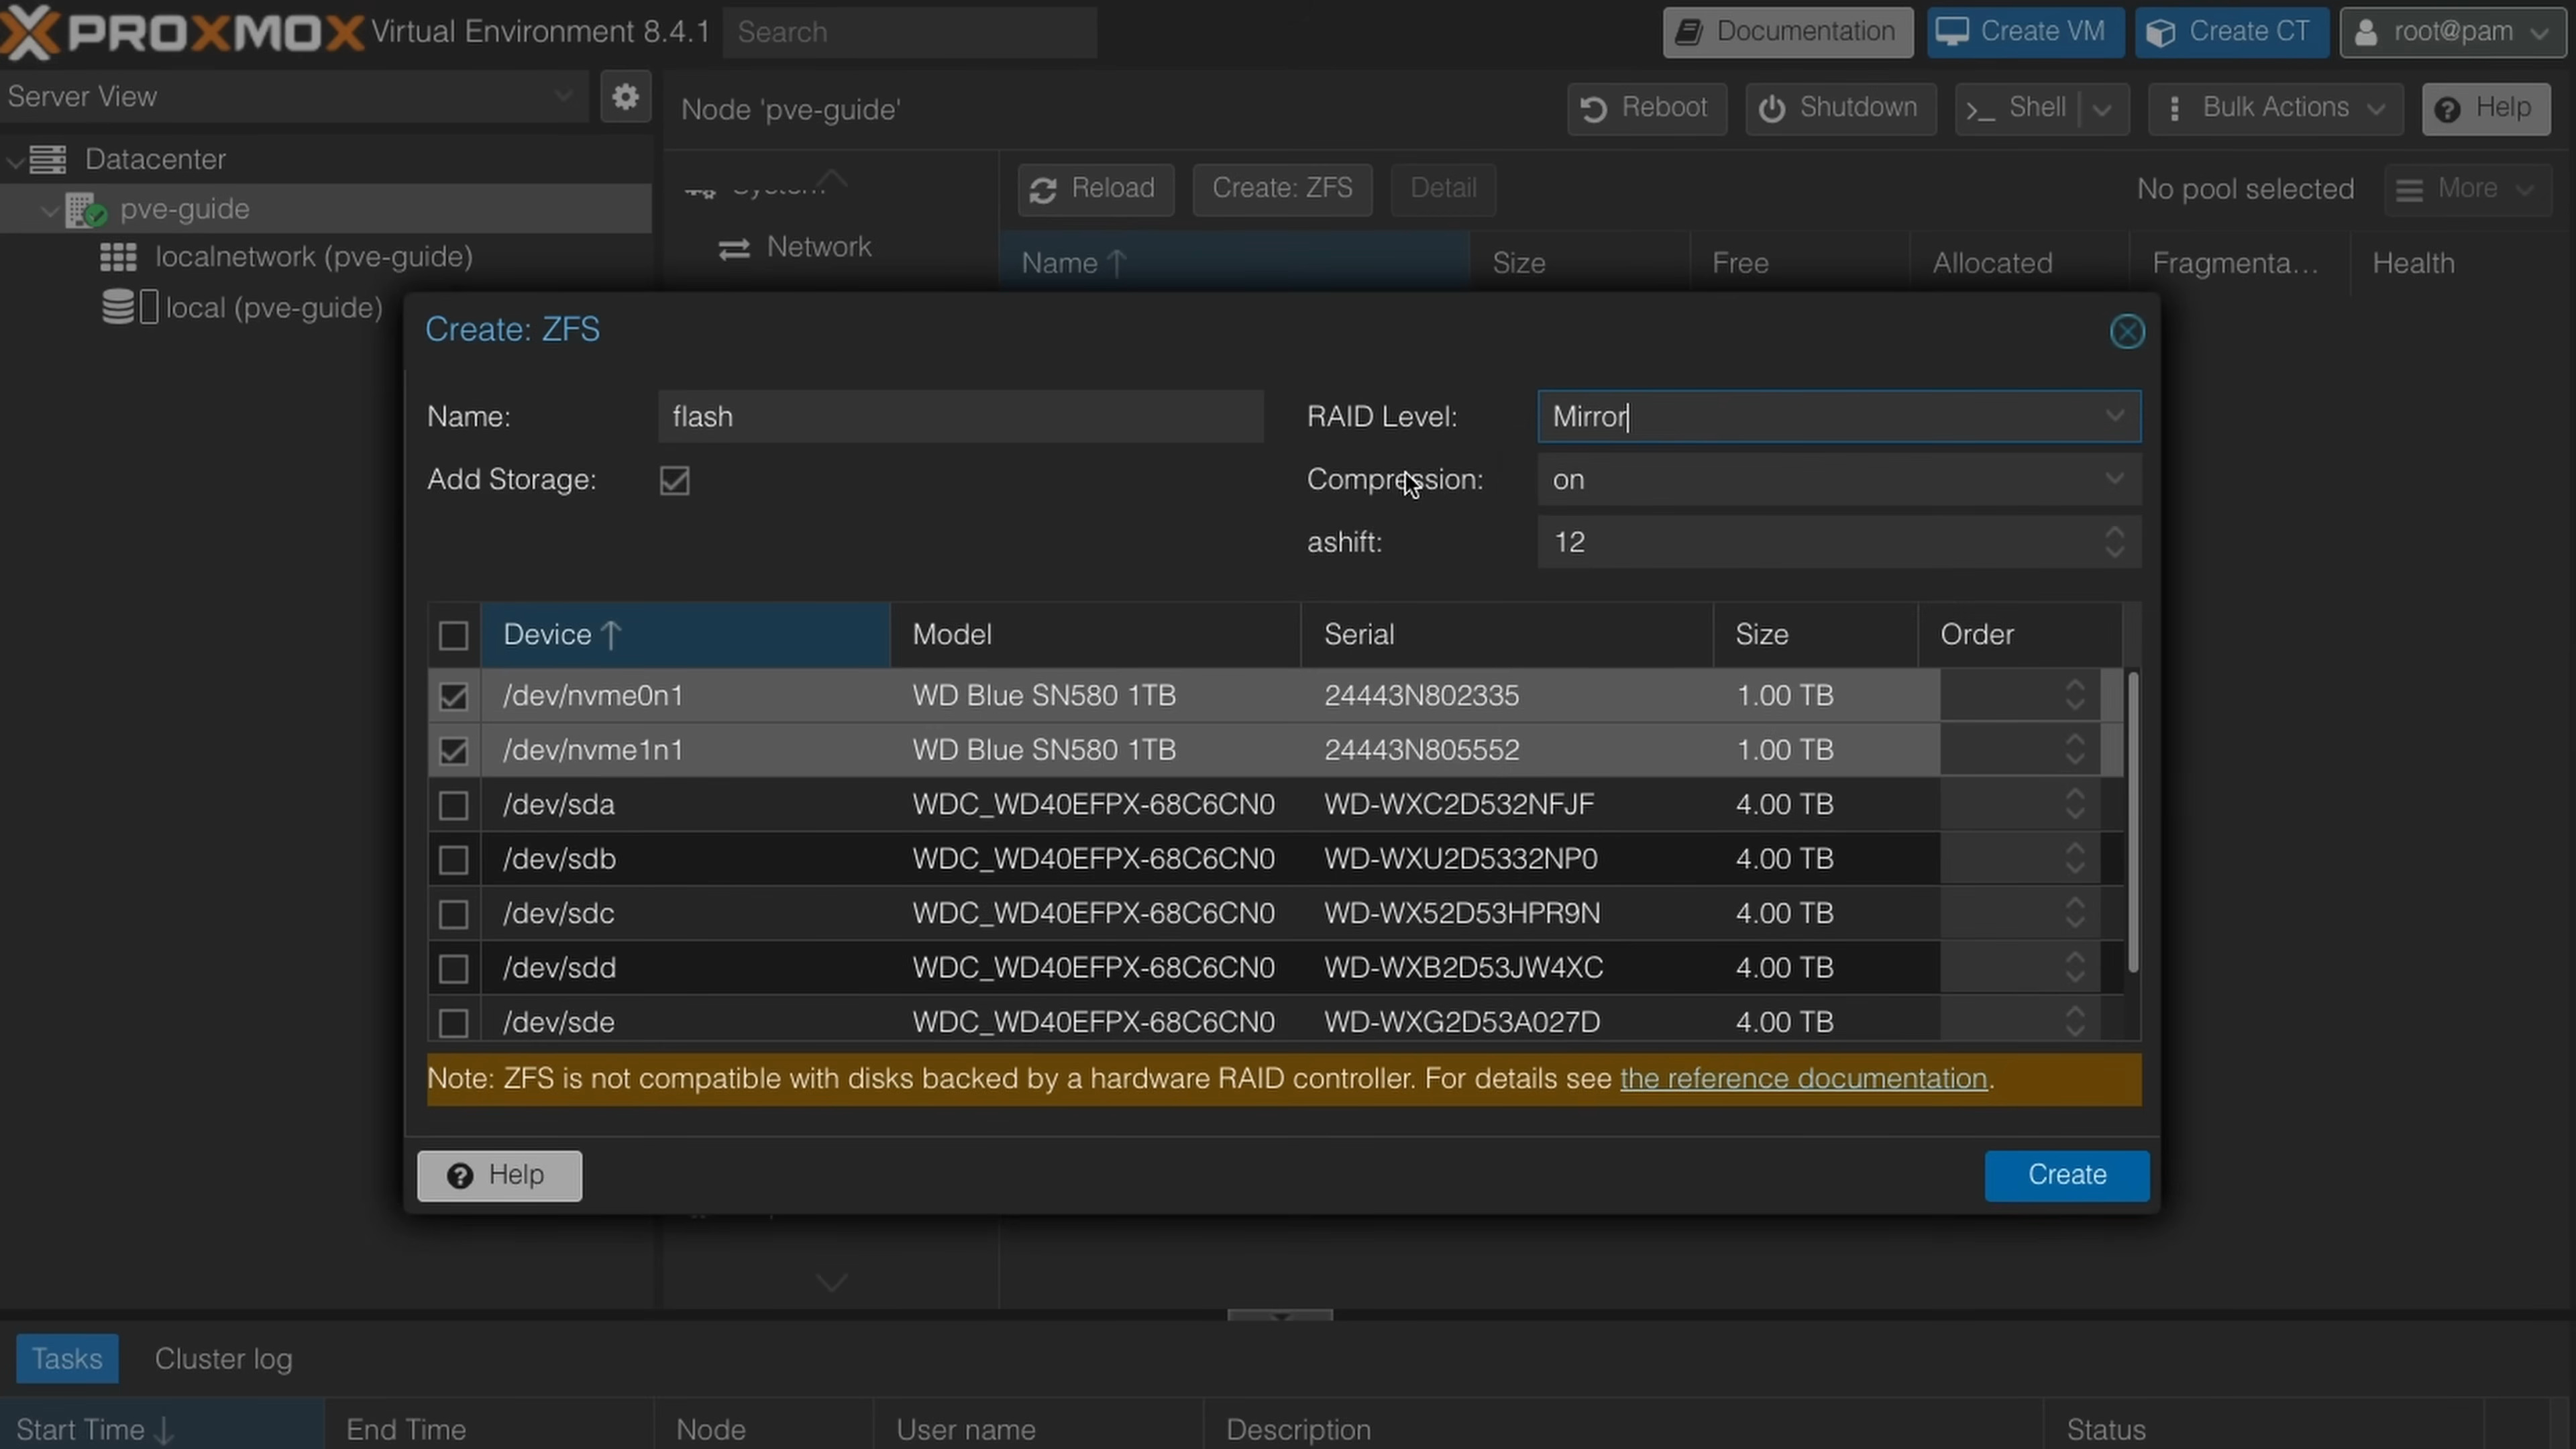
Proxmox ZFS Mirroring

Create LXC for NetBird

First, we need to download a template for this LXC container. I like to use a slightly older LTS of Ubuntu for added stability. Go to local storage and click on CT Templates. Click the "Templates" button and you'll see a ton of options, you can pick whatever distro you're familiar with. I chose Ubuntu 22.04 for this demo.

Container Setup

Once we have a template ready, we can click the "Create CT" button on the top right. Then input all of your settings. If you're only using this container for NetBird, the required specs will be relatively low and you can always change things in the future.

  1. General tab:
    • Set CT ID (e.g., 100)
    • Enter hostname
    • Set password or upload SSH key
    • Setup as unprivileged
  2. Template tab:
    • Select the downloaded template
  3. Disks tab:
    • Set disk size to 8 GB or higher
    • Choose storage location (SSD/NVME storage is best)
  4. CPU tab:
    • Set cores as needed (1-2 cores)
  5. Memory tab:
    • Set memory to 1024 MB (1GB)
    • Set swap as desired (512 MB recommended)
  6. Network tab:
    • Configure network interface (usually bridge vmbr0)
    • Set IPv4 to DHCP to manage with your router or a static IP.
  7. DNS tab:
    • Configure DNS servers if needed
  8. Confirm - Review settings and click "Finish"

The container will be created and ready to start. Head into the options for this LXC and enable the start-on-boot option so this container will automatically run if the Proxmox Node reboots.

Enable /dev/tun Passthrough

TUN provides an interface for user applications, such as NetBird, to deal with the raw network traffic. By default, since we set this up as an unprivileged container, there is no access to this interface. To fix this, we will add some lines manually to the configuration for this container. Under your main node, access the shell. Find your container number, for example, mine is 100. Use nano or another text editor to open the configuration.


Now add these lines to the bottom.


Now, restart the container and you can check within the shell for the container to see if the interface is available.


Installing NetBird

Before we install NetBird, we are going to want to generate a one-off setup key to use with our LXC installation. While NetBird's documentation offers comprehensive guidance on this process , let's quickly review the essential steps:

  • Access your NetBird dashboard
  • Navigate to the section
  • Click the button on the right
  • Name your key (e.g., "ProxmoxLXC")
  • Set an expiration date (recommended for enhanced security)
  • Configure auto-assigned groups if needed (e.g., "Homelab")
  • Click to generate the setup key
  • Copy the generated key and store it securely as you'll need it for the next steps

Access the shell for your container. You can log in as root and use the password from the initial setup wizard. We are going to need to update our system and install curl so the installation script will work. The command below is for Ubuntu/Debian, change this if needed.


Now that our system is updated, we can install NetBird with the following command.


Now that NetBird is installed, we can connect our peer to our account using the setup key we generated earlier.


Now you should see a successful connection message and you're good to go! Now if you want to access your entire network using this LXC with NetBird, check out the docs to learn more about NetBird Networks!
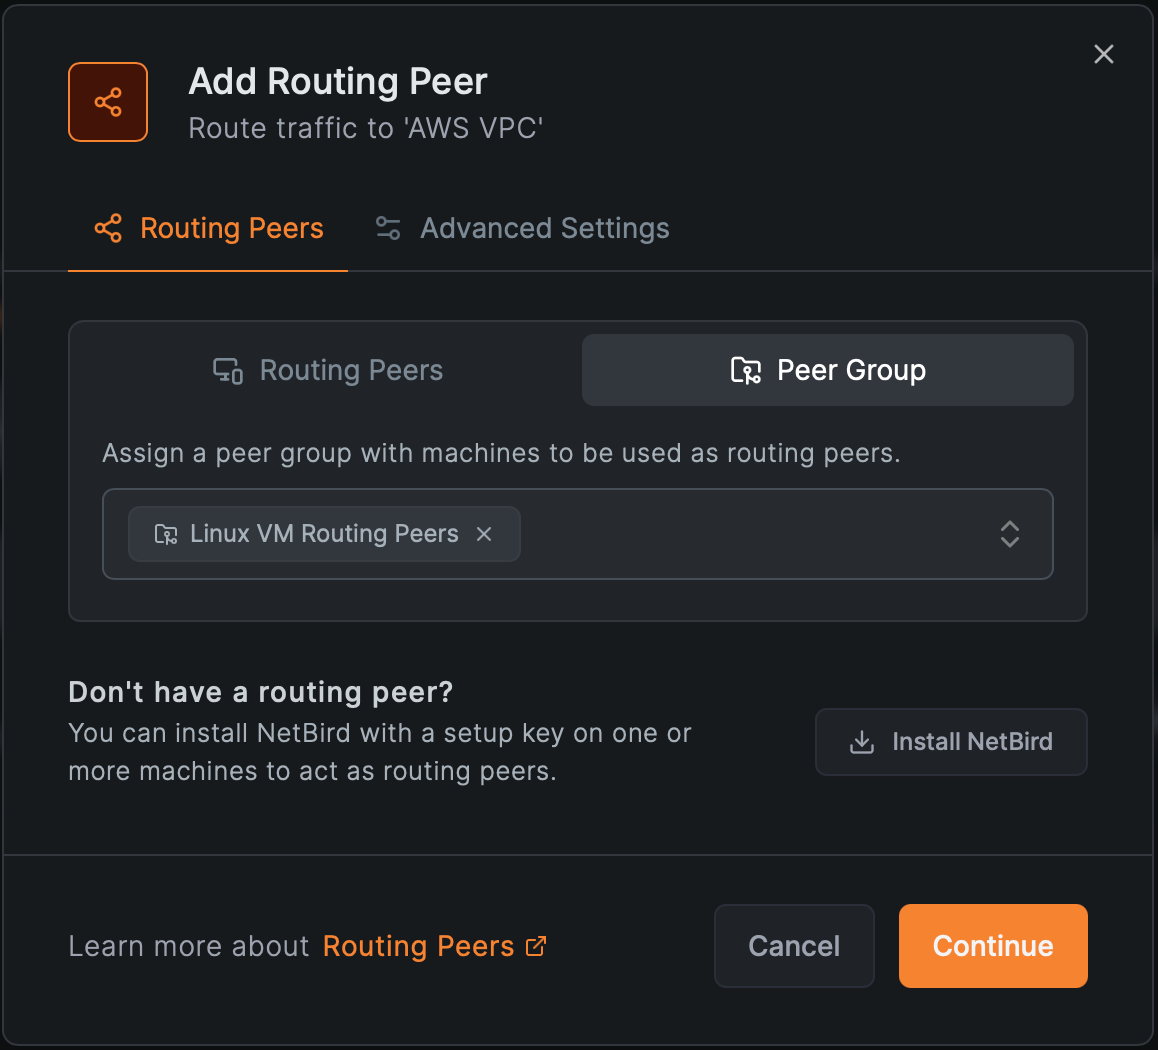
NetBird Add Routing Peer

Need help? Refer to these official guides: