





Security breaches in the cloud occur with significant frequency, and proactive planning is essential. But not every threat can be prevented.
Many assume that a strong preventive security posture makes them immune to incidents, only to be caught off guard when one occurs. It’s better to operate under the assumption that a breach is inevitable and prepare accordingly. As cloud attacks grow faster and more sophisticated and the threat landscape becomes less predictable, security leaders must embrace an “assume breach” mindset to stay ahead.
Incident response in AWS environments is crucial for maintaining the security, availability, and overall health of cloud-based applications and infrastructure. In the dynamic world of cloud infrastructure, recovering from a security incident — and tracing the threat actor that caused it — requires a well-defined and practiced incident response plan. Without a robust incident response capability, organizations risk significant financial losses, reputational damage, legal repercussions, and the compromise of sensitive data.
Thankfully, there is a wide variety of open source tools that can facilitate incident response. In this article, we will show how they can be used, and introduce a new publicly available MCP server to help in your efforts.
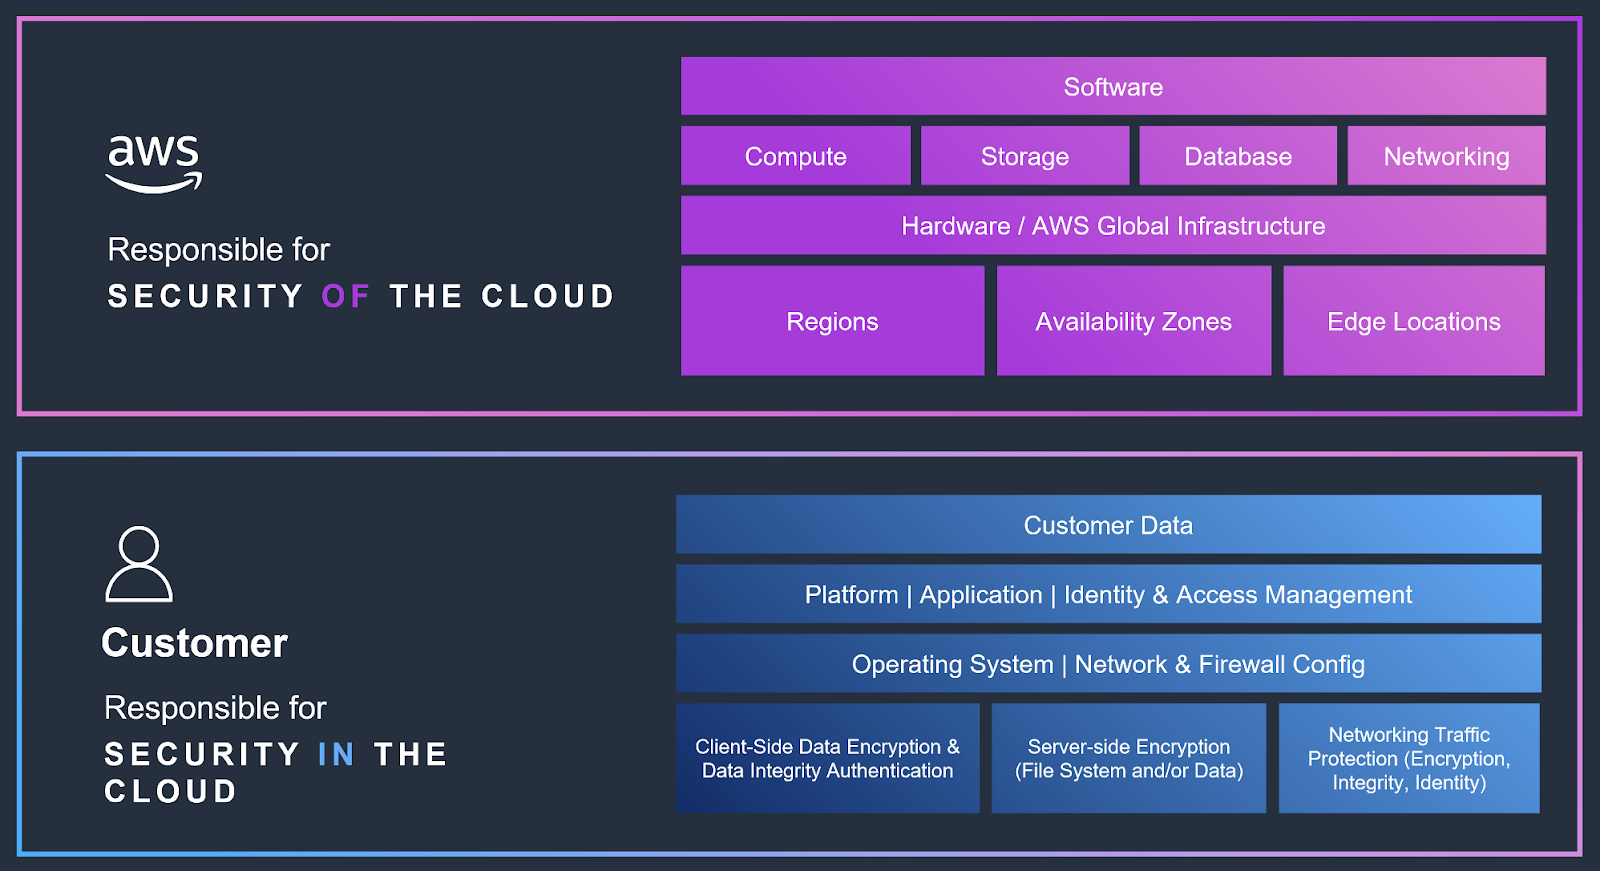
The Shared Responsibility Model is fundamental to incident response within AWS environments. It clearly defines the division of security responsibilities between AWS and the customer, influencing how incidents are handled and managed. AWS is responsible for the security of the cloud itself, encompassing the infrastructure and foundational services. Customers are responsible for security in the cloud, including data, applications, operating systems, and network traffic.
In incident response, this distinction specifies which party is responsible for investigating and remediating different aspects of a breach. AWS would address issues related to infrastructure vulnerabilities or service disruptions, while customers must manage flaws involving compromised data, misconfigurations, or application exploits. This model ensures clarity and cooperation during incident handling, with both AWS and the customer playing distinct but complementary roles in securing the overall environment.
It is recommended that users set up an organizational structure for their AWS account that includes one organization unit (OU) for security and one for forensics.
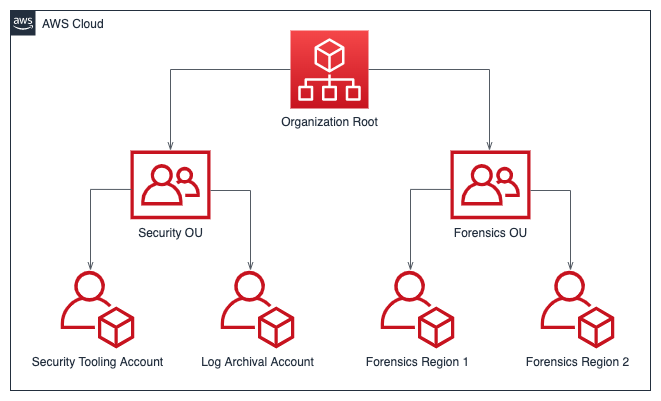
Having separate OUs for security and forensics in AWS organizations offers several advantages for incident response:
A comprehensive AWS incident response plan should encompass several phases, as shown below.
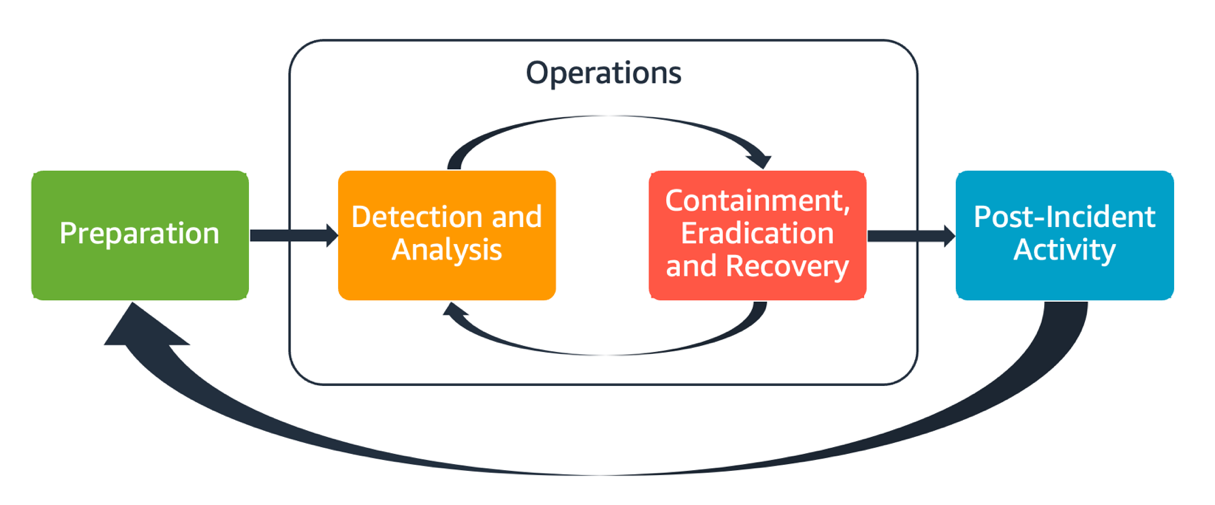
This plan employs multiple AWS services during these phases to perform a thorough threat investigation and response:
The subsequent stages depend on the impacted services:
Every investigation of an incident is a multi-stage journey where we want to track and understand:
The success of those stages depends on the preventive precautions we took to prepare our AWS account for any incident. A comprehensive logging capability is the main ingredient for a proper investigation and response.
Throughout the investigation steps below, we will mention multiple open source tools for incident response, including AWS-IReveal-MCP, an MCP server developed by the Sysdig Threat Research Team. It integrates with the previously mentioned AWS services. You can think of it as an assistant to help you during the analysis of suspicious activity. It will also propose remediations based on the investigation discoveries.
If you’re concerned there was an issue with your AWS account, AWS CloudTrail would likely be the first place you would look to get an idea of what happened.
When creating a trail, it defaults to enabling logging only of management events, not data events, network activity events, or Insights. Those can be enabled with an additional cost.
It’s a good practice to set up an organization trail instead of one trail for each member account. Since we do not want to miss any event in any region, the trail should be multi-region. You should also protect the trail logs stored in the S3 bucket by configuring Object Lock.
CloudTrail provides basic filtering using the Event history, which calls the LookupEvents API. This is a good starting point for investigating suspicious activity. The following screenshot shows how AWS-IReveal-MCP works, using a sample prompt.
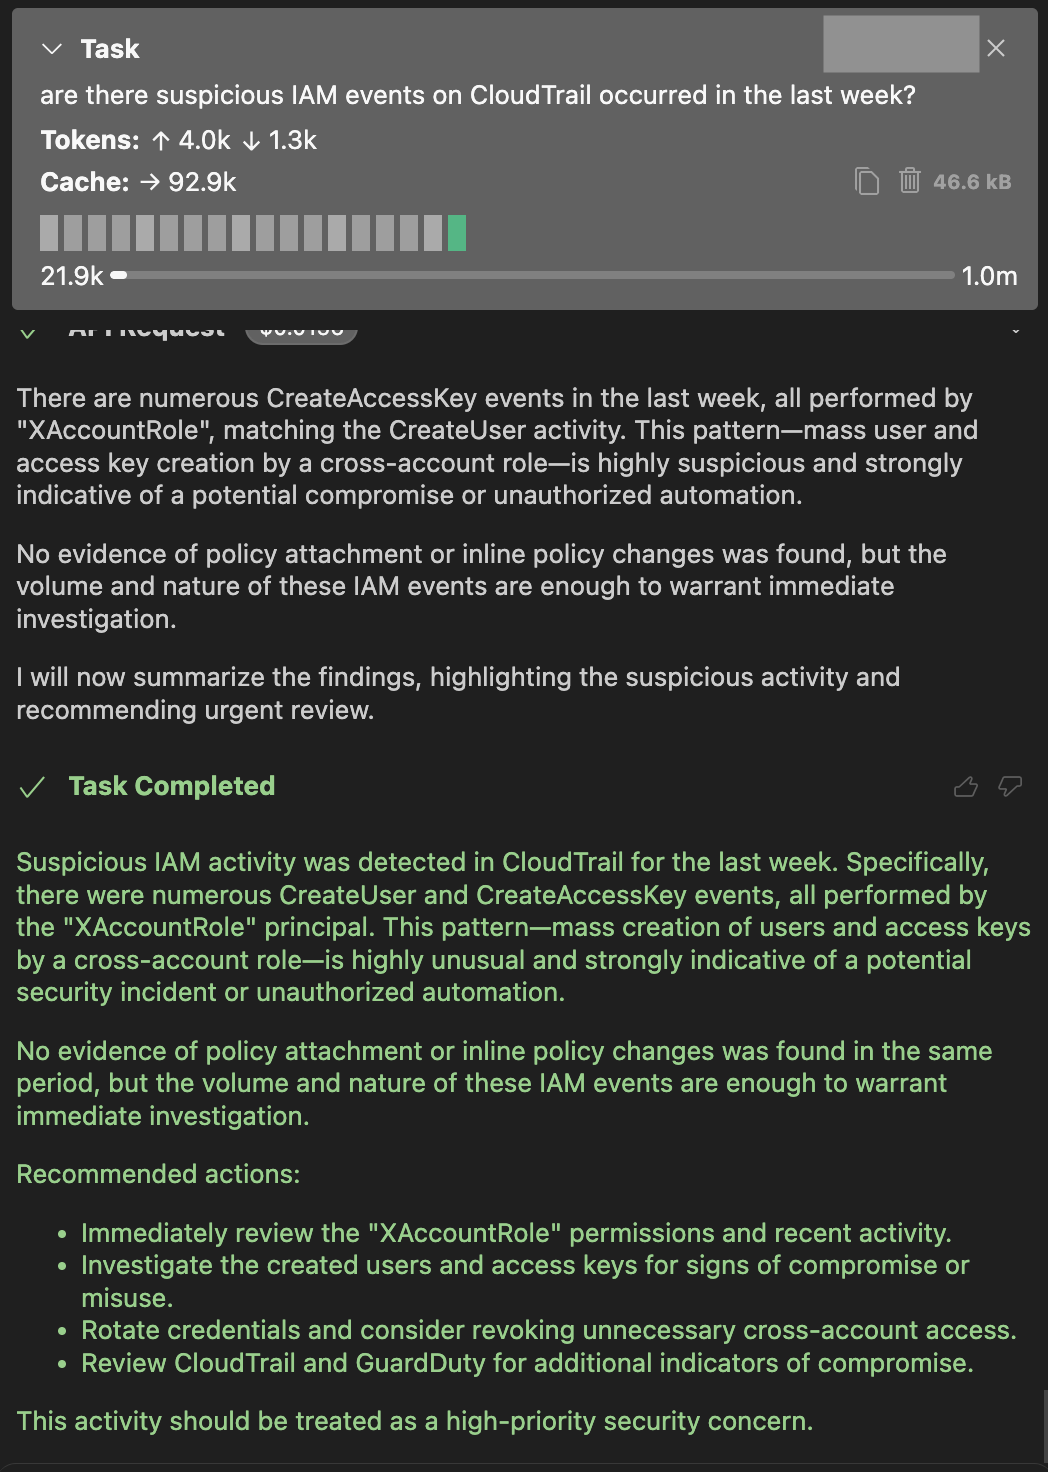
The MCP server running with Cline
We can even ask to go through the operations performed by a role or set of roles with a specific naming pattern, as shown below:
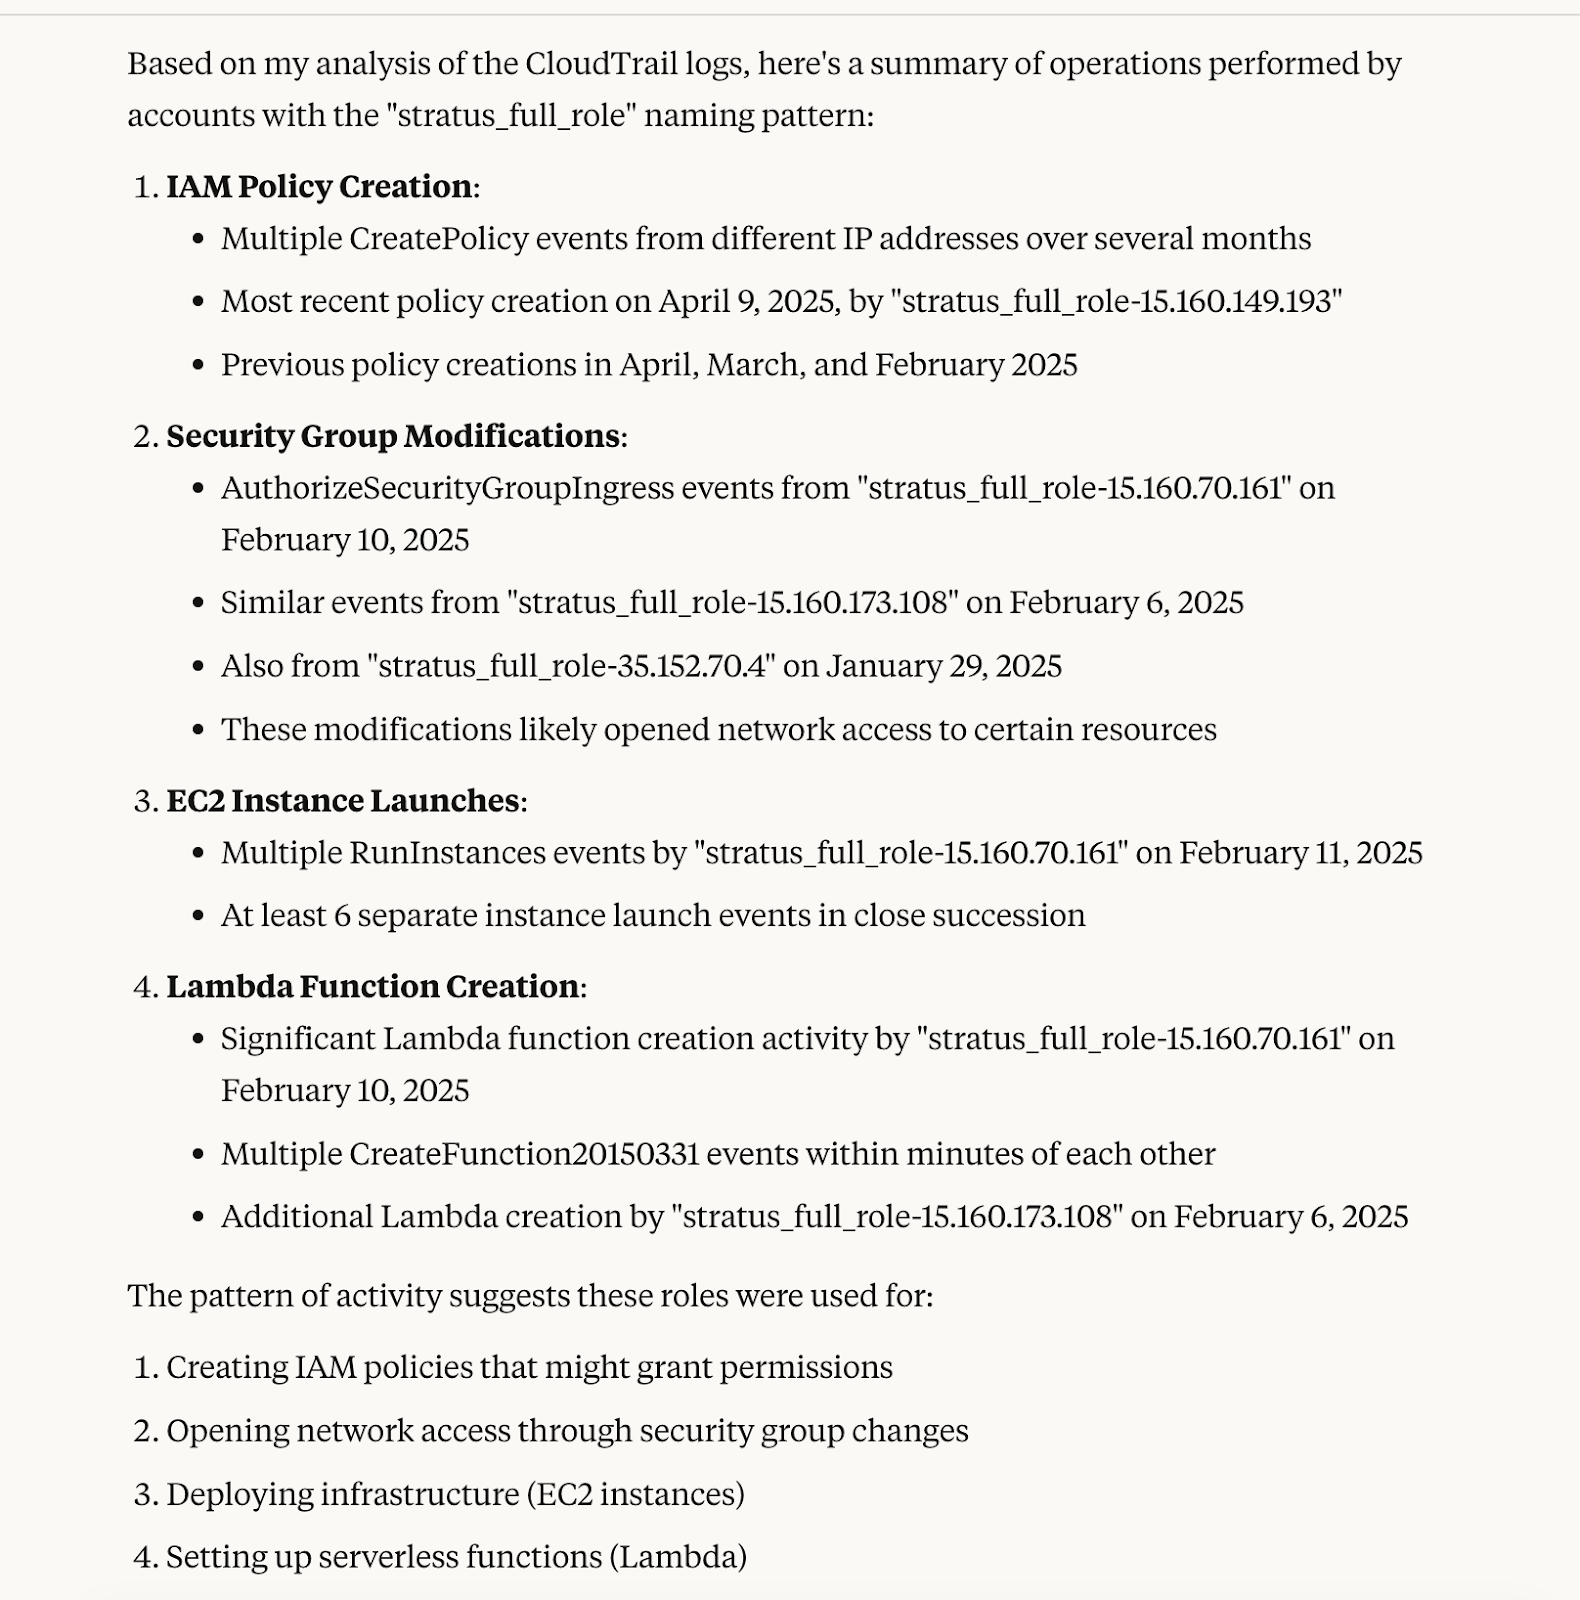
The MCP server running with Claude Code
We utilized Stratus Red Team to conduct adversary emulation tests here. The LLM correctly pointed it out:
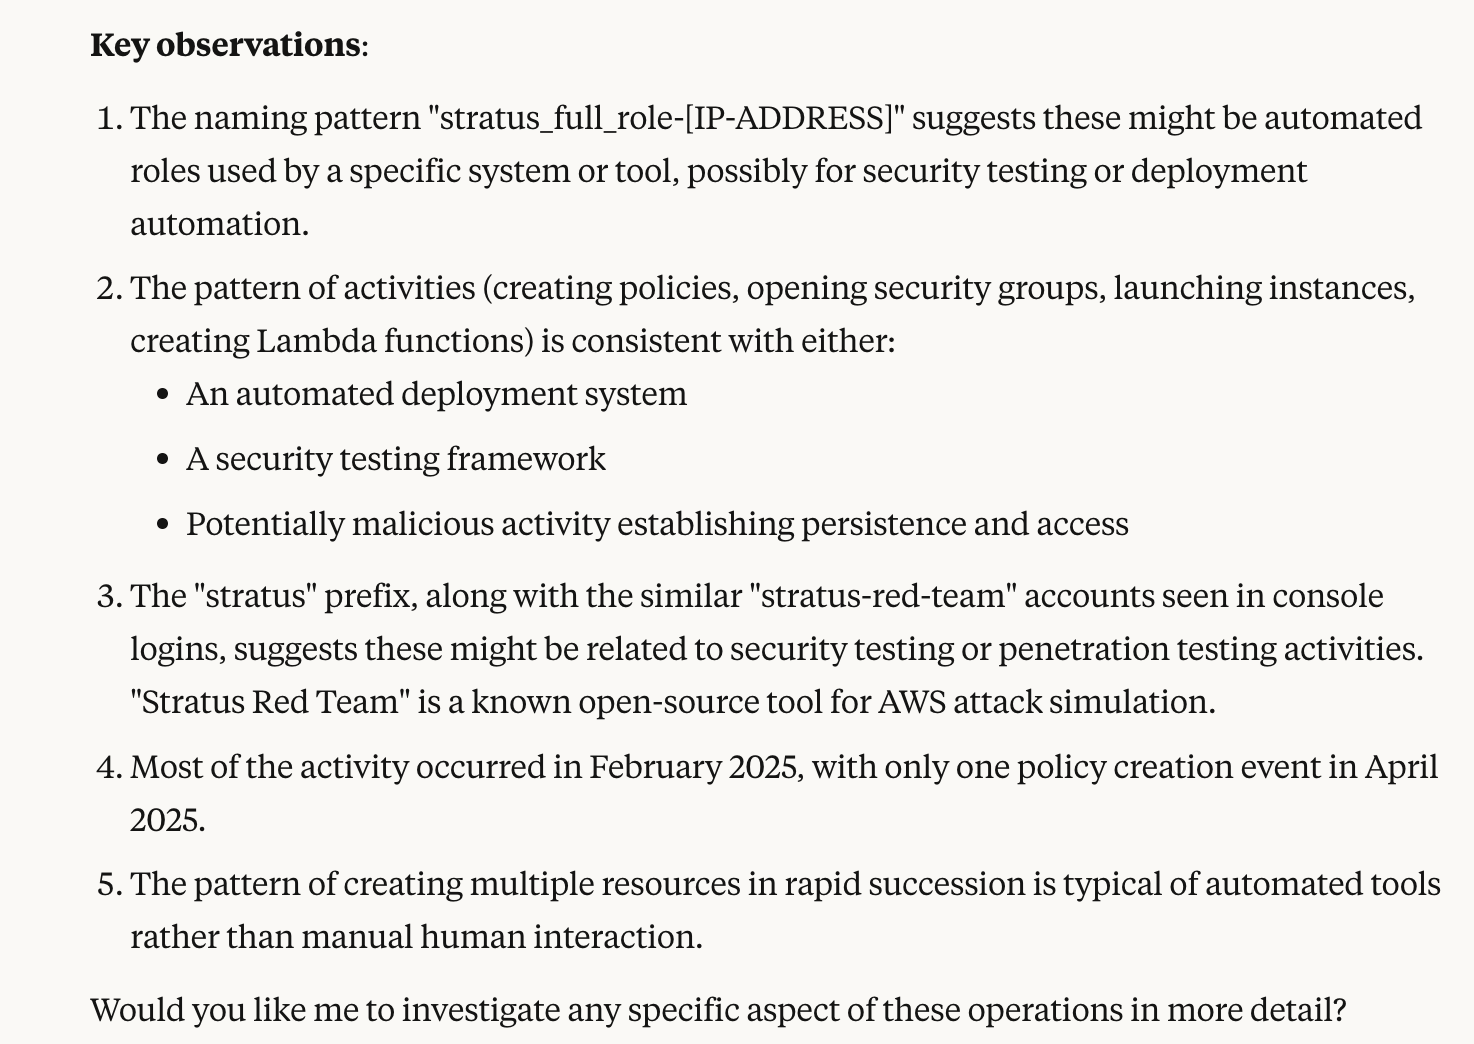
When investigating CloudTrail logs, here are a few key points to keep in mind:
CloudTrail logs can be queried using SQL for more granular searches with CloudTrail Lake or Amazon Athena. Here are some of the key differences between the two services:
For the purposes of this article, we will use Athena.
Partition projection is a great way to reduce operational overhead. AWS-IReveal-MCP
implements the query shown in the documentation to create a table that uses partition projection on CloudTrail logs from a specified date for a single AWS region. Now everything is ready to start investigating some suspicious activity using Athena. One effective template for queries is the following:
WITH flat_logs AS (
    SELECT
        eventTime,
        eventName,
        userIdentity.principalId,
        userIdentity.arn,
        userIdentity.userName,
        userIdentity.sessionContext.sessionIssuer.userName as sessionUserName,
        sourceIPAddress,
        eventSource,
        json_extract_scalar(requestParameters, '$.bucketName') as bucketName,
        json_extract_scalar(requestParameters, '$.key') as object
    FROM <TABLE_NAME>
)
SELECT *
FROM  flat_logs
WHERE date(from_iso8601_timestamp(eventTime)) BETWEEN timestamp '<yyyy-mm-dd hh:mm:ss>' AND timestamp '<yyyy-mm-dd hh:mm:ss>'
--AND eventname IN (GetObject, 'PutObject', 'DeleteObject')
--AND userName = 'adminXX'
--AND sessionUserName = '<ROLE_NAME>'
--AND principalId LIKE 'AROA<xxxxx>:%'
--AND arn LIKE '%user/admin%'
--AND eventSource = '<SERVICE>.amazonaws.com'
--AND sourceIPAddress LIKE '<x.x.x.x>'
--AND bucketName = '<BUCKET_NAME>'
--ORDER BY eventTime DESC
LIMIT 50;
The query conditions are commented in this template, so you can uncomment the ones you need based on the search you plan to do.
Below are some examples of using AWS-IReveal-MCP with Athena tools.
Prompt:
Has any S3 data event occurred on buckets with name containing 'customers' in eu-central-1 in the last 24 hours?
for Athena queries use s3://pallas-athenas/ in us-east-1 as output bucket
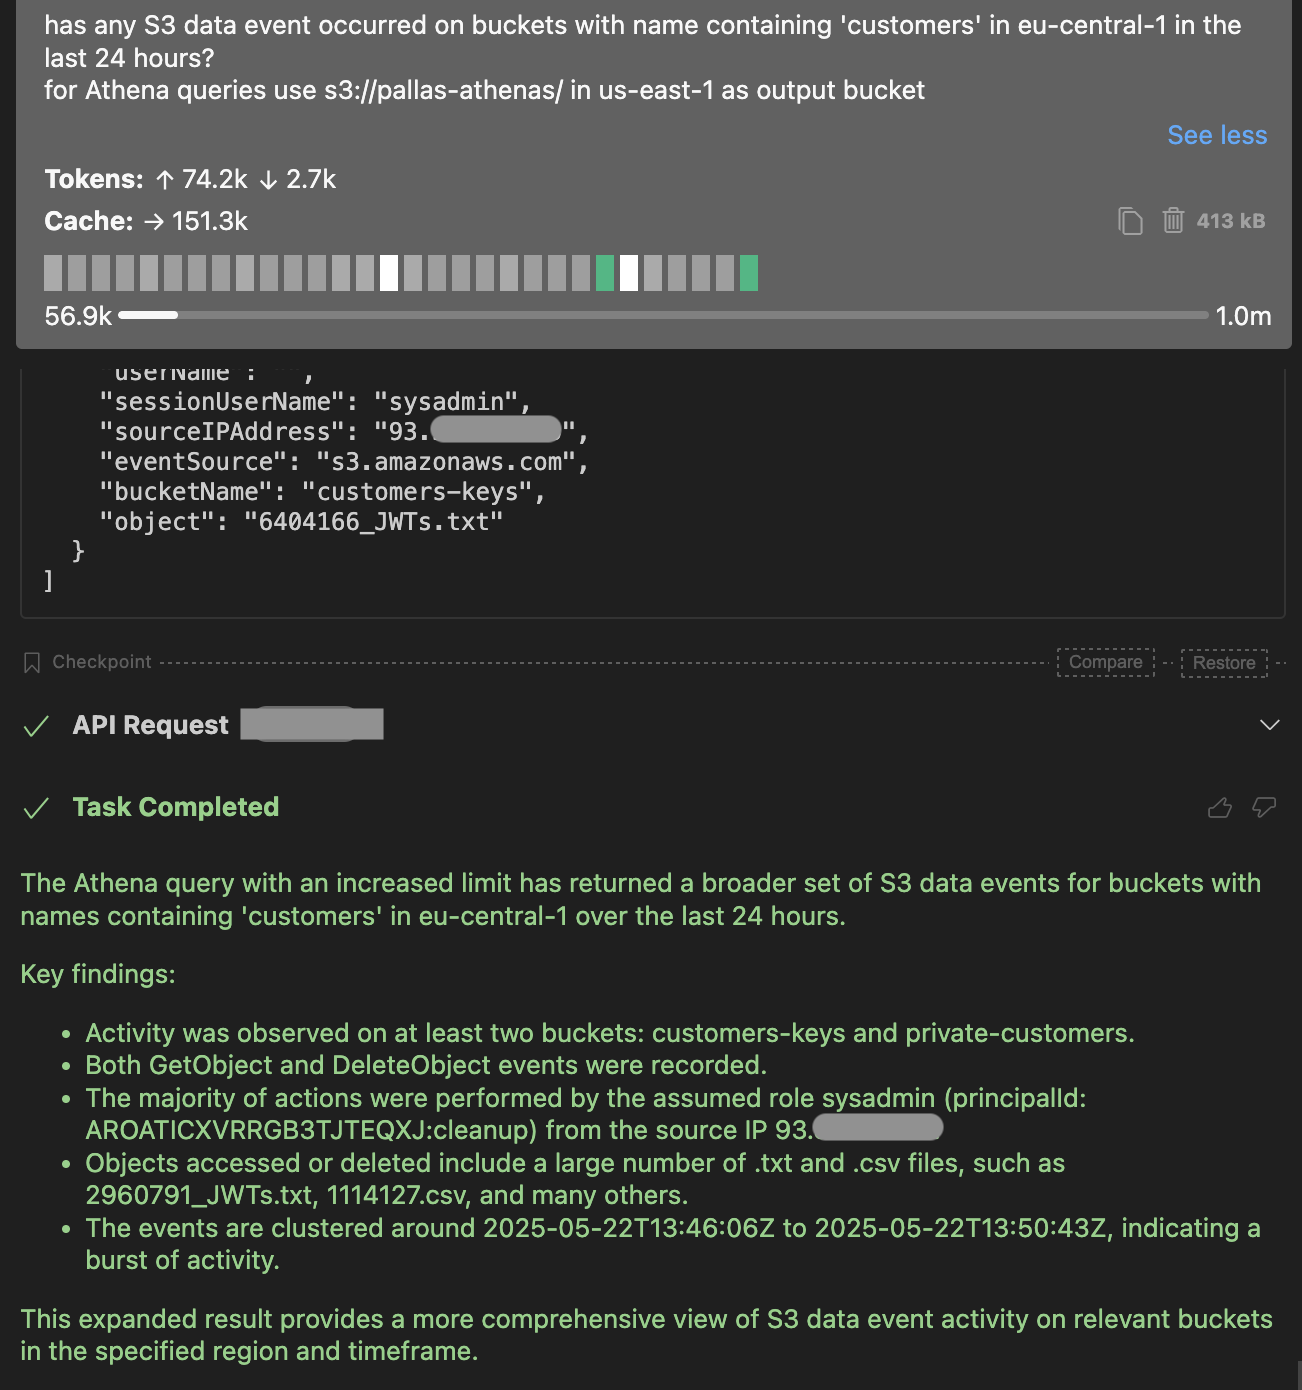
From this, we’ve already received crucial information:
For additional Amazon Athena queries that cover a variety of attack scenarios, look at the open source repository aws-incident-response.
Many AWS services can be configured to send logs to Amazon CloudWatch. Depending on the service settings, those logs can potentially reach very high volumes. Enabling them can make a massive difference in understanding what happened during an incident.
Let’s say a threat actor compromised a user or role with the permissions to call SES APIs, including those to send emails. They launched a phishing campaign from your AWS account targeting thousands of users. If SES was configured to send data events to CloudWatch, then the incident responder can retrieve a lot of helpful information about the emails that were sent. The following screenshot shows a CloudWatch log of a real attack abusing SES to send phishing emails:
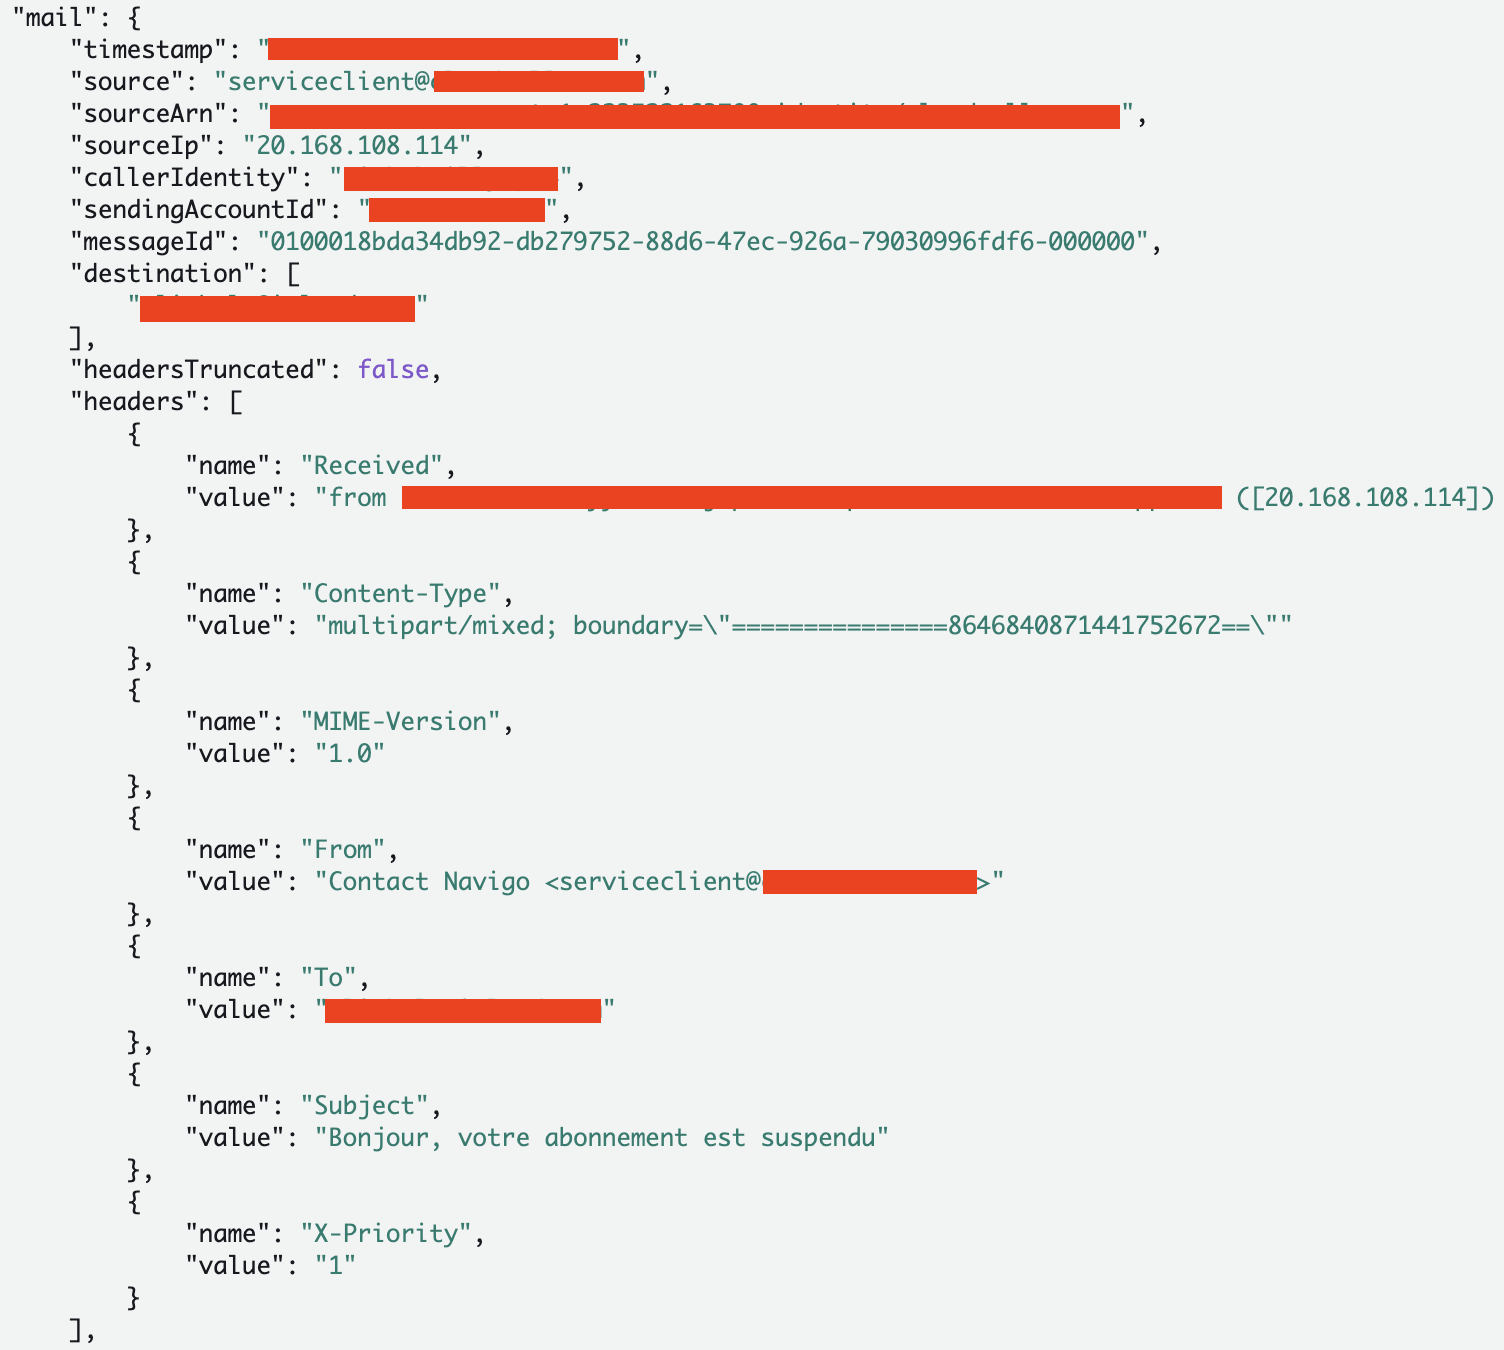
As you can see, this log contains highly relevant data, including the sender's IP address, the email addresses of both the sender and the recipient, the sender’s alias, and the email subject.
We suggest a threat detection and response orchestration that can be summarized as follows:
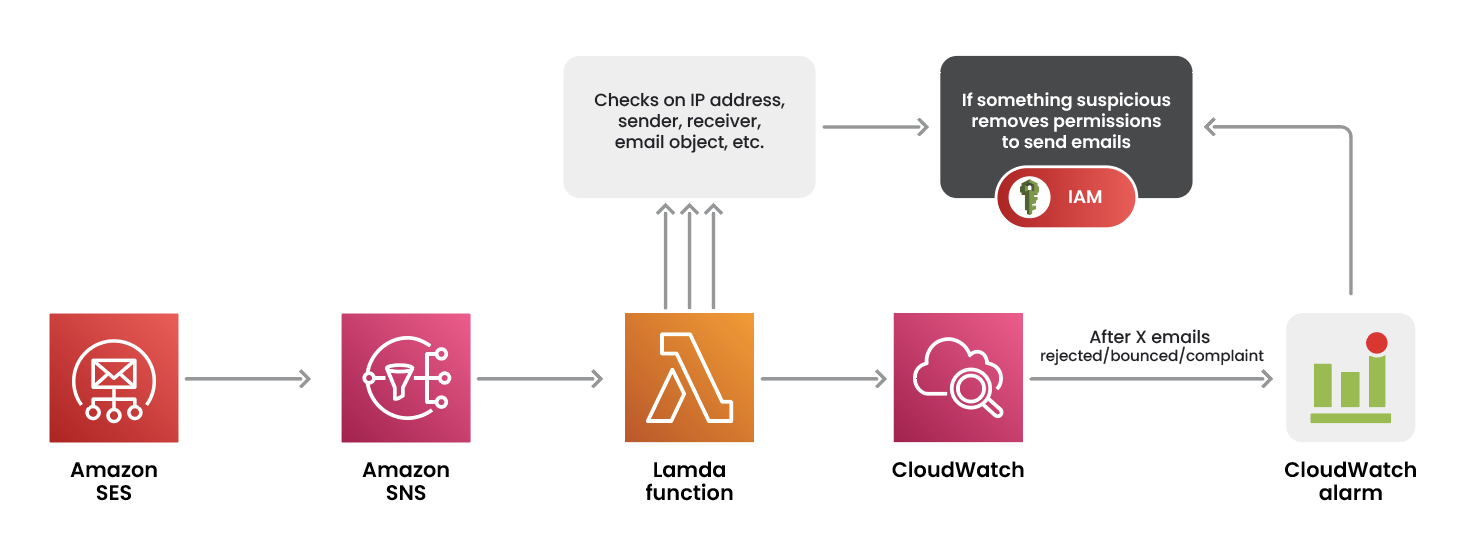
It all starts with an email sending event from SES, which is published to an Amazon Simple Notification Service (Amazon SNS) topic that triggers a Lambda function. This function performs custom checks on the fields we previously showed in the event log. You can implement whitelists of IP addresses or sender’s email addresses, for example. If one or more checks fail, there might be something suspicious with the sent email. The Lambda function can then act promptly to respond by removing permissions to the caller identity, for example. Those security checks are performed on a single email log, but what about suspicious patterns involving multiple emails? CloudWatch comes to the rescue by providing metrics such as rejected, bounced, and complaint emails. You can set up CloudWatch alarms for a threshold of emails with those metrics.
In April 2025, AWS introduced support for CloudTrail logging for email sending events. This is undoubtedly helpful when relying on CloudTrail for threat detection.
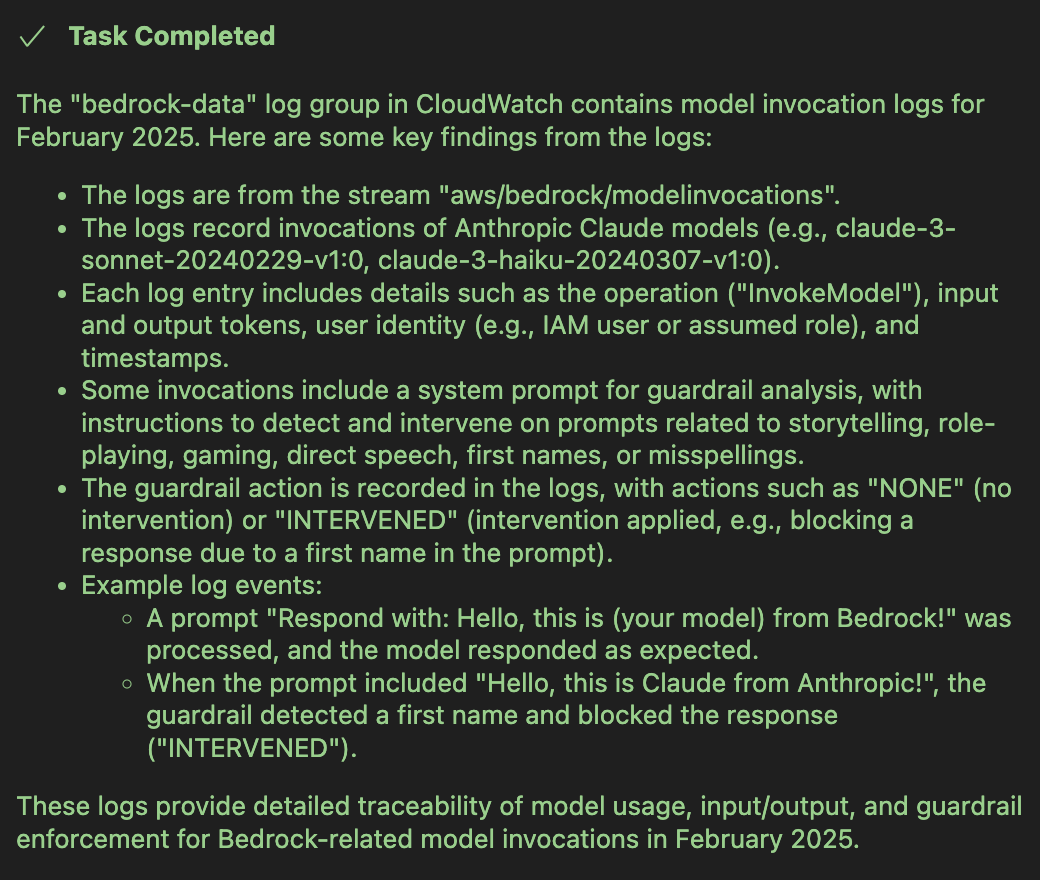
Another example of a service that benefits from CloudWatch logs during an investigation is Amazon Bedrock. It provides several large language models that can be invoked using different APIs, such as InvokeModel and Converse. Bedrock provides the logging of invocation events in CloudWatch. These enriched logs detail user prompts, model responses, and additional data not found in corresponding CloudTrail logs.
All this data is extremely helpful when investigating an incident like an LLMjacking attack.
We can utilize AWS-IReveal-MCP to support our analysis. For example, we could ask something like “Are there log groups related to Bedrock in CloudWatch?”
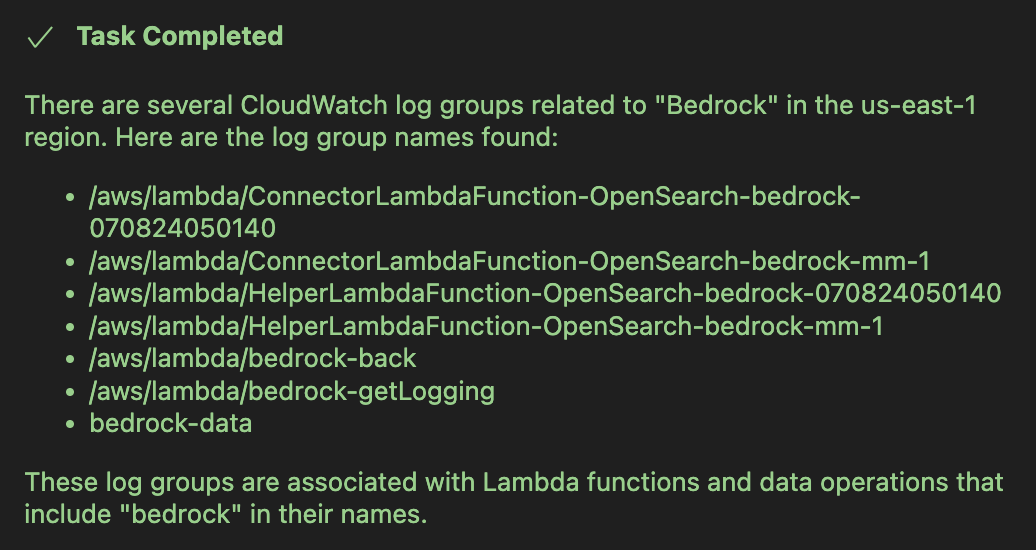
Then, we can proceed with investigating the relevant log groups using the prompt: “Let's investigate the bedrock-data log group for February 2025”.
To prevent future abuses of Bedrock, you can utilize Service Control Policies (SCPs), which enable you to manage permissions within your organization. Those policies apply to all IAM users and roles across all accounts in the organization, except for the root account.
For example, the following policy denies the invocation APIs of all Anthropic models:
{
  "Version": "2012-10-17",
  "Statement": {
    "Sid": "DenyInferenceForAnthropicModels",
    "Effect": "Deny",
    "Action": [
      "bedrock:InvokeModel",
      "bedrock:InvokeModelWithResponseStream",
      "bedrock:Converse",
      "bedrock:ConverseWithResponseStream"
    ],
    "Resource": [
      "arn:aws:bedrock:*::foundation-model/anthropic.*"
    ]
  }
}
If you don’t use Bedrock at all in your organization, you may want to deny all its APIs for all resources. This is, of course, a valuable option for any AWS service.
A common method for gaining initial access to an AWS account is by exploiting a vulnerable or misconfigured web application hosted on an EC2 instance. AWS provides an Automated Incident Response and Forensics Framework, as well as an Automated Forensics Orchestrator, for automating the forensic analysis of EC2 instances.
These include the following essential steps needed to set up the analysis:
After isolating the machine, its volume snapshots should be shared with the forensic account. Then, new EBS volumes have to be created from those snapshots and attached to an EC2 instance running in a private subnet within a VPC for the investigation.
Now we can proceed with analyzing the machine. Several open source tools can be used based on the operating system of the machine:
Automating threat detection and response can be extremely helpful when employing a high volume of EC2 instances. A finding from GuardDuty can trigger the framework provided by AWS to analyze the affected machine, alert the account owner, and send them a report of the analysis. The framework can be further enriched with additional tools for a more in-depth analysis.
Let’s consider an EC2 instance we want to investigate. After installing cloud-forensics-utils, we run the following command to copy the volume from the account with the instance to a different forensics account:
cloudforensics aws 'us-east-1c' copydisk --volume_id='vol-0f1af2a470d420440' --src_profile='hp2-adminB' --dst_profile='default'
Then, the following command runs a new EC2 instance in the forensics account with the provided AMI, 4 CPUs, a 50 GB volume, and the volume copied from the compromised instance.
cloudforensics aws 'us-east-1c' startvm 'vm-forensics' --boot_volume_size=50 --cpu_cores=4 --ami='ami-020cba7c55df1f615' --attach_volumes='vol-0db527dfcd85612f8' --dst_profile='default'
Now we can connect to the new EC2 instance to analyze the compromised volume.
We can start with fls, which is part of The Sleuth Kit, to enumerate every file and directory entry on the given device:
sudo fls -r -m / /dev/xvdf1 > full.bodyThe output file is then input to mactime to build a chronological “MAC timeline” (Modify, Access, Change) in a CSV file:
sudo mactime -z UTC -d full.body > timeline.csvFor a richer, event-based timeline, we can also leverage Plaso, which is included in the forensic tools automatically installed in the instance. The following command scans hundreds of artifact sources (filesystem timestamps, Windows event logs, macOS logs, browser history, etc.) and writes events to /mnt/plaso.dump.
sudo log2timeline.py /mnt/plaso.dump /dev/xvdf1Finally, we can create an HTML or CSV file with a timeline by running:
sudo psort.py -o dynamic -w plaso_timeline.html /mnt/plaso.dumpThis procedure enables us to analyze any changes in the filesystem and reconstruct a complete timeline of activity on the suspect volume. By pulling raw filesystem metadata into a “body file” and then timestamp‐sorting it using SleuthKit’s fls and mactime, you see every file’s create/modify/access/change times in one CSV. And by ingesting the same raw device into Plaso (log2timeline and psort), you layer on hundreds of other artefact sources into a single timeline.
The following screenshot is an excerpt from the output of psort, showing the evidence of someone trying to brute-force the SSH login of a machine.
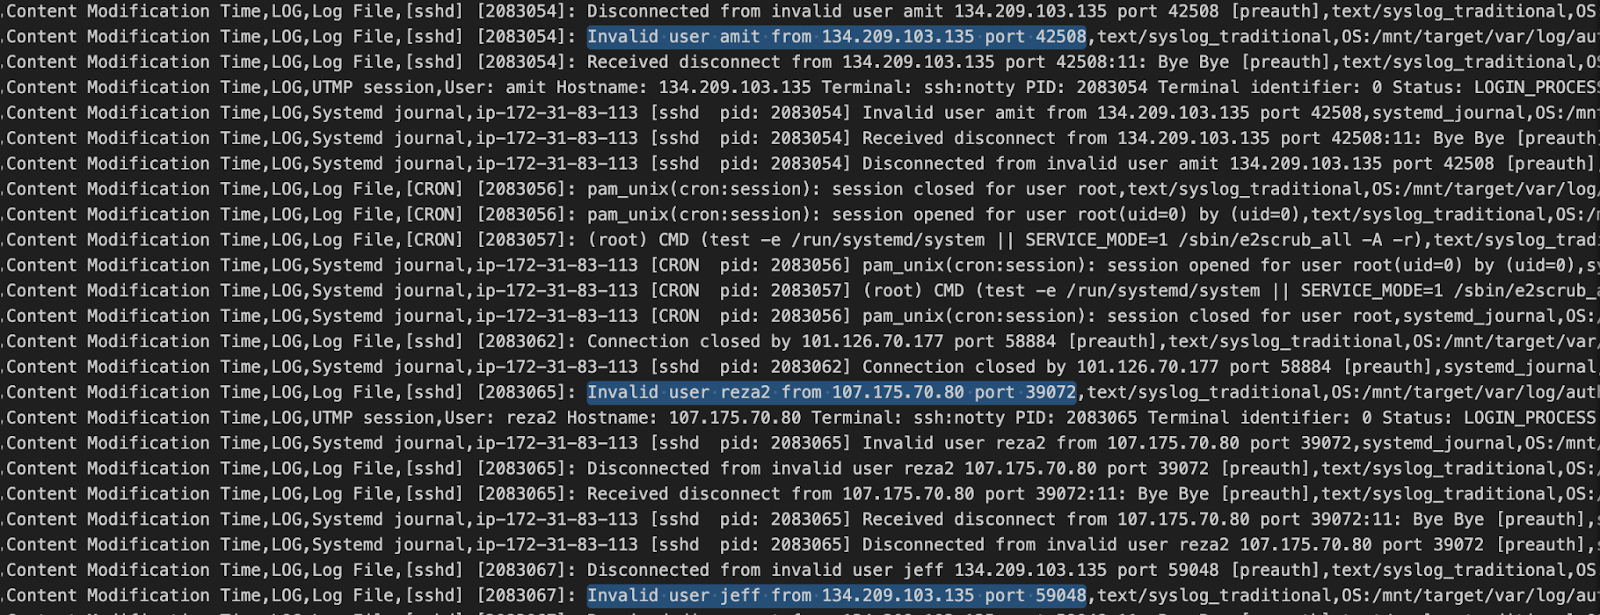
That information is retrieved by psort because the /mnt/target/var/log/auth.log.1 file is getting updated for each login attempt.
A related idea that can be helpful is comparing the current filesystem with the original AMI’s filesystem to look for suspicious changes.
VPC Flow Logs capture network traffic going to and from network interfaces in your VPC, making them a critical resource for detecting malicious activity. You can choose to deliver these logs to CloudWatch, an S3 bucket, or Amazon Data Firehose (in the same or different account). CloudWatch provides the capability to configure alarms based on various metric filters such as source and destination ports, source and destination addresses, protocol, and others. Here is an example of how to create an alarm for 10 or more rejected SSH connection attempts to an EC2 instance within one hour.
After this, you can use Amazon Athena to analyze network traffic with SQL queries. Look for unusual patterns such as connections to unfamiliar IP addresses, high volumes of data transfer to external locations, traffic on ports that are not typically used, or communication patterns that deviate significantly from established baselines. Correlate these findings with other security logs, such as CloudTrail, to identify the source and context of the suspicious network activity. Pay close attention to rejected connections, as they can indicate attempts to probe your network for vulnerabilities. Regularly review and analyze Flow Logs to build a strong understanding of your normal network behavior. When you know your organization’s baseline behavior, you can effectively identify deviations that could signify malicious intent.
The first response to detecting that an IAM user’s keys have been compromised is often to deactivate or delete those keys. However, this does not prevent the attacker from misusing that user if they were able to create temporary credentials with GetFederationToken before the keys were disabled.
That API creates temporary credentials that last up to 36 hours (or one hour if the user is the root user). When calling it, you can pass a session policy (managed or inline). The resulting session permissions are the intersection of the IAM user policies and the provided session policies.
You should revoke the session permissions by attaching a deny-all policy to the compromised user with the “aws:TokenIssueTime” field. What follows is an example policy reported here:
{
  "Version": "2012-10-17",
  "Statement": {
    "Effect": "Deny",
    "Action": "*",
    "Resource": "*",
    "Condition": {
      "DateLessThan": {"aws:TokenIssueTime": "2014-05-07T23:47:00Z"}
    }
  }
}
By setting a date following the creation of the federation credentials, this policy denies all permissions. Additionally, if your environment does not utilize federated users, you may want to monitor for calls to GetFederationToken and implement appropriate detection rules.
A common method for attackers to maintain access to an AWS account is to backdoor an IAM role. This can be pursued by modifying the trust policy of a role to specify that it can be assumed by an identity belonging to the attacker’s AWS account.
{
    "Version": "2012-10-17",
    "Statement": [
        {
            "Effect": "Allow",
            "Principal": {
                "AWS": [
                    "arn:aws:iam::<ATTACKER_ACCOUNT_ID>:user/evil_user
                ]
            },
            "Action": "sts:AssumeRole"
        }
    ]
}
You should have a security mechanism in place that monitors roles’ trust policies and alerts for those that can be assumed by an external account ID.
Another persistent threat is posed by a set of roles that can assume one another. An attacker who compromises one of those could then assume another role to refresh credentials and continue doing so to maintain access. According to the documentation of the role chaining, the duration of those credentials can be set to a maximum of one hour. This method is known as role chain juggling.
To manage their permissions, EC2 instances use instance profiles, which are containers for an IAM role. Those permissions are needed to allow the instance to access AWS services. To retrieve the session credentials of an instance profile, you should call the endpoints provided by IMDSv1 or IMDSv2, based on which one is configured on the instance.
An attacker who discovers an RCE or SSRF vulnerability in a web application running on an EC2 instance can exploit it to steal those credentials. This allows the attacker to use the permissions of the instance profile and maintain access to the victim’s AWS account.
Proper runtime detection on the machine is necessary to detect someone stealing credentials via IMDS promptly. That operation does not generate an AssumeRole event; thus, you cannot rely on monitoring for suspicious calls to that API. Instead, as previously mentioned, we can rely on the field ec2RoleDelivery in the CloudTrail logs. That field shows if the credentials used to call an API were generated with IMDSv1 or IMDSv2.
After detecting suspicious events from an EC2 instance role, the first response is, once again, to attach a deny policy to that role and revoke previous sessions. Then, you should consider disassociating the compromised instance profile from the instance by calling DisassociateIamInstanceProfile. After remediating the root cause of the attack (i.e., vulnerability or misconfiguration of the web app), you should create a new instance profile (with a new set of keys) to associate with that EC2 instance.
Another way attackers can maintain persistence in an EC2 instance is by using user data. They contain commands that will be run as root upon starting the machine. Should an attacker have compromised an identity with the ModifyInstanceAttribute permission, they can modify the user data of an EC2 instance and insert malicious code. Be aware that the instance should be stopped to allow the modification of its user data. Thus, the following sequence of events should be monitored as it can be suspicious: StopInstances -> ModifyInstanceAttribute -> StartInstances.
The previous persistence techniques can be considered operational, where the attacker backdoored an IAM role or runtime instance to maintain control over a set of services or resources. Another type of persistence is tied to resources, such as RDS databases,
S3 buckets, Lambda functions, and SQS queues. Backdooring those resources allows attackers to keep access to data passing through them without having access to any identity within the victim’s AWS account. Mitigation and response strategies may differ based on the affected resource:
Then, you should:
Incident response is not a static process; it's a dynamic and evolving discipline that requires constant refinement to remain effective against ever-changing threat landscapes. The lessons learned from each incident provide invaluable insights that must be integrated into the current incident response plan. This continuous feedback loop ensures that the organization's defenses are constantly adapting and improving. The following areas are particularly critical for fostering continuous improvement:
By committing to continuous improvement and leveraging available resources, organizations can build highly effective incident response capabilities in AWS, minimizing the impact of security incidents and protecting their critical assets in the cloud.
此内容由惯性聚合(RSS阅读器)自动聚合整理,仅供阅读参考。 原文来自 — 版权归原作者所有。