


Recently, an accessibility-savvy client asked me if one of the animations they were planning to place on their website could cause seizures with people who have Photosensitive Epilepsy. There are several examples of this happening in the real world, such as this Pokémon episode that caused seizures in several Japanese children in 1997, this promotional video for the 2012 Olympic Games in London and even a case of someone trying to induce a seizure in someone on purpose with an animated GIF. The avoid this from happening in accessible web applications, the W3C’s Web Content Accessibility Guidelines require that a web page cannot “contain anything that flashes more than three times in any one second period, or the flash is below the general flash and red flash thresholds” (this is known as the Three Flashes or Below Threshold requirement)
Testing this requirement may seem a little daunting at first, but luckily there is a free tool called PEAT that web developers can use to test if their animations and videos can cause an epileptic attack in those with Photosensitive Epilepsy. The help files for it are really good at explaining how the seizure risk is determined using the Harding Test (and even what a general flash and a red flash is). However, when I installed it on my computer, I found that there were limitations:
In order to work around these issues, we need to produce a video capture, convert it to an uncompressed AVI, and then let PEAT analyze that.
On a Mac, use Quicktime to capture the video of your animation. On Windows 10, you can use this built-in feature in Windows to capture video, but since not all computers running Windows support it, you may find CamStudio a good alternative (Note: I have not used either Windows solution to capture video, so your mileage may vary).
PEAT is guaranteed to analyze 25 frame-per-second uncompressed AVIs. I have used FFmpeg to convert other types of video content to this format. Once you download the program (or install it with your favourite package manager like macports, brew, or cygwin), you can use the following command line recipe to do this:
ffmpeg -i input.mp4 -an -vcodec rawvideo -y -r 25 output.avi
For those who are interested: the -an removes the audio (since PEAT doesn’t need it to analyze the video), the -vcodec rawvideo converts the output to an uncompressed format, the -y will overwrite the video without asking, and the -r 25 will ensure the output video has a framerate of 25 frames-per-second. Note that even though I use an MPEG-4 as the input video in the command above, FFmpeg can read and write a variety of other video formats.
Sometimes PEAT will fail to read the uncompressed video, or only analyze part of the video, because it’s too big. In that case, you should resize the video using this ffmpeg recipe:
ffmpeg -i input.mp4 -vf scale=640:-1 -an -vcodec rawvideo -y -r 25 output.avi
This will rescale the video to 640 pixels across without changing the aspect ratio. This rescale is acceptable for seizure testing purposes.
You can now use PEAT to analyze the input file. If you are using a Mac or Linux, use VirtualBox or another type of Virtual Machine software to run it on a copy of Windows (this can be done by downloading one of the modern.IE Windows 10 virtual machine images from Microsoft’s developer website). You can open the file using File → Open and then analyze the video using Analysis → Analyze Video. To show how it works, let’s give PEAT a video capture of a game I have been developing in my spare time:
When I put this video through PEAT, it starts producing a graph like this:
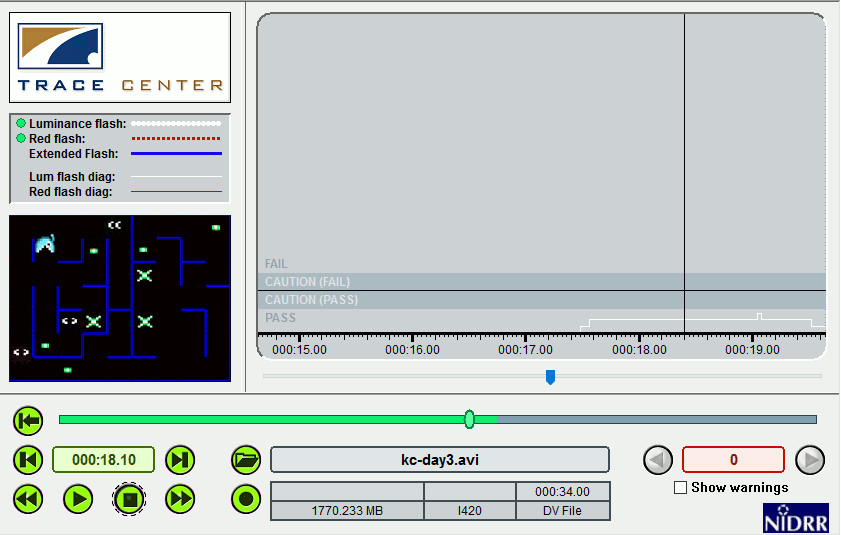
As you can see from the graph, the animations used in the video are safe — the only times the graph starts spiking are when the monsters start flashing, but this flashing is well within acceptable levels (the tool shows some light luminance flash).
To show how the tool behaves when it comes across a bad animation, I fed it a the seizure inducing scene from Pokémon that I mentioned earlier. I do not link to the video, since I don’t want people getting seizures as a result of going to my blog (if you want to see it, search for it in YouTube), but here is what PEAT displays when it came across the seizure-inducing part of the show:
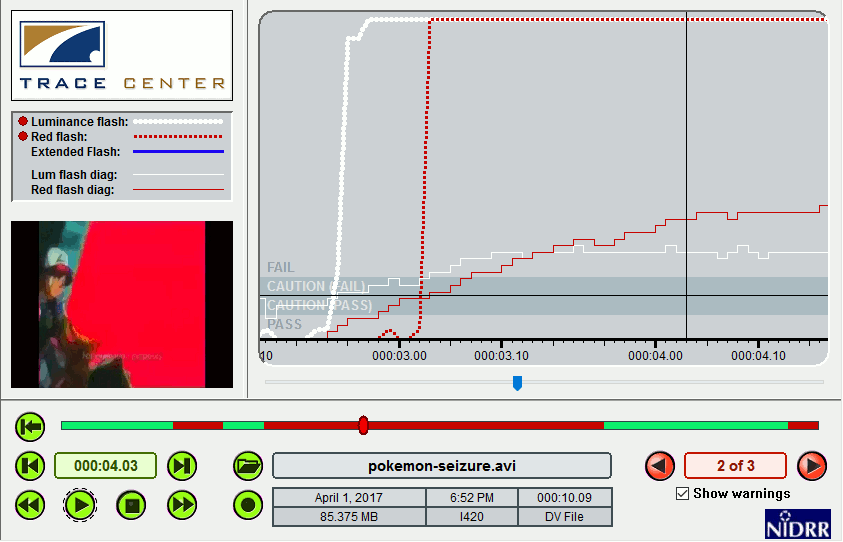
Note that both luminance and red flash metrics are going off the charts. Flashing saturated reds are especially bad for those who susceptible to seizures.
Header photo credit: Gerd Altmann.
此内容由惯性聚合(RSS阅读器)自动聚合整理,仅供阅读参考。 原文来自 — 版权归原作者所有。
