



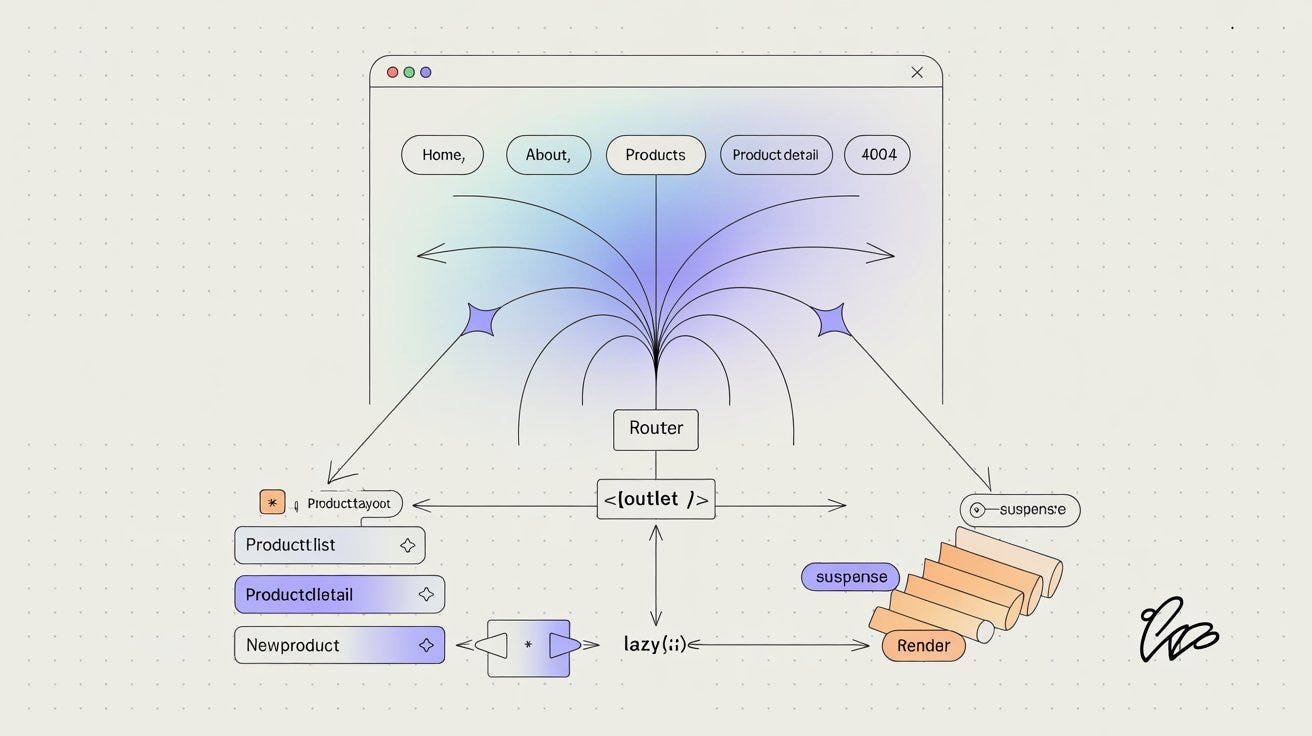
React Router has changed considerably over the years, but the basic idea behind it remains simple.
A URL changes. The router matches that URL against your route configuration. React then renders the interface associated with the best matching route.
React Router v8 builds on that model while cleaning up some of the legacy package structure. Most importantly for existing tutorials, react-router-dom is gone. The primary APIs now come from react-router, while RouterProvider and HydratedRouter are provided through react-router/dom.
In this guide, we will stay with Declarative Mode and build routing with HashRouter, Routes, and Route. That keeps the concepts easy to see while still using the current React Router v8 API.
Along the way, we will add lazy-loaded pages, nested routes, dynamic parameters, shared layouts, programmatic navigation, redirects, and a proper 404 fallback.
Before writing any routes, there is one important difference to understand.
Older React Router tutorials commonly start with:
import {
  Routes,
  Route,
  Link,
} from "react-router-dom";
Do not use that for a new React Router v8 project.
React Router v7 consolidated the packages while keeping react-router-dom around as a compatibility layer. Version 8 removes that package entirely.
Install React Router with:
npm install react-routerThen import the declarative routing APIs directly:
import {
  HashRouter,
  Link,
  Navigate,
  Outlet,
  Route,
  Routes,
  useNavigate,
  useParams,
} from "react-router";
This is the import style we will use throughout the article.
React Router v8 also raises its platform baseline to Node 22.22+, React 19.2.7+, and Vite 7+ for Framework Mode. The packages are now ESM-only.
For the simple client-side application in this article, the most visible migration change is the package name.
Let’s begin with the smallest useful application.
import {
  HashRouter,
  Link,
  Route,
  Routes,
} from "react-router";

import Home from "./pages/Home";
import About from "./pages/About";
import NotFound from "./pages/NotFound";

export default function App() {
  return (
    <HashRouter>
      <Navigation />

      <Routes>
        <Route path="/" element={<Home />} />
        <Route path="/about" element={<About />} />
        <Route path="*" element={<NotFound />} />
      </Routes>
    </HashRouter>
  );
}

function Navigation() {
  return (
    <nav>
      <Link to="/">Home</Link>
      <Link to="/about">About</Link>
    </nav>
  );
}
There are three important pieces here.
HashRouter provides the routing context and stores the application location in the hash portion of the URL.
Routes examines the current location and renders the route branch that best matches it. That wording matters because modern React Router performs route ranking rather than simply choosing routes according to the order in which you happened to write them. The official documentation describes Routes as rendering the branch that best matches the current location.
Finally, each Route describes the relationship between a URL pattern and an element.
For example:
<Route path="/about" element={<About />} />means that /about should render the About component.
Because we are using HashRouter, navigation is stored after the #.
Your URLs will look roughly like this:
https://example.com/#/
https://example.com/#/about
https://example.com/#/products
The hash is not sent to the server, which makes this routing strategy convenient for static hosting environments where server-side rewrite rules are unavailable.
The final route uses a wildcard:
<Route path="*" element={<NotFound />} />It catches locations that do not match another route.
Visit something like:
/#/this-page-does-not-existand React Router renders NotFound.
This gives the application a client-side 404 experience without manually inspecting window.location.hash.
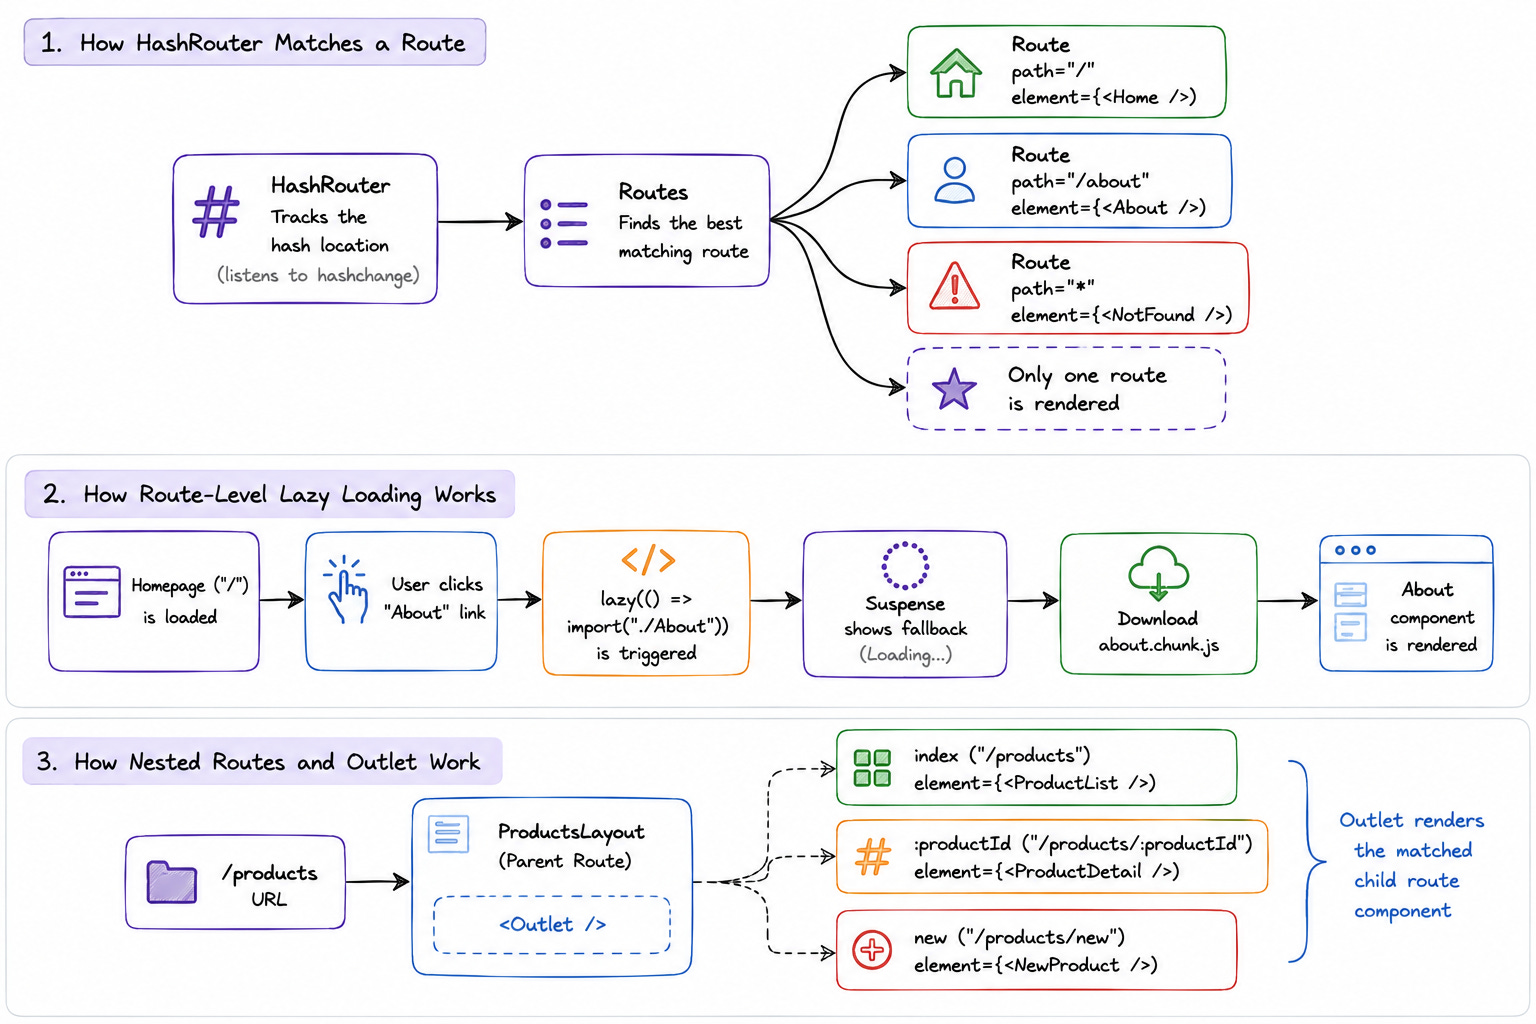
HashRouter observes the hash location, Routes finds the best matching route, and the matching element is rendered.
Navigation inside the application should normally use Link.
Instead of:
<a href="/about">About</a>use:
import { Link } from "react-router";

<Link to="/about">About</Link>
There is an important nuance here.
It is too simplistic to say that every <a> automatically sends an HTTP request while every <Link> does not.
The real distinction is that Link participates in React Router’s client-side navigation system. React Router can update the location and render the new route without performing a normal full-document navigation.
This keeps the application mounted while the route changes.
It also gives the router control over navigation state and history.
Use regular anchors for destinations that should behave like normal document navigation, especially external websites:
<a
  href="https://example.com"
  target="_blank"
  rel="noreferrer"
>
  External website
</a>
For routes owned by your React application, use Link.
A router determines which page should appear.
That also makes route boundaries natural places to split your JavaScript.
Suppose the application contains several pages:
import Home from "./pages/Home";
import About from "./pages/About";
import Dashboard from "./pages/Dashboard";
import Products from "./pages/Products";
Static imports put these modules into the application’s dependency graph immediately.
For a small project, that may be perfectly fine.
Larger applications can benefit from loading page code only when it becomes necessary.
React provides lazy() for this.
import { lazy } from "react";

const Home = lazy(() => import("./pages/Home"));
const About = lazy(() => import("./pages/About"));
const NotFound = lazy(() => import("./pages/NotFound"));
The dynamic import() gives your bundler a code-splitting boundary.
Instead of treating every page as part of one initial chunk, it can create separate chunks that are requested when required.
A lazy component cannot render until its module is available.
React’s Suspense provides the temporary interface displayed during that wait.
import {
  lazy,
  Suspense,
} from "react";

import {
  HashRouter,
  Link,
  Route,
  Routes,
} from "react-router";

const Home = lazy(() => import("./pages/Home"));
const About = lazy(() => import("./pages/About"));
const NotFound = lazy(() => import("./pages/NotFound"));

export default function App() {
  return (
    <HashRouter>
      <Navigation />

      <Suspense fallback={<PageLoader />}>
        <Routes>
          <Route path="/" element={<Home />} />
          <Route path="/about" element={<About />} />
          <Route path="*" element={<NotFound />} />
        </Routes>
      </Suspense>
    </HashRouter>
  );
}

function PageLoader() {
  return <p>Loading page...</p>;
}
Now imagine the user starts on the homepage.
The Home module is required because React needs to render it.
The user then clicks About.
React encounters the lazy About component and requests its module. While that request is unresolved, Suspense renders PageLoader.
Once the module becomes available, React renders About.
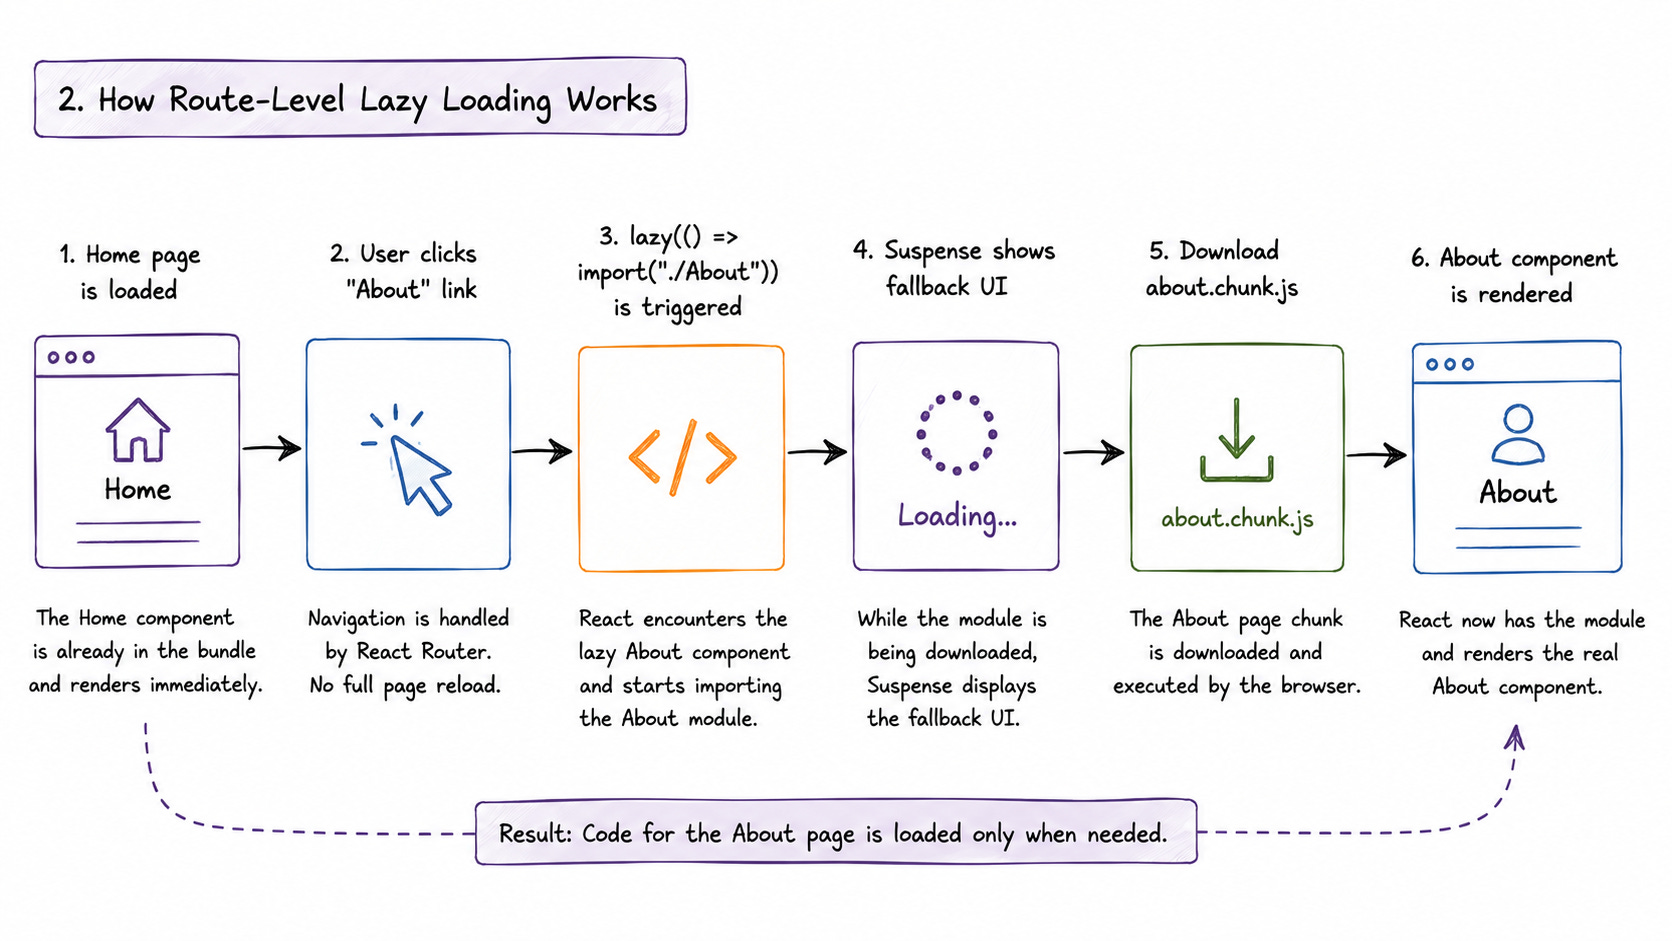
The About page is requested only when its lazy component needs to render, while Suspense provides a temporary fallback.
Be careful with claims such as “ten pages means ten times faster.”
Real bundle performance does not work that way.
Applications have shared dependencies. Files are compressed. Browsers cache resources. Network latency, parsing, compilation, and execution also contribute to startup performance.
A more accurate benefit is this:
route-level code splitting can reduce the amount of page-specific JavaScript required for the initial render.
That can make a substantial difference in a large application without relying on unrealistic performance math.
This is where routing starts becoming much more useful than simply switching pages.
Consider a product section containing these URLs:
/products
/products/123
/products/new
They are different pages, but they probably share interface elements.
Perhaps every product page has the same heading, toolbar, filters, sidebar, or breadcrumbs.
You could repeat that structure in every component.
Nested routes give us a better option.
<Routes>
  <Route
    path="/products"
    element={<ProductsLayout />}
  >
    <Route
      index
      element={<ProductList />}
    />

    <Route
      path="new"
      element={<NewProduct />}
    />

    <Route
      path=":productId"
      element={<ProductDetail />}
    />
  </Route>
</Routes>
/products is now the parent route.
The three child states are:
/products
/products/new
/products/:productId
The parent provides the shared layout.
Our ProductsLayout component needs to specify where React Router should place the matched child.
That is the job of Outlet.
import {
  Link,
  Outlet,
} from "react-router";

export default function ProductsLayout() {
  return (
    <section className="products">
      <header>
        <h1>Products</h1>

        <nav>
          <Link to="/products">
            All Products
          </Link>

          <Link to="/products/new">
            Add Product
          </Link>
        </nav>
      </header>

      <main>
        <Outlet />
      </main>
    </section>
  );
}
Visit:
/productsand the outlet renders:
<ProductList />Visit:
/products/newand the same outlet renders:
<NewProduct />Open:
/products/123and it becomes:
<ProductDetail />The surrounding ProductsLayout stays in place.
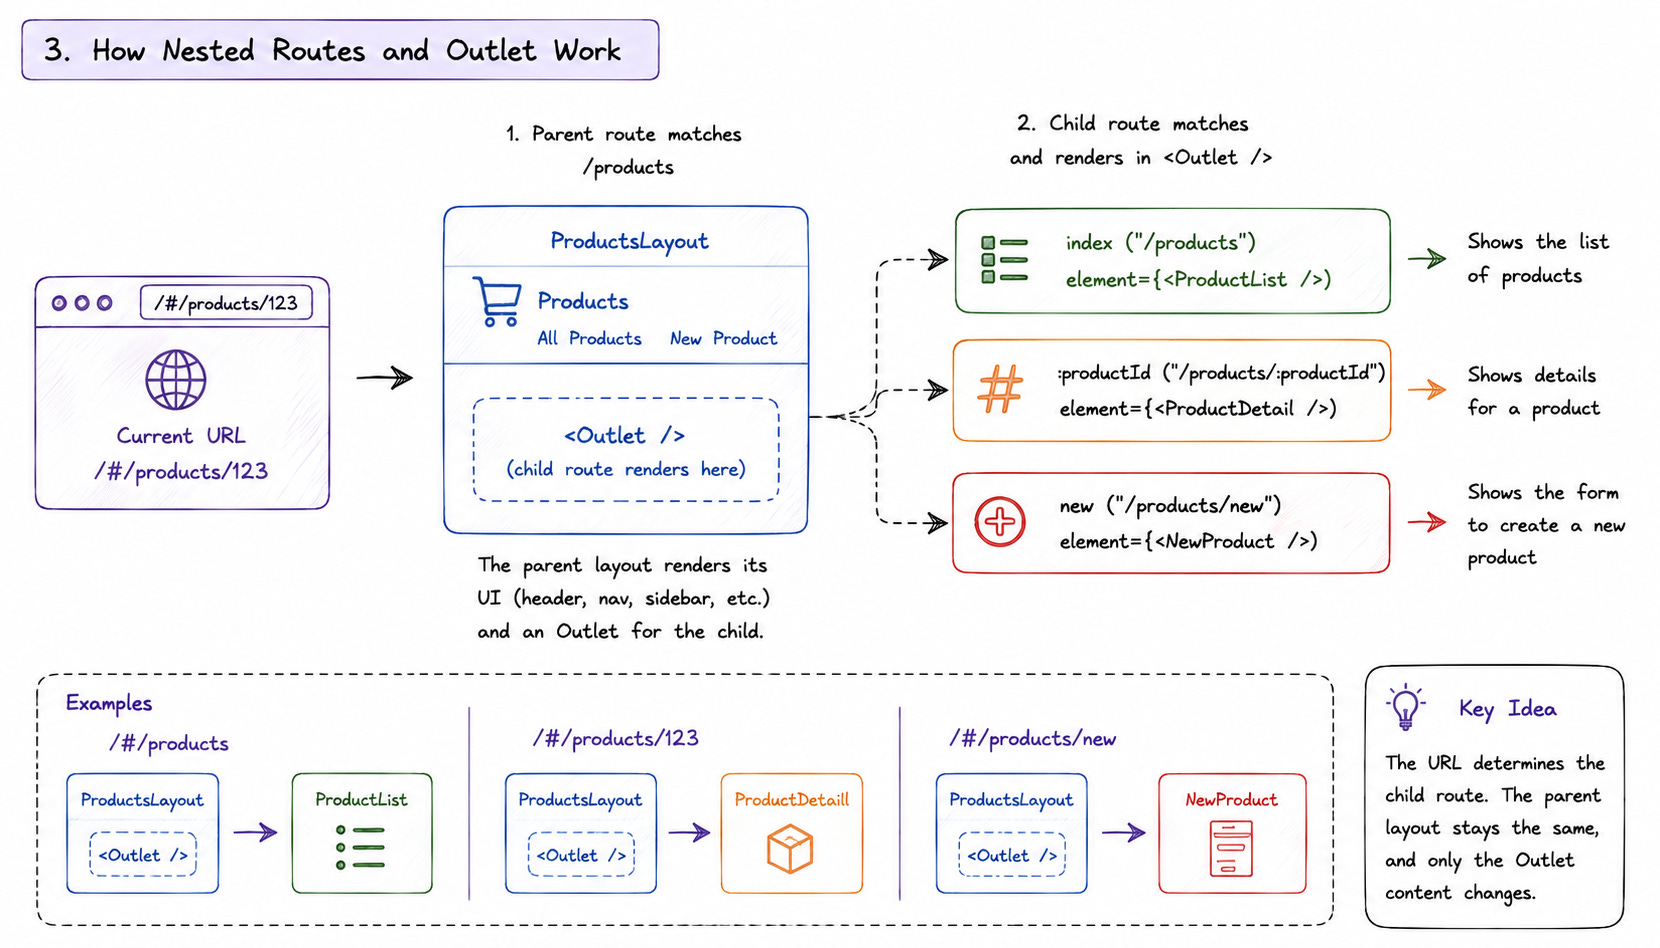
The parent Products route owns the shared layout, while Outlet renders the child route selected by the URL.
This is the real advantage of nested routing.
It lets the URL hierarchy mirror the UI hierarchy.
There is one interesting line in our products configuration:
<Route index element={<ProductList />} />An index route is the default child of its parent.
It does not need its own path.
Given:
<Route
  path="/products"
  element={<ProductsLayout />}
>
  <Route
    index
    element={<ProductList />}
  />
</Route>
visiting:
/productsrenders ProductsLayout, then places ProductList inside its Outlet.
This pattern becomes particularly useful for dashboards.
<Route
  path="/dashboard"
  element={<DashboardLayout />}
>
  <Route
    index
    element={<Overview />}
  />

  <Route
    path="analytics"
    element={<Analytics />}
  />

  <Route
    path="settings"
    element={<Settings />}
  />
</Route>
Now the URL structure clearly describes the interface structure.
Product pages usually cannot have a manually declared route for every product.
You need a dynamic segment.
React Router represents dynamic segments with a colon:
<Route
  path=":productId"
  element={<ProductDetail />}
/>
Because this route is nested under /products, it can match URLs such as:
/products/42
/products/123
/products/keyboard
/products/react-router-book
The component can read the value with useParams.
import { useParams } from "react-router";

export default function ProductDetail() {
  const { productId } = useParams();

  return (
    <article>
      <h2>Product Details</h2>
      <p>Product ID: {productId}</p>
    </article>
  );
}
For this URL:
/products/123the result is effectively:
productId === "123";Remember that URL parameters are strings.
If your application expects a numeric database ID, validate it before using it.
const id = Number(productId);

if (!Number.isInteger(id) || id <= 0) {
  return <p>Invalid product ID.</p>;
}
In a production application, that validated value might then be passed to a query, loader, API call, or state selector.
Links cover navigation initiated directly by the user.
Applications also need to navigate as a consequence of logic.
A common example is login.
import { useNavigate } from "react-router";

export default function LoginForm() {
  const navigate = useNavigate();

  async function handleSubmit(event) {
    event.preventDefault();

    const success = await login();

    if (success) {
      navigate("/dashboard");
    }
  }

  return (
    <form onSubmit={handleSubmit}>
      <button type="submit">
        Sign In
      </button>
    </form>
  );
}
useNavigate() returns a navigation function.
You can call it after a form submission, authentication event, deletion, checkout, onboarding step, or another application action.
You can also replace the current history entry:
navigate("/dashboard", {
  replace: true,
});
That is useful when the previous location should not remain as a meaningful destination in the browser history.
The wildcard route gives us our fallback:
<Route
  path="*"
  element={<NotFound />}
/>
Instead of automatically throwing the visitor back to the homepage, a more useful 404 page can offer a clear way out.
import { Link } from "react-router";

export default function NotFound() {
  return (
    <main>
      <h1>Page Not Found</h1>

      <p>
        The page you requested does not exist.
      </p>

      <Link to="/">
        Return Home
      </Link>
    </main>
  );
}
Automatic redirects are not always good UX.
A visitor may want to inspect the incorrect URL, copy it, or simply understand what happened.
Still, if your application genuinely requires a delayed redirect, useNavigate can handle it safely.
import { useEffect } from "react";
import { useNavigate } from "react-router";

export default function NotFound() {
  const navigate = useNavigate();

  useEffect(() => {
    const timer = window.setTimeout(() => {
      navigate("/", {
        replace: true,
      });
    }, 3000);

    return () => {
      window.clearTimeout(timer);
    };
  }, [navigate]);

  return <p>Redirecting to the homepage...</p>;
}
The cleanup function prevents the timer from remaining active after the component unmounts.
Sometimes a redirect is simply part of the route configuration.
Suppose an old application used:
/catalogbut the new section lives at:
/productsYou can redirect the old route with Navigate.
import { Navigate } from "react-router";

<Route
  path="/catalog"
  element={
    <Navigate
      to="/products"
      replace
    />
  }
/>
The replace option replaces the current history entry instead of pushing another one.
This prevents the browser’s Back button from returning the user to a route that immediately redirects again.
We now have enough pieces to build the complete router.
import {
  lazy,
  Suspense,
} from "react";

import {
  HashRouter,
  Link,
  Navigate,
  Outlet,
  Route,
  Routes,
} from "react-router";

const Home = lazy(() =>
  import("./pages/Home")
);

const About = lazy(() =>
  import("./pages/About")
);

const ProductList = lazy(() =>
  import("./pages/ProductList")
);

const ProductDetail = lazy(() =>
  import("./pages/ProductDetail")
);

const NewProduct = lazy(() =>
  import("./pages/NewProduct")
);

const NotFound = lazy(() =>
  import("./pages/NotFound")
);

export default function App() {
  return (
    <HashRouter>
      <Navigation />

      <Suspense fallback={<PageLoader />}>
        <Routes>
          <Route
            path="/"
            element={<Home />}
          />

          <Route
            path="/about"
            element={<About />}
          />

          <Route
            path="/products"
            element={<ProductsLayout />}
          >
            <Route
              index
              element={<ProductList />}
            />

            <Route
              path="new"
              element={<NewProduct />}
            />

            <Route
              path=":productId"
              element={<ProductDetail />}
            />
          </Route>

          <Route
            path="/catalog"
            element={
              <Navigate
                to="/products"
                replace
              />
            }
          />

          <Route
            path="*"
            element={<NotFound />}
          />
        </Routes>
      </Suspense>
    </HashRouter>
  );
}

function Navigation() {
  return (
    <nav>
      <Link to="/">Home</Link>
      <Link to="/about">About</Link>
      <Link to="/products">Products</Link>
    </nav>
  );
}

function ProductsLayout() {
  return (
    <section>
      <h1>Products</h1>

      <nav>
        <Link to="/products">
          All Products
        </Link>

        <Link to="/products/new">
          New Product
        </Link>
      </nav>

      <Outlet />
    </section>
  );
}

function PageLoader() {
  return (
    <p role="status">
      Loading page...
    </p>
  );
}
Despite covering several features, the routing configuration remains readable.
You can see the public URLs, nested hierarchy, dynamic segments, redirect, and fallback without tracing a collection of manual if statements.
That is exactly what a routing layer should give you.
We have deliberately used HashRouter throughout this article.
It is useful for understanding routing and remains practical when deploying to static hosting where you cannot configure server rewrites.
The result looks like this:
https://example.com/#/products/123For many normal web applications, however, you will probably prefer BrowserRouter.
import {
  BrowserRouter,
  Routes,
  Route,
} from "react-router";
The URLs become cleaner:
https://example.com/products/123The tradeoff is that your server or hosting platform must be configured to serve the application correctly when someone directly requests a client-side route.
The routing concepts themselves remain nearly identical.
Learn one and switching between them is straightforward.
React Router v8 is much larger than the API shown in this tutorial.
The official documentation organizes React Router around Declarative, Data, and Framework modes.
This article intentionally uses Declarative Mode:
<HashRouter>
  <Routes>
    <Route />
  </Routes>
</HashRouter>
It is the clearest way to learn route matching, nested layouts, parameters, and navigation.
Data Mode takes a different approach by creating a router configuration:
import {
  createBrowserRouter,
} from "react-router";

const router = createBrowserRouter([
  {
    path: "/",
    Component: Root,
  },
]);
It enables router-level data APIs and other capabilities beyond what <Routes> alone provides. In fact, the React Router documentation explicitly notes that routes declared directly inside <Routes> do not participate in data loading, actions, route-module code splitting, or other route-module features.
Framework Mode goes further and can configure routes through app/routes.ts, route modules, the Vite integration, rendering strategies, and other framework-level features.
Those deserve their own article.
For understanding the fundamentals, Declarative Mode remains a good place to start.
React Router v8 does not require you to rethink routing from scratch.
The biggest visible change for developers coming from older tutorials is the package cleanup. react-router-dom is gone, and most APIs now come directly from react-router.
The underlying concepts remain familiar.
HashRouter provides hash-based navigation. Routes finds the route branch that best matches the current location. Route connects URL patterns with UI.
Link provides router-aware navigation.
React’s lazy and Suspense can split page components into chunks that are loaded when needed.
Nested routes allow several pages to share the same layout, while Outlet determines where the active child appears.
Dynamic segments such as :productId make URLs useful application input, and useParams gives the component access to those values.
Finally, useNavigate handles navigation triggered by application logic, while Navigate provides a declarative option for redirects.
React Router v8 can go much further with Data and Framework modes, but these fundamentals still form a useful mental model.
Once the relationship between the URL, route tree, layout, and rendered component becomes clear, routing stops feeling like infrastructure and starts becoming part of the application’s architecture.
A URL tells you where you are. A good router determines what the application should become when you get there.