


This article assumes you've read many of the other articles starting with the fundamentals. If you have not read them please start there first.
In the article on the smallest WebGL programs we covered some examples of drawing with very little code. In this article will go over drawing with no data.
Traditionally, WebGL apps put geometry data in buffers. They then use attributes to pull vertex data from those buffers into shaders and convert them to clip space.
The word traditionally is important. It's only a tradition
to do it this way. It is in no way a requirement. WebGL doesn't
care how we do it, it only cares that our vertex shaders
assign clip space coordinates to gl_Position.
So, let's provide only a count as an attribute instead of positions
const numVerts = 20;
const vertexIds = new Float32Array(numVerts);
vertexIds.forEach((v, i) => {
  vertexIds[i] = i;
});

const idBuffer = gl.createBuffer();
gl.bindBuffer(gl.ARRAY_BUFFER, idBuffer);
gl.bufferData(gl.ARRAY_BUFFER, vertexIds, gl.STATIC_DRAW);
Now let's make a vertex shader to draw a circle of points based on that count.
attribute float vertexId;
uniform float numVerts;

#define PI radians(180.0)

void main() {
  float u = vertexId / numVerts;      // goes from 0 to 1
  float angle = u * PI * 2.0;         // goes from 0 to 2PI
  float radius = 0.8;

  vec2 pos = vec2(cos(angle), sin(angle)) * radius;

  gl_Position = vec4(pos, 0, 1);
  gl_PointSize = 5.0;
}
The code above should be pretty straight forward.
vertexId is going to count from 0 to numVerts.
Based on that we generate positions for a circle.
If we stopped there the circle would be an ellipse because clip space is normalized (goes from -1 to 1) across and down the canvas. If we pass in the resolution we can take into account that -1 to 1 across might not represent the same space as -1 to 1 down the canvas.
attribute float vertexId;
uniform float numVerts;
+uniform vec2 resolution;

#define PI radians(180.0)

void main() {
  float u = vertexId / numVerts;      // goes from 0 to 1
  float angle = u * PI * 2.0;         // goes from 0 to 2PI
  float radius = 0.8;

  vec2 pos = vec2(cos(angle), sin(angle)) * radius;

+  float aspect = resolution.y / resolution.x;
+  vec2 scale = vec2(aspect, 1);

+  gl_Position = vec4(pos * scale, 0, 1);
  gl_PointSize = 5.0;
}
And our fragment shader can just draw a solid color
precision mediump float;

void main() {
  gl_FragColor = vec4(1, 0, 0, 1);
}
In our JavaScript at init time we'll compile the shader and look up the attributes and uniforms,
// setup GLSL program
const program = webglUtils.createProgramFromSources(gl, [vs, fs]);
const vertexIdLoc = gl.getAttribLocation(program, 'vertexId');
const numVertsLoc = gl.getUniformLocation(program, 'numVerts');
const resolutionLoc = gl.getUniformLocation(program, 'resolution');
And to render we'll use the program, setup our one attribute with vertex ids,
set the resolution and numVerts uniforms, and finally draw the points.
gl.useProgram(program);

{
  // Turn on the attribute
  gl.enableVertexAttribArray(vertexIdLoc);

  // Bind the id buffer.
  gl.bindBuffer(gl.ARRAY_BUFFER, idBuffer);

  // Tell the attribute how to get data out of idBuffer (ARRAY_BUFFER)
  const size = 1;          // 1 components per iteration
  const type = gl.FLOAT;   // the data is 32bit floats
  const normalize = false; // don't normalize the data
  const stride = 0;        // 0 = move forward size * sizeof(type) each iteration to get the next position
  const offset = 0;        // start at the beginning of the buffer
  gl.vertexAttribPointer(
      vertexIdLoc, size, type, normalize, stride, offset);
}

// tell the shader the number of verts
gl.uniform1f(numVertsLoc, numVerts);
// tell the shader the resolution
gl.uniform2f(resolutionLoc, gl.canvas.width, gl.canvas.height);

const offset = 0;
gl.drawArrays(gl.POINTS, offset, numVerts);
And we get a circle of points.
Is this technique useful? Well with some creative code we could make a starfield or a simple rain effect with almost no data and a single draw call.
Let's do the rain just to see it work. First we'll change the vertex shader to
attribute float vertexId;
uniform float numVerts;
uniform float time;

void main() {
  float u = vertexId / numVerts;          // goes from 0 to 1
  float x = u * 2.0 - 1.0;                // -1 to 1
  float y = fract(time + u) * -2.0 + 1.0; // 1.0 ->  -1.0

  gl_Position = vec4(x, y, 0, 1);
  gl_PointSize = 5.0;
}
For this situation we don't need the resolution.
We've added a time uniform which will be the time
in seconds since the page loaded.
For 'x' we're just going to go from -1 to 1
For 'y' we use time + u but fract returns
only the fractional portion so a value from 0.0 to 1.0.
By expanding that to 1.0 to -1.0 we get a y that repeats
over time but one that is offset differently for each
point.
Let's change the color to blue in the fragment shader.
precision mediump float;

void main() {
-  gl_FragColor = vec4(1, 0, 0, 1);
+  gl_FragColor = vec4(0, 0, 1, 1);
}
Then in JavaScript we need to look up the time uniform
// setup GLSL program
const program = webglUtils.createProgramFromSources(gl, [vs, fs]);
const vertexIdLoc = gl.getAttribLocation(program, 'vertexId');
const numVertsLoc = gl.getUniformLocation(program, 'numVerts');
-const resolutionLoc = gl.getUniformLocation(program, 'resolution');
+const timeLoc = gl.getUniformLocation(program, 'time');
And we need to convert to code to animate
by creating a render loop and setting the time uniform.
+function render(time) {
+  time *= 0.001;  // convert to seconds

+  webglUtils.resizeCanvasToDisplaySize(gl.canvas);
+  gl.viewport(0, 0, gl.canvas.width, gl.canvas.height);

  gl.useProgram(program);

  {
    // Turn on the attribute
    gl.enableVertexAttribArray(vertexIdLoc);

    // Bind the id buffer.
    gl.bindBuffer(gl.ARRAY_BUFFER, idBuffer);

    // Tell the attribute how to get data out of idBuffer (ARRAY_BUFFER)
    const size = 1;          // 1 components per iteration
    const type = gl.FLOAT;   // the data is 32bit floats
    const normalize = false; // don't normalize the data
    const stride = 0;        // 0 = move forward size * sizeof(type) each iteration to get the next position
    const offset = 0;        // start at the beginning of the buffer
    gl.vertexAttribPointer(
        vertexIdLoc, size, type, normalize, stride, offset);
  }

  // tell the shader the number of verts
  gl.uniform1f(numVertsLoc, numVerts);
+  // tell the shader the time
+  gl.uniform1f(timeLoc, time);

  const offset = 0;
  gl.drawArrays(gl.POINTS, offset, numVerts);

+  requestAnimationFrame(render);
+}
+requestAnimationFrame(render);
This gives us POINTS going down the screen but they are all in order. We need to add some randomness. There is no random number generator in GLSL. Instead we can use a function that generates something that appears random enough.
Here's one
// hash function from https://www.shadertoy.com/view/4djSRW
// given a value between 0 and 1
// returns a value between 0 and 1 that *appears* kind of random
float hash(float p) {
  vec2 p2 = fract(vec2(p * 5.3983, p * 5.4427));
  p2 += dot(p2.yx, p2.xy + vec2(21.5351, 14.3137));
  return fract(p2.x * p2.y * 95.4337);
}
and we can use that like this
void main() {
  float u = vertexId / numVerts;          // goes from 0 to 1
-  float x = u * 2.0 - 1.0;                // -1 to 1
+  float x = hash(u) * 2.0 - 1.0;          // random position
  float y = fract(time + u) * -2.0 + 1.0; // 1.0 ->  -1.0

  gl_Position = vec4(x, y, 0, 1);
  gl_PointSize = 5.0;
}
We pass hash our previous 0 to 1 value and it gives us
back a pseudo random 0 to 1 value.
Let's also make the points smaller
  gl_Position = vec4(x, y, 0, 1);
-  gl_PointSize = 5.0;
+  gl_PointSize = 2.0;
And bump up the number of points we're drawing
-const numVerts = 20;
+const numVerts = 400;
And with that we get
If you look really closely you can see the rain is repeating. Look for some clump of points and watch as they fall off the bottom and pop back on the top. If there was more going on in the background like if this cheap rain effect was happening over a 3D game it's possible no one would ever notice it's repeating.
We can fix the repetition by adding in a little more randomness.
void main() {
  float u = vertexId / numVerts;          // goes from 0 to 1
+  float off = floor(time + u) / 1000.0;   // changes once per second per vertex
-  float x = hash(u) * 2.0 - 1.0;          // random position
+  float x = hash(u + off) * 2.0 - 1.0;    // random position
  float y = fract(time + u) * -2.0 + 1.0; // 1.0 ->  -1.0

  gl_Position = vec4(x, y, 0, 1);
  gl_PointSize = 2.0;
}
In the code above we added off. Since we're calling floor
the value of floor(time + u) will effectively give us
a second timer that only changes once per second for each vertex.
This offset is in sync with the code moving the point down the screen
so at the same instance the point jumps back to the top
of the screen some small amount is added to the value
hash is being passed which means this particular point
will get a new random number and therefore a new random horizontal position.
The result is a rain effect that doesn't appear to repeat
Can we do more than gl.POINTS? Of course!
Let's make circles. To do this we need triangles around a center like slices of pie. We can think of each triangle as 2 points around the edge of the pie followed by 1 point in the center. We then repeat for each slice of the pie.
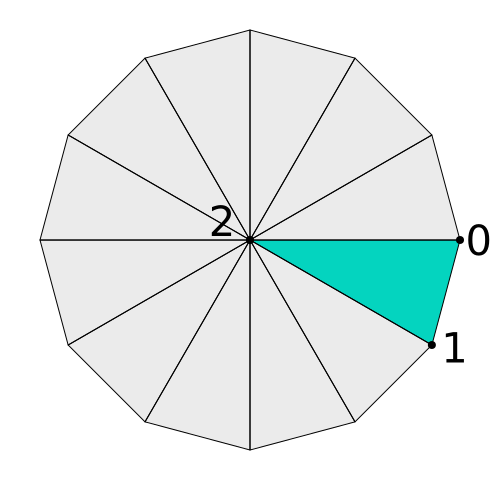
So first we want some kind of counter that changes once per pie slice
float sliceId = floor(vertexId / 3.0);
Then we need a count around the edge of the circle that goes
0, 1, ?, 1, 2, ?, 2, 3, ?, ...
The ? value doesn't really matter because looking at the diagram above the 3rd value is always in the center (0,0) so we can just multiply by 0 regardless of value.
To get the pattern above this would work
float triVertexId = mod(vertexId, 3.0);
float edge = triVertexId + sliceId;
For points on the edge vs points in the center we need this pattern. 2 on the edge then 1 in the center, repeat.
1, 1, 0, 1, 1, 0, 1, 1, 0, ...
We can get that pattern with
float radius = step(1.5, triVertexId);
step(a, b) is 0 if a < b and 1 otherwise. You can think of it as
function step(a, b) {
  return a < b ? 0 : 1;
}
step(1.5, triVertexId) will be 1 when 1.5 is less than triVertexId.
That's true for the first 2 vertices of each triangle and false
for the last one.
We can get triangle vertices for a circle like this
float numSlices = 8.0;
float sliceId = floor(vertexId / 3.0);
float triVertexId = mod(vertexId, 3.0);
float edge = triVertexId + sliceId;
float angleU = edge / numSlices;  // 0.0 to 1.0
float angle = angleU * PI * 2.0;
float radius = step(triVertexId, 1.5);
vec2 pos = vec2(cos(angle), sin(angle)) * radius;
Putting all of this together let's just try to draw 1 circle.
attribute float vertexId;
uniform float numVerts;
uniform vec2 resolution;

#define PI radians(180.0)

void main() {
  float numSlices = 8.0;
  float sliceId = floor(vertexId / 3.0);
  float triVertexId = mod(vertexId, 3.0);
  float edge = triVertexId + sliceId;
  float angleU = edge / numSlices;  // 0.0 to 1.0
  float angle = angleU * PI * 2.0;
  float radius = step(triVertexId, 1.5);
  vec2 pos = vec2(cos(angle), sin(angle)) * radius;

  float aspect = resolution.y / resolution.x;
  vec2 scale = vec2(aspect, 1);

  gl_Position = vec4(pos * scale, 0, 1);
}
Notice we put resolution back in so we don't get an ellipse.
For a 8 slice circle we need 8 * 3 vertices
-const numVerts = 400;
+const numVerts = 8 * 3;
and we need to draw TRIANGLES not POINTS
const offset = 0;
-gl.drawArrays(gl.POINTS, offset, numVerts);
+gl.drawArrays(gl.TRIANGLES, offset, numVerts);
And if what if we wanted to draw multiple circles?
All we need to do is come up with a circleId which we
can use to pick some position for each circle that is
the same for all vertices in the circle.
float numVertsPerCircle = numSlices * 3.0;
float circleId = floor(vertexId / numVertsPerCircle);
For example let's draw a circle of circles.
First let's turn the code above into a function,
vec2 computeCircleTriangleVertex(float vertexId) {
  float numSlices = 8.0;
  float sliceId = floor(vertexId / 3.0);
  float triVertexId = mod(vertexId, 3.0);
  float edge = triVertexId + sliceId;
  float angleU = edge / numSlices;  // 0.0 to 1.0
  float angle = angleU * PI * 2.0;
  float radius = step(triVertexId, 1.5);
  return vec2(cos(angle), sin(angle)) * radius;
}
Now here's the original code we used to draw a circle of points at the top of this article.
float u = vertexId / numVerts;      // goes from 0 to 1
float angle = u * PI * 2.0;         // goes from 0 to 2PI
float radius = 0.8;

vec2 pos = vec2(cos(angle), sin(angle)) * radius;

float aspect = resolution.y / resolution.x;
vec2 scale = vec2(aspect, 1);

gl_Position = vec4(pos * scale, 0, 1);
We just need to change it to use circleId instead
of vertexId and to divide by the number of circles
instead of the number of vertices.
void main() {
+  float circleId = floor(vertexId / numVertsPerCircle);
+  float numCircles = numVerts / numVertsPerCircle;

-  float u = vertexId / numVerts;      // goes from 0 to 1
+  float u = circleId / numCircles;    // goes from 0 to 1
  float angle = u * PI * 2.0;         // goes from 0 to 2PI
  float radius = 0.8;

  vec2 pos = vec2(cos(angle), sin(angle)) * radius;

+  vec2 triPos = computeCircleTriangleVertex(vertexId) * 0.1;

  float aspect = resolution.y / resolution.x;
  vec2 scale = vec2(aspect, 1);

-  gl_Position = vec4(pos * scale, 0, 1);
+  gl_Position = vec4((pos + triPos) * scale, 0, 1);
}
Then we just need to increase the number of vertices
-const numVerts = 8 * 3;
+const numVerts = 8 * 3 * 20;
And now we have a circle of 20 circles.
And of course we could apply the same things we did above to make a rain of circles. That probably has no point so I'm not going to go through it but it does show making triangles in the vertex shader with no data.
The above technique could be used for making rectangles or squares instead, then generating UV coordinates, passing those the fragment shader and texture mapping our generated geometry. This might be good for falling snowflakes or leaves that actually flip around in 3D by applying the 3D techniques we used in the articles on 3D perspective.
I want to emphasize these techniques are not common. Making a simple particle system might be semi common or the rain effect above but making extremely complex calculations will hurt performance. In general you if you want performance you should ask your computer to do as little work as possible so if there is a bunch of stuff you can pre-calculate at init time and pass it into the shader in some form or another you should do that.
For example here's an extreme vertex shader that calculates a bunch of cubes (warning, has sound).
As an intellectual curiosity of the puzzle "If I had no data except a vertex id could I draw something interesting?" it's kind of neat. In fact that entire website is about the puzzle of if you only have a vertex id can you make something interesting. But, for performance it would be much much faster to use the more traditional techniques of passing in cube vertex data in buffers and reading that data with attributes or other techniques we'll go in other articles.
There is some balance to be struck. For the rain example above if you want that exact effect then the code above is pretty efficient. Somewhere between the two lies the boundary where one technique is more performant than another. Usually the more traditional techniques are far more flexible as well but you have to decide on a case by case basis when to use one way or another.
The point of this article is mostly to introduce these ideas
and to emphasize other ways of thinking about what WebGL
is actually doing. Again it only cares that you set gl_Position
and gl_FragColor in your shaders. It doesn't care how you do it.
Next up see how Shadertoy shaders work.
gl.POINTS
One thing a technique like this can be useful for is to simulate drawing
with gl.POINTS.
There are 2 problems with gl.POINTS
Most people using gl.POINTS use small sizes
but if that maximum size is smaller than you need you'll need to choose a different solution.
The issue here is imagine you set the center of a point to be 1 pixel off the left edge
of the canvas but you set gl_PointSize to 32.0.
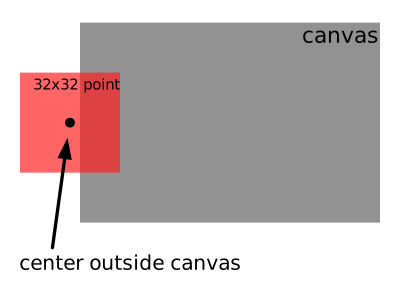
So, if either of those issues is a problem for your needs then as a solution you need to draw your own quads
with gl.TRIANGLES instead of using gl.POINTS.
If you do that both problems are solved.
The maximum size problem goes away as does the inconsistent clipping problem. There are various
ways to draw lots of quads. One of them is using techniques like the ones in this article.
此内容由惯性聚合(RSS阅读器)自动聚合整理,仅供阅读参考。 原文来自 — 版权归原作者所有。