


WebGL (Web Graphics Library) is often thought of as a 3D API. People think "I'll use WebGL and magic I'll get cool 3d". In reality WebGL is just a rasterization engine. It draws points, lines, and triangles based on code you supply. Getting WebGL to do anything else is up to you to provide code to use points, lines, and triangles to accomplish your task.
WebGL runs on the GPU on your computer. As such you need to provide the code that runs on that GPU. You provide that code in the form of pairs of functions. Those 2 functions are called a vertex shader and a fragment shader and they are each written in a very strictly typed C/C++ like language called GLSL. (GL Shader Language). Paired together they are called a program.
A vertex shader's job is to compute vertex positions. Based on the positions the function outputs WebGL can then rasterize various kinds of primitives including points, lines, or triangles. When rasterizing these primitives it calls a second user supplied function called a fragment shader. A fragment shader's job is to compute a color for each pixel of the primitive currently being drawn.
Nearly all of the entire WebGL API is about setting up state for these pairs of functions to run.
For each thing you want to draw you setup a bunch of state then execute a pair of functions by calling
gl.drawArrays or gl.drawElements which executes your shaders on the GPU.
Any data you want those functions to have access to must be provided to the GPU. There are 4 ways a shader can receive data.
Attributes and Buffers
Buffers are arrays of binary data you upload to the GPU. Usually buffers contain things like positions, normals, texture coordinates, vertex colors, etc although you're free to put anything you want in them.
Attributes are used to specify how to pull data out of your buffers and provide them to your vertex shader. For example you might put positions in a buffer as three 32bit floats per position. You would tell a particular attribute which buffer to pull the positions out of, what type of data it should pull out (3 component 32 bit floating point numbers), what offset in the buffer the positions start, and how many bytes to get from one position to the next.
Buffers are not random access. Instead a vertex shader is executed a specified number of times. Each time it's executed the next value from each specified buffer is pulled out and assigned to an attribute.
Uniforms
Uniforms are effectively global variables you set before you execute your shader program.
Textures
Textures are arrays of data you can randomly access in your shader program. The most common thing to put in a texture is image data but textures are just data and can just as easily contain something other than colors.
Varyings
Varyings are a way for a vertex shader to pass data to a fragment shader. Depending on what is being rendered, points, lines, or triangles, the values set on a varying by a vertex shader will be interpolated while executing the fragment shader.
WebGL only cares about 2 things: clip space coordinates and colors. Your job as a programmer using WebGL is to provide WebGL with those 2 things. You provide your 2 "shaders" to do this. A Vertex shader which provides the clip space coordinates, and a fragment shader that provides the color.
Clip space coordinates always go from -1 to +1 no matter what size your canvas is.
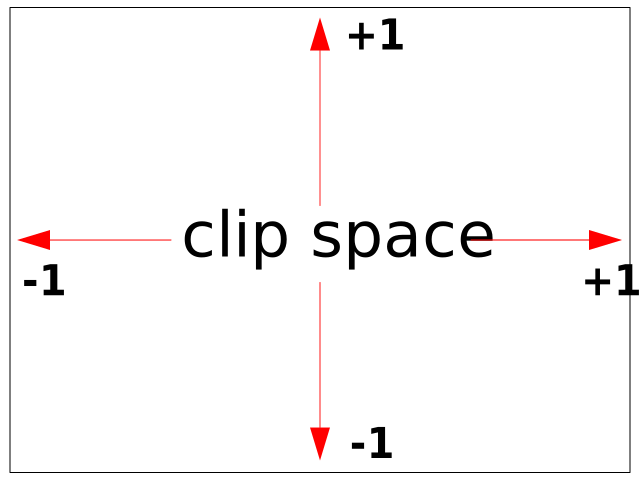
Here is a simple WebGL example that shows WebGL in its simplest form.
Let's start with a vertex shader
// an attribute will receive data from a buffer
attribute vec4 a_position;

// all shaders have a main function
void main() {

  // gl_Position is a special variable a vertex shader
  // is responsible for setting
  gl_Position = a_position;
}
When executed, if the entire thing was written in JavaScript instead of GLSL you could imagine it would be used like this
// *** PSEUDO CODE!! ***

var positionBuffer = [
  0, 0, 0, 0,
  0, 0.5, 0, 0,
  0.7, 0, 0, 0,
];
var attributes = {};
var gl_Position;

drawArrays(..., offset, count) {
  var stride = 4;
  var size = 4;
  for (var i = 0; i < count; ++i) {
     // copy the next 4 values from positionBuffer to the a_position attribute
     const start = offset + i * stride;
     attributes.a_position = positionBuffer.slice(start, start + size);
     runVertexShader();
     ...
     doSomethingWith_gl_Position();
}
In reality it's not quite that simple because positionBuffer would need to be converted to binary
data (see below) and so the actual computation for getting data out of the buffer
would be a little different but hopefully this gives you an idea of how a vertex
shader will be executed.
Next we need a fragment shader
// fragment shaders don't have a default precision so we need
// to pick one. mediump is a good default. It means "medium precision"
precision mediump float;

void main() {
  // gl_FragColor is a special variable a fragment shader
  // is responsible for setting
  gl_FragColor = vec4(1, 0, 0.5, 1); // return reddish-purple
}
Above we're setting gl_FragColor to 1, 0, 0.5, 1 which is 1 for red, 0 for green,
0.5 for blue, 1 for alpha. Colors in WebGL go from 0 to 1.
Now that we have written the 2 shader functions lets get started with WebGL
First we need an HTML canvas element
<canvas id="c"></canvas>
Then in JavaScript we can look that up
var canvas = document.querySelector("#c");
Note: These lessons were started in 2011, long before modern JavaScript. Back then, there was no
import, noasync/await, noPromise, no spread syntax, no rest parameters, no optional chaining, no nullish coalescing operator, no destructuring assignment, no Map and no Set. In particular,varwas all there was andletandconstdid not exist.So, please forgive the oldskool JavaScript. The lessons are still valid but you'll have to translate them to more modern JavaScript on your own. For more info see this issue.
Now we can create a WebGLRenderingContext
 var gl = canvas.getContext("webgl");
 if (!gl) {
    // no webgl for you!
    ...
Now we need to compile those shaders to put them on the GPU so first we need to get them into strings. You can create your GLSL strings any way you normally create strings in JavaScript: by concatenating, by using AJAX to download them, by using multiline template strings. Or in this case, by putting them in non-JavaScript typed script tags.
<script id="vertex-shader-2d" type="notjs">

  // an attribute will receive data from a buffer
  attribute vec4 a_position;

  // all shaders have a main function
  void main() {

    // gl_Position is a special variable a vertex shader
    // is responsible for setting
    gl_Position = a_position;
  }

</script>

<script id="fragment-shader-2d" type="notjs">

  // fragment shaders don't have a default precision so we need
  // to pick one. mediump is a good default
  precision mediump float;

  void main() {
    // gl_FragColor is a special variable a fragment shader
    // is responsible for setting
    gl_FragColor = vec4(1, 0, 0.5, 1); // return reddish-purple
  }

</script>
In fact, most 3D engines generate GLSL shaders on the fly using various types of templates, concatenation, etc. For the samples on this site though none of them are complex enough to need to generate GLSL at runtime.
Next we need a function that will create a shader, upload the GLSL source, and compile the shader. Note I haven't written any comments because it should be clear from the names of the functions what is happening.
function createShader(gl, type, source) {
  var shader = gl.createShader(type);
  gl.shaderSource(shader, source);
  gl.compileShader(shader);
  var success = gl.getShaderParameter(shader, gl.COMPILE_STATUS);
  if (success) {
    return shader;
  }

  console.log(gl.getShaderInfoLog(shader));
  gl.deleteShader(shader);
}
We can now call that function to create the 2 shaders
var vertexShaderSource = document.querySelector("#vertex-shader-2d").text;
var fragmentShaderSource = document.querySelector("#fragment-shader-2d").text;

var vertexShader = createShader(gl, gl.VERTEX_SHADER, vertexShaderSource);
var fragmentShader = createShader(gl, gl.FRAGMENT_SHADER, fragmentShaderSource);
We then need to link those 2 shaders into a program
function createProgram(gl, vertexShader, fragmentShader) {
  var program = gl.createProgram();
  gl.attachShader(program, vertexShader);
  gl.attachShader(program, fragmentShader);
  gl.linkProgram(program);
  var success = gl.getProgramParameter(program, gl.LINK_STATUS);
  if (success) {
    return program;
  }

  console.log(gl.getProgramInfoLog(program));
  gl.deleteProgram(program);
}
And call it
var program = createProgram(gl, vertexShader, fragmentShader);
Now that we've created a GLSL program on the GPU we need to supply data to it.
The majority of the WebGL API is about setting up state to supply data to our GLSL programs.
In this case our only input to our GLSL program is a_position which is an attribute.
The first thing we should do is look up the location of the attribute for the program
we just created
var positionAttributeLocation = gl.getAttribLocation(program, "a_position");
Looking up attribute locations (and uniform locations) is something you should do during initialization, not in your render loop.
Attributes get their data from buffers so we need to create a buffer
var positionBuffer = gl.createBuffer();
WebGL lets us manipulate many WebGL resources on global bind points. You can think of bind points as internal global variables inside WebGL. First you bind a resource to a bind point. Then, all other functions refer to the resource through the bind point. So, let's bind the position buffer.
gl.bindBuffer(gl.ARRAY_BUFFER, positionBuffer);
Now we can put data in that buffer by referencing it through the bind point
// three 2d points
var positions = [
  0, 0,
  0, 0.5,
  0.7, 0,
];
gl.bufferData(gl.ARRAY_BUFFER, new Float32Array(positions), gl.STATIC_DRAW);
There's a lot going on here. The first thing is we have positions which is a
JavaScript array. WebGL on the other hand needs strongly typed data so the part
new Float32Array(positions) creates a new array of 32bit floating point numbers
and copies the values from positions. gl.bufferData then copies that data to
the positionBuffer on the GPU. It's using the position buffer because we bound
it to the ARRAY_BUFFER bind point above.
The last argument, gl.STATIC_DRAW is a hint to WebGL about how we'll use the data.
WebGL can try to use that hint to optimize certain things. gl.STATIC_DRAW tells WebGL
we are not likely to change this data much.
The code up to this point is initialization code. Code that gets run once when we load the page. The code below this point is rendering code or code that should get executed each time we want to render/draw.
Before we draw we should resize the canvas to match its display size. Canvases just like Images have 2 sizes. The number of pixels actually in them and separately the size they are displayed. CSS determines the size the canvas is displayed. You should always set the size you want a canvas to be with CSS since it is far far more flexible than any other method.
To make the number of pixels in the canvas match the size it's displayed I'm using a helper function you can read about here.
In nearly all of these samples the canvas size is 400x300 pixels if the sample is run in its own window but stretches to fill the available space if it's inside an iframe like it is on this page. By letting CSS determine the size and then adjusting to match we easily handle both of these cases.
webglUtils.resizeCanvasToDisplaySize(gl.canvas);
We need to tell WebGL how to convert from the clip space
values we'll be setting gl_Position to back into pixels, often called screen space.
To do this we call gl.viewport and pass it the current size of the canvas.
gl.viewport(0, 0, gl.canvas.width, gl.canvas.height);
This tells WebGL the -1 +1 clip space maps to 0 <-> gl.canvas.width for x and 0 <-> gl.canvas.height
for y.
We clear the canvas. 0, 0, 0, 0 are red, green, blue, alpha respectively so in this case we're making the canvas transparent.
// Clear the canvas
gl.clearColor(0, 0, 0, 0);
gl.clear(gl.COLOR_BUFFER_BIT);
We tell WebGL which shader program to execute.
// Tell it to use our program (pair of shaders)
gl.useProgram(program);
Next we need to tell WebGL how to take data from the buffer we setup above and supply it to the attribute in the shader. First off we need to turn the attribute on
gl.enableVertexAttribArray(positionAttributeLocation);
Then we need to specify how to pull the data out
// Bind the position buffer.
gl.bindBuffer(gl.ARRAY_BUFFER, positionBuffer);

// Tell the attribute how to get data out of positionBuffer (ARRAY_BUFFER)
var size = 2;          // 2 components per iteration
var type = gl.FLOAT;   // the data is 32bit floats
var normalize = false; // don't normalize the data
var stride = 0;        // 0 = move forward size * sizeof(type) each iteration to get the next position
var offset = 0;        // start at the beginning of the buffer
gl.vertexAttribPointer(
    positionAttributeLocation, size, type, normalize, stride, offset)
A hidden part of gl.vertexAttribPointer is that it binds the current ARRAY_BUFFER
to the attribute. In other words now this attribute is bound to
positionBuffer. That means we're free to bind something else to the ARRAY_BUFFER bind point.
The attribute will continue to use positionBuffer.
note that from the point of view of our GLSL vertex shader the a_position attribute is a vec4
attribute vec4 a_position;
vec4 is a 4 float value. In JavaScript you could think of it something like
a_position = {x: 0, y: 0, z: 0, w: 0}. Above we set size = 2. Attributes
default to 0, 0, 0, 1 so this attribute will get its first 2 values (x and y)
from our buffer. The z, and w will be the default 0 and 1 respectively.
After all that we can finally ask WebGL to execute our GLSL program.
var primitiveType = gl.TRIANGLES;
var offset = 0;
var count = 3;
gl.drawArrays(primitiveType, offset, count);
Because the count is 3 this will execute our vertex shader 3 times. The first time a_position.x and a_position.y
in our vertex shader attribute will be set to the first 2 values from the positionBuffer.
The second time a_position.x and a_position.y will be set to the second 2 values. The last time they will be
set to the last 2 values.
Because we set primitiveType to gl.TRIANGLES, each time our vertex shader is run 3 times
WebGL will draw a triangle based on the 3 values we set gl_Position to. No matter what size
our canvas is those values are in clip space coordinates that go from -1 to 1 in each direction.
Because our vertex shader is simply copying our positionBuffer values to gl_Position the
triangle will be drawn at clip space coordinates
  0, 0,
  0, 0.5,
  0.7, 0,
Converting from clip space to screen space if the canvas size happened to be 400x300 we'd get something like this
 clip space      screen space
   0, 0       ->   200, 150
   0, 0.5     ->   200, 225
 0.7, 0       ->   340, 150
WebGL will now render that triangle. For every pixel it is about to draw WebGL will call our fragment shader.
Our fragment shader just sets gl_FragColor to 1, 0, 0.5, 1. Since the Canvas is an 8bit
per channel canvas that means WebGL is going to write the values [255, 0, 127, 255] into the canvas.
Here's a live version
In the case above you can see our vertex shader is doing nothing but passing on our position data directly. Since the position data is already in clip space there is no work to do. If you want 3D it's up to you to supply shaders that convert from 3D to clip space because WebGL is only a rasterization API.
You might be wondering why does the triangle start in the middle and go to toward the top right.
Clip space in x goes from -1 to +1. That means 0 is in the center and positive values will
be to the right of that.
As for why it's on the top, in clip space -1 is at the bottom and +1 is at the top. That means 0 is in the center and so positive numbers will be above the center.
For 2D stuff you would probably rather work in pixels than clip space so let's change the shader so we can supply the position in pixels and have it convert to clip space for us. Here's the new vertex shader
<script id="vertex-shader-2d" type="notjs">

-  attribute vec4 a_position;
*  attribute vec2 a_position;

+  uniform vec2 u_resolution;

  void main() {
+    // convert the position from pixels to 0.0 to 1.0
+    vec2 zeroToOne = a_position / u_resolution;
+
+    // convert from 0->1 to 0->2
+    vec2 zeroToTwo = zeroToOne * 2.0;
+
+    // convert from 0->2 to -1->+1 (clip space)
+    vec2 clipSpace = zeroToTwo - 1.0;
+
*    gl_Position = vec4(clipSpace, 0, 1);
  }

</script>
Some things to notice about the changes. We changed a_position to a vec2 since we're
only using x and y anyway. A vec2 is similar to a vec4 but only has x and y.
Next we added a uniform called u_resolution. To set that we need to look up its location.
var resolutionUniformLocation = gl.getUniformLocation(program, "u_resolution");
The rest should be clear from the comments. By setting u_resolution to the resolution
of our canvas the shader will now take the positions we put in positionBuffer supplied
in pixels coordinates and convert them to clip space.
Now we can change our position values from clip space to pixels. This time we're going to draw a rectangle made from 2 triangles, 3 points each.
var positions = [
*  10, 20,
*  80, 20,
*  10, 30,
*  10, 30,
*  80, 20,
*  80, 30,
];
gl.bufferData(gl.ARRAY_BUFFER, new Float32Array(positions), gl.STATIC_DRAW);
And after we set which program to use we can set the value for the uniform we created.
gl.useProgram is like gl.bindBuffer above in that it sets the current program. After
that all the gl.uniformXXX functions set uniforms on the current program.
gl.useProgram(program);

...

// set the resolution
gl.uniform2f(resolutionUniformLocation, gl.canvas.width, gl.canvas.height);
And of course to draw 2 triangles we need to have WebGL call our vertex shader 6 times
so we need to change the count to 6.
// draw
var primitiveType = gl.TRIANGLES;
var offset = 0;
*var count = 6;
gl.drawArrays(primitiveType, offset, count);
And here it is
Note: This example and all following examples use webgl-utils.js
which contains functions to compile and link the shaders. No reason to clutter the examples
with that boilerplate code.
Again you might notice the rectangle is near the bottom of that area. WebGL considers positive Y as up and negative Y as down. In clip space the bottom left corner -1,-1. We haven't changed any signs so with our current math 0, 0 becomes the bottom left corner. To get it to be the more traditional top left corner used for 2d graphics APIs we can just flip the clip space y coordinate.
* gl_Position = vec4(clipSpace * vec2(1, -1), 0, 1);
And now our rectangle is where we expect it.
Let's make the code that defines a rectangle into a function so we can call it for different sized rectangles. While we're at it we'll make the color settable.
First we make the fragment shader take a color uniform input.
<script id="fragment-shader-2d" type="notjs">
  precision mediump float;

+  uniform vec4 u_color;

  void main() {
*    gl_FragColor = u_color;
  }
</script>
And here's the new code that draws 50 rectangles in random places and random colors.
  var colorUniformLocation = gl.getUniformLocation(program, "u_color");
  ...

  // draw 50 random rectangles in random colors
  for (var ii = 0; ii < 50; ++ii) {
    // Setup a random rectangle
    // This will write to positionBuffer because
    // its the last thing we bound on the ARRAY_BUFFER
    // bind point
    setRectangle(
        gl, randomInt(300), randomInt(300), randomInt(300), randomInt(300));

    // Set a random color.
    gl.uniform4f(colorUniformLocation, Math.random(), Math.random(), Math.random(), 1);

    // Draw the rectangle.
    gl.drawArrays(gl.TRIANGLES, 0, 6);
  }
}

// Returns a random integer from 0 to range - 1.
function randomInt(range) {
  return Math.floor(Math.random() * range);
}

// Fills the buffer with the values that define a rectangle.
function setRectangle(gl, x, y, width, height) {
  var x1 = x;
  var x2 = x + width;
  var y1 = y;
  var y2 = y + height;

  // NOTE: gl.bufferData(gl.ARRAY_BUFFER, ...) will affect
  // whatever buffer is bound to the `ARRAY_BUFFER` bind point
  // but so far we only have one buffer. If we had more than one
  // buffer we'd want to bind that buffer to `ARRAY_BUFFER` first.

  gl.bufferData(gl.ARRAY_BUFFER, new Float32Array([
     x1, y1,
     x2, y1,
     x1, y2,
     x1, y2,
     x2, y1,
     x2, y2]), gl.STATIC_DRAW);
}
And here's the rectangles.
I hope you can see that WebGL is actually a pretty simple API. Okay, simple might be the wrong word. What it does is simple. It just executes 2 user supplied functions, a vertex shader and fragment shader and draws triangles, lines, or points. While it can get more complicated to do 3D that complication is added by you, the programmer, in the form of more complex shaders. The WebGL API itself is just a rasterizer and conceptually fairly simple.
We covered a small example that showed how to supply data in an attribute and 2 uniforms. It's common to have multiple attributes and many uniforms. Near the top of this article we also mentioned varyings and textures. Those will show up in subsequent lessons.
Before we move on I want to mention that for most applications updating
the data in a buffer like we did in setRectangle is not common. I used that
example because I thought it was easiest to explain since it shows pixel coordinates
as input and demonstrates doing a small amount of math in GLSL. It's not wrong, there
are plenty of cases where it's the right thing to do, but you should keep reading to find out
the more common way to position, orient and scale things in WebGL.
If you're new to web development or even if you're not please check out Setup and Installation for some tips on how to do WebGL development.
If you're 100% new to WebGL and have no idea what GLSL is or shaders or what the GPU does then checkout the basics of how WebGL really works. You might also want to take a look at this interactive state diagram for another way of understanding how WebGL works.
You should also, at least briefly read about the boilerplate code used here that is used in most of the examples. You should also at least skim how to draw multiple things to give you some idea of how more typical WebGL apps are structured because unfortunately nearly all the examples only draw one thing and so do not show that structure.
Otherwise from here you can go in 2 directions. If you are interested in image processing I'll show you how to do some 2D image processing. If you are interested in learning about translation, rotation and scale and eventually 3D then start here.
<script> tags default to having JavaScript in them.
You can put no type or you can put type="javascript" or
type="text/javascript" and the browser will interpret the
contents as JavaScript. If you put anything else for type the browser ignores the
contents of the script tag. In other words type="notjs"
or type="foobar" have no meaning as far as the browser
is concerned.
This makes the shaders easy to edit. Other alternatives include string concatenations like
  var shaderSource =
    "void main() {\n" +
    "  gl_FragColor = vec4(1,0,0,1);\n" +
    "}";
or we could load shaders with ajax requests but that is slow and asynchronous.
A more modern alternative would be to use multiline template literals.
  var shaderSource = `
    void main() {
      gl_FragColor = vec4(1,0,0,1);
    }
  `;
Multiline template literals work in all browsers that support WebGL. Unfortunately they don't work in really old browsers so if you care about supporting a fallback for those browsers you might not want to use multiline template literals or you might want to use a transpiler.
此内容由惯性聚合(RSS阅读器)自动聚合整理,仅供阅读参考。 原文来自 — 版权归原作者所有。