


I've been an Apple Watch owner for a couple of years now, and the ability to get a detailed report about diverse aspects of my health has always been its most interesting feature to me. However, having that data trapped in the Apple ecosystem is a bit of a bummer. I've always wanted to build my own Health Dashboard, like the one you can see on http://aprilzero.com/ and Gyroscope's, but custom made. The only issue blocking me was the lack of an API that could allow me to query the data that's been recorded by my watch. Moreover, it seems like I'm also far from being the only one in this situation. A lot of people on reddit or Apple support keep asking whether that API exists or not.
Well, good news if you're in this situation as well, I recently figured out a way to build a personal Apple Health API! In this article, I'm going to show you how, by using a combination of Apple Shortcuts and serverless functions, you can implement a way to transfer recorded Apple Watch health samples to a Fauna database and, in return, get a fully-fledged GraphQL API.
That same API is what is powering this little widget above, showcasing my recorded heart rate throughout the day. How cool is that? The chart will automatically refresh every now and then (I'm still finalizing this project) so if you're lucky, you might even catch a live update!
Back in 2016-2017, I built a "working" personal health API. I relied on a custom iOS app that would read my Apple Health data and run in the background to send the data.
This implementation, although pretty legitimate, had its flaws:
it needed a server running 24/7 to be available to receive the data and write it to the database. However, the data would only be pushed maybe twice to three times a day.
the iOS app I build with React Native was pretty limited. For example, Apple doesn't let you run specific actions within your app on a schedule. You have no real control over what your app will do while in the background. Additionally, the HealthKit package I was using was really limited and did not allow me to read most of the data entries I was interested in, and on top of that, the package was pretty much left unmaintained thus ending up breaking my app.
Today, though, we can address these 2 flaws pretty easily. For one, we can replace the server on the receiving end of the data with a serverless function. Moreover, instead of having to build a whole iOS app, we can simply build an Apple Shortcut which not only is way easier as it integrates well better with the ecosystem, it also allows us to run tasks on a schedule!
Thus, with these elements, I came out with the following plan that can allow us to build a Apple Health API powered with a shortcut and a serverless function:
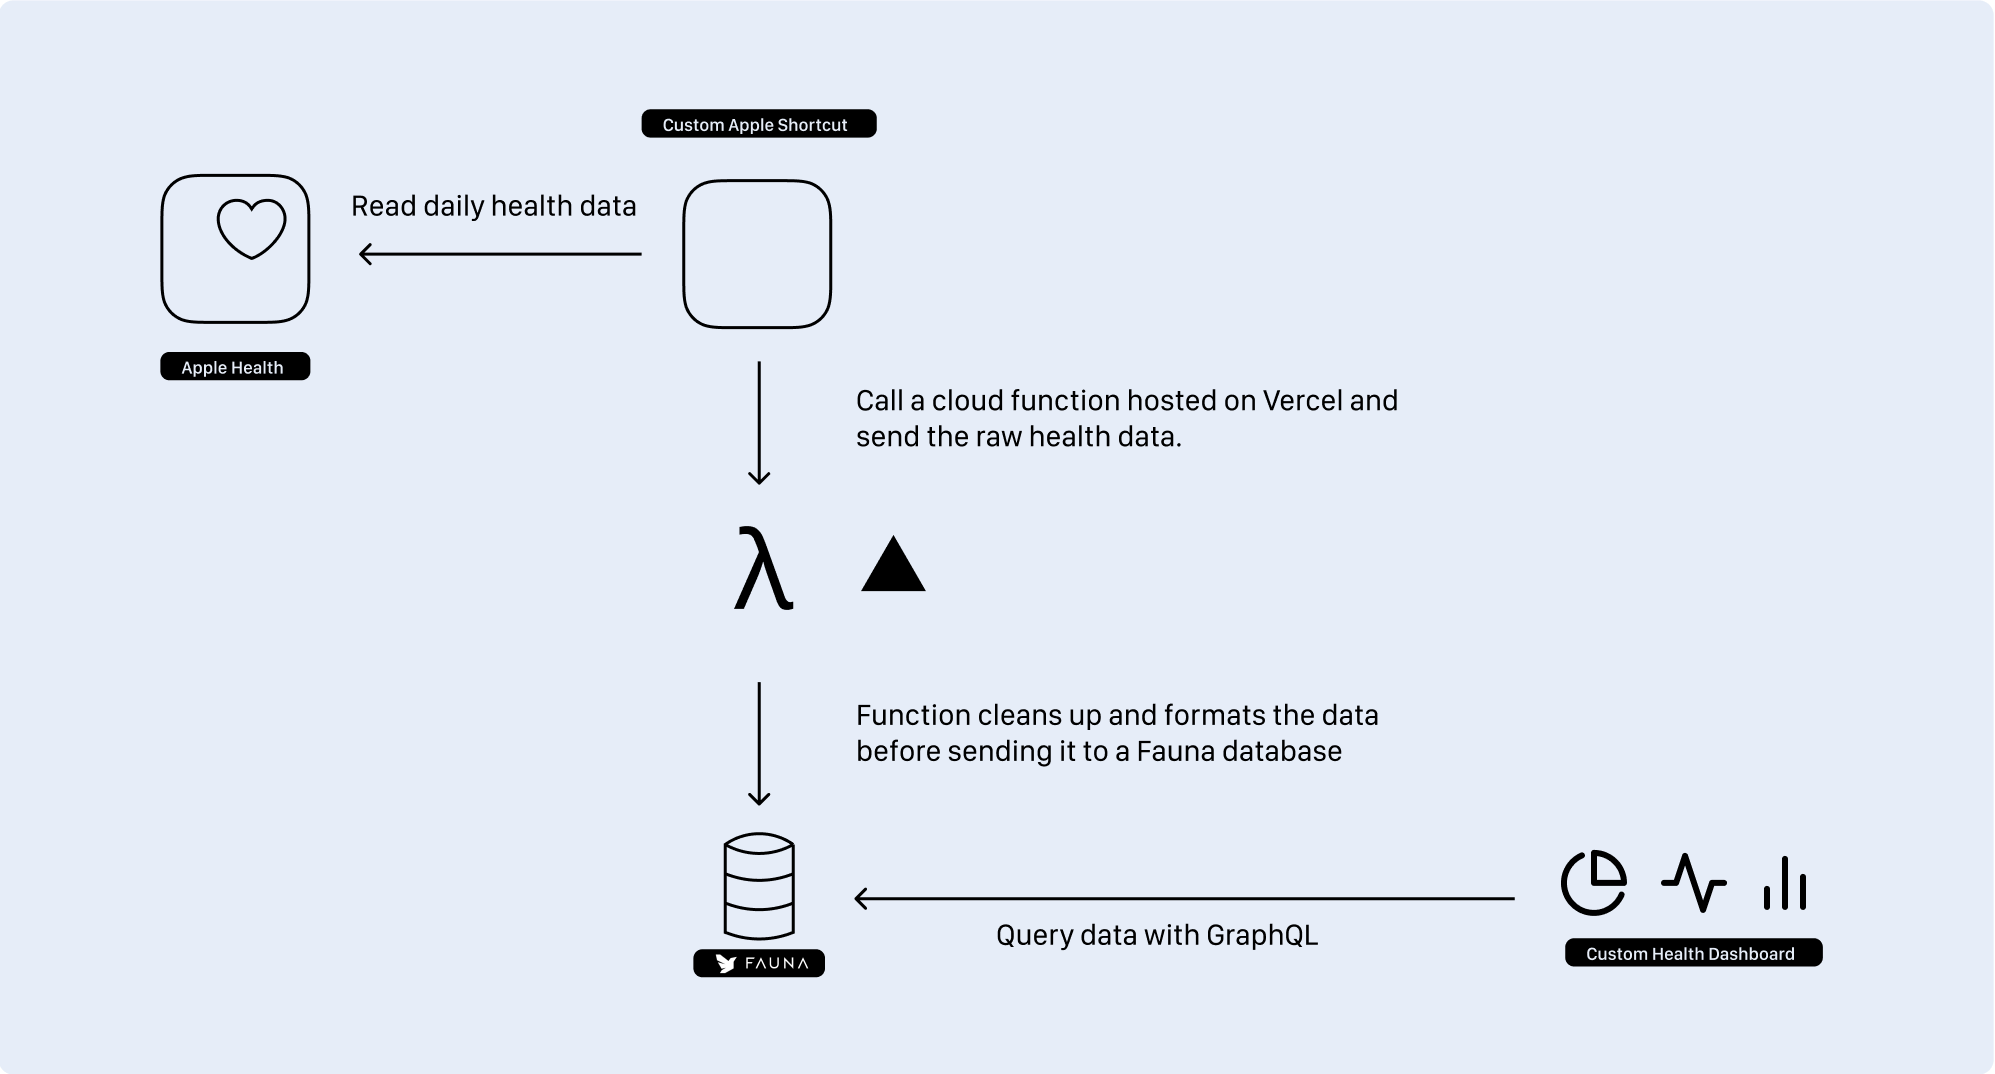
Here's the flow:
When running, our shortcut will read the daily measurements (heart rate, steps, blood oxygen, activity, ...), and send a POST request to the serverless function
The serverless function, hosted on Vercel, will receive that data, sanitize it, and then send a GraphQL mutation to FaunaDB (I'll get into why I chose FaunaDB later in the article)
On FaunaDB, we'll store each daily entry in its own document. If the entry doesn't exist, we'll create a document for it. If it does exist, we'll update the existing entry with the new data
Any client can query the database using GraphQL and get the health data.
Now that we've established a plan, let's execute it 🚀!
Shortcuts are at the core of our plan. The one we're going to build is the centerpiece that allows us to extract our health data out of the Apple ecosystem. As Apple Shortcuts can only be implemented in the Shortcuts app, and are purely visual, I'll share screenshots of each key steps, and describe them.
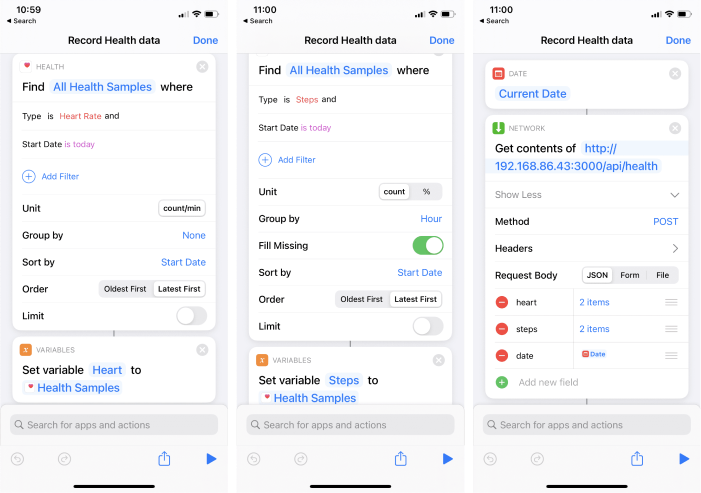
The first step consists of finding health samples of a given type. For this example, we'll get both the heart rate, and the number of steps (see the first two screenshots). You can see that the options available to you in the "Find Health Sample" action may vary depending on which metric you're trying to read, you can tune these at will, the ones showcased above are the options I wanted for my specific setup:
Heart Rate measurements are not grouped and are sorted by start date
Steps measurements are grouped by hour, I want to have an entry for hours where no steps are recorded, and I want it sorted by start date as well
You may also note that I set a variable for each sample. This is necessary to reference them in steps that are declared later in the shortcut.
In the second step, we get the current date (the one from the device, more on that later), and we trigger a request with the "Get Contents Of" action where we pass the URL where our serverless function lives, as well as the body of our POST request.
Regarding the body, we'll send an object of type JSON, with a date field containing the current date, a steps, and a heart field, both of type dictionary, that are respectively referencing the Steps and Heart variables that were declared earlier.
There's one issue here though: every health sample in the Shortcuts app is in text format separated by \n. Thus, I had to set the two fields in each dictionary as text and I couldn't find an efficient way to parse these samples within the shortcut itself. We'll have to rely on the serverless function in the next step to format that data in a more friendly way. In the meantime, here's a snapshot of the samples we're sending:
Example of payload sent by the shortcut
13
dates: '2020-11-01T16:12:06-05:00\n' +
14
'2020-11-01T15:59:40-05:00\n' +
15
'2020-11-01T15:56:56-05:00\n' +
16
'2020-11-01T15:56:49-05:00\n' +
17
'2020-11-01T15:56:46-05:00\n' +
18
'2020-11-01T15:56:38-05:00\n' +
19
'2020-11-01T15:56:36-05:00\n' +
20
'2020-11-01T15:56:31-05:00\n' +
21
'2020-11-01T15:56:26-05:00\n' +
22
'2020-11-01T15:56:20-05:00\n' +
25
count: '409\n5421\n70\n357\n82\n65\n1133\n3710\n0\n0\n12',
26
date: '2020-11-02T00:00:00-05:00\n' +
27
'2020-11-01T23:00:00-05:00\n' +
28
'2020-11-01T22:00:00-05:00\n' +
29
'2020-11-01T21:00:00-05:00\n' +
30
'2020-11-01T20:00:00-05:00\n' +
31
'2020-11-01T19:00:00-05:00\n' +
32
'2020-11-01T18:00:00-05:00\n' +
33
'2020-11-01T17:00:00-05:00\n' +
34
'2020-11-01T16:00:03-05:00\n' +
35
'2020-11-01T15:10:50-05:00\n' +
As mentioned in the first part, I used to run a very similar setup to get a working personal Apple Health API. However, running a server 24/7 to only receive data every few hours might not be the most efficient thing here.
If we look at the plan we've established earlier, we'll only run our Shortcuts a few times a day, and we don't have any requirements when it comes to response time. Thus, knowing this, we have a perfect use case for serverless functions!
Vercel is my service of choice when it comes to serverless functions. This is where I deployed my function for this side project, however, it should work the same on other similar services.
Our function will have 2 main tasks:
sanitize the data coming from the shortcut. Given the output of the shortcut that we looked at in the previous part, there's some cleanup to do
send the data to a database (that will be detailed in the next part)
Below is the code I wrote as an initial example in /api/health.js, that will sanitize the health data from the shortcut, and log all the entries. I added some comments in the code to detail some of the steps I wrote.
Serverless function handling and formatting the data coming from our shortcut
1
import { NowRequest, NowResponse } from '@now/node';
8
const formathealthSample = (entry: {
11
}): Array<{ value: number; timestamp: string }> => {
16
const { values, timestamps } = entry;
18
const formattedSample = values
22
.filter((item) => item !== '')
23
.map((item, index) => {
25
value: parseInt(item, 10),
26
timestamp: new Date(timestamps.split('\n')[index]).toISOString(),
30
return formattedSample;
38
const handler = async (
41
): Promise<NowResponse> => {
45
const { heart, steps, date: deviceDate } = req.body;
50
const formattedStepsData = formathealthSample(steps);
53
formattedStepsData.filter((item) => item.value !== 0).length
60
const formattedHeartData = formathealthSample(heart);
61
console.info(`Heart Rate: ${formattedHeartData.length} items`);
67
const today = new Date(`${deviceDate}T00:00:00.000Z`);
70
heartRate: formattedHeartData,
71
steps: formattedStepsData,
72
date: today.toISOString(),
79
return res.status(200).json({ response: 'OK' });
82
export default handler;
Then, we can run our function locally with yarn start, and trigger our Apple shortcut from our iOS device. Once the shortcut is done running, we should see the health entries that were recorded from your Apple Watch logged in our terminal 🎉!
Now that we have a basic serverless function that can read and format the data set from our shortcut, let's look at how we can save that data to a database.
In this part, we'll tackle storing the data, and building an API for any client app. Luckily for us, there are tons of services out there that can do just that, but the one I used in this case is called Fauna.
When building the first prototype of my Apple Health API I wanted to:
Have a hosted database. I did not want to have to manage a cluster with a custom instance of Postgres or MySQL or any other type of database.
Have something available in a matter of seconds,
Have a service with complete support for GraphQL so I did not have to build a series of API endpoints.
Have a database accessible directly from any client app. My idea was to be able to simply send GraphQL queries from a frontend app, directly to the database and get the data back.
Fauna was checking all the boxes for this project. My objective here was to privilege speed by keeping things as simple as possible and use something that would allow me to get what I want with as little code as possible (as a frontend engineer, I don't like to deal with backend services and databases too much 😅)
I didn't want to build a bunch of REST endpoints, thus why I picked GraphQL here. I've played with it in the past and I liked it. It's also pretty popular among Frontend engineers. If you want to learn more about it, here's a great link to help you get started
As advertised on their website, Fauna supports GraphQL out of the box. Well, sort of. You can indeed get pretty far by writing your GraphQL schema and uploading it to the Fauna Dashboard, but whenever you get into a slightly complex use case (which I did very quickly), you'll need to write custom functions using Fauna's custom query language called FQL.
Before jumping into the complex use cases, let's write the GraphQL schema that will describe how our Apple Health API will work:
GraphQL schema for our health data
18
heartRate: [ItemInput]
25
entryByDate(date: Time!): [Entry]
29
addEntry(entries: [EntryInput]): [Entry]
30
@resolver(name: "add_entry", paginated: false)
Let's look at some of the most important elements of this schema:
we are able to put each health sample for a given day in the same object called Entry, and query all entries
we are able to add one or several entries to the database, via a mutation. In this case, I declared the addEntry mutation with a custom resolver (I'll get to that part very soon).
each Entry would also have a date field representing the date of the entry. This would allow me to query by date with the entryByDate query.
each health sample would be of type Item containing a value and a timestamp field. This would allow my clients to draw time-based charts for a set of samples.
Now, the great thing with Fauna is that we simply have to upload this schema to their Dashboard, under the GraphQL section, and it will take care of creating the functions, indexes, and collections for us!
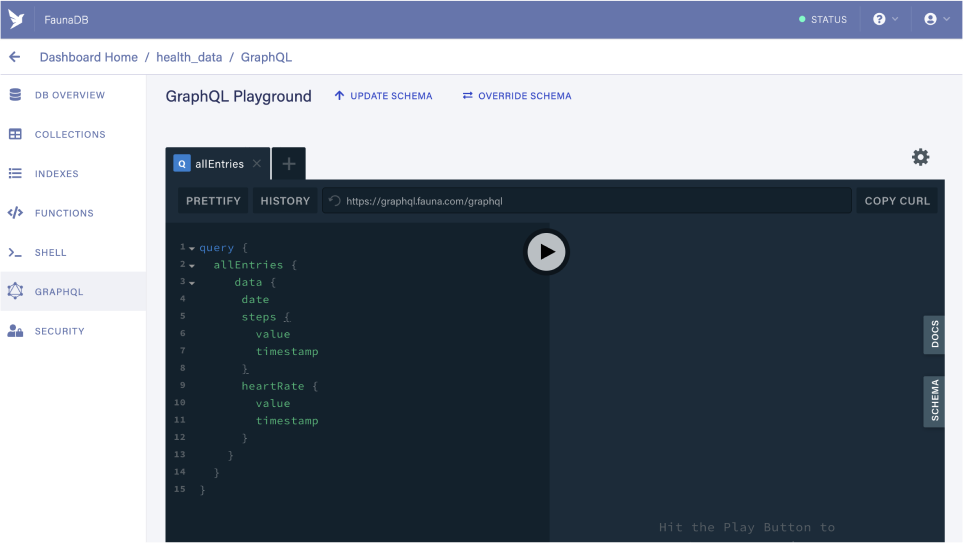
Once uploaded we can start querying data right away! We won't get anything back though, as our database is still empty, but we can still validate that everything works well. Below is an example query you can run, based on the schema we just uploaded:
In the schema above you can see that we used the @resolver directive next to our addEntry mutation.
2
addEntry(entries: [EntryInput]): [Entry]
3
@resolver(name: "add_entry", paginated: false)
This is because we're going to implement a custom function, or resolver, called add_entry for this mutation, directly into Fauna that will help us write our data into the database the exact way we want.
We don't want to create one entry in the database every time our shortcut runs, we want instead to create one entry per day and update that entry as the day goes by, thus we want our resolver to:
Create a new document in the Entry collection if an entry of the date specified in the mutation does not yet exist.
Update the document with a date matching the one specified in the mutation.
Implementing custom functions in FaunaDB requires us to use their custom FQL language. It took me a lot of digging through the FQL docs to make my add_entry function work, however, detailing the full implementation and how custom FQL functions work would deserve its own article (maybe my next article? Let me know if you'd like to learn more about that!). Instead, I'll give the following code snippet containing a commented version of my code which should help you understand most of the key elements:
Custom FQL resolver for our GraphQL mutation
14
IsEmpty(Match(Index('entryByDate'), Select('date', Var('X')))),
16
Create(Collection('Entry'), { data: Var('X') }),
25
Match(Index('entryByDate'), Select('date', Var('X')))
27
Lambda('X', Select('ref', Get(Var('X'))))
Now that we have our GraphQL schema defined, and our custom resolver implemented, there's one last thing we need to do: updating our serverless function.
We have to add a single mutation query to our function code to allow it to write the health data on Fauna. Before writing this last piece of code, however, there's a couple of things to do:
We need to generate a secret key on Fauna that will be used by our function to securely authenticate with our database. There's a step by step guide on how to do so in this dedicated documentation page about FaunaDB and Vercel. (you just need to look at step 3). Once you have the key, copy it and put it on the side, we'll need it in just a sec.
Install a GraphQL client for our serverless function. You can pretty much use any client you want here. On my end, I used graphql-request.
Once done, we can add the code to our function to
initiate our GraphQL client using the key we just generated
send a mutation request to our Fauna database which will write the health data we gathered from the shortcut.
Updated serverless function including the GraphQL mutation
1
import { NowRequest, NowResponse, NowRequestBody } from '@now/node';
2
import { GraphQLClient, gql } from 'graphql-request';
4
const URI = 'https://graphql.fauna.com/graphql';
9
const graphQLClient = new GraphQLClient(URI, {
11
authorization: `Bearer mysupersecretfaunakey`,
22
const handler = async (
25
): Promise<NowResponse> => {
29
heartRate: formattedHeartData,
30
steps: formattedStepsData,
31
date: today.toISOString(),
37
mutation ($entries: [EntryInput]) {
38
addEntry(entries: $entries) {
53
await graphQLClient.request(mutation, {
57
'Successfully transfered heart rate and steps data to database'
61
return res.status(500).json({ response: error.response.errors[0].message });
64
return res.status(200).json({ response: 'OK' });
67
export default handler;
The plan we established in the first part of this post is now fully implemented 🎉! We can now run the shortcut from our phone, and after a few seconds, we should see some data populated in our Entry collection on Fauna:
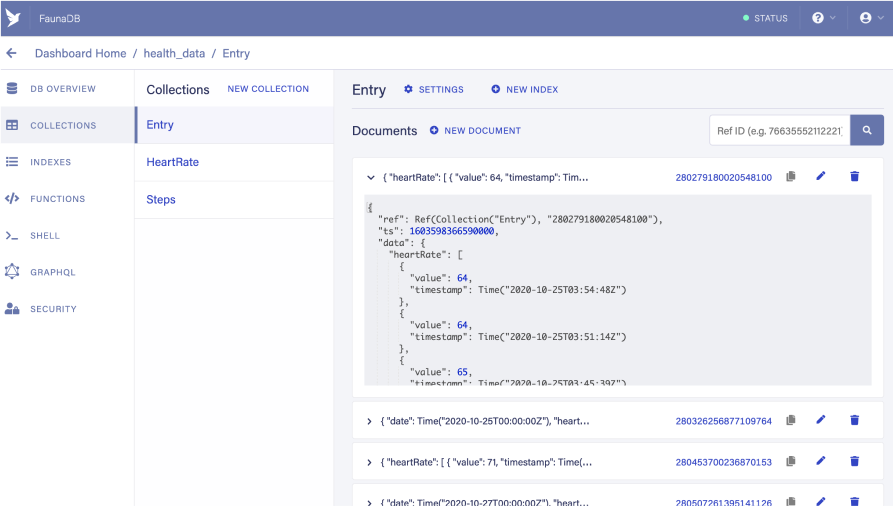
We now have a fully working pipeline to write our Apple Watch recorded health data to a database thanks to Shortcuts and serverless, and also a GraphQL API to read that data from any client we want!
Here are some of the next steps you can take a look at:
Deploying the serverless function to Vercel
Set the shortcut to run as an automation in the Shortcuts app. I set mine to run every 2 hours. This can be done through the Shortcuts app on iOS, in the Automation tab.
Add more health sample and extend the GraphQL schema!
Hack! You can now leverage that GraphQL API and build anything you want 🙌
I hope you liked this mini side-project, and hope it inspired you to build amazing things (and also that this article was not too dense 😅). I was quite impressed that this setup was made possible with just a few lines of code and amazing services like Vercel and Fauna. This is also my first time experimenting with Apple Shortcuts, I can't wait to find new use cases for them, and of course, share them with you all!
此内容由惯性聚合(RSS阅读器)自动聚合整理,仅供阅读参考。 原文来自 — 版权归原作者所有。