







When writing my first Three.js scene from start to finish in Building a Vaporwave scene with Three.js, I felt an immense sense of achievement. However, all I really did in this project was glue a couple of PNGs and maps I drew on Figma onto a plane and make the scene move. I'm being hard on myself here, I know 😅. At that point, I barely scratched the surface of the possibilities of creative coding on the web.
Around the same time, as I was looking for inspiration for my next Three.js challenge, I kept finding gorgeous 3D scenes like this one:
I had no clue how to build such dynamic meshes or make my geometries move, and my materials change colors. A few Google searches later: I got introduced to the concept of shaders that make scenes like the one above possible, and I wanted to know everything about them. However, shaders are incredibly difficult. Thus, I spent the past few weeks studying them, learned new techniques, created dozens of scenes from scratch, and hit as many roadblocks.
In this article, you'll find everything I learned about shaders during my experimentations, from how they work and use them with React Three Fiber to making them dynamic and interactive ✨. I included some of my own scenes/shaders as examples, as well as all the resources I used myself and tips on making your shaders composable and reusable.
Before jumping into the world of shaders and what they are, I want to introduce their use case. In Three.js and React Three Fiber, a 3D object is called a Mesh. And there's one thing you need to know and remember about meshes:
Mesh = Geometry + Material
The geometry is what defines the shape of the mesh.
The material defines how the object looks and also what gives it some specific properties like reflection, metalness, roughness, etc.
Basic definition of a React Three Fiber mesh
1
import { Canvas } from '@react-three/fiber';
2
import { useRef } from 'react';
9
<boxGeometry args={[1, 1, 1]} />
10
<meshBasicMaterial color={0xffffff} />
If you were to render the mesh defined by the React Three Fiber code above, you would see a white cube on your screen. That render is made possible by shaders.
Three.js, and by extension React Three Fiber, is an abstraction on top of WebGL that uses shaders as its main component to render things on the screen: the materials bundled inside Three.js itself are implemented with shaders. So, if you've been tinkering around with Three.js or React Three Fiber, you've already used shaders without knowing it 🤯!
These materials are pretty handy, but sometimes they are very limiting and put boundaries on our creativity. Defining your own material through shaders gives you absolute control over how your mesh looks within a scene. That is why a lot of creative developers decide to create their shaders from scratch!
A shader is a program, written in GLSL, that runs on the GPU. This program consists of two main functions that can output both 2D and 3D content:
Vertex Shader
Fragment Shader
You can pass both functions to your React Three Fiber mesh's material via a shaderMaterial to render your desired custom material.
Basic definition of a React Three Fiber mesh with shaderMaterial
1
import { Canvas } from '@react-three/fiber';
2
import { useRef } from 'react';
4
const fragmentShader = `...`;
5
const vertexShader = `...`;
12
<boxGeometry args={[1, 1, 1]} />
14
fragmentShader={fragmentShader}
15
vertexShader={vertexShader}
Why do we need to pass these two functions separately? Simply because each has a very distinct purpose. Let's take a closer look at what they are doing.
The role of the vertex shader is to position each vertex of a geometry. In simpler terms, this shader function allows you to programmatically alter the shape of your geometry and, potentially, "make things move".
The code snippet below showcases how the default vertex shader looks. In this case, this function runs for every vertex and sets a property called gl_Position that contains the x,y,z coordinates of a given vertex on the screen.
2
vec4 modelPosition = modelMatrix * vec4(position, 1.0);
3
vec4 viewPosition = viewMatrix * modelPosition;
4
vec4 projectedPosition = projectionMatrix * viewPosition;
6
gl_Position = projectedPosition;
For this first vertex shader example, I showcase how to edit the position of any vertex programmatically by changing their y coordinate and make it a function of the x coordinate. In this case, y = sin(x * 4.0) * 0.2 means that the "height" of our plane geometry follows a sine curve along the x-axis.
Once the GPU has run the vertex shader and placed all the vertices on the screen, i.e. when we have the overall "shape" of our geometry, and it can start processing the second function: the fragment shader.
The role of the Fragment Shader is to set the color of each visible pixel of a geometry. This function sets the color in RGBA format, which we're already familiar with thanks to CSS (The only difference is that the values range from 0 to 1 instead of 0 to 255: 1.0, 1.0, 1.0 is white and 0.0, 0.0, 0.0 is black).
Simple Fragment shader setting every pixel of the mesh to white
2
gl_FragColor = vec4(1.0, 1.0, 1.0, 1.0);
Using Fragment Shader feels a lot like painting with computer code. Many creative coders, such as the author of the Book Of Shaders, draw a lot of stunning effects only through fragment shaders applied to a plane, like paint on a canvas.
To demonstrate in a simple way how the fragment shader works, I built the little widget ✨ below that shows some simulated, low-resolution (16x16) examples of fragment shaders. Notice how the fragment shader function runs for each pixel and outputs an RGBA color.
6
float x = gl_FragCoord.x / 500.0;
9
gl_FragColor = vec4(color,1.0);
As for your first (real) fragment shader example, why not play with some gradients 🎨! The scene below features a plane geometry with a shader material set to render of pink and yellow colors. In this specific fragment shader, we use the mix function that's bundled in the GLSL language along the x-axis of our plane. The x coordinates go from 0 to 1, thus rendering a different color for each pixel along the x-axis, that color being a mix of pink and yellow.
You have to learn a whole new language: GLSL. It is always challenging, but in this case, doing some C adjacent coding can feel far from pleasant, especially when coming from Javascript 😮💨. My advise here: go read The Book Of Shaders!
If you're used to fixing Javascript using console.log, you are out of luck here: you can't log any values 😬. Debugging GLSL code is very tedious.
Finally, the worst of all the reasons: when your code doesn't compile, nothing renders. You just get a blank screen 😵.
All these downsides should not scare you away from learning shaders. Like when learning anything, it will take practice. Shaders will just require a bit more than usual. That's also the reason I'm writing this blog post: to give you some examples to put you on the right track!
So far, the shaders we saw are pretty static: we do not pass any external data, which is why we were only rendering some static colors and geometry. To make those dynamic, we need to add variables to our shaders and also be able to send data to the vertex and the fragment shader. This is where uniforms, varyings, and attributes come into the picture.
To pass data from your Javascript code into your shader, we need to use uniforms. A uniform acts as an input to both vertex and fragment shader. The information passed is read-only and the same for each pixel and vertex of your mesh, hence the name "uniform".
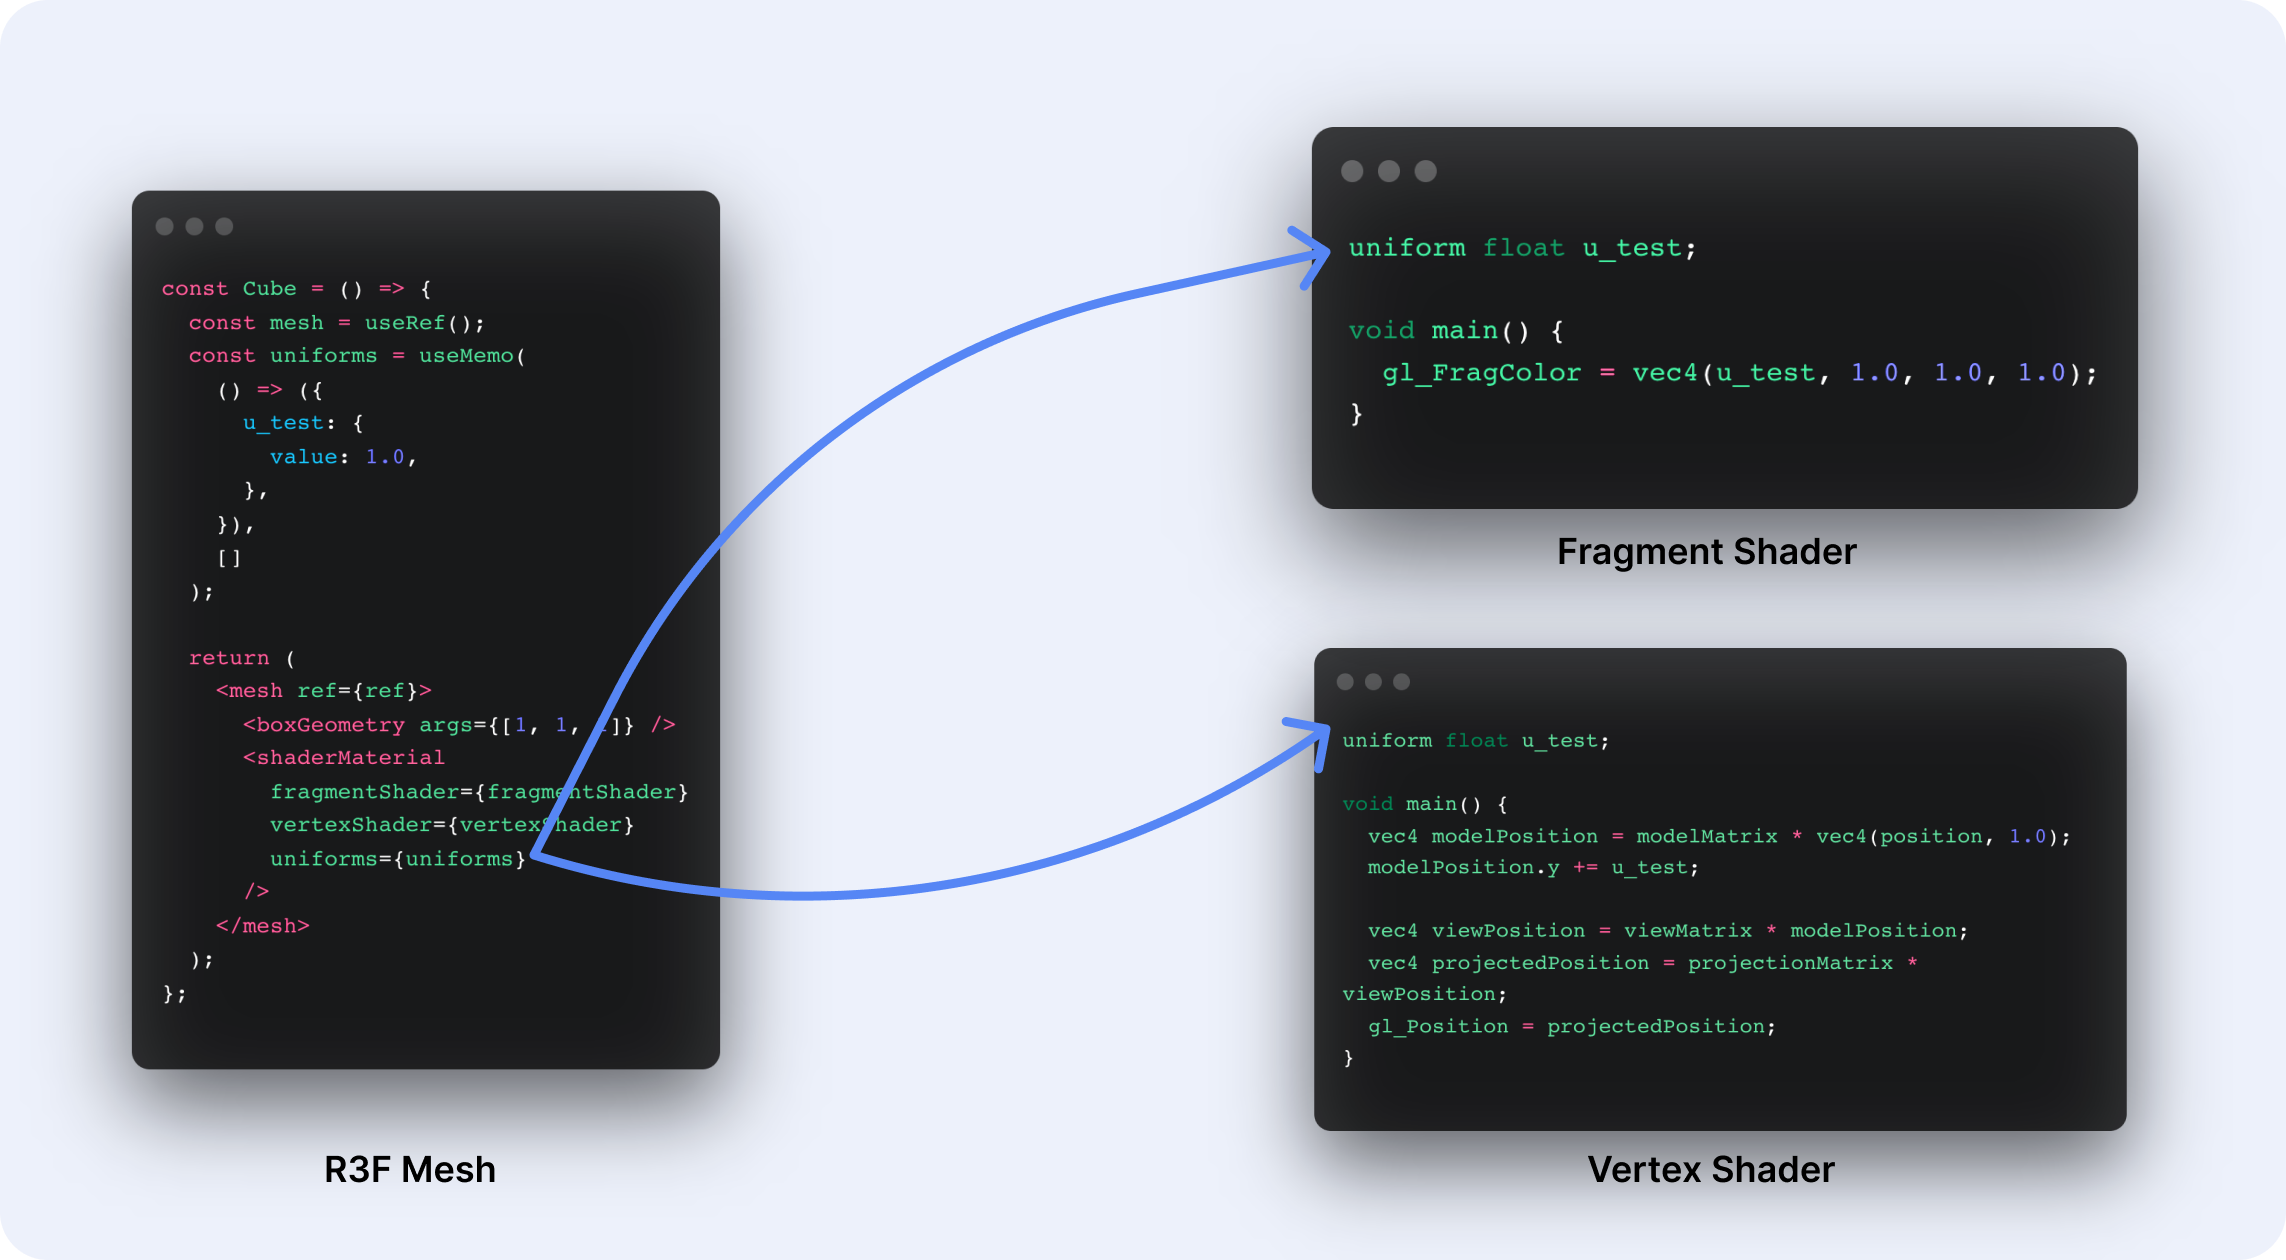
You can picture a uniform as a bridge between your JS code and your shader code:
Do you want to pass the x and y position of the mouse on the screen to your shader? That will be through a uniform.
Do you want to pass the number of milliseconds since the scene rendered? That will be through a uniform as well.
What about passing colors? Same: uniform!
To declare uniforms, we need to place them at the top of your shaders, preceded by the variable type: float vec2 mat3, etc.
Then we have to pass a uniforms object to our shaderMaterial through the uniforms prop as follows:
Example of passing a uniform to a shader
1
import { Canvas } from '@react-three/fiber';
2
import { useRef, useMemo } from 'react';
4
const fragmentShader = `
7
// Rest of fragment shader code
13
// Rest of vertex shader code
17
const mesh = useRef();
18
const uniforms = useMemo(
29
<boxGeometry args={[1, 1, 1]} />
31
fragmentShader={fragmentShader}
32
vertexShader={vertexShader}
By accessing the uniforms object through the ref of our mesh within the useFrame hook and updating any values within that object, we can obtain dynamic uniforms that change their value through time/each frame.
That is the technique featured below where the u_time uniform is continuously given the elapsed time since the scene rendered, thus changing its value on every frame and resulting in the shape moving:
We now know how to pass data from our React Three Fiber code to our shaders 🎉. But, what if we want to send information from one shader function to the other? Lucky us, we have varyings to do just that!
A varying is a variable that can be declared and set in the vertex shader to be read by the fragment shader.
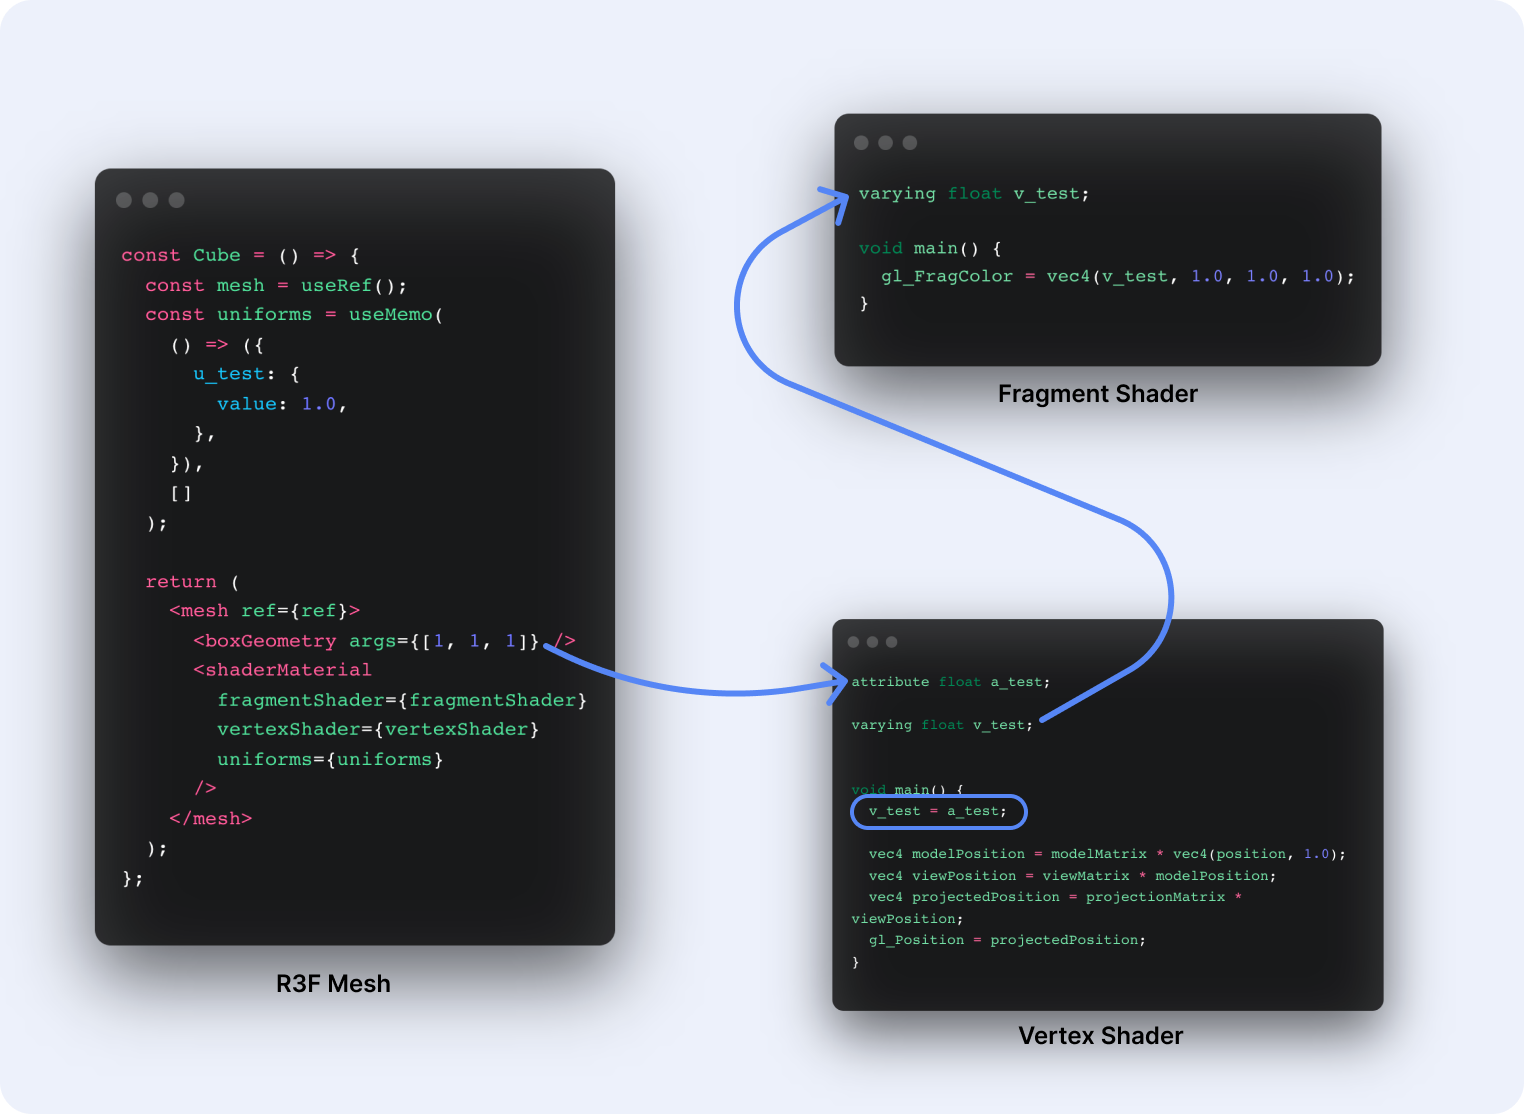
In a nutshell, with varyings, we can "link" how we set the color of a given pixel based on the position of a vertex of the geometry. They are handy to pass attribute data to the fragment shader since, as we saw earlier, we can't pass attributes directly to the fragment shader. One way to do that is to:
Declare a varying in the vertex shader.
Assign the attribute to that varying variable.
Read the varying in the fragment shader.
Using varying to send the value of an attribute to the fragment shader
17
gl_FragColor = vec4(v_test, 0.0, 1.0, 1.0);
In my own shader work, I use varyings to send my mesh's UV coordinates to my fragment shaders, especially when drawing shaders onto a plane. It allows me to simplify and normalize the coordinate system of my fragment shader. I've seen many fellow Three.js / React Three Fiber developers do so on their own shader work, and it's been working well for me. We're going to use this technique in our scenes going forward.
In the code sandbox below we can see an example of such a technique:
assign the UV coordinates in a varying in the vertex shader
retrieve the UV coordinates back in the fragment shader.
use the mix function against the x-axis of the vUv vector.
The result is this horizontal gradient going from pink to yellow:
When using both uniforms and varyings within a shader, we can start seeing some magic happen 🪄. The code sandbox below showcases the implementation of the scene used as a teaser in the introduction:
We use a combination of the useFrame hook from React Three Fiber and uniforms to pass the number of elapsed milliseconds since we rendered the scene.
We apply a function to make the y coordinate of a given vertex depend on the u_time uniform and the x/z coordinates: the plane wobbles.
We pass the y coordinate as a varying to the fragment shader and colorize each pixel based on the value of y: higher points are pink, lower points are more yellow.
In this part, we'll look at two examples of interactive React Three Fiber scenes with shaders that combine everything we've seen in the previous parts. But first, before we deep dive into those…
I'm going to give you the one trick every creator developer uses to create those beautiful scenes with gradients, organic textures, clouds, and landscapes: noise.
Sometimes you want to create a shader that is:
dynamic: it evolves through time
random: it is not repetitive
One could use an equivalent of Math.random() in GLSL on every pixel or vertices, but that would not yield an appealing result. What we want is organic randomness, which is exactly what noise functions enable us to get!
In the upcoming code sandboxes, we'll use only two types of noise:
Perlin noise
Simplex noise
The full code for both noise functions will be featured in the code snippets (this was the only way I could make those work in Sandpack), it's long and very hard to follow but that's expected! You do not need to understand those functions. Most developers don't. In a normal setup, I'd recommend using the glsl-noise package and simply import the functions you need.
The first shader we'll look at, named Blob, is a bit of a classic. It's an icosahedronGeometry with the detail property (second argument) tuned to a high value to appear like a sphere.
A 3D sphere using a icosahedron geometry
1
const fragmentShader = `...`;
2
const vertexShader = `...`;
9
<icosahedronGeometry args={[2, 20]} />
11
fragmentShader={fragmentShader}
12
vertexShader={vertexShader}
We apply a ShaderMaterial to this geometry with a custom shader:
We use Perlin noise to "displace" vertices in the vertex shader.
We use a u_time uniform to make the organic randomness evolve through time.
The displacement value for each vertex is set as a varying to be sent to the fragment shader.
In the fragment shader, we set the color based on the value of that displacement varying, thus creating an organic-looking colored sphere.
We also add a bit of interactivity to this scene:
We use a u_intensity uniform that sets the "amplitude" of our noise.
We add hover listeners to increase the intensity of the noise when we hover the mesh.
We lerp between the base value of our u_intensity uniform and its final value, when hovered, to ease the transition between these two values in the useFrame hook.
Pretty right? ✨
By combining uniforms, varyings, noise, and some hover effects, we created a pretty advanced shader for this scene that is both dynamic and interactive.
For this second shader, I wanted to emphasize the "painting" aspect of shaders. When I feel like experimenting, I like to keep my geometries simple: I use a planeGeometry like I'd use an actual canvas to paint.
In this shader:
We do not touch anything in the vertex shader besides sending the UV coordinates as a varying to the fragment shader.
We use the UV coordinates, the u_mouse and u_time uniforms as arguments for our Simplex noise. Instead of a hover effect like in the previous example, we directly send the cursor coordinates to the fragment shader!
We use the mix function with color uniforms and our noise and assign the result to a color variable several times to create a random gradient.
The result is a dynamic gradient that changes when our cursor moves over the scene ✨:
Throughout this article, we built our shaders from scratch on top of the shaderMaterial material bundled in React Three Fiber. While it gives us almost unlimited possibilities, it also strips away a lot of work already done in some other materials.
meshPhysicalMaterial, for example, comes with props that allow us to tweak the reflectivity and interact with lights on a scene. However, if we want to get that effect along a custom shader, we're out of luck: we would have to reimplement the reflectivity and other physical properties of the material from scratch!
It is possible to do just that, but for many developers getting started with shaders, including me, this feels out of reach at this stage. This is where Lamina comes into the picture 🍰.
lamina lets you create materials with a declarative, system of layers. Layers make it incredibly easy to stack and blend effects. This approach was first made popular by the Spline Team.
With Lamina, you can not only stack their pre-build layers (like Depth, Fresnel, or Displace) on top of existing material, but it also lets you declare your own custom layers (doc). And guess what? Those custom layers can be built using shaders!
Sample code for a Lamnina custom layer and layered material
1
import { Canvas, extend } from '@react-three/fiber';
2
import { LayerMaterial, Depth } from 'lamina';
3
import { Abstract } from 'lamina/vanilla';
4
import { useRef } from 'react';
6
class CustomLayer extends Abstract {
8
static u_colorA = 'blue';
9
static u_colorB = 'pink';
12
static vertexShader = `...`;
13
static fragmentShader = `...`;
23
extend({ CustomLayer });
26
const mesh = useRef();
30
<boxGeometry args={[1, 1, 1]} />
33
<CustomLayer colorA="pink" colorB="orange" />
34
<Depth colorA="purple" colorB="red" />
The result of that custom layer is a reusable and composable shader. Notice how the uniforms are automatically made available as props of the layer: our shader layer is easier to use and read ✨.
Excerpt of the layered material
6
<CustomLayer colorA="pink" colorB="orange" />
Using a combination of custom shaders in Lamina can yield incredible results ✨. One such example is the Planet scene I created while learning shaders:
I used Fractal Brownian Motion, a concept I learned about in the dedicated chapter of The Book Of Shaders. This noise type can be changed more granularly and produce results that feel more organic, akin to clouds or mountains.
I created a custom Lamina layer based on this shader.
I used this custom layer on top of a meshLambertMaterial: this material can interact with light.
Finally, I also used a Fresnel layer to add that "light pink atmospheric effect" at the edge of the mesh 🍒.
I provided the full implementation of this final example right below 👇, ready to be tweaked/forked:
Absolutely stunning result isn't it? 🪄
I hope this blog post gave you the little push you needed if you ever were on the fence about exploring shaders!
There are a lot more aspects of shaders to cover, but this article sums up what I focused on while learning them. At this point, you have all the knowledge and techniques I gathered after spending several weeks working hard on many different shader scenes. From the fundamentals of shaders to building composable layers to use in your next creation, you now have all the tools to start experimenting on your own 🎉.
If you are looking for a productive "next step" from this blog post, I would really encourage you to read The Book Of Shaders (I know, this is perhaps the third time I'm mentioning this website), go through all the examples, and even attempt to recreate some of the scene featured in the gallery. Or you can check out my creations and challenge yourself to reproduce them as closely as possible on your own 😄.
此内容由惯性聚合(RSS阅读器)自动聚合整理,仅供阅读参考。 原文来自 — 版权归原作者所有。