


For the past few months, I've taken, once again, the endeavor of learning how to build native iOS apps (it was my 3rd attempt, I've given up twice in the past). However, this time was different. Apple has been promoting SwiftUI for over a year to develop apps across its entire platform. From the iPhone to the Mac: one single framework. Not only the cross-platform aspect was interesting for me, but what stroke me the most when I got my first glance at SwiftUI was how familiar it looked to me, as someone who's been working with React and Typescript for several years now.
Indeed, having experience working with "Reactive" libraries/frameworks and types speed up my learning quite significantly. My first SwiftUI code felt oddly familiar to things I've built in the past in React and, I could see a lot of overlap in design patterns. Now that I started developing an app on my own, I wanted to share some of these common design patterns and little differences between SwiftUI and React that I keep encountering with the hope that this will inspire other React developer out there to get started with SwiftUI as well! 🚀
Before jumping into the core of the subject, I'd like to dedicate this first part to look at the key elements that compose a SwiftUI view. Not only knowing what property wrappers, view and, view modifiers are and the difference between them is essential to get started with SwiftUI, it will also be necessary for some of the things I'm going to talk about in this article. In the diagram below, you can see a code snippet featuring a basic SwiftUI view with a view modifier and a property wrapper. I annotated the elements to help you identify them, and also so you can come back later to it if you need a refresher 😊!
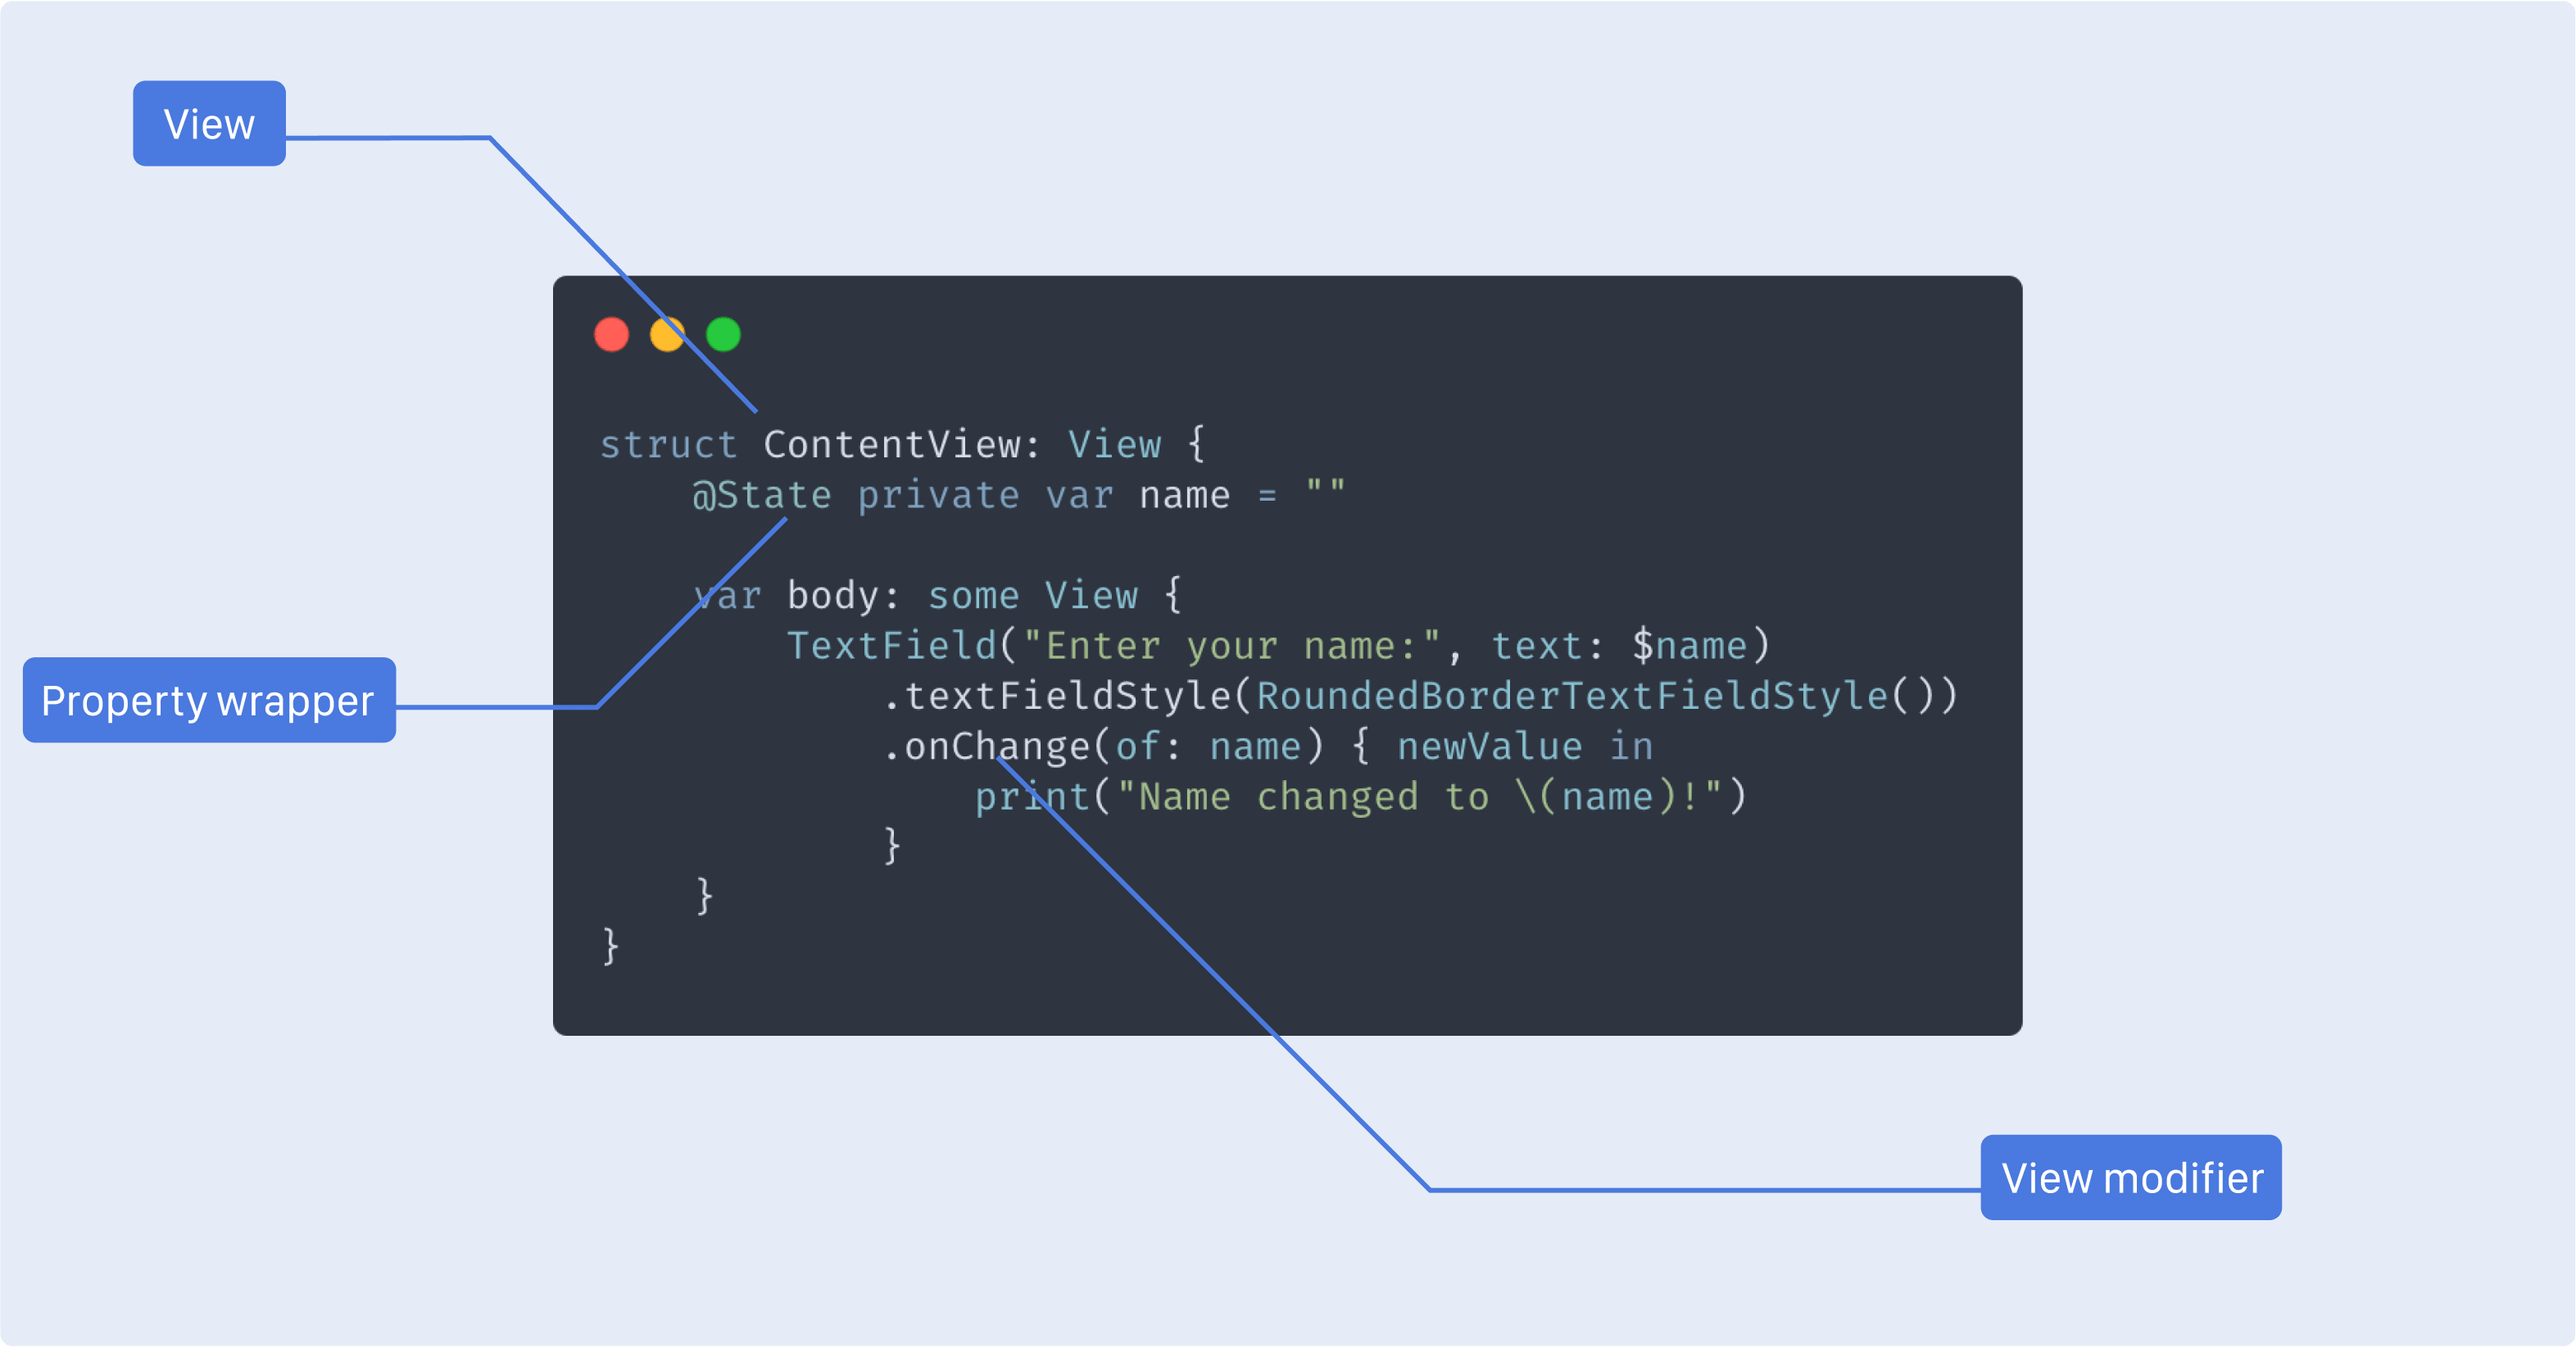
This is the protocol or type that represents anything dealing with the user interface. They are to SwiftUI what components are to React if you will.
Below, you'll find two code snippets, the first one featuring a valid SwiftUI view and the second one showcasing some examples of invalid SwiftUI views:
A valid SwiftUI view using the VStack and Text primitive views
1
struct ContentView: View {
Example of invalid SwiftUI views
1
struct ContentView: View {
8
struct ContentView: View {
14
struct ContentView: View {
15
return Text("Hello World")
As stated in the previous part, SwiftUI provides a set of primitive views, like a mini UI library. These views act as the building blocks for any app. However, you may want to change the styles, or the behavior of certain views, i.e. "modify" them. That is pretty much what view modifiers are all about. Additionally, they are easy to use, the only thing to do to add a mofifier to a view is to add it after the closing bracket of the view you want to modify. In the diagram above, .textFieldStyle and .onChange are modifiers
Some basic modifiers include: .font(), .backgroundColor(), or .padding() that can change the look and feel of a view. Other modifiers, however, can help to tune the functionalities or behavior of a component, like .onChange() or, .onAppear(). And yes, if the last two modifiers I just mentioned resonated with your React developer senses, you're not alone! We'll see in the last part of this post how these modifiers can map to some of the use cases of the useEffect hook in React.
This is perhaps my favorite feature set of SwiftUI. We saw above that SwiftUI views are structs, and structs in this context are by definition immutable and so are the properties that we may pass to them.
In the diagram above, you can see that I labeled the @State in @State private var name as a property wrapper. This @State property wrapper will notify SwiftUI to recreate the view whenever the property name changes. As a React developer, this sounds oddly familiar again right? SwiftUI features the same kind of re-rendering mechanism that we're already familiar with!
Now that we have defined the key elements that compose a SwiftUI view, let's deep dive together into some more concrete examples and comparisons with React.
As a React developer, you might have had a few "aha moments" reading the few definitions and the code snippets above. Now let's look at several more detailed design patterns of SwiftUI views that overlap with React components:
Passing properties to a view is as easy as we're used to doing it in React! The only major difference here is that given that SwiftUI views are structs and not functions unlike React, it might feel a bit weird at first to declare the properties of our view inside the view itself:
Passing props to a SwiftUI view
5
Text("Hello, \(text)!")
9
struct ContentView: View {
Another element that can feel pretty familiar is that you can pass one or multiple views as properties of a view, the same way you can pass children to React components! The trick here though is that, unlike React children, you can't declare these children views the same way you declare other properties:
Passing a view as a property
1
struct ViewWrapperWithTitle<Content: View>: View {
12
struct ContentView: View {
14
ViewWrapperWithTitle(content: Text("Some content"))
Like components, views have the advantage of being composable. Breaking complex views into smaller ones is as much of good practice in SwiftUI as it has been for us with React.
Example of view composition in SwiftUI
7
.foregroundColor(.white)
8
.background(Color.blue)
13
struct ContentView: View {
17
Label(labelText: "JS")
18
Label(labelText: "Swift")
19
Label(labelText: "Typescript")
When working with React, we've been used to think of components only being able to propagate a property from the parent to the children, i.e. one-way binding. For a child component to update the state of its parent, we have to get around the one-way binding limitation by passing callback function as props. When called, these callbacks will update the parent state and thus propagate that new state to the children. We've perhaps done this a thousand times in our web apps and it now feels pretty natural for us to think of data flow this way.
Example of callback functions as props in React
1
import React from 'react';
3
const CustomInput = (props) => {
4
const { value, onChange } = props;
7
<input id="customInput" value={value} onChange={(event) => onChange(event.target.value)}/>
12
const [value, setValue] = React.useState("")
15
<CustomInput value={value}, onChange={(newValue) => setValue(newValue)}/>
We saw earlier that SwiftUI can do one-way binding just like React through properties. Well, SwiftUI can also do two-way binding thanks to a property wrapper: @Bindings!
Example of a bound property in SwiftUI
1
struct ShowRectangle: View {
2
@Binding var isShown: Bool
5
Button(isShown ? "Rectangle is Visible!" : "Show Rectangle (using Binding)") {
6
self.isShown = !isShown
11
struct ContentView: View {
12
@State private var enabled = false
16
ShowRectangle(isShown: self.$enabled)
18
Rectangle().fill(Color.blue).frame(width: 300, height: 300)
By declaring a isShown binding in our view in the example above, we make it accept a isShown prop that can be updated by the view itself, and also propagate that change to the parent view! The only thing to keep in mind is that isShown needs to be passed as a bound variable, i.e. simply prefixing it by $.
If instead of @Binding we were to use a simple state, we wouldn't be able to reflect the state of our Button in the parent component. We can see this in the video below, clicking on the second button that doesn't use the @Binding property wrapper, does not update the state of the parent view, but clicking on the first one which uses @Binding does:
We just saw our first use case for a property wrapper in a SwiftUI view with @Bindings. Another very useful property wrapper that definitely speaks to many React developers is @State.
We saw an example of the use of @State in the first part, but I want to use this part to give a bit more details about what it does, and also what it can't do.
When declaring a variable with a @State property wrapper, we're telling SwiftUI to "watch" this variable and to "re-render" the user interface on any change.
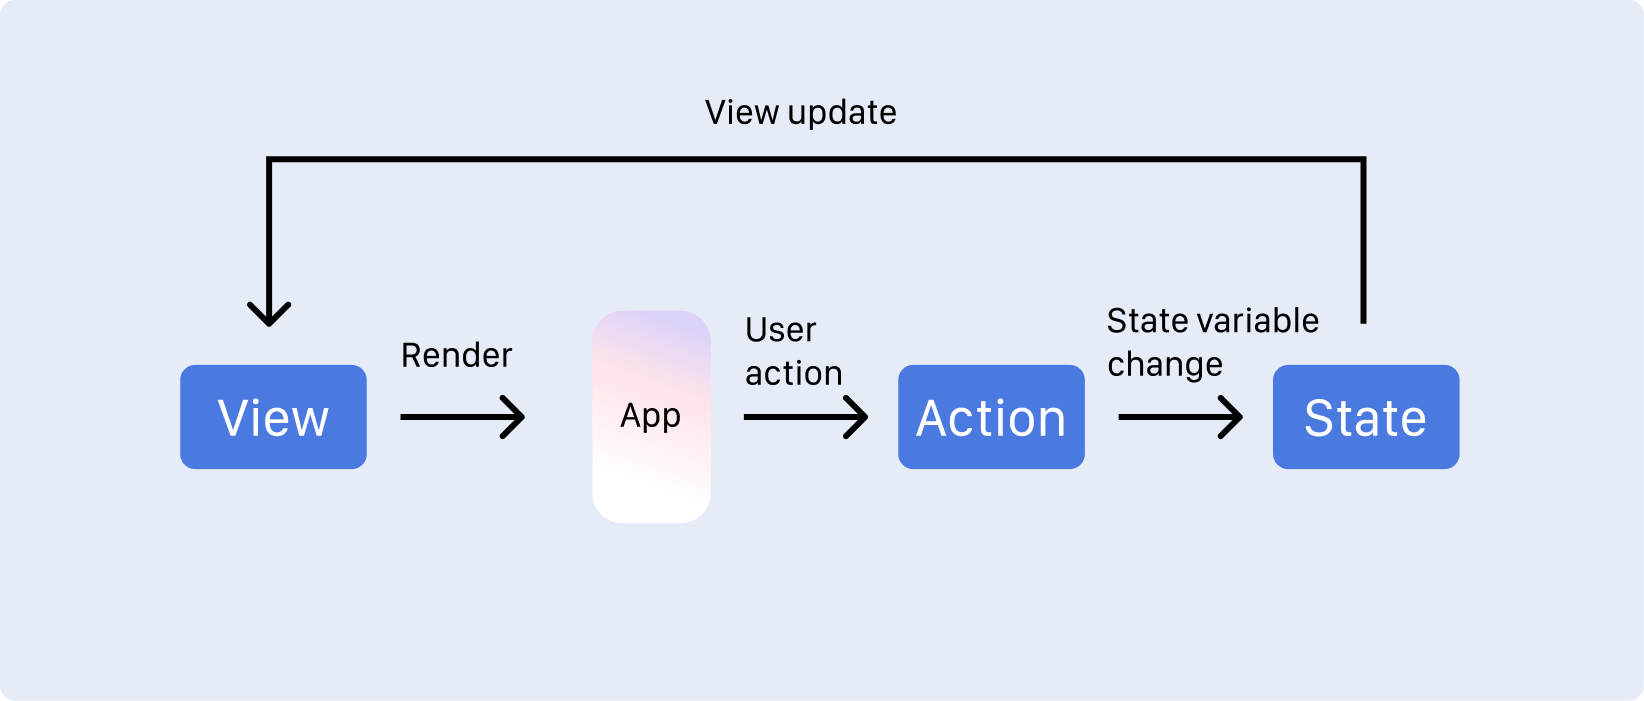
This is very similar to using the kind of re-rendering flow we're used to with React, and when comparing a similar feature, the code between SwiftUI and React looks extremely familiar:
Basic state management in React unsing the useState hook
1
import React from 'react';
4
const [enabled, setEnabled] = React.useState(false);
8
<p>{enabled ? 'Enabled!' : 'Not enabled.'}</p>
9
<Button onClick={() => setEnabled((prevState) => !prevState)}>
Basic state management in SwiftUI unsing the @State property wrapper
1
struct ContentView: View {
2
@State private var enabled = false
6
Text(enabled ? "Enabled!": "Not enabled.")
However, unlike React, where your state can technically take pretty complex objects, @State is only limited to simple values, like string, number, or booleans. Using @State for a class for example won't work the same way:
Code Snippet of the example featured above:
2
var username = "@MaximeHeckel"
5
struct ContentView: View {
6
@State private var user = User()
7
@State private var username = "@MaximeHeckel"
11
Text("User here is a class, the text above does not change when we edit the content of the text field :(").padding()
14
Text("Your Twitter username is \(user.username).")
15
TextField("Twitter username", text: $user.username)
18
Text("Here it works because we use a basic string in a @State property wrapper").padding()
21
Text("Your Twitter username is \(username).")
22
TextField("Twitter username", text: $username)
Other property wrappers exist to fix this behavior, however, I'll write about these more complex use-cases in an upcoming blog post entirely dedicated to state management in SwiftUI. This one is only meant to cover the basics to get you started! If in the meantime, you're curious to know why @State doesn't work of classes, you can check this article from Paul Hudson on Hacking With Swift which covers this subject.
Finally, let's talk about side effects. Despite being a very complex piece of React, we've all used the useEffect hook at some point. Whether it's to set a state after an API call or execute a function when a dependency is updated, useEffect is a key part in every recent React app.
SwiftUI on the other hand, doesn't have an umbrella functionality to manage side effects. It has distinct modifiers that each cover some specific use-cases that React developers would cover using useEffect.
Below is an example of a component and a view triggering functions on mount and unmount in both React and SwiftUI:
Component using the useEffect hook in React to trigger functions on mount and unmount
1
import React from 'react';
4
React.useEffect(() => {
8
console.log('goodbye');
View using .appear and .disappear modifier in SwiftUI to trigger functions on mount and unmount
1
struct ContentView : View {
There are plenty of modifiers available to developers to handle these side effects in SwiftUI. The .onChange modifier will let you trigger some functions whenever a variable of your choosing changes. The .onReceive modifier can be used for timers or to detect whether the app is going to the background or foreground. Sadly, there are too many to cover them all in this post. I'll make sure to mention any interesting ones in future articles dedicated to SwiftUI.
The striking resemblance of some of the key design patterns of React and SwiftUI really helped me to quickly get started with native iOS development. I was personally really pleased to see that I could port all the knowledge I've accumulated over the years while building web apps to develop native iOS apps. Obviously, not everything is that easy, there are a lot of other things that can be counter-intuitive in SwiftUI, but getting started and building a simple app is definitely feasible for anyone with some React experience.
Hopefully, that this article will inspire you to get started as well! The SwiftUI community has been growing quite significantly in the last few months. I've seen many designers and frontend developers jumping onboard and showcasing some pretty impressive work in a short amount of time. I'm actually currently developing my first app myself and sharing the ongoing work and some useful code snippets on Twitter, follow me if you want to see my progress I'm making on this project! I also hope to see your future iOS app on my timeline or even on the App Store in the near future, and to hear more about your SwiftUI experience 😊!
此内容由惯性聚合(RSS阅读器)自动聚合整理,仅供阅读参考。 原文来自 — 版权归原作者所有。