


What a better way to start 2021 than reflecting on one of my main goals for 2020: learning SwiftUI and building my first app.
While I was, and still am, just a beginner in the iOS development world, I felt that the best way to learn would be to build an app from scratch. I had this idea of a simple yet beautiful weather app, which seemed pretty straightforward to build. However, a lot of things didn't go as planned 😅. Whether it was lack of planning, too high expectations, or just the developer experience itself, the closer I was getting to finishing this project, the less confident I became about my app being worth releasing on the App Store. So we can call this project a failure if you want, but I'm nonetheless still pretty proud of what I ended up building!
Thus I felt a lookback at this whole experience would be an interesting topic for a blog post. Let's take a look at my first SwiftUI app, what I built, some of the challenges I faced that made me learn a lot, and why I failed to finalize this project.

I built Sunshine, my weather app, during the Summer and Fall of 2020. If you're following me on Twitter, you might have seen quite a few screenshots, video recordings showcasing how the app evolved throughout its development. For those who did not get the chance to see them, here is a little screen recording for you, showcasing what I built:
My goal was to build a simple and beautiful weather app, with "home-made" assets that would animate on the screen based on the weather at a given location.
What makes it unique compared to other apps was the asset I built (sun, clouds, rain), the focus on the UX, and the little animations sprinkled across the interface. Although challenging, I tried to stand by these principles from the prototyping phase and throughout the development of this app.
The app has three main screens, each of them having a simple role yet featuring little details for a polished look:
The main screen features the name of the location, the date, and one of the most complex SwiftUI View I built for this app: the Weather Card.
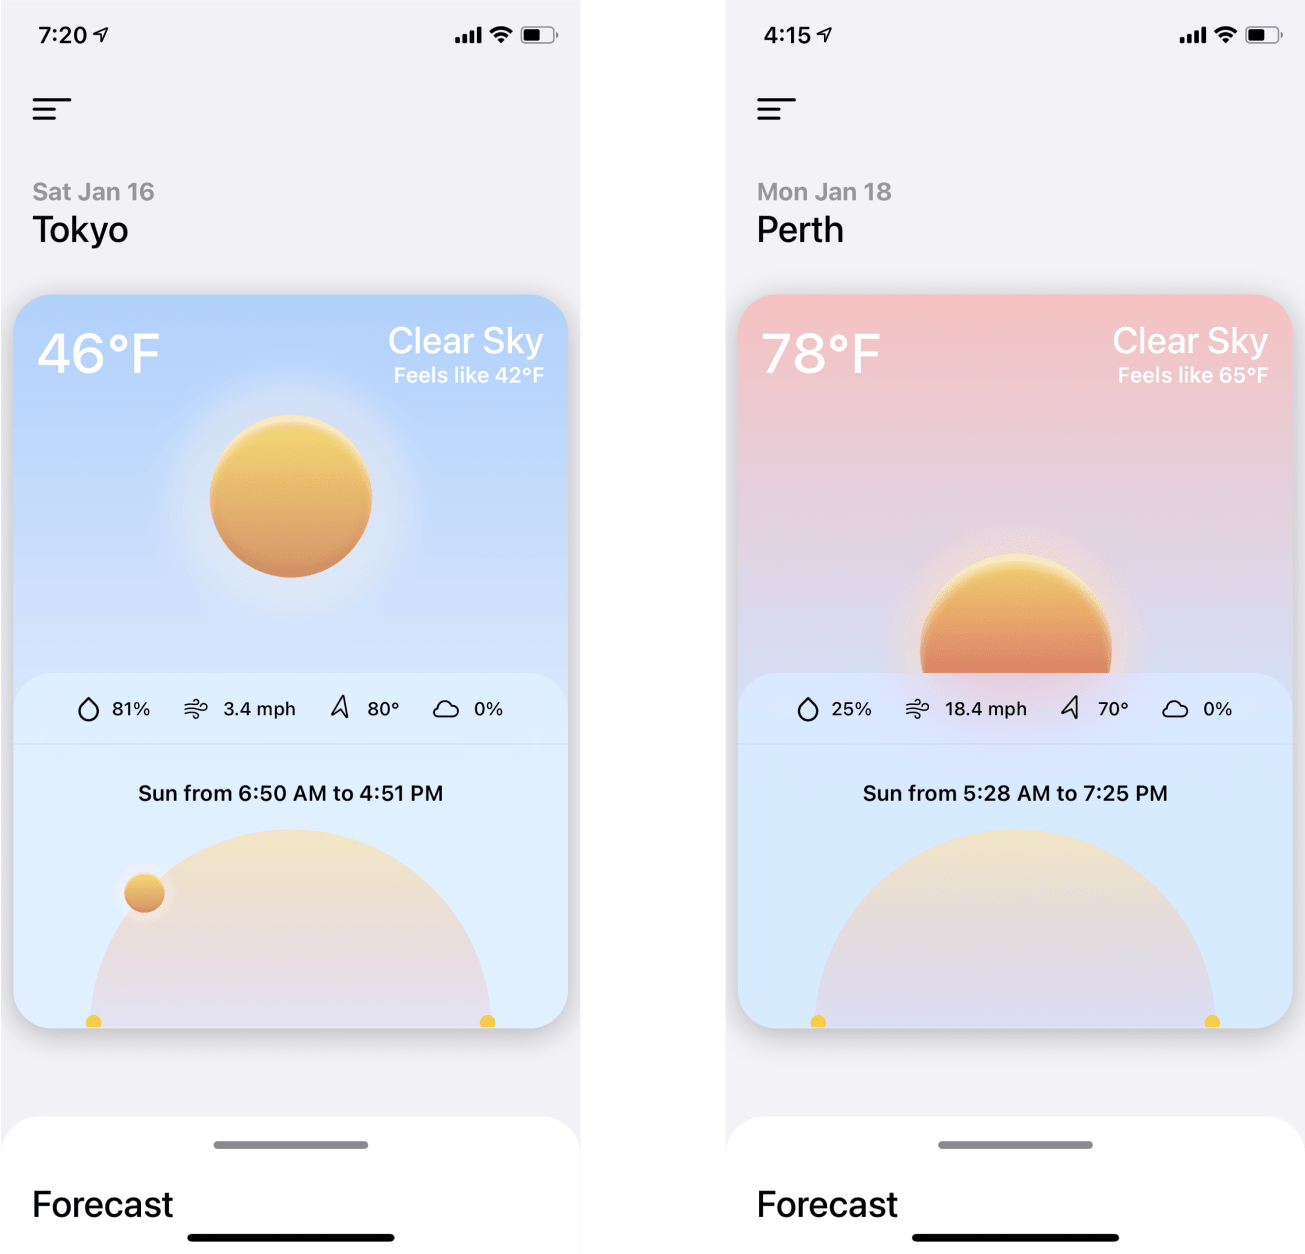
This card is central to the UX. It displays all the information about the current weather conditions at a glance such as:
Temperature
Weather description
Other metrics: wind speed, humidity, etc.
The sun's position throughout the day
Sunrise and sunset time
An animated representation of the weather: the sun rising, clouds sliding from the sides of the card, etc
The color of the card also adapts based on both the weather conditions and the time of the day. You will get a blue gradient at midday and a more orange pastel gradient at dawn, a more grayish color when the weather is cloudy, etc.
Sliding the bottom panel up reveals the Forecast Panel. I felt it was a good idea to hide the complexity of this panel away from the main screen while still keeping the user "in context" within the main screen when it's displayed.
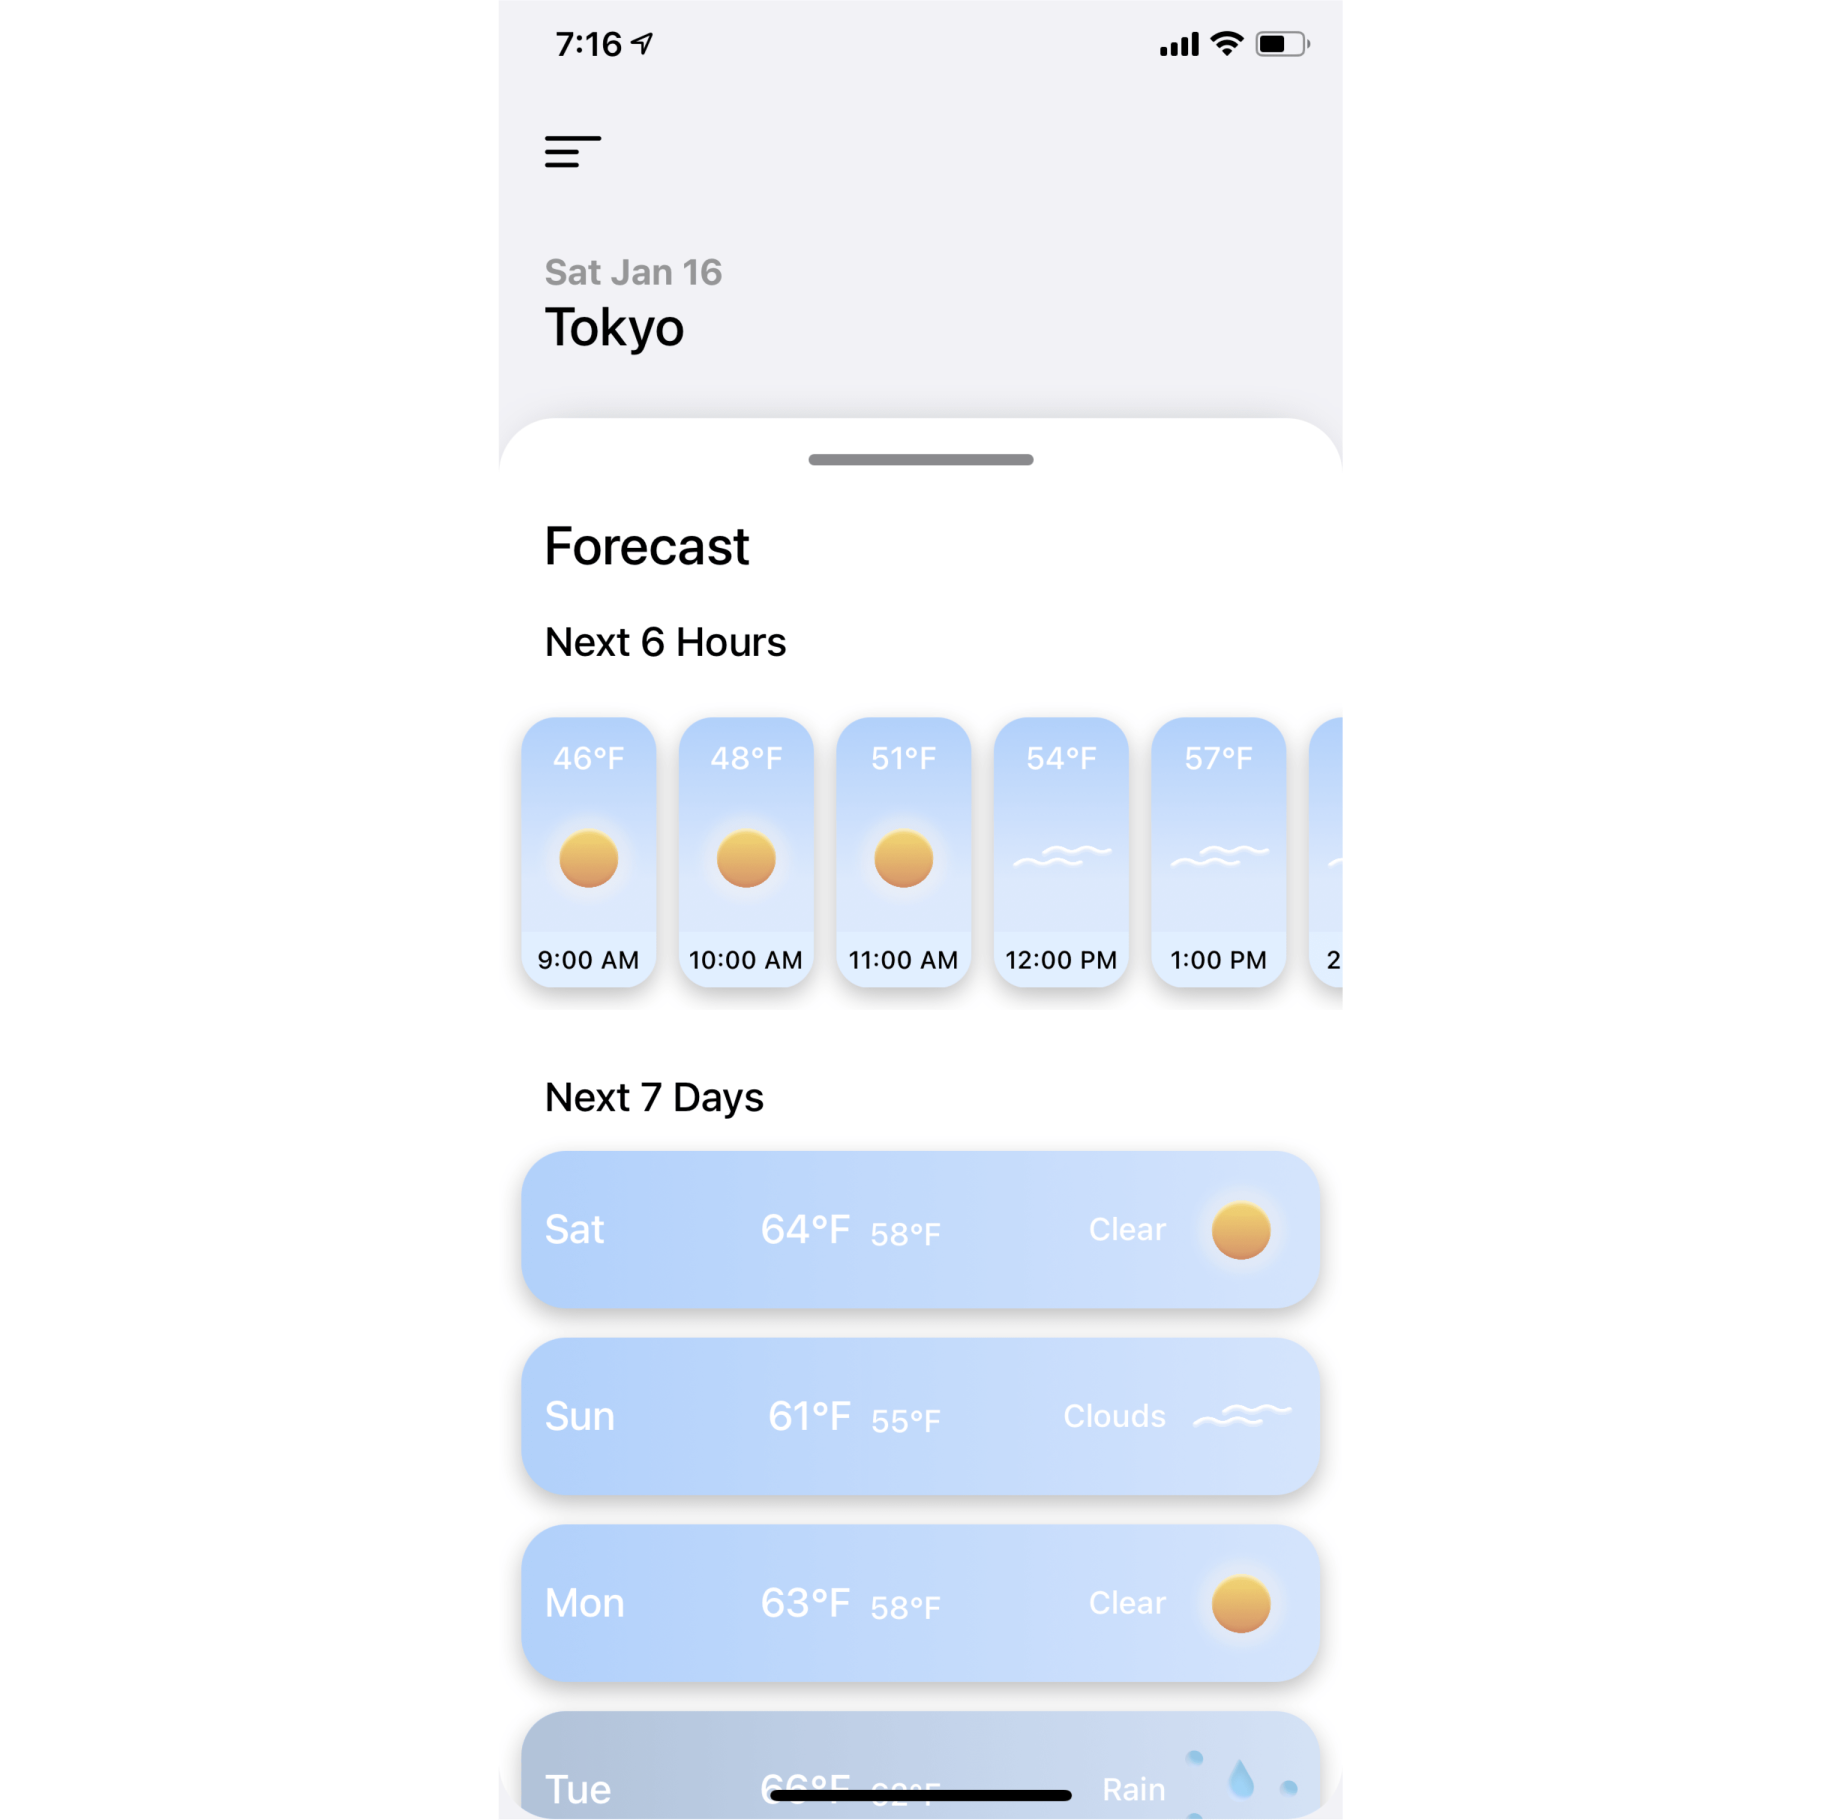
On this screen you can see both:
The hourly forecast for the next 6 hours
The daily forecast for the next 7 days
Each card will display the temperature, and the weather conditions are reflected through the combination of an icon and a background gradient, just like the weather card on the main screen.
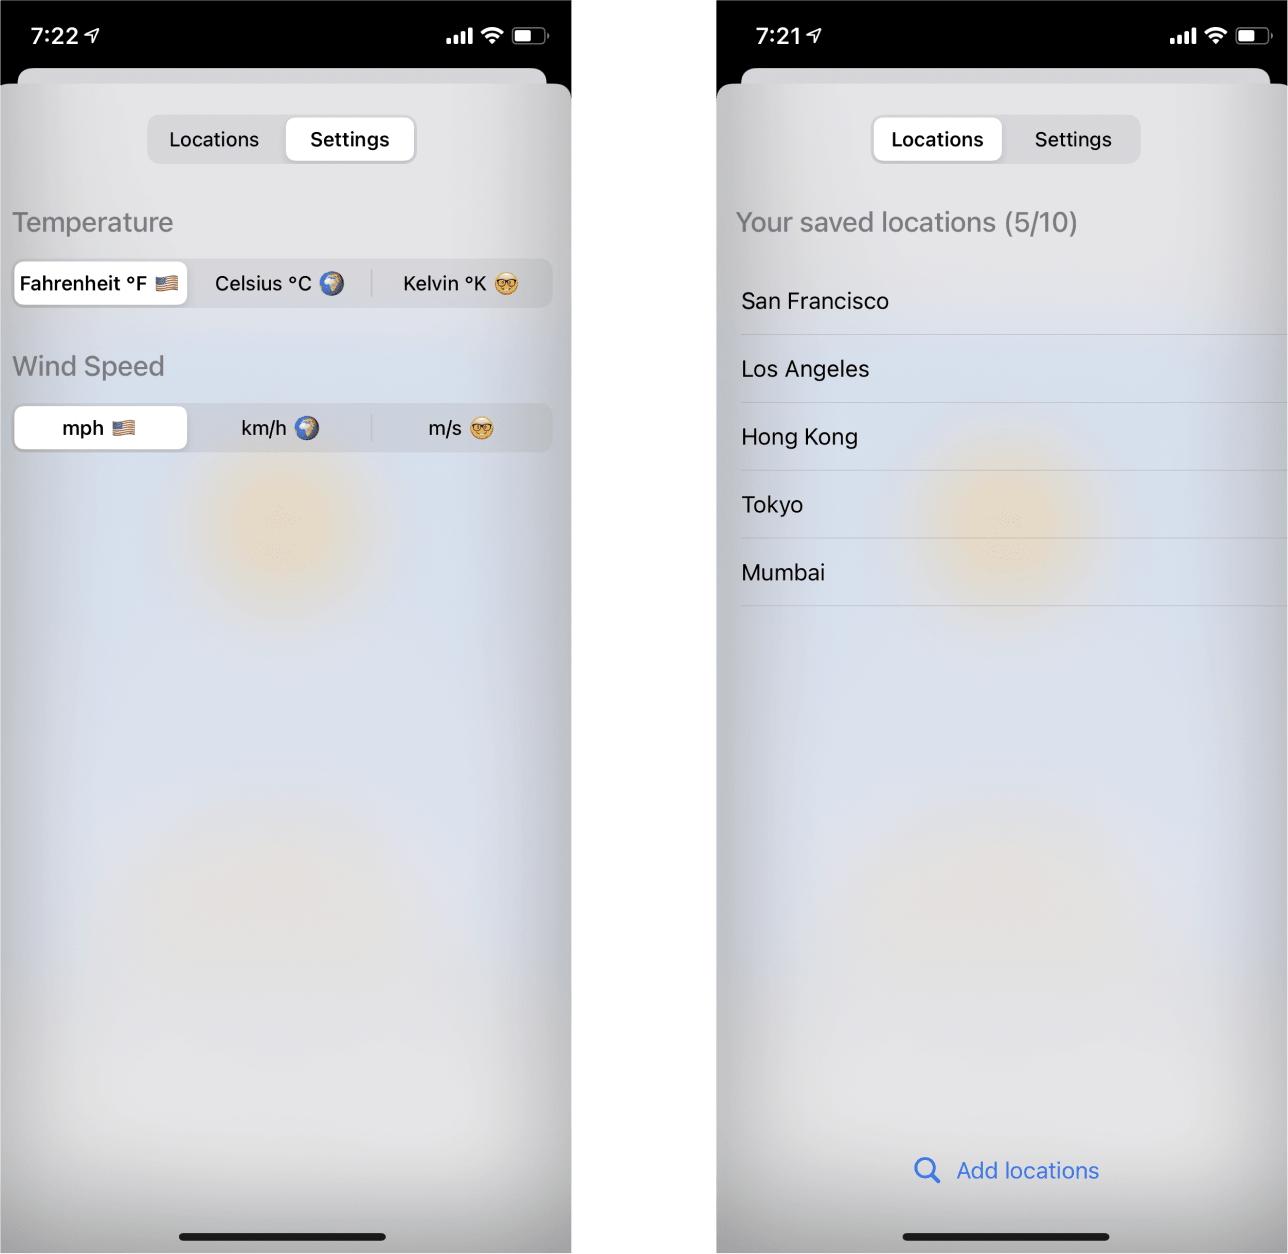
Tapping the menu icon on the top left corner brings the Settings Panel. This is where you can manage some settings and also the list of locations.
While the Sunshine feels somewhat simple from what we've just seen, it presented its own set of challenges and setbacks during the development... which was great! 🎉 These challenges allowed me to learn so much more than I would have had by solely focusing on mini-projects around a specific aspect of SwiftUI, so if you ask me now, all that frustration was worth it!
Building a whole SwiftUI app from scratch can feel a bit overwhelming. I mostly proceeded as I'd usually do on any complex project: one feature at a time, baby steps, breaking down any problem into smaller achievable tasks.
There were, however, a few problems that showed up along the development of particularly challenging features. Here's the list of interesting ones I handpicked:
I used the following code snippet to implement a simple TabView with pages that could be swiped left/right:
Initial implementation of TabView with PageTabViewStyle used in Sunshine
11
print("Call API to fetch weather data")
12
fetchWeatherData(city)
17
struct ContentView: View {
18
@State private var selected = 0
21
TabView(selection: $selected) {
22
MainView(city: "New York").tag(0)
23
MainView(city: "San Francisco").tag(1)
25
.tabViewStyle(PageTabViewStyle())
In my case, I wanted this TabView component to do the following:
each "page" would show the weather at a given location
swiping to another page would show the weather to the previous/following location
when done swiping, i.e. the index of the current page displayed changes, I'd use the onAppear modifier to detect that the page is visible and make an API call to fetch the weather data of the location currently in view.
The entire app was architected around these few lines and the idea of pages, and it worked... until iOS 14.2 🤦♂️. If you copy the code above and try it out today, you'll see the onAppear being called multiple times instead of just once! I reported this issue to the SwiftUI community on Reddit and it sadly looks like every iOS dev is kind of accustomed to this kind of things happening. This is not very reassuring I know..., and many developers share this frustration:
Upgrading OS, even minor, break your app? That's insane. Clicking a button doesn't work because my user upgrade iOS 13 to iOS 14. My app also crash because I use opacity of 0 when upgraded to BigSur. -- Philip Young, creator of Session
As someone working primarily on the web, I'm not used at all to this kind of issues. This didn't even cross my mind that it could be a possibility when starting this project.
The fix? Instead of handling whether a view within a TabView "appears", I'd move the state of the index in an "observable" and trigger my API call whenever a change in the index has been observed:
Latest implementation of TabView with PageTabViewStyle used in Sunshine
3
class PageViewModel: ObservableObject {
8
@Published var selectTabIndex = 0
11
struct MainView: View {
23
struct ContentView: View {
24
@StateObject var vm = PageViewModel()
26
var cities: [String] {
27
return ["New York", "San Francisco"]
38
TabView(selection: $vm.selectTabIndex) {
39
MainView(city: cities[0]).tag(0)
40
MainView(city: cities[1]).tag(1)
42
.onReceive(vm.$selectTabIndex, perform: { idx in
44
print("PageView :: body :: onReceive" + idx.description)
45
print("Call API to fetch weather data")
46
fetchWeatherData(cities[idx])
48
.tabViewStyle(PageTabViewStyle(indexDisplayMode: .always))
Because of this issue, the app ended up in an half broken state on iOS 14.2, and I had so much refactoring to do that I ended up restarting the development of Sunshine almost from scratch 😬.
One of the things that can feel weird when one gets started with iOS development is knowing that SwiftUI is, to this day, still "incomplete". Many core APIs are still not available to SwiftUI and the only way to interact with those is to do it through UIKit. One of those API I had to work with was MapKit.
Sunshine needed a simple "Location Service" to search for cities and getting their corresponding lat/long coordinates. For that, I needed to use MapKit, and that's where things got rather complicated:
Using anything MapKit related felt less "Swift" and I wasn't the most comfortable with UIKit
There were very few MapKit related resources or blog posts besides the Apple Documentation
The hardest part was actually to know the right keywords to search for. What I needed to use was a combination of:
MKSearchCompleter: a MapKit utility to output a list of locations based on a partial string: i.e. passing "New" would output, "New York", "New Jersey"
MKLocalSearch: a MapKit utility with all the tools to do points of interest search: this is what I used to get the coordinates associated with a given MKSearchCompleter result.
Knowing that these were the MapKit utility functions I needed to use to build my "Location Service" took a lot of time digging through the documentation. This can be a bit frustrating at the beginning, especially as a frontend developer where I'm used to "Google my way" through a problem or an unknown.
In case anyone has to build that kind of "Location Service", you'll find the code just below. I added some comments to explain as much I could in a small format, but I might write a dedicated blog post about this in the future:
Implementation of a Location Service to search for cities and get their coordinates
7
class LocationSearchService: NSObject, ObservableObject, MKLocalSearchCompleterDelegate {
13
@Published var searchQuery = ""
15
@Published var completions: [MKLocalSearchCompletion] = []
17
var completer: MKLocalSearchCompleter
18
var cancellable: AnyCancellable?
21
completer = MKLocalSearchCompleter()
24
cancellable = $searchQuery.assign(to: \.queryFragment, on: self.completer)
25
completer.delegate = self
26
completer.resultTypes = .address
34
func completer(_ completer: MKLocalSearchCompleter, didFailWithError: Error) {
45
func completerDidUpdateResults(_ completer: MKLocalSearchCompleter) {
46
self.completions = completer.results
50
extension MKLocalSearchCompletion: Identifiable {}
54
struct ContentView: View {
55
@ObservedObject var locationSearchService: LocationSearchService
59
TextField("type something...", text: $locationSearchService.searchQuery)
60
}.onChange(of: locationSearchService.completions) {
68
getCoordinatesLocation(locationSearchService.completions[0])
71
func getCoordinatesLocation(_ completion: MKLocalSearchCompletion) {
73
let searchRequest = MKLocalSearch.Request(completion: completion)
75
let search = MKLocalSearch(request: searchRequest)
77
search.start { response, error in
82
guard let coordinates = response?.mapItems[0].placemark.coordinate else {
86
guard let name = response?.mapItems[0].name else {
SwiftUI provides a system called UserDefaults to store user preferences, very similar to LocalStorage on the web. It's simple and straightforward to integrate into an existing codebase:
Small example showcasing how to use UserDefaults
1
let defaults = UserDefaults.standard
2
defaults.set("celsius", forKey: "temperature")
3
defaults.set("mph", forKey: "speed")
I planned on using UserDefaults to save some user preferences: which unit between Kelvin, Celsius, or Fahrenheit the user wanted to use to display the temperature and also the lists of "locations".
That's where I hit a wall 🤕... I didn't carefully read the documentation about UserDefaults: you can't save custom types to this system (at least out of the box) and in my case my "locations" were defined as a custom type:
Location type used in Sunshine
The only way to go forward was to use CoreData, another system that helps saving data that are defined with more complex types. However, integrating CoreData mid-way through a project seemed extremely complicated, so I simply decided to restart a whole new XCode Project, with CoreData enabled this time, and copy over the code 😅. Total lack of planning on my end.
The screenshots and video recordings from the first part and the details I gave about the problems I faced and eventually solved in the second part might leave you wondering why the app didn't end up being released.
The answer to that is that I simply stopped working on it. I have a few reasons why, and this part focuses on the main ones.
Let's start with the obvious one, that I realized half-way through the development of the app: it was a bit too ambitious for a first project. One could build a very simple weather app, but the vision I had for mine was a bit more complex and tricky. I built lots of custom Views, had to integrate some UIKit utilities, make API calls, and tons of animations.
Maybe my first app should have been a bit simpler, like a single view app focused solely on UX (which initially was what I wanted to focus on the most anyway).
The "iOS 14.2 update incident" that broke my app left a bad taste in my mouth. It made me reconsider the commitment that one must put in an iOS project.
A simple iOS update can easily break your app, especially SwiftUI-based, to a point where it can be completely unusable. The only way to avoid this as an iOS developer is to test your app on every iOS betas as soon as they get released. If I were to fully commit to this project I'd be in a perpetual race with Apple's update cycle and could not afford to miss an update at the risk of getting bad ratings or letting down my users.
This is not something I usually have to worry about when working on a web-based project.
On top of that releasing a patch or a new version of an iOS app is significantly slower and more complex than patching your web app: No third-party company reviews your website or SaaS when you update it. You just patch the issues, run your deploy scripts, and done! For iOS apps, you have to go through the App Store review process which can take a significant amount of time. I did not take all of these elements into account when starting this project.
This is not a critic of the Apple Ecosystem, far from that. I'm pretty sure these drawbacks would have easily been minimized would my project be less complex.
While Sunshine may look great on the video recordings and screenshots, in reality it's a different story.
The app ended up feeling sluggish at times. Swiping pages randomly drops frames, even if I disable all the animations or hide complex views. There are a few memory leaks that I tried my best to track down. However, after weeks of investigation, and no progress made, I simply gave up.
Are the underlying reasons linked to SwiftUI itself? Or the way I use it? I still have no way to know. SwiftUI is still in its infancy, and while Apple is extremely invested in it, it still feels it's not quite there yet in some specific areas at times.
That last bit was quite discouraging after all this work. It is probably is the main reason why I completely stopped working on Sunshine and why it's stuck in an unfinished state. The result was simply not on a par with what I originally envisioned and wanted to release.
On top of that, drawing my own assets was way more time consumming that I thought it would be. There were too many weather types to handle, and I was not able to provide a satisfying result for some of them with my current Figma skills.
Probably the least important reason, but worth mentioning still. I used Open Weather Map's One Call API to provide accurate weather data. They have a decent free tier that's perfect for development. However, I'd quickly exceed the limit of calls per hour/day if I were to release it.
The next tier is $40/month, which I can afford without a problem, the next one though is $180/month which made me think a bit more: Was I serious enough about this project to start spending a significant amount of money to run it over time or was this just for fun?
Despite all the setbacks and the looming "doom" of this project, I still had tons of fun! I loved sharing my journey and my solutions to the little problems encountered along the way with all of you on Twitter. Seeing this app slowly take shape was incredibly satisfying. I feel confident that the lessons learned here will be tremendously helpful and guarantee the success of my future SwiftUI projects.
This project also helped me realized how lucky we frontend/web developers are. The speed at which we can develop an idea from a prototype to a product, the tooling, and the community we have is something to be cherished.
Nonetheless, I will still continue to build stuff with SwiftUI. My next project will probably be very simple, like the ones I mentioned in the previous part, or maybe just a series of bite-sized apps/experiments like @jsngr does so well. This was my first failed SwiftUI project, it probably won't be the last. There's still a lot to learn and a lot of fun to have building stuff.
Want to checkout more of my SwiftUI related content?
此内容由惯性聚合(RSS阅读器)自动聚合整理,仅供阅读参考。 原文来自 — 版权归原作者所有。