







Since writing The Study of Shaders with React Three Fiber, I've continued building new scenes to perfect my shader skills and learn new techniques to achieve even more ambitious creations. While shaders on their own unlocked a new realm of what's possible to do on the web, there's one type of 3D object that I've overlooked until recently: particles!
Whether it's to create galaxies, stars, smoke, fire, or even some other abstract effects, particles are the best tool to help you create scenes that can feel truly magical 🪄.
However, particles can also feel quite intimidating at first. It takes a lot of practice to get familiar with the core concepts of particle-based scenes such as attributes or buffer geometries and advanced ones like combining them with custom shaders or using Frame Buffer Objects to push those scenes even further.
In this article, you will find all the tips and techniques I learned regarding particles, from creating simple particle systems with standard and buffer geometries to customizing how they look, controlling their movement with shaders, and techniques to scale the number of particles even further. You'll also get a deeper understanding of attributes, a key shader concept I overlooked in my previous blog post that is essential for these use cases.
Before we can jump into creating gorgeous particle-based scenes with React Three Fiber, we have to talk about attributes.
Attributes are pieces of data associated with each vertex of a mesh. If you've been playing with React Three Fiber and created some meshes, you've already used attributes without knowing! Each geometry associated with a mesh has a set of pre-defined attributes such as:
The position attribute: an array of data representing all the positions of each vertex of a given geometry.
The uv attribute: an array of data representing the UV coordinates of a given geometry.
These are just two examples among many possibilities, but you'll find these in pretty much any geometry you'll use. You can easily take a peek at them to see what kind of data it contains:
Logging the attributes of a geometry
5
console.log(mesh.current.geometry.attributes);
8
return <mesh ref={mesh}>{}</mesh>;
You should see something like this:
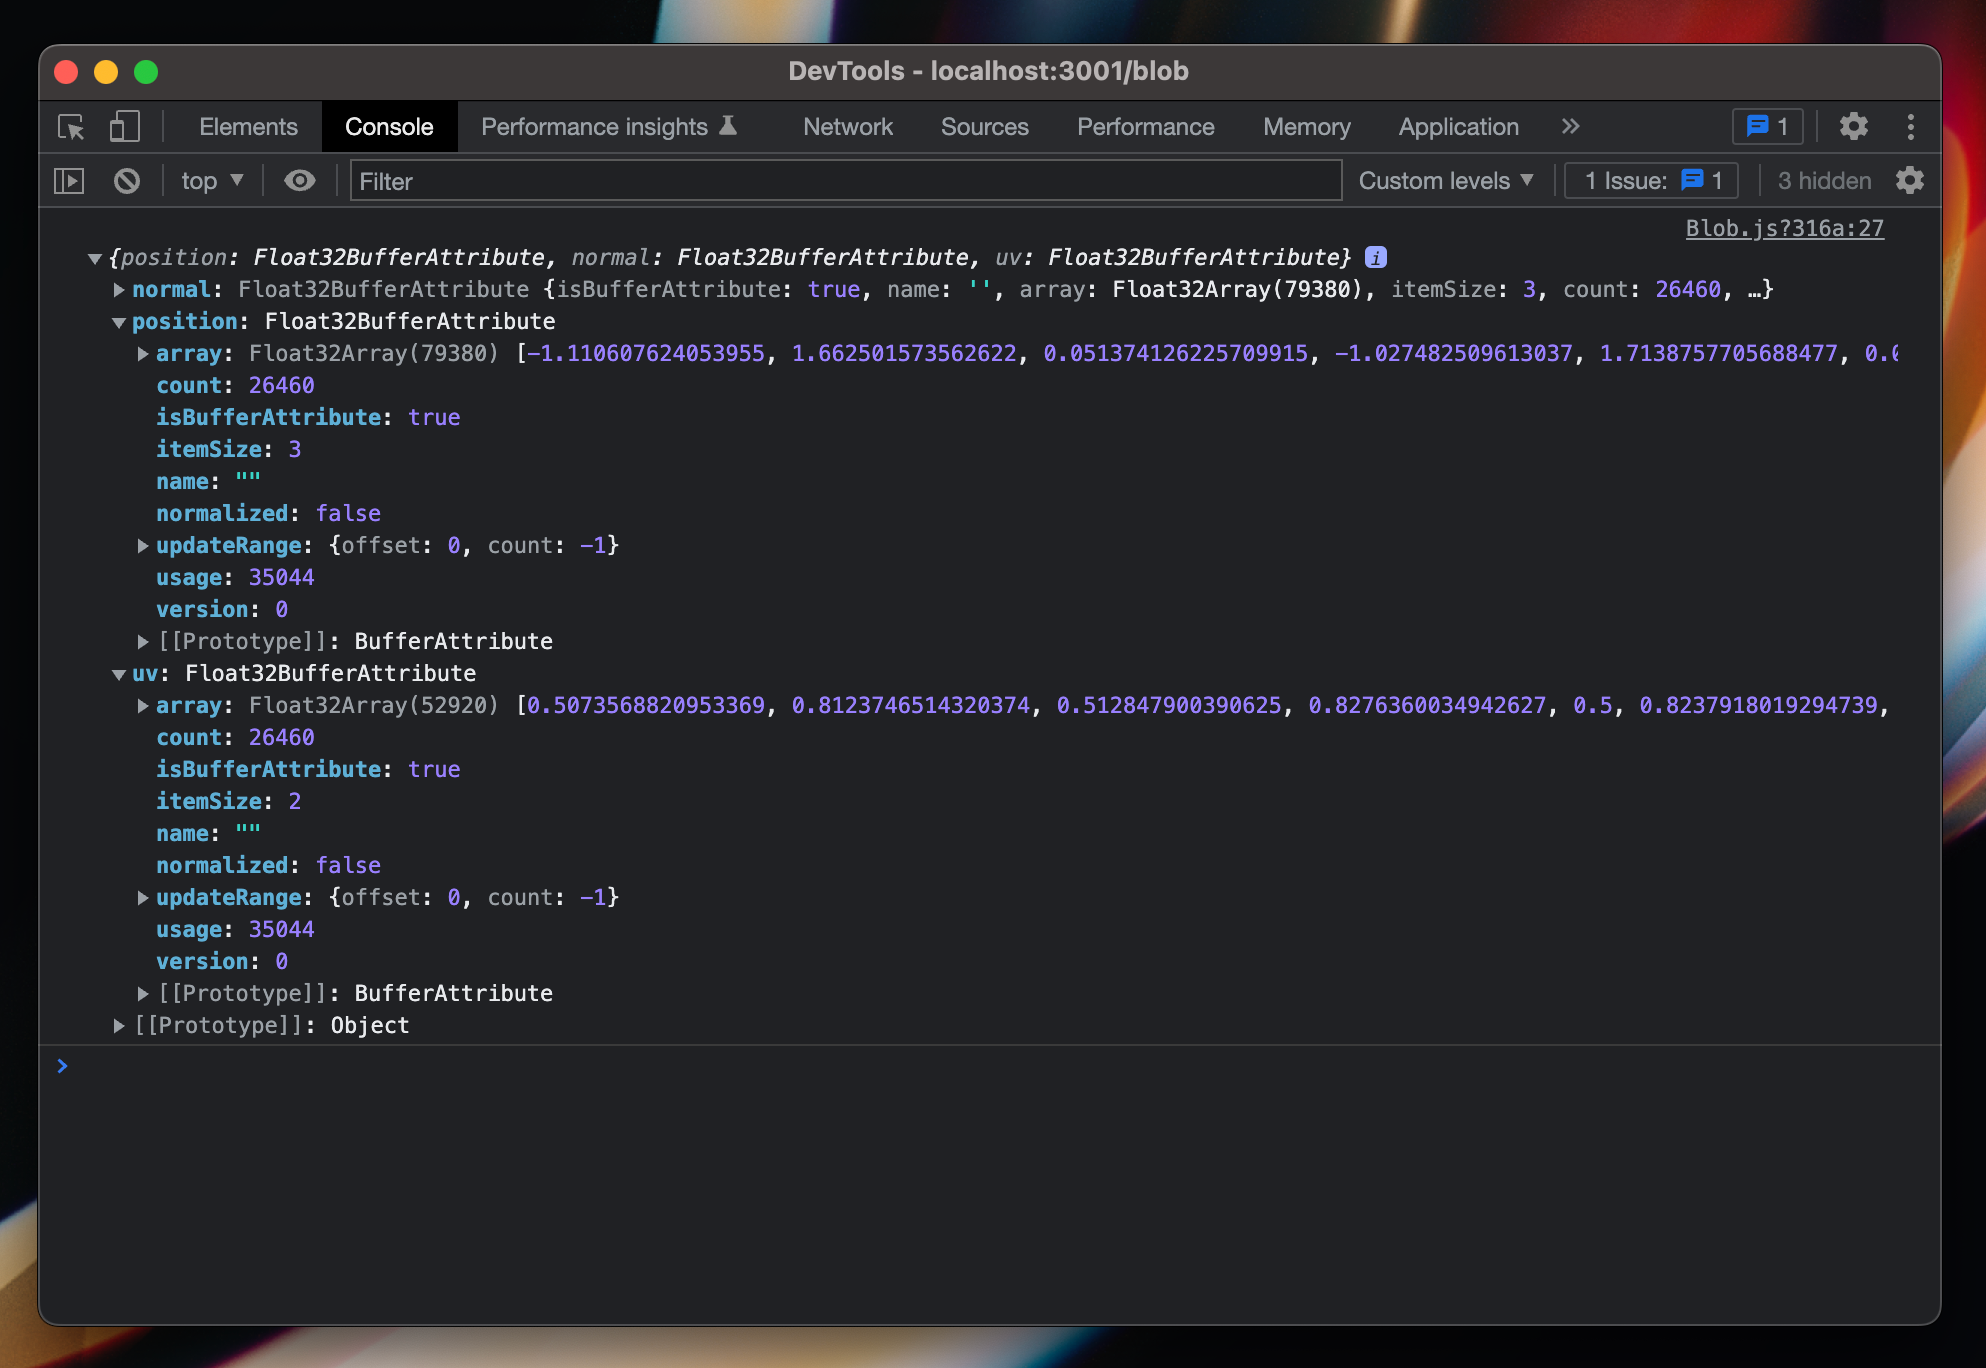
If you're feeling confused right now, do not worry 😄. I was too! Seeing data like this can feel intimidating at first, but we'll make sense of all this just below.
This long array with lots of numbers represents the value of the x, y, and z coordinates for each vertex of our geometry. It's one-dimensional (no nested data), where each value x, y, and z of a given vertex is right next to the ones from the other vertex. I built the little widget below to illustrate in a more approachable way how the values of that position array translate to points in space:
Position attributes array to vertex visualizer
Now that we know how to interpret that data, we can start having some fun with it. You can easily manipulate and modify attributes and create some nice effects without the need to touch shader code.
Below is an example where we use attributes to twist a boxGeometry along its y-axis.
We do this effect by:
Copying the original position attribute of the geometry.
2
const currentPositions = mesh.current.geometry.attributes.position;
4
const originalPositions = currentPositions.clone();
Looping through each value of the array and applying a rotation.
1
const originalPositionsArray = originalPositions?.array || [];
4
for (let i = 0; i < originalPositionsArray.length; i = i + 3) {
Pass the newly generated data to the geometry to replace the original position attribute array.
2
currentPositions.array[i] = modifiedPositionVector.x;
3
currentPositions.array[i + 1] = modifiedPositionVector.y;
4
currentPositions.array[i + 2] = modifiedPositionVector.z;
I briefly touched upon this subject when I introduced the notion of uniforms in The Study of Shaders with React Three Fiber but could not find a meaningful way to tackle it without making an already long article even longer.
We saw that we use uniforms to pass data from our Javascript code to a shader. Attributes are pretty similar in that regard as well, but there is one key difference:
Data passed to a shader via a uniform remains constant between each vertex of a mesh (and pixels as well)
Data passed via an attribute can be different for each vertex, allowing us to more fine-tuned controls of our vertex shader.
You can see that attributes allow us to control each vertex of a mesh, but not only! For particle-based scenes, we will heavily rely on them to:
position our particles in space
move, scale, or animate our particles through time
customize each particle in a unique way
That is why it's necessary to have a somewhat clear understanding of attributes before getting started with particles.
Now that we know more about attributes, we can finally bring our focus to the core of this article: particles.
Remember how we can define a mesh as follows: mesh = geometry + material? Well, that definition also applies to points, the construct we use to create particles:
points = geometry + material
The only difference at this stage is that our points will use a specific type of material, the pointsMaterial.
Below you'll find an example of a particle system in React Three Fiber. As you can see, we're creating a system in the shape of a sphere by using
points
sphereGeometry for our geometry
pointsMaterial for our material
Now you may ask me: this is great, but what if I want to position my particles more organically? What about creating a randomized cloud of particles? Well, this is where the notion of attributes comes into play!
In Three.js and React Three Fiber, we can create custom geometries thanks to the use of:
bufferGeometry
bufferAttribute
our newly acquired knowledge of attributes 🎉
When working with Particles, using a bufferGeometry can be really powerful: it gives us full-control over the placement of each particle, and later we'll also see how this lets us animate them.
Let's take a look at how we can define a custom geometry in React Three Fiber with the following code example:
Custom geometry with bufferGeometry and bufferAttribute
1
const CustomGeometryParticles = () => {
2
const particlesPosition = [
10
attach="attributes-position"
11
count={particlesPosition.length / 3}
12
array={particlesPosition}
In the code snippet above, we can see that:
We are rendering a bufferGeometry as the geometry of our points.
In this bufferGeometry, we're using the bufferAttribute element that lets us set the position attribute of our geometry.
Now let's take a look at the props that we're passing to the bufferAttribute element:
count is the total number of vertex our geometry will have. In our case, it is the number of particles we will end up rendering.
attach is how we specify the name of our attribute. In this case, we set it as attributes-position so the data we're feeding to the bufferAttribute is available under the position attribute.
itemSize represents the number of values from our attributes array associated with one item/vertex. In this case, it's set to 3 as we're dealing with the position attribute that has three components x, y, and z.
Now when it comes to creating the attributes array itself, let's look at the particlePositions array located in our particle scene code.
Generating a position attribute array
3
const particlesPosition = useMemo(() => {
7
const positions = new Float32Array(count * 3);
9
for (let i = 0; i < count; i++) {
11
let x = (Math.random() - 0.5) * 2;
12
let y = (Math.random() - 0.5) * 2;
13
let z = (Math.random() - 0.5) * 2;
16
positions.set([x, y, z], i * 3);
First, we specify a Float32Array with a length of count * 3. We're going to render count particles, e.g. 2000, and each particle has three values (x, y, and z) associated with its position, i.e. *6000 values in total.
Then, we create a loop, and for each particle, we set all the values for x, y, and z. In this case, we're using some level of randomness to position our particles randomly.
Finally, we're adding all three values to the array at the position i * 3 with positions.set([x,y,z], i*3).
The code sandbox below showcases what we can render with this technique of using custom geometries. In this example, I created two different position attribute arrays that place particles randomly:
at the surface of a sphere
in a box, which you can render by changing the shape prop to box and hitting reload.
We can see that using custom geometries lets us get a more organic render for our particle system, which looks prettier and opens up way more possibilities than standard geometries ✨.
Now that we know how to create a particle system based on custom geometries, we can start focusing on the fun part: animating particles! 🎉
There are two ways to approach animating particles:
Using attributes (easier)
Using shaders (a bit harder)
We'll look at both ways, although, as you may expect, if you know me a little bit through the work I share on Twitter, we're going to focus a lot on the second one. A little bit of challenge never hurts!
For this part, we will see how to animate our particles by updating our position attribute array on every frame using the useFrame hook. If you've animated meshes with React Three Fiber before, this method should be straightforward!
We just saw how to create an attributes array; updating it is pretty much the same process:
We loop through the current values of the attributes array. It can be all the values or just some of them.
Update them.
And finally, the most important: set the needsUpdate field of our position attribute to true.
Animate particles via attributes in React Three Fiber
2
const { clock } = state;
4
for (let i = 0; i < count; i++) {
7
points.current.geometry.attributes.position.array[i3] +=
8
Math.sin(clock.elapsedTime + Math.random() * 10) * 0.01;
9
points.current.geometry.attributes.position.array[i3 + 1] +=
10
Math.cos(clock.elapsedTime + Math.random() * 10) * 0.01;
11
points.current.geometry.attributes.position.array[i3 + 2] +=
12
Math.sin(clock.elapsedTime + Math.random() * 10) * 0.01;
15
points.current.geometry.attributes.position.needsUpdate = true;
The scene rendered below uses this technique to move the particles around their initial position, making the particle system feel a bit more alive ✨
Despite being the easiest, this method is also pretty expensive: on every frame, we have to loop through very long attribute arrays and update them. Over and over. As you might expect, this becomes a real problem as the number of particles grows. Thus it's preferable to delegate that part to the GPU with a sweet shader, which also has the added benefit to be more elegant. (a totally non-biased opinion from someone who dedicated weeks of their life working with shaders 😄).
First and foremost, it's time to say goodbye to our pointsMaterial 👋, and replace it with a shaderMaterial as follows:
How to use a custom shaderMaterial with particles and a custom buffer geometry
1
const CustomGeometryParticles = (props) => {
2
const { count } = props;
3
const points = useRef();
5
const particlesPosition = useMemo(() => ({
9
const uniforms = useMemo(() => ({
17
const { clock } = state;
19
points.current.material.uniforms.uTime.value = clock.elapsedTime;
26
attach="attributes-position"
27
count={particlesPosition.length / 3}
28
array={particlesPosition}
34
fragmentShader={fragmentShader}
35
vertexShader={vertexShader}
As we learned in The Study of Shaders with React Three Fiber, we need to specify two functions for our shaderMaterial:
the fragment shader: this is where we'll focus on the next part to customize our particles
the vertex shader: this is where we'll animate our particles
Vertex shader code that applies a rotation along the y-axis
4
vec3 particlePosition = position * rotation3dY(uTime * 0.2);
6
vec4 modelPosition = modelMatrix * vec4(particlePosition, 1.0);
7
vec4 viewPosition = viewMatrix * modelPosition;
8
vec4 projectedPosition = projectionMatrix * viewPosition;
10
gl_Position = projectedPosition;
As you can see in the snippet above, when it comes to the code, animating particles using a shader is very similar to animating a mesh. With the vertex shader, you get to interact with the vertices of a geometry, which are the particles themselves in this use case.
Since we're there, let's iterate on that shader code to make the resulting scene even better: make the particles close to the center of the sphere move faster than the ones on the outskirts.
Enhanced version of the previous vertex shader
5
float distanceFactor = pow(uRadius - distance(position, vec3(0.0)), 2.0);
6
vec3 particlePosition = position * rotation3dY(uTime * 0.2 * distanceFactor);
8
vec4 modelPosition = modelMatrix * vec4(particlePosition, 1.0);
9
vec4 viewPosition = viewMatrix * modelPosition;
10
vec4 projectedPosition = projectionMatrix * viewPosition;
12
gl_Position = projectedPosition;
Which renders as the following once we wire this shader to our React Three Fiber code with a uTime and uRadius uniform:
This entire time, our particles were simple tiny squares, which is a bit boring. In this part, we'll look at how to fix this with some well-thought-out shader code.
First, let's look at the size. All our particles are the same size right now which does not really give off an organic vibe to this scene. To address that, we can tweak the gl_PointSize property in our vertex shader code.
We can do multiple things with the point size:
Making it a function of the position with some Perlin noise
Making it a function of the distance from the center of your geometry
Simply making it random
Anything is possible! For this example, we'll pick the second one:
Now, when it comes to the particle pattern itself, we can modify it in the fragment shader. I like to make my particles look like tiny points of light that we can luckily achieve with a few lines of code.
Fragment shader that changes the appearance of our particles
1
varying float vDistance;
4
vec3 color = vec3(0.34, 0.53, 0.96);
6
float strength = distance(gl_PointCoord, vec2(0.5));
7
strength = 1.0 - strength;
9
strength = pow(strength, 3.0);
12
color = mix(vec3(0.0), color, strength);
13
gl_FragColor = vec4(color, strength);
We can now make the colors of the particles a parameter of the material through a uniform and also make it a function of the distance to the center, for example:
Enhanced version of the previous fragment shader
1
varying float vDistance;
4
vec3 color = vec3(0.34, 0.53, 0.96);
5
float strength = distance(gl_PointCoord, vec2(0.5));
6
strength = 1.0 - strength;
7
strength = pow(strength, 3.0);
11
color = mix(color, vec3(0.97, 0.70, 0.45), vDistance * 0.5);
12
color = mix(vec3(0.0), color, strength);
15
gl_FragColor = vec4(color, strength);
In the end, we get a beautiful set of custom particles with just a few lines of GLSL sprinkled on top of our particle system 🪄
What if we wanted to render a lot more particles onto our scene? What about 100's of thousands? That would be pretty cool, right? With this advanced technique I'm about to show you, it is possible! And on top of that, with little to no frame drop 🔥!
This technique is named Frame Buffer Object (FBO). I stumbled upon it when I wanted to reproduce one of @winkerVSbecks attractor scenes from his blog post Three ways to create 3D particle effects.
Long story short, I wanted to build the same attractor effect but with shaders. The problem was that in an attractor, the position of a particle is dictated by its previous one, which doesn't work by just relying on the position attributes and a vertex shader: there's no way to get the updated position back to our Javascript code after it's been updated in our vertex shader and feed it back to the shader to calculate the next one! Thankfully, thanks to using an FBO, I figured out a way to render this scene.
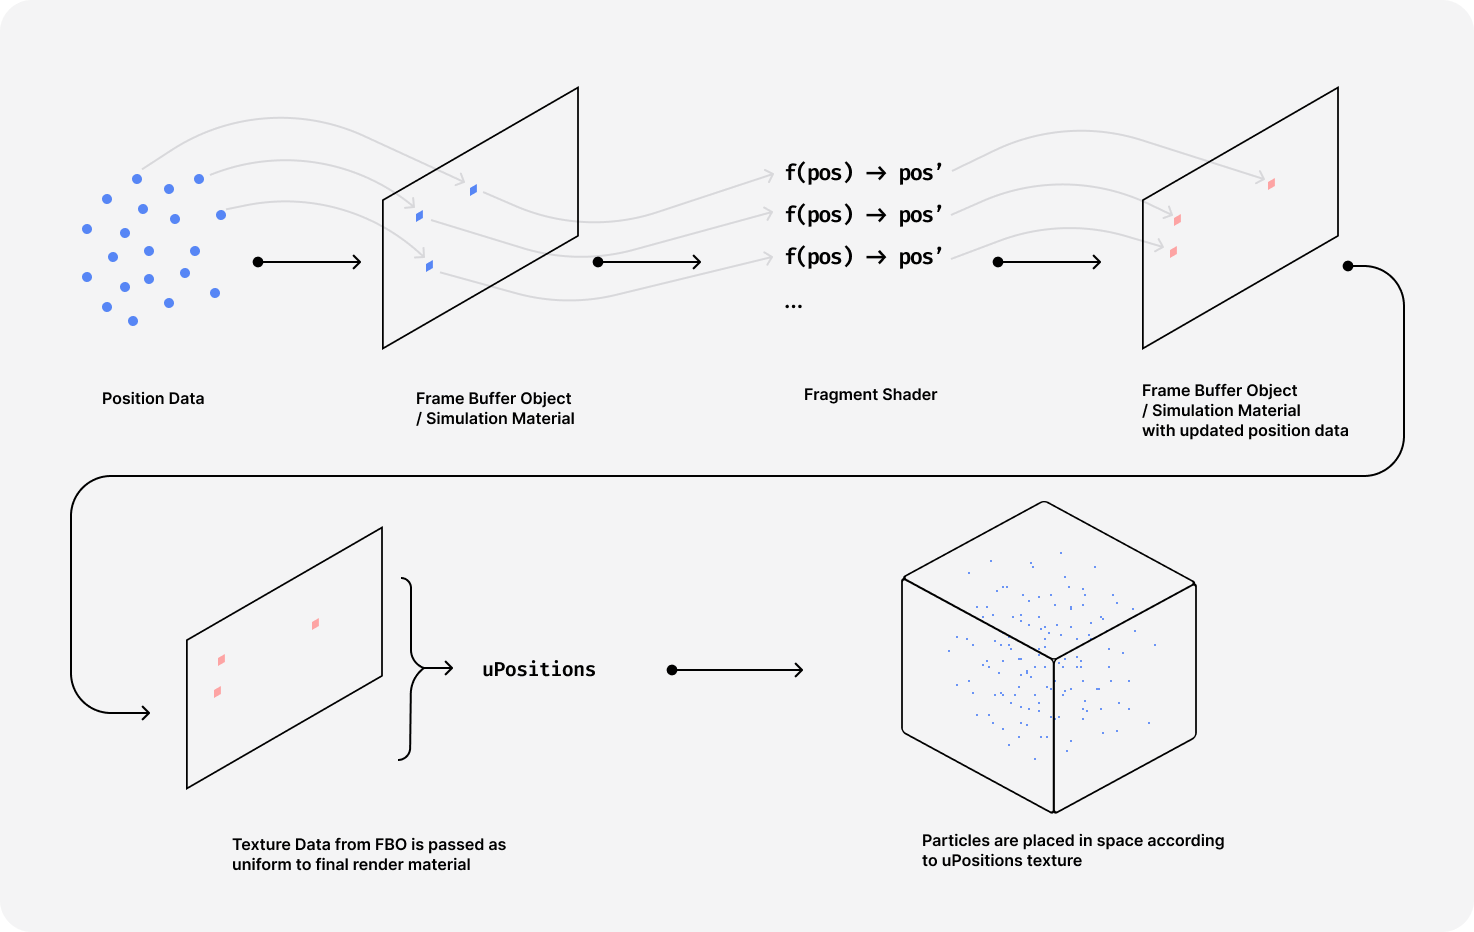
I've seen many people using this technique in Three.js codebases. Here is how it goes: instead of initiating our particles positions array and passing it as an attribute and then render them, we are going to have 3 phases with two render passes.
The simulation pass. We set the positions of the particles as a Data Texture to a shader material. They are then read, returned, and sometimes modified in the material's fragment shader (you heard me right!).
Create a WebGLRenderTarget, a "texture" we can render to off-screen where we will add a small scene containing our material from the simulation pass and a small plane. We then set it as the current render target, thus rendering our simulation material with its Data Texture that is filled with position data.
The render pass. We can now read the texture rendered in the render target. The texture data is the positions array of our particles, which we can now pass as a uniform to our particles' shaderMaterial.
In the end, we're using the simulation pass as a buffer to store data and do a lot of heavy calculations on the GPU by processing our positions in a fragment shader, and we do that on every single frame. Hence the name Frame Buffer Object. I hope I did not lose you there 😅. Maybe the diagram below, as well as the following code snippet will help 👇:
Setting up a simulation material
1
import { extend } from '@react-three/fiber';
5
const generatePositions = (width, height) => {
8
const length = width * height * 4;
9
const data = new Float32Array(length);
17
class SimulationMaterial extends THREE.ShaderMaterial {
20
const positionsTexture = new THREE.DataTexture(
21
generatePositions(size, size),
27
positionsTexture.needsUpdate = true;
29
const simulationUniforms = {
31
positions: { value: positionsTexture },
35
uniforms: simulationUniforms,
36
vertexShader: simulationVertexShader,
37
fragmentShader: simulationFragmentShader,
43
extend({ SimulationMaterial: SimulationMaterial });
Setting up an FBO with a simulation material in React Three Fiber
1
import { useFBO } from '@react-three/drei';
2
import { useFrame, createPortal } from '@react-three/fiber';
4
const FBOParticles = () => {
8
const points = useRef();
9
const simulationMaterialRef = useRef();
12
const scene = new THREE.Scene();
13
const camera = new THREE.OrthographicCamera(
23
const positions = new Float32Array([
24
-1, -1, 0, 1, -1, 0, 1, 1, 0, -1, -1, 0, 1, 1, 0, -1, 1, 0,
27
const uvs = new Float32Array([0, 0, 1, 0, 1, 1, 0, 0, 1, 1, 0, 1]);
30
const renderTarget = useFBO(size, size, {
31
minFilter: THREE.NearestFilter,
32
magFilter: THREE.NearestFilter,
33
format: THREE.RGBAFormat,
35
type: THREE.FloatType,
39
const particlesPosition = useMemo(() => {
40
const length = size * size;
41
const particles = new Float32Array(length * 3);
42
for (let i = 0; i < length; i++) {
44
particles[i3 + 0] = (i % size) / size;
45
particles[i3 + 1] = i / size / size;
50
const uniforms = useMemo(
60
const { gl, clock } = state;
63
gl.setRenderTarget(renderTarget);
66
gl.render(scene, camera);
68
gl.setRenderTarget(null);
72
points.current.material.uniforms.uPositions.value = renderTarget.texture;
74
simulationMaterialRef.current.uniforms.uTime.value = clock.elapsedTime;
82
<simulationMaterial ref={simulationMaterialRef} args={[size]} />
85
attach="attributes-position"
86
count={positions.length / 3}
91
attach="attributes-uv"
92
count={uvs.length / 2}
100
<points ref={points}>
103
attach="attributes-position"
104
count={particlesPosition.length / 3}
105
array={particlesPosition}
110
blending={THREE.AdditiveBlending}
112
fragmentShader={fragmentShader}
113
vertexShader={vertexShader}
To demonstrate the power of FBO, let's look at two scenes I built with this technique 👀.
The first one renders a particle system in the shape of a sphere with randomly positioned points. In the simulationMaterial, I applied a curl-noise to the position data of the particles, which yields the gorgeous effect you can see below ✨!
In this scene, we:
render 128 x 128 (the resolution of our render target) particles.
apply a curl noise to each of our particles in our simulation pass.
pass all that data along to the renderMaterial that takes care to render each vertex with that position data and also the particle size using the gl_pointSize property.
Finally, one last scene, just for fun! I ported to React Three Fiber a Three.js demo from an article written by @nicoptere that does a pretty good job at deep diving into the FBO technique.
In it, I pass not only one but two Data Textures:
the first one contains the data to position the particles as a box
the second one as a sphere
Then in the fragment shader of the simulationMaterial, we use GLSL's mix function to alternate over time between the two "textures" which results in this scene where the particles morph from one shape to another.
From zero to FBO, you now know pretty much everything I know about particles as of writing these words 🎉! There's, of course, still a lot more to explore, but I hope this blog post was a good introduction to the basics and more advanced techniques and that it can serve as a guide to get back to during your own journey with Particles and React Three Fiber.
Techniques like FBO enable almost limitless possibilities for particle-based scenes, and I can't wait to see what you'll get to create with it ✨. I couldn't resist sharing this with you in this write-up 🪄. Frame Buffer Objects have a various set of use cases, not just limited to particles that I haven't explored deeply enough yet. That will probably be a topic for a future blog post, who knows?
As a productive next step to push your particle skills even further, I can only recommend to hack on your own. You now have all the tools to get started 😄.
此内容由惯性聚合(RSS阅读器)自动聚合整理,仅供阅读参考。 原文来自 — 版权归原作者所有。