
惯性聚合 高效追踪和阅读你感兴趣的博客、新闻、科技资讯
阅读原文 在惯性聚合中打开

推荐订阅源

Hacker News - Newest:
Hacker News - Newest: "LLM"
Webroot Blog
Webroot Blog
S
Security @ Cisco Blogs
H
Heimdal Security Blog
cs.CV updates on arXiv.org
www.infosecurity-magazine.com
N
News and Events Feed by Topic
H
Hacker News: Front Page
K
KPMG report finds enterprise disconnect between AI and its ROI | CIO
cs.AI updates on arXiv.org
Application and Cybersecurity Blog
SecWiki News
SecWiki News
N
News | PayPal Newsroom
T
Tor Project blog
W
WeLiveSecurity
A
Arctic Wolf
Security Archives - TechRepublic
S
Secure Thoughts
月光博客
月光博客
AWS News Blog
AWS News Blog
D
Docker
C
CERT Recently Published Vulnerability Notes
MyScale Blog
MyScale Blog
Google Online Security Blog
大猫的无限游戏
大猫的无限游戏
T
The Blog of Author Tim Ferriss
I
InfoQ
人人都是产品经理
人人都是产品经理
Recent Announcements
Google DeepMind News
Hacker News: Ask HN
Hacker News: Ask HN
Blog — PlanetScale
Blog — PlanetScale
博客园 - 【当耐特】
Engineering at Meta
Engineering at Meta
Stack Overflow Blog
Stack Overflow Blog
Recorded Future
Recorded Future
罗磊的独立博客
Exploit-DB.com RSS Feed
T
The Exploit Database - CXSecurity.com
D
DataBreaches.Net
S
Security Affairs
WordPress大学
WordPress大学
T
Threatpost
Microsoft Security Blog
V
Vulnerabilities – Threatpost
The Hacker News
The Hacker News
S
SegmentFault 最新的问题
B
Blog RSS Feed
Project Zero
Project Zero
P
Proofpoint News Feed

oida.dev | TypeScript, Rust

TypeScript's `erasableSyntaxOnly` Flag Unsafe for work Tokio: Macros Tokio: Channels Tokio: Getting Started Network Applications on the Tokio Stack Remake, Remodel, Reduce. The `never` type and error handling in TypeScript 5 Inconvenient Truths about TypeScript Refactoring in Rust: Introducing Traits Refactoring in Rust: Abstraction with the Newtype Pattern Announcing the TypeScript Cookbook TypeScript: Iterating over objects The road to universal JavaScript 10 years of oida.dev Rust: Tiny little traits The TypeScript converging point How not to learn TypeScript Getting started with Rust Introducing Slides and Coverage TypeScript: The humble function overload TypeScript + React: Children types are broken TypeScript: In defense of any Rust: Enums to wrap multiple errors Dissecting Deno Error handling in Rust TypeScript: Unexpected intersections Upgrading Node.js dependencies after a yarn audit TypeScript: Array.includes on narrow types TypeScript + React: Typing Generic forwardRefs shared, util, core: Schroedinger's module names Learning Rust and Go TypeScript: Narrow types in catch clauses TypeScript: Low maintenance types Tidy TypeScript: Name your generics Tidy TypeScript: Avoid traditional OOP patterns Tidy TypeScript: Prefer type aliases over interfaces Tidy TypeScript: Prefer union types over enums My new book: TypeScript in 50 Lessons Go Preact! ❤️ this in JavaScript and TypeScript TypeScript and ECMAScript Modules TypeScript + React: Why I don't use React.FC TypeScript + React: Component patterns TypeScript: Augmenting global and lib.dom.d.ts Vite with Preact and TypeScript TypeScript: Union to intersection type 11ty: Generate Twitter cards automatically Are large node module dependencies an issue? TypeScript: Variadic Tuple Types Preview TypeScript: Improving Object.keys Remake, Remodel. Part 4. TypeScript + React: Typing custom hooks with tuple types TypeScript: Assertion signatures and Object.defineProperty TypeScript: Check for object properties and narrow down type Boolean in JavaScript and TypeScript void in JavaScript and TypeScript Symbols in JavaScript and TypeScript Why I use TypeScript TypeScript + React: Extending JSX Elements TypeScript: Validate mapped types and const context TypeScript: Match the exact object shape TypeScript: The constructor interface pattern Streaming your Meetup - Part 3: Speaker audio Streaming your Meetup - Part 2: Speaker video Streaming your Meetup - Part 1: Basics and Projector TypeScript and React Guide: Added a new styles chapter TypeScript and React Guide: Added a new render props chapter TypeScript and React: Styles and CSS TypeScript and React TypeScript and React Guide: Added a new prop types chapter TypeScript without TypeScript -- JSDoc superpowers TypeScript: Mapped types for type maps JAMStack vs serverless web apps The Unsung Benefits of JAMStack Sites TypeScript: Ambient modules for Webpack loaders My most favourite talks in 2018 TypeScript and React Guide: Added a new context chapter TypeScript: Built-in generic types TypeScript: Type predicates JSX is syntactic sugar TypeScript and React Guide: Added a new hooks chapter Getting your CfP application right FAQ on our Angular Connect Talk: Automating UI development TypeScript and Substitutability Debugging Node.js apps in TypeScript with Visual Studio Code From Medium: Deconfusing Pre- and Post-processing From Medium: PostCSS misconceptions Saving and scraping a website with Puppeteer Cutting the mustard - 2018 edition Wordpress as CMS for your JAMStack sites My most favourite podcast episodes in 2017 My most favourite talks in 2017 My most favourite books in 2017 The Best Request Is No Request, Revisited Not so hidden figures - Organizing ScriptConf My podcast journey to ScriptCast Grid layout, grid layout everywhere! #scriptconf and #devone Object streams in Node.js
Streaming your Meetup - Part 4: Directing and Streaming with OBS
2019-08-06 · via oida.dev | TypeScript, Rust

Now that we have everything wired up, it’s time to record, direct and stream! If you missed the previous parts, check out the table of contents to quickyl jump to a previous section.

  1. Basics and Projector
  2. Recording the speaker
  3. Recording audio
  4. Directing and streaming with OBS – 📍you are here

Ready? Let’s go!

A few words before we start #

For this tutorial we use OBS, aka Open Broadcaster Software. This thing is a beast. There’s almost nothing you can’t do with OBS. I could fill pages, but this shouldn’t be an OBS guide book, rather a gentle introduction so you can get started easily.

There are of course other programs out there that might have a nicer user interface or are generally more intuitive to use, but OBS is free, cross-platform, can do a ton, and is totally sufficient for your videos.

One thing that I don’t share in this tutorial is how to operate the YouTube live studio or similar. There are just too many options out there, and especially YouTube changes look and feel way too often. I just can’t keep up with those changes.

I try to lead you to the correct settings you need for your YouTube stream, though.

Ready? Let’s go!

Really important hardware settings #

I already spoke about it in the last parts, but here’s a quick rundown of some important hardware requirements and settings you have to take to successfully stream your meetup:

  1. Have a laptop with a proper graphics card. ATI or NVIDIA. Intel on-board is not sufficent enough for 30fps or more.
  2. Make sure you plug the cameras (the projector and your speaker) to the opposite sides of your laptop. The reasoning is that the left and the right side might have different power supply. Especially CamLink is draining a lot of power, and it might crash at times if there isn’t enough.
  3. Power plugged in, always.
  4. If possible, go for an ethernet link rather than WiFi. Even with the best upstream WiFi can be flaky.

All good? Than check out this one important software setting.

One really important software setting #

OBS works without much hassle. You open it and everything is like you left it before. It has a ton of settings for you to fiddle around, but there is one really important setting you shouldn’t miss.

The original output and canvas resolution of OBS is some weird value. You want to have HD, at least. To change this, click Settings (button) → Video (tab) and change both canvas resolution and output resolution to HD.
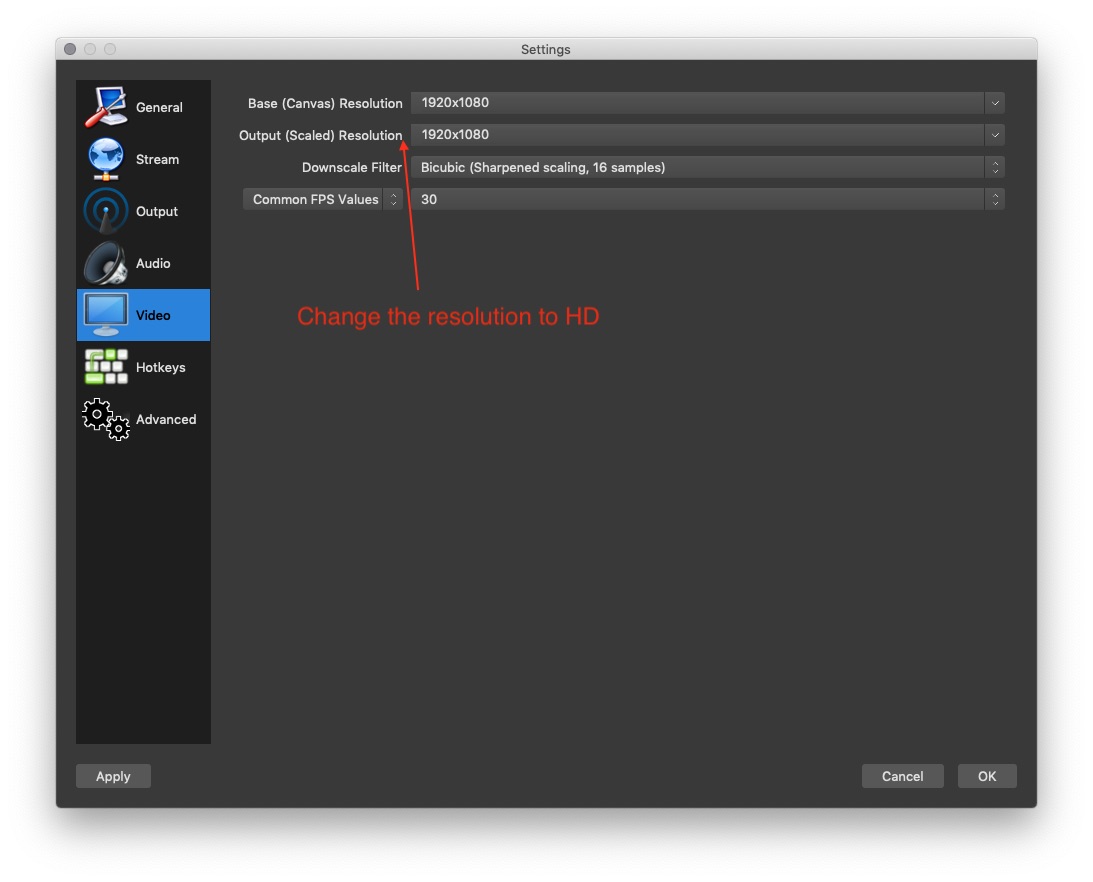
The settings screen

Now you can start designing your scenes.

Scenes #

OBS works in scenes. Think of it as different arrangements for your content. You can switch easily between scenes to get more dynamic into your live streams.

The scenes box is located at the bottom left of the OBS screen. With the + button you can add new screens, with - you delete them. You know how this works.

I usually create four different scenes:

  1. Intro and Break This one is for the parts of the live stream where people shouldn’t see what’s going on. I usually put in a logo and some catchy background music. Royalty free of course.
  2. Scene. The main scene itself. This one contains all of it. Speaker video, speaker audio, logo and projector. The setup is something you usually see from conference videos.
  3. Speaker only. This one is a full screen capture of the speaker. Nice for parts where you don’t need a slide in your background, but where it’s more important to see how the speaker reacts.
  4. Projector only. Projector only is the opposite. Here we see what’s going on on screen, no distractions. I use this especially for live coding parts.

You can switch between scenes by clicking on them. If you want to have keyboard shortcuts, go to SettingsHot Keys and assign shortcuts at every Switch to scene entry.
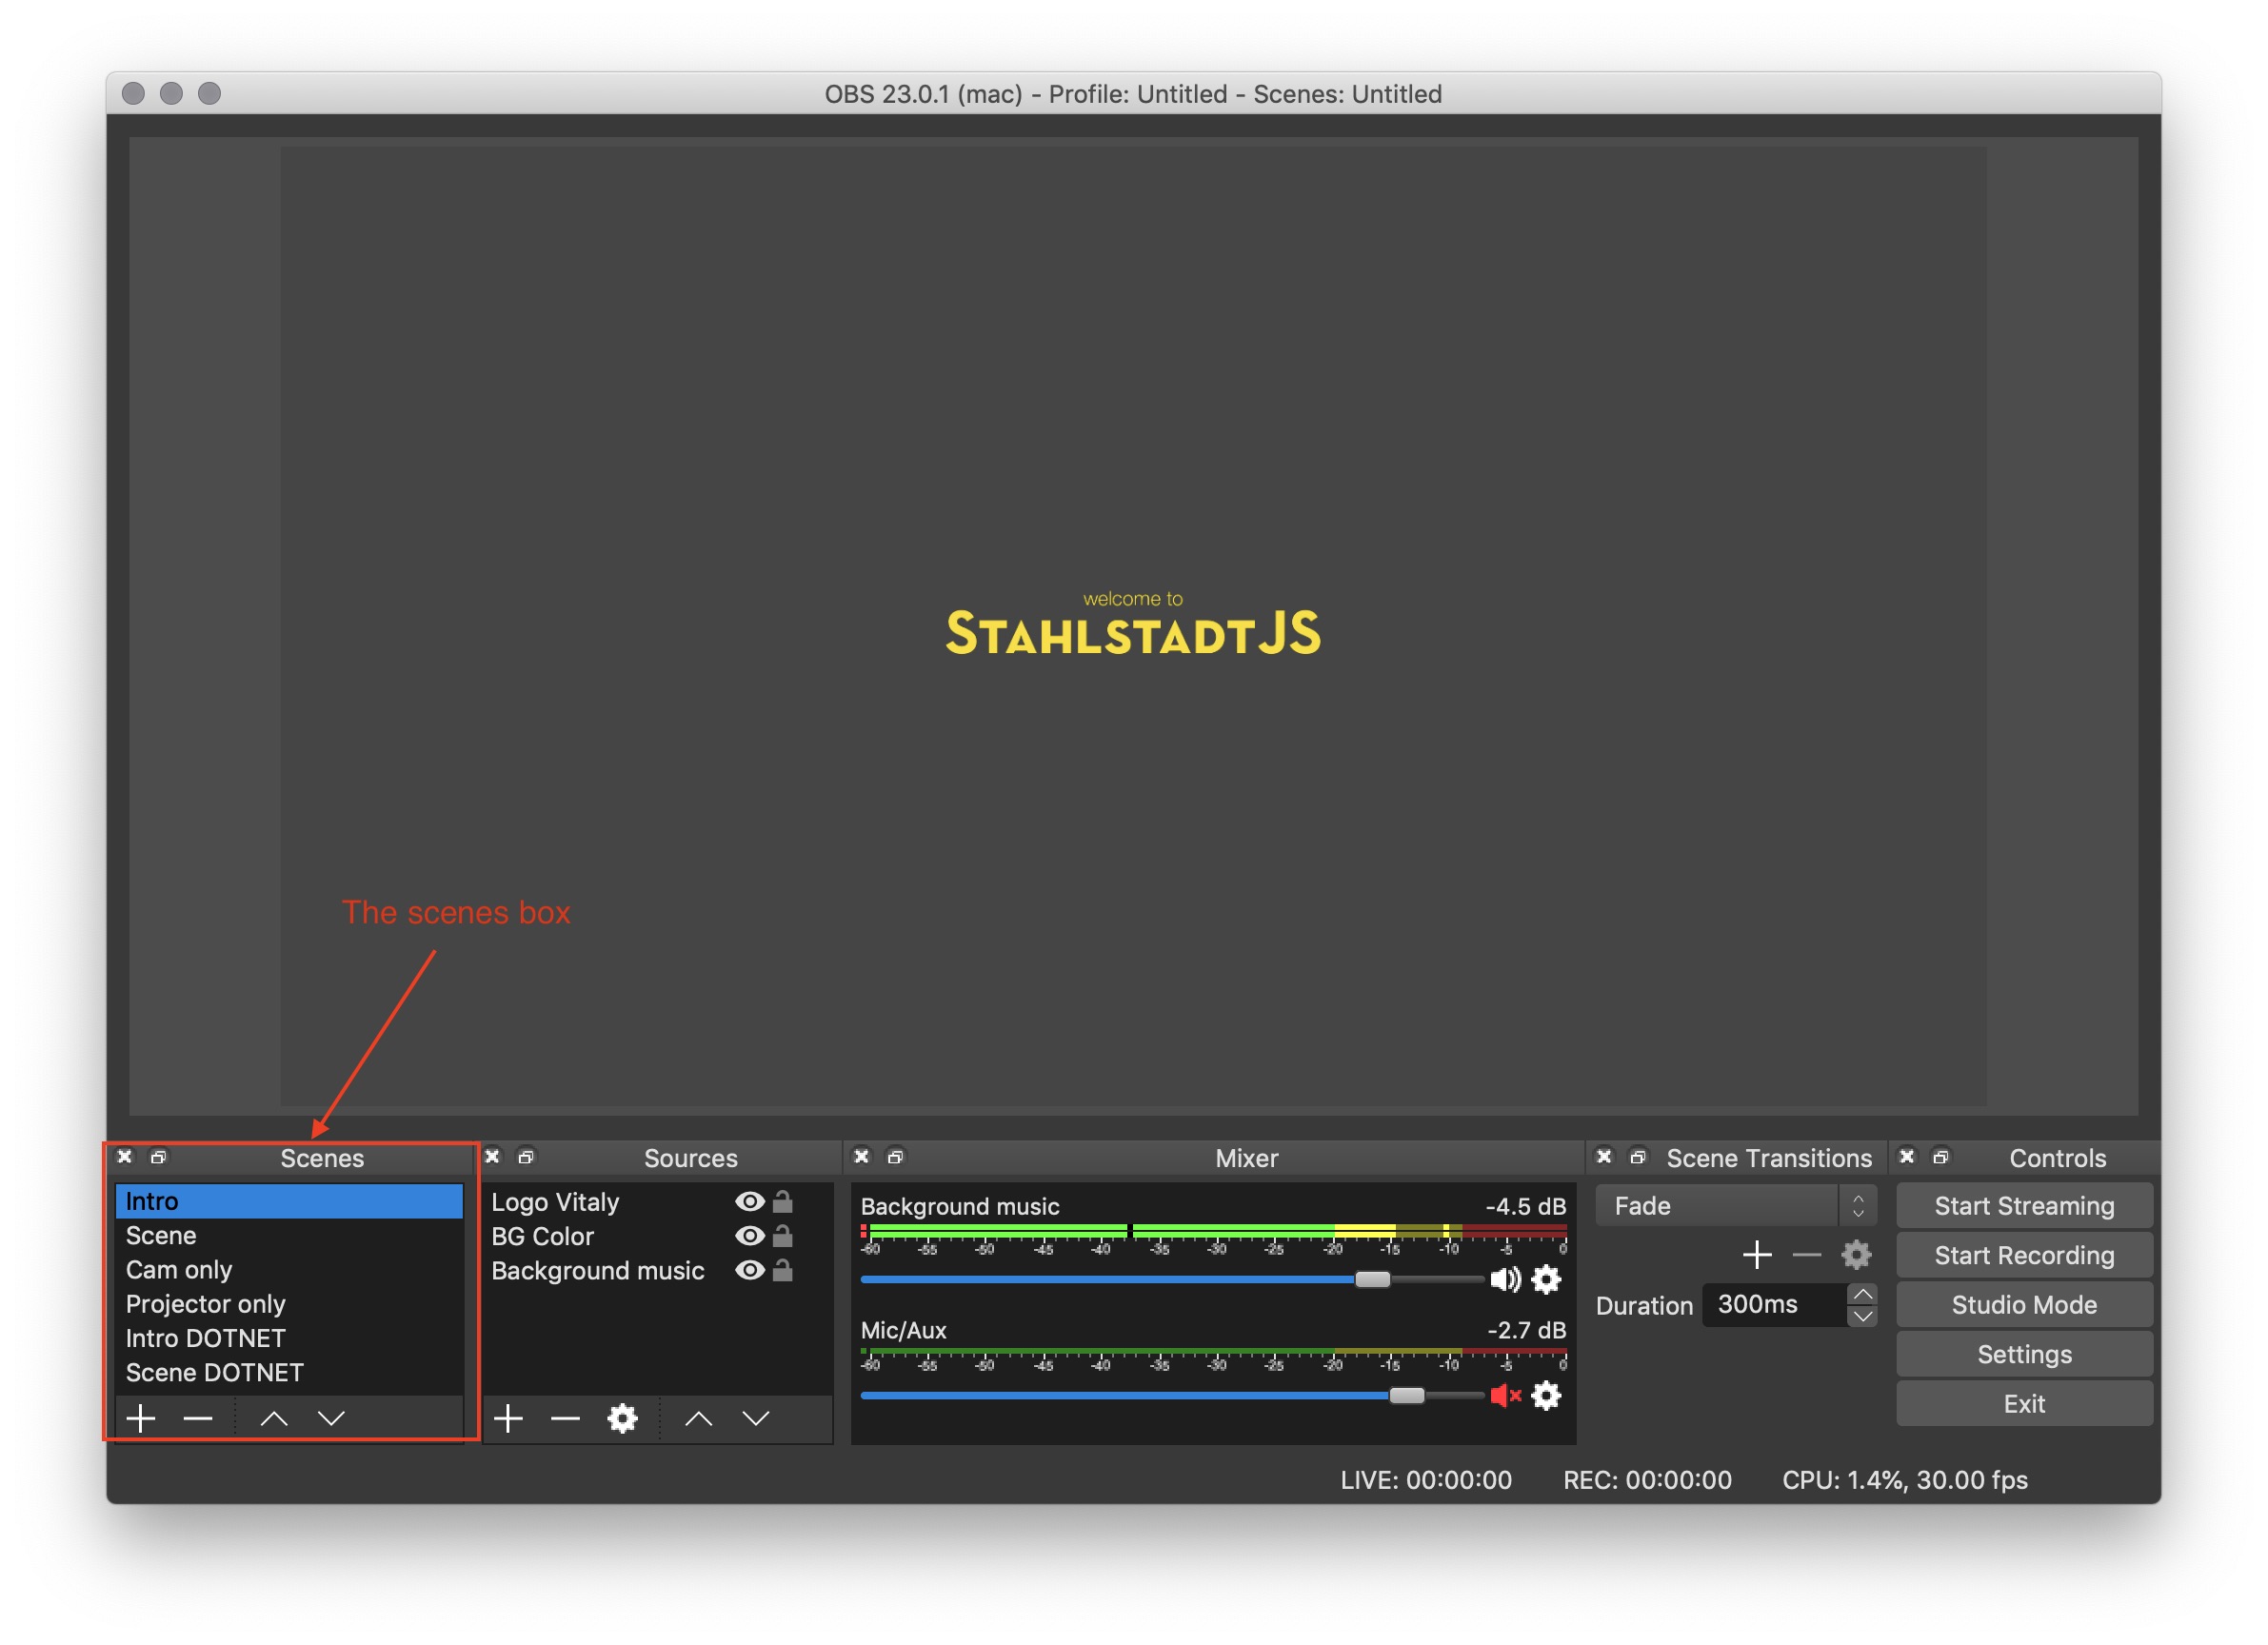
The scenes box

The scenes are set, now we add the sources.

Sources #

Sources are, well, the input sources for your live stream. This can also be anything. Starting from everything we have attached to the laptop over to images, pre-recorded videos, media of any kind or simple things like colored areas. This can be overwhelming. So here’s a list of important sources that you need.

  1. Projector video. This is a Video Capture Device. Your webcam. Add a new Video Capture Device and select your CamLink with the projector image. Make sure to set the framerate right with the tools by Elgato (see the chapter on projector video).
  2. Projector audio. You are using HDMI, that’s why you get audio input from your laptop as well. Adding a new Audio Input Capture adds your CamLinks audio signal to your mixer. This is great if your speaker uses audio in their talks or if they show videos. Audio sources are also added to your Mixer where you can selectively mute them. Watch the Mic/Aux part. This one should be muted in your break scenes, as it could contain some background sound from the microphone attached to it. Level your audio so it’s comfortably in the yellow area of the loundness scale.
  3. Speaker video. Another Video Capture Device with your second camera. Either via CamLink or via USB.
  4. Speaker audio. Another Audio Input Capture with your speaker’s voice. Either from the standard External Microphone attached to your audio jack, or from your webcam, or from a Zoom. Whatever you’ve chosen.
  5. Backdrop. I create a nice backdrop for our stream with the logo of the event, and maybe it’s number. In full HD. I use an Image source and add it to the mix.
  6. Background mnusic. A loop for the breaks. It’s a Media source where I select something catch from Kevin MacLeod

Depending on how you want to style your stream, you also can have some text sources with the speaker names or similar.
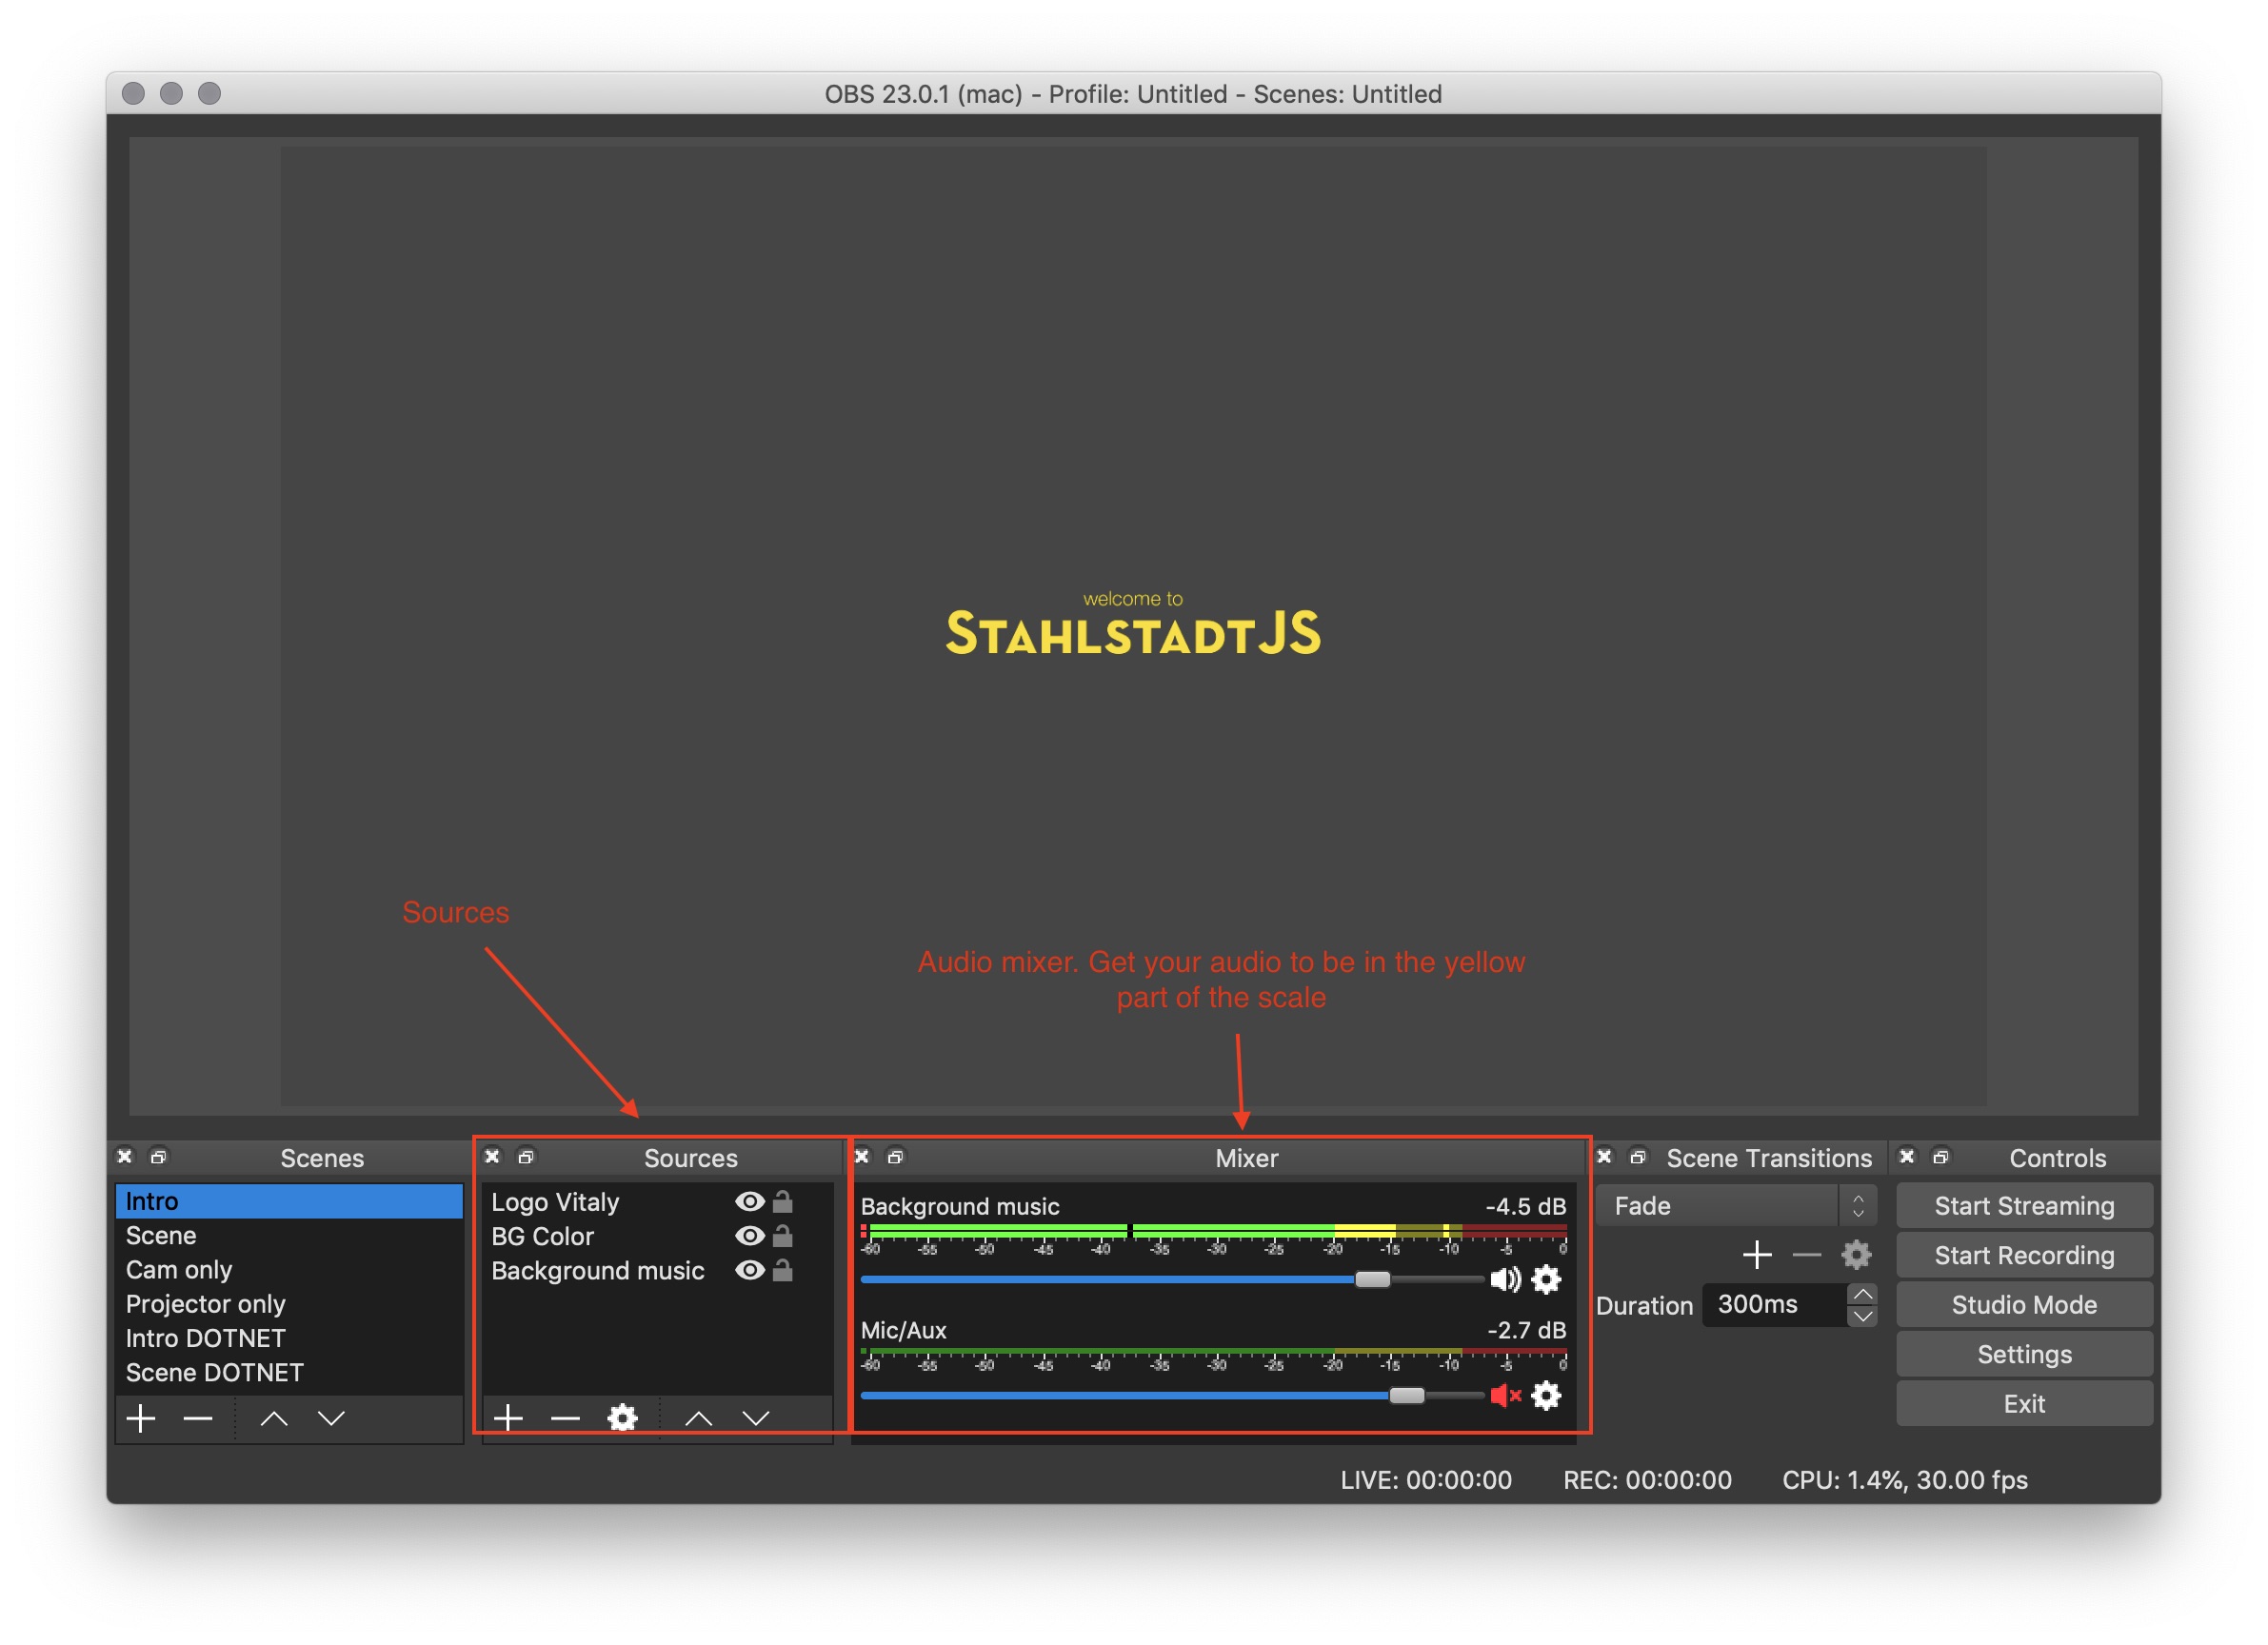
Sources and audio

Every source you create is added to the selected scene. You can move them around, change the size and crop it to your liking. This one is actually the tedious part and requires the most work.

Sources are however globally available. This means that you can create a new source at a different scene, or just use the one you already created.

Here’s how I distribute sources along scenes:

  • Intro and Break: Backdrop and Background music. I mute Mic/Aux. I might add a Text Source with a quick statement that we are either “starting soon” or “having a break”.
  • Scene: I add the Backdrop, Projector Audio, Projector Video, Speaker Audio and Speaker Video nicely arranged. I might add another Text Source showing speaker name and talk title.
  • Cam only: Includes Speaker Video, Speaker Audio, Projector Audio. Nothing more.
  • Projector only: Includes Speaker Audio, Projector Video, Projector Audio. Nothing more.

Scenes may vary a bit depending on the meetup. But in general this is my setup. Now get it out the public!

Streaming and Recording #

Let’s assume you want to stream it via YouTube. Usually you go to the live stream dashboard to get started. Make sure you try this out way before your first meetup. It can take up to 24hours for YouTube to verify you. Once you are ready and you set up your live stream, look at the live stream page for the Encoder setup. This part shows a streaming server and a key. Copy both to a note or scribble it down. We need it.
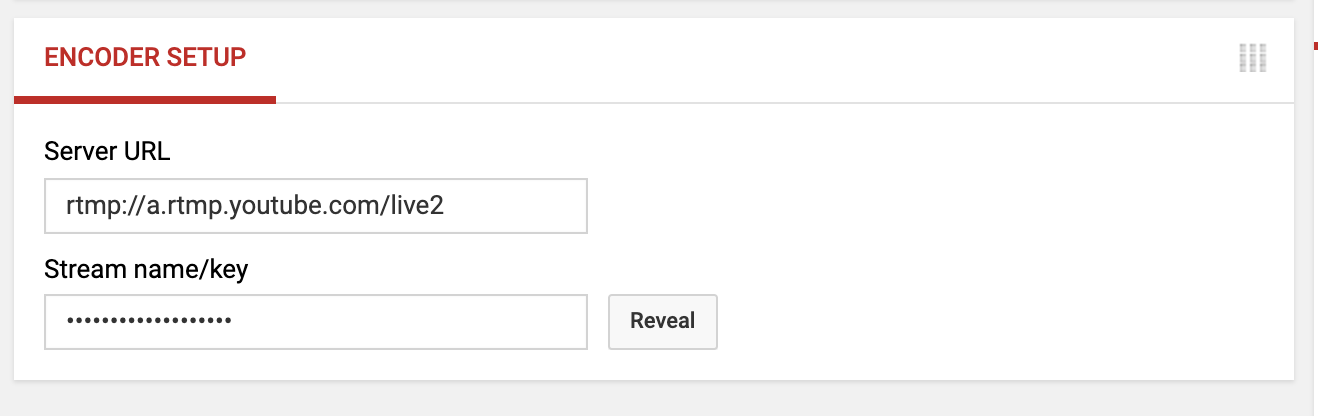
Streaming encoder setup

We need this data to set up our streaming environment. In general, OBS needs a streaming server and some form of authentication, no matter which service you use.

Go to SettingsStream and select your streaming service of choice. Enter your streaming key (in case of YouTube) and you are set.
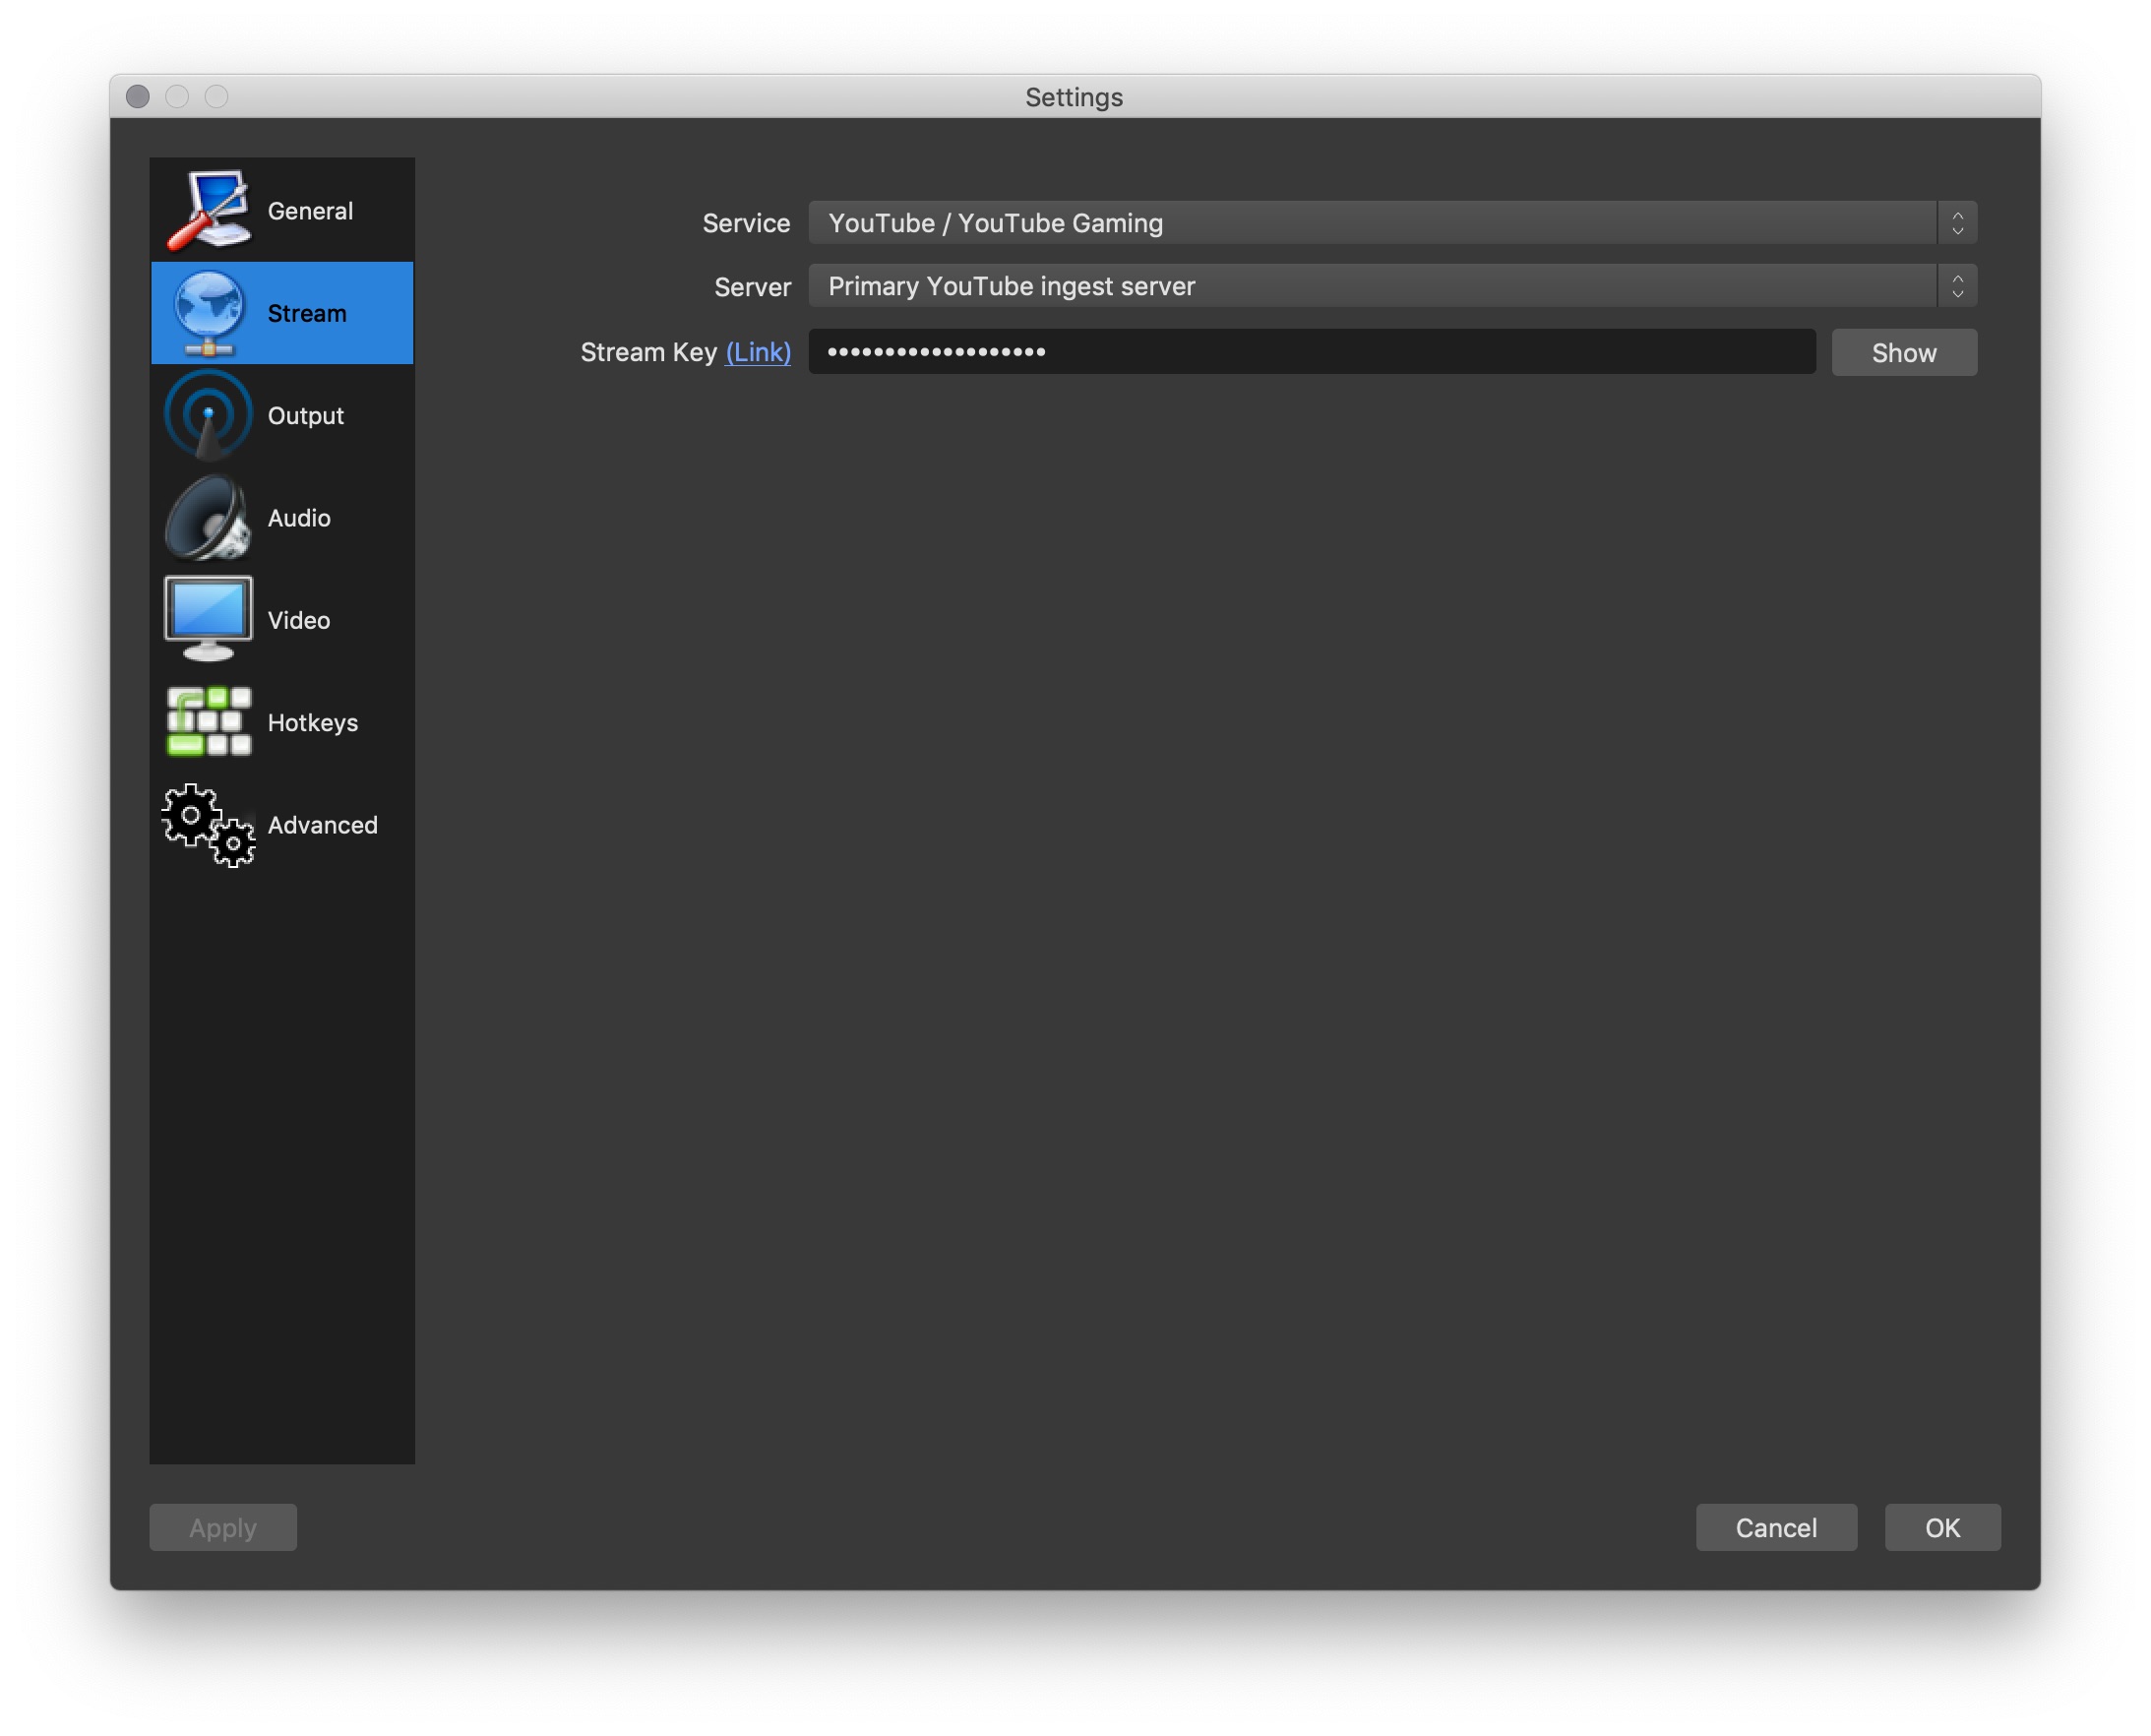
Streaming setup

You have two buttons in your main UI: Start Streaming and Start Recording. Press Start Streaming to get everything out to YouTube. Everytime a talk starts, I also press Start Recording. I stop it after the talk ends. This gives me a nice MKV file I can edit later to have a “clean” version for our YouTube channel.

Don’t record everything in one sitting. Your memory might get filled up and you can’t end recording.

A click on a scene activates the scene. Which means when you stream, this is the scene you are currently streaming.

Congratulations! You are a streamer!

Studio Mode #

One last tip is Studio Mode. When you activate it, you see two scenes. The scene that is streaming on the right, and any upcoming scene you wish on the left. This gives you some time to prepare the screen (e.g. changing the speaker name or similar), and makes sure you don’t accidentally click on a scene you don’t want to stream. This is however very heavy on your machine, so make good use when you know you can afford it.
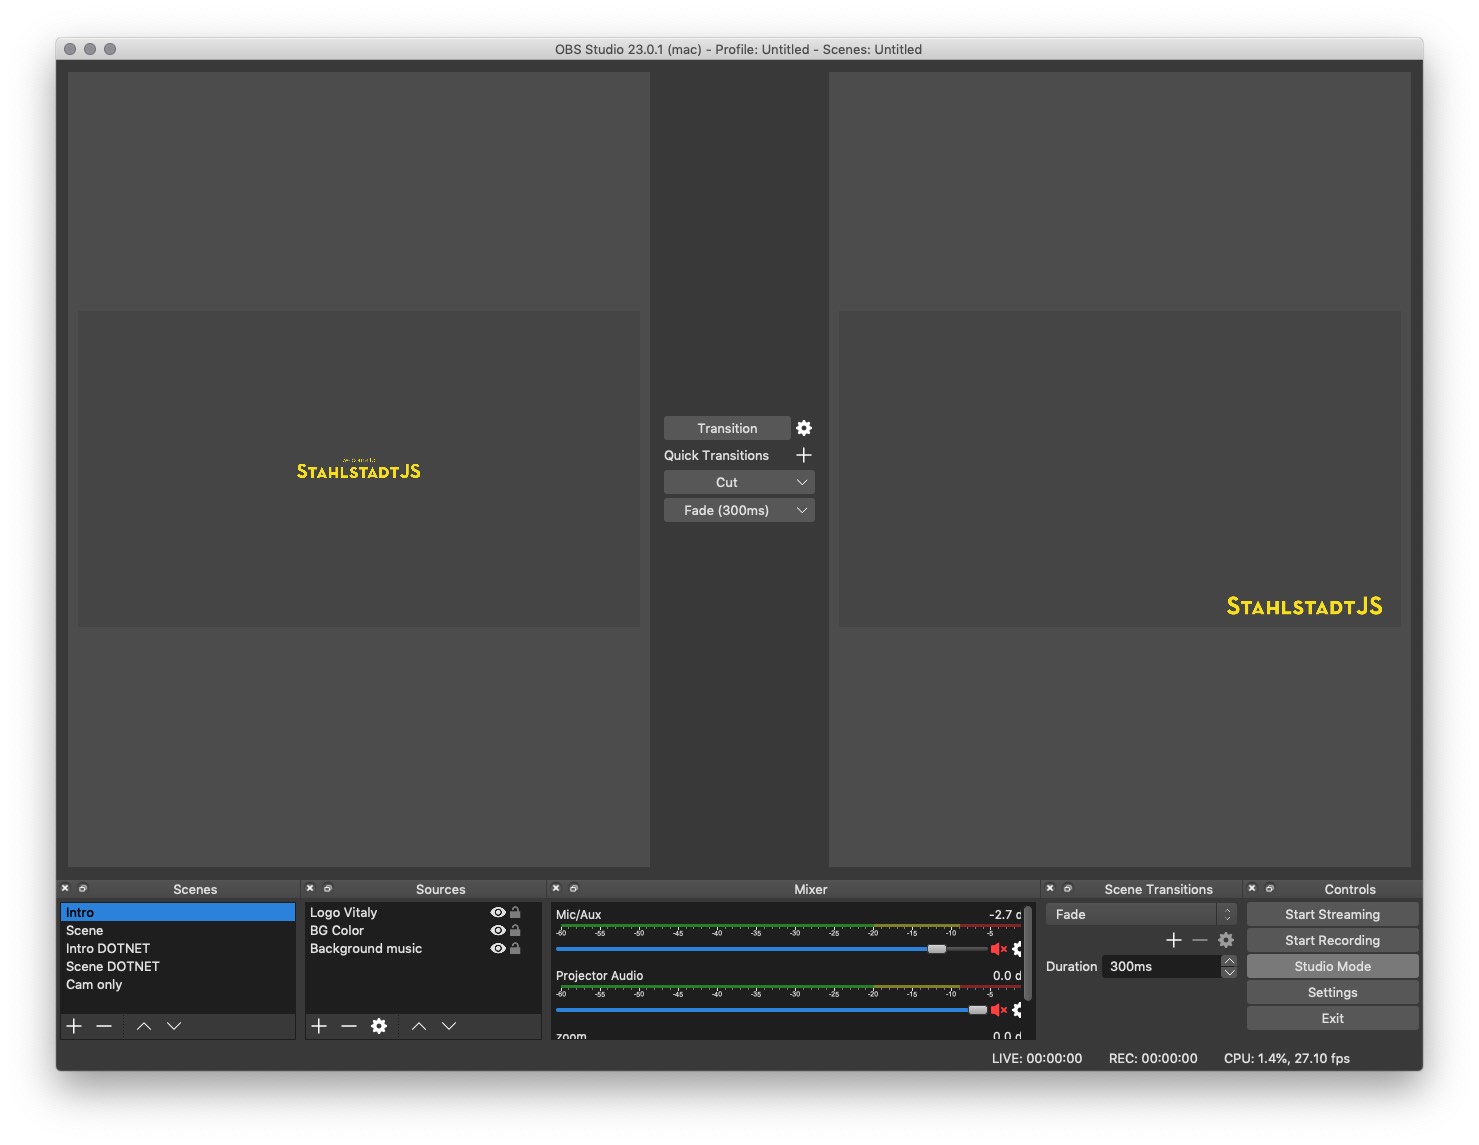
Studio mode

The end. #

This is it! So far, at least. We were able to get a decent streaming setup for 315 EUR, and with the professional, yet free Open Broadcaster Software we are able to stream the whole show over the wire to your meetup members who can’t attend.

We’ve done this a lot with meetups like Technologieplauscherl (where we even have a streamer collective) and Stahlstadt.js.

I’m really curious if you used this guide and how it helped you. Please reach out to me on Twitter and chat with me. I really want to know which setup you have decided on.

And never forget to practice. I’ve recorded a couple of meetups now and everytime I find things that I thought I can do better next time. Having a trial run never is a bad idea.

And with that! Have fun and stream on a budget!

Related Articles