


Edit · Feb 8, 2014 · 19 minutes read · Follow @mgechev AngularJS canvas HTML5 JavaScript Node.js vnc
In this blog post I’m going to show you how to build a VNC client using AngularJS and Yeoman. The source code used in the post is available at my GitHub. Click here to see the final result.

It seems I have affinity to the remote desktop protocols, because this is my third project at GitHub, which implements one (VNC client on 200 lines of JavaScript, VNC client for Chrome DevTools and VNC client with AngularJS).
Anyway, lets begin with the tutorial.
Architecture
First, lets take a look at our architecture:
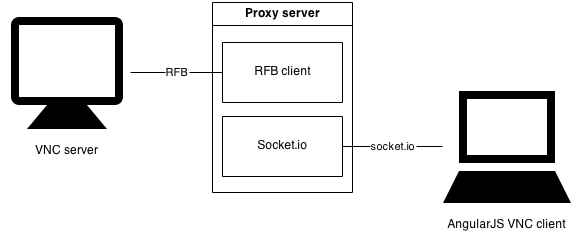
We should have a VNC server on the machine we want to control. This machine provides interface accessible through the RFB protocol. The proxy in the middle has RFB client, which knows how to talk to the RFB server. The proxy also provides HTTP server, which is responsible for serving static files to the client and also allows communication through socket.io. The last component in our diagram is the “AngularJS VNC client”, which consists few HTML and JavaScript files provided to the browser by the proxy. This is what actually the user of our VNC client sees. He or she use the form provided in the “AngularJS VNC client” in order to enter connection details and connect to the machine he or she wants to control
Proxy
If you’re not interested in the Node.js stuff, you can skip it and just copy and paste the code for the proxy from GitHub.
We can now continue with our proxy server. Create a directory called angular-vnc. Inside it create another one called proxy:
mkdir angular-vnc
cd angular-vnc
mkdir proxy
cd proxy
# Initialize the node.js application, creates package.json
npm init
Now lets install all the dependencies required for our proxy server:
# Required for the communication with the AngularJS client
npm install socketio --save
# Required for the communication with the VNC server
npm install rfb --save
# It provides the static files of the AngularJS client
npm install express --save
# We use it to create HTTP server
npm install http --save
# We use it to process the received frames
npm i git+https://github.com/pkrumins/node-png --save
All dependencies are installed, now your package.json should look something like this:
{
  "name": "js-vnc",
  "version": "0.0.1",
  "repository": {
    "type": "git",
    "url": ""
  },
  "dependencies": {
    "socket.io": "~0.9.16",
    "rfb": "~0.2.3",
    "express": "~3.4.8",
    "http": "0.0.0",
    "png": "git+https://github.com/pkrumins/node-png"
  }
}
We will put our proxy in folder called lib, located inside angular-vnc/proxy:
mkdir lib
touch lib/server.js
touch index.js
Note that we created one more file in the root directory of our proxy, we will use it to start the proxy server.
Add the following content inside index.js:
var server = require('./lib/server');

server.run();
Using CommonJS we require our server, located inside the lib folder and call its run method. In order to make this code work, we should define run method in ./lib/server.js:
var clients = [],
    express = require('express'),
    http = require('http'),
    Config = {
      HTTP_PORT: 8090
    };
exports.run = function () {
  var app = express(),
      server = http.createServer(app);

  app.use(express.static(__dirname + '/../../client/app'));
  server.listen(Config.HTTP_PORT);
  io = io.listen(server, { log: false });
  io.sockets.on('connection', function (socket) {
    console.info('Client connected');
    socket.on('init', function (config) {
      var r = createRfbConnection(config, socket);
      socket.on('mouse', function (evnt) {
        r.sendPointer(evnt.x, evnt.y, evnt.button);
      });
      socket.on('keyboard', function (evnt) {
        r.sendKey(evnt.keyCode, evnt.isDown);
        console.info('Keyboard input')
      });
      socket.on('disconnect', function () {
        disconnectClient(socket);
        console.info('Client disconnected')
      });
    });
  });
};
In the snippet above we create new Express application, with static directory /../../client/app and also start HTTP server, listening on port 8090.
As next step we wrap the HTTP server with socket.io, add event handler for incoming socket.io connections and initialize variable called clients. In the connection handler we add one more event handler, which is invoked when the AngularJS application sends init message. When init message is received, we add three more handlers, which are responsible for handling the incoming mouse, keyboard and disconnect events.
Lets take a quick look at createRfbConnection:
function createRfbConnection(config, socket) {
  try {
    var r = RFB({
      host: config.hostname,
      port: config.port,
      password: config.password,
      securityType: 'vnc',
    });
  } catch (e) {
    console.log(e);
  }
  addEventHandlers(r, socket);
  return r;
}
With the received by the client configuration we initialize new RFB connection and add some event handlers. Note that you should require RFB in server.js, in order to make the script work:
var RFB = require('rfb');addEventHandlers adds event handlers, which should handle RFB events, like errors and new incoming frames.
function addEventHandlers(r, socket) {

  var initialized = false,
      screenWidth, screenHeight;

  function handleConnection(width, height) {
    screenWidth = width;
    screenHeight = height;
    console.info('RFB connection established');
    socket.emit('init', {
      width: width,
      height: height
    });
    clients.push({
      socket: socket,
      rfb: r,
      interval: setInterval(function () {
        r.requestRedraw();
      }, 1000)
    });
    r.requestRedraw();
    initialized = true;
  }

  r.on('error', function () {
    console.error('Error while talking with the remote RFB server');
  });

  r.on('raw', function (rect) {
    !initialized && handleConnection(rect.width, rect.height);
    socket.emit('frame', {
      x: rect.x,
      y: rect.y,
      width: rect.width,
      height: rect.height,
      image: encodeFrame(rect).toString('base64')
    });
    r.requestUpdate({
      x: 0,
      y: 0,
      subscribe: 1,
      width: screenWidth,
      height: screenHeight
    });
  });

  r.on('*', function () {
    console.error(arguments);
  });
}
Lets take a look at the handler of the raw event. It takes very important role in the initialization of the connection. When we receive a raw event for first time the value of initialized is false, because of the way boolean expressions are being evaluated (see Lazy evaluation), !initialized is evaluated to true, which leads to the call of handleConnection. handleConnection is responsible for notifying the AngularJS client that now we are connected to the VNC server. It also adds the client to the clients collection and changes the value of initialized to true, so when next time we receive new frame this won’t lead to call of handleConnection.
In other words, !initialized && handleConnection(rect.width, rect.height); is short version of:
if (!initialized) {
  handleConnection(rect.width, rect.height);
}
The next method of our proxy, we are going to look at is encodeFrame:
function encodeFrame(rect) {
  var rgb = new Buffer(rect.width * rect.height * 3, 'binary'),
      offset = 0;

  for (var i = 0; i < rect.fb.length; i += 4) {
    rgb[offset++] = rect.fb[i + 2];
    rgb[offset++] = rect.fb[i + 1];
    rgb[offset++] = rect.fb[i];
  }
  var image = new Png(rgb, rect.width, rect.height, 'rgb');
  return image.encodeSync();
}
Don’t forget to require node-png:
var Png = require('../node_modules/png/build/Release/png').Png;All that encodeFrame does is reordering the received pixels and converting them to PNG. The handler of the raw event converts the binary result, received by encodeFrame to base64, in order to make it readable for the AngularJS client.
And the last method in the proxy is disconnectClient:
function disconnectClient(socket) {
  clients.forEach(function (client) {
    if (client.socket === socket) {
      client.rfb.end();
      clearInterval(client.interval);
    }
  });
  clients = clients.filter(function (client) {
    return client.socket === socket;
  });
}
As its name states it disconnects clients. This method is called with socket. First, it finds the client, which corresponds to the given socket, ends its RFB connection and removes it from the clients array.
And now we are done with the proxy! Lets continue with the fun part, AngularJS and Yeoman!
AngularJS & Yeoman VNC client
First, of all you will need to install Yeoman, if you don’t already have it on your computer:
# Installs Yeoman
npm install -g yeoman
# Installs the AngularJS generator for Yeoman
npm install -g generator-angular
Now we can begin! Inside the directory angular-vnc create a directory called client:
cd angular-vnc
mkdir client
cd client
# Creates new AngularJS application
yo angular
Yeoman will ask you few questions, you should answer as follows:
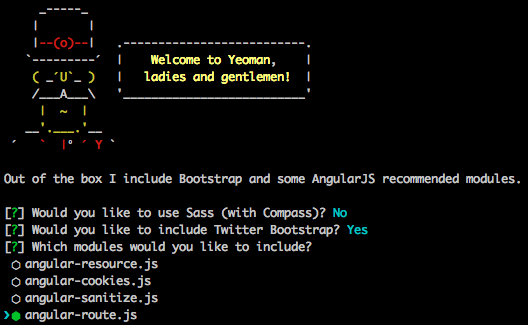
We are going to use Bootstrap and `angular-route.js`. Wait few seconds and all required dependencies will be resolved.
Look at: app/scripts/app.js, its content should be something like:
'use strict';

angular.module('angApp', [
  'ngRoute'
])
  .config(function ($routeProvider) {
    $routeProvider
      .when('/', {
        templateUrl: 'views/main.html',
        controller: 'MainCtrl'
      })
      .otherwise({
        redirectTo: '/'
      });
  });
Now in the client directory run:
After the command completes, the content of app/scripts/app.js, should be magically turned into:
'use strict';

angular.module('angApp', [
  'ngRoute'
])
  .config(function ($routeProvider) {
    $routeProvider
      .when('/', {
        templateUrl: 'views/main.html',
        controller: 'MainCtrl'
      })
      .when('/vnc', {
        templateUrl: 'views/vnc.html',
        controller: 'VncCtrl'
      })
      .otherwise({
        redirectTo: '/'
      });
  });
For next step, replace the content of app/views/main.html with:
<div class="container">

  <div class="row" style="margin-top:20px">
      <div class="col-xs-12 col-sm-8 col-md-6 col-sm-offset-2 col-md-offset-3">
      <form role="form" name="vnc-form" novalidate>
        <fieldset>
          <h2>VNC Login</h2>
          <hr class="colorgraph">
          <div class="form-error" ng-bind="errorMessage"></div>
          <div class="form-group">
              <input type="text" name="hostname" id="hostname-input" class="form-control input-lg" placeholder="Hostname" ng-model="host.hostname" required ng-minlength="3">
          </div>
          <div class="form-group">
              <input type="number" min="1" max="65535" name="port" id="port-input" class="form-control input-lg" placeholder="Port" ng-model="host.port" required>
          </div>
          <div class="form-group">
              <input type="password" name="password" id="password-input" class="form-control input-lg" placeholder="Password" ng-model="host.password">
          </div>
          <div class="form-group">
              <a href="" class="btn btn-lg btn-primary btn-block" ng-click="login()">Login</a>
          </div>
          <hr class="colorgraph">
        </fieldset>
      </form>
    </div>
  </div>

</div>
You should also insert some CSS at app/styles/main.css:
.colorgraph {
  margin-bottom: 7px;
  height: 5px;
  border-top: 0;
  background: #c4e17f;
  border-radius: 5px;
  background-image: -webkit-linear-gradient(left, #c4e17f, #c4e17f 12.5%, #f7fdca 12.5%, #f7fdca 25%, #fecf71 25%, #fecf71 37.5%, #f0776c 37.5%, #f0776c 50%, #db9dbe 50%, #db9dbe 62.5%, #c49cde 62.5%, #c49cde 75%, #669ae1 75%, #669ae1 87.5%, #62c2e4 87.5%, #62c2e4);
  background-image: -moz-linear-gradient(left, #c4e17f, #c4e17f 12.5%, #f7fdca 12.5%, #f7fdca 25%, #fecf71 25%, #fecf71 37.5%, #f0776c 37.5%, #f0776c 50%, #db9dbe 50%, #db9dbe 62.5%, #c49cde 62.5%, #c49cde 75%, #669ae1 75%, #669ae1 87.5%, #62c2e4 87.5%, #62c2e4);
  background-image: -o-linear-gradient(left, #c4e17f, #c4e17f 12.5%, #f7fdca 12.5%, #f7fdca 25%, #fecf71 25%, #fecf71 37.5%, #f0776c 37.5%, #f0776c 50%, #db9dbe 50%, #db9dbe 62.5%, #c49cde 62.5%, #c49cde 75%, #669ae1 75%, #669ae1 87.5%, #62c2e4 87.5%, #62c2e4);
  background-image: linear-gradient(to right, #c4e17f, #c4e17f 12.5%, #f7fdca 12.5%, #f7fdca 25%, #fecf71 25%, #fecf71 37.5%, #f0776c 37.5%, #f0776c 50%, #db9dbe 50%, #db9dbe 62.5%, #c49cde 62.5%, #c49cde 75%, #669ae1 75%, #669ae1 87.5%, #62c2e4 87.5%, #62c2e4);
}

form.ng-invalid.ng-dirty input.ng-invalid {
  border-color: #ff0000 !important;
}

.form-error {
  width: 100%;
  height: 25px;
  color: red;
  text-align: center;
}
This defines the markup and styles for simple Bootstrap form.
After you start the proxy:
cd ../proxy
node index.js
and open http://localhost:8090, you should see something like this:
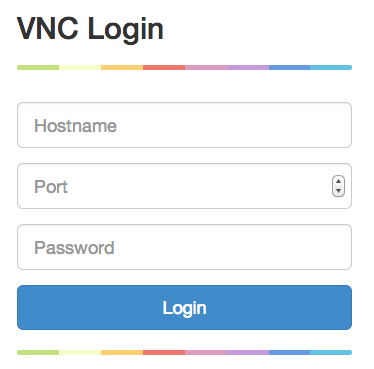
The awesome thing is that we already have validation for the form! Did you notice that we added selector form.ng-invalid.ng-dirty input.ng-invalid? AngularJS is smart enough to validate the fields in our form by seeing their type (for example input type="number", for the port) and their attributes (required, ng-minlength). When AngularJS detects that any field is not valid it adds the class: ng-invalid to the field, it also adds the class ng-invalid to the form, where this field is located. We, simply, take advantage, of this functionality provided by AngularJS, and define the styles: form.ng-invalid.ng-dirty input.ng-invalid. If you’re still not aware how the validation works checkout Form Validation in NG-Tutorial.
We already have attached controller, to our view (because of Yeoman), so we only need to change its behavior.
Replace the content of app/scripts/controllers/main.js with the following snippet:
'use strict';

angular.module('clientApp')
  .controller('MainCtrl',
  function ($scope, $location, VNCClient) {

    $scope.host = {};
    $scope.host.proxyUrl = $location.protocol() + '://' + $location.host() + ':' + $location.port();

    $scope.login = function () {
      var form = $scope['vnc-form'];
      if (form.$invalid) {
        form.$setDirty();
      } else {
        VNCClient.connect($scope.host)
        .then(function () {
          $location.path('/vnc')
        }, function () {
          $scope.errorMessage = 'Connection timeout. Please, try again.';
        });
      }
    };

  });
The most interesting part of MainCtrl is the login method. In it, we first check wether the form is invalid (form.$invalid), if it is we make the it “dirty”. We do this in order to remove the ng-pristine class from the form and force the validation. This scenario will happen if the user does not enter anything in the form and press the “Login” button. If the form is valid, we call the connect method of the service VNCClient. As you see it returns promise, when the promise is resolved we redirect the user to the page http://localhost:8090/#/vnc, otherwise we show him or her the message: 'Connection timeout. Please, try again.' (checkout <div class="form-error" ng-bind="errorMessage"></div>).
The next component we are going to look at is the service VNCClient. Before that, lets create it using Yeoman:
yo angular:service VNCClientNow open the file: app/scripts/services/vncclient.js and place the following content there:
'use strict';

var CONNECTION_TIMEOUT = 2000;

function VNCClient($q, Io) {

  this.frameCallbacks = [];

  this.addFrameCallback = function (fn) {
    this.frameCallbacks.push(fn);
  };

  this.update = function (frame) {
    this.frameCallbacks.forEach(function (cb) {
      cb.call(null, frame);
    });
  };

  this.removeFrameCallback = function (fn) {
    var cbs = this.frameCallbacks;
    cbs.splice(cbs.indexOf(fn), 1);
  };

  this.sendMouseEvent = function (x, y, mask) {
    this.socket.emit('mouse', {
      x: x,
      y: y,
      button: mask
    });
  };

  this.sendKeyboardEvent = function (code, shift, isDown) {
    var rfbKey = this.toRfbKeyCode(code, shift, isDown);
    if (rfbKey)
      this.socket.emit('keyboard', {
        keyCode: rfbKey,
        isDown: isDown
      });
  };

  this.connect = function (config) {
    var deferred = $q.defer(),
        self = this;
    if (config.forceNewConnection) {
      this.socket = Io.connect(config.proxyUrl);
    } else {
      this.socket = Io.connect(config.proxyUrl, { 'force new connection': true });
    }
    this.socket.emit('init', {
      hostname: config.hostname,
      port: config.port,
      password: config.password
    });
    this.addHandlers();
    this.setConnectionTimeout(deferred);
    this.socket.on('init', function (config) {
      self.screenWidth = config.width;
      self.screenHeight = config.height;
      self.connected = true;
      clearTimeout(self.connectionTimeout);
      deferred.resolve();
    });
    return deferred.promise;
  };

  this.disconnect = function () {
    this.socket.disconnect();
    this.connected = false;
  };

  this.setConnectionTimeout = function (deferred) {
    var self = this;
    this.connectionTimeout = setTimeout(function () {
      self.disconnect();
      deferred.reject();
    }, CONNECTION_TIMEOUT);
  };

  this.addHandlers = function (success) {
    var self = this;
    this.socket.on('frame', function (frame) {
      self.update(frame);
    });
  };

  this.toRfbKeyCode = function (code, shift) {
    var keyMap = VNCClient.keyMap;
    for (var i = 0, m = keyMap.length; i < m; i++)
      if (code == keyMap[i][0])
        return keyMap[i][shift ? 2 : 1];
    return null;
  };

}

VNCClient.keyMap = [[8,65288,65288],[9,65289,65289],[13,65293,65293],[16,65505,65505],[16,65506,65506],[17,65507,65507],[17,65508,65508],[18,65513,65513],[18,65514,65514],[27,65307,65307],[32,32,32],[33,65365,65365],[34,65366,65366],[35,65367,65367],[36,65360,65360],[37,65361,65361],[38,65362,65362],[39,65363,65363],[40,65364,65364],[45,65379,65379],[46,65535,65535],[48,48,41],[49,49,33],[50,50,64],[51,51,35],[52,52,36],[53,53,37],[54,54,94],[55,55,38],[56,56,42],[57,57,40],[65,97,65],[66,98,66],[67,99,67],[68,100,68],[69,101,69],[70,102,70],[71,103,71],[72,104,72],[73,105,73],[74,106,74],[75,107,75],[76,108,76],[77,109,77],[78,110,78],[79,111,79],[80,112,80],[81,113,81],[82,114,82],[83,115,83],[84,116,84],[85,117,85],[86,118,86],[87,119,87],[88,120,88],[89,121,89],[90,122,90],[97,49,49],[98,50,50],[99,51,51],[100,52,52],[101,53,53],[102,54,54],[103,55,55],[104,56,56],[105,57,57],[106,42,42],[107,61,61],[109,45,45],[110,46,46],[111,47,47],[112,65470,65470],[113,65471,65471],[114,65472,65472],[115,65473,65473],[116,65474,65474],[117,65475,65475],[118,65476,65476],[119,65477,65477],[120,65478,65478],[121,65479,65479],[122,65480,65480],[123,65481,65481],[186,59,58],[187,61,43],[188,44,60],[189,45,95],[190,46,62],[191,47,63],[192,96,126],[220,92,124],[221,93,125],[222,39,34],[219,91,123]];

angular.module('clientApp').service('VNCClient', VNCClient);
I know it is a lot of code but we will look only at the most important methods. You might noticed that we don’t follow the best practices for defining constructor functions – we don’t add the methods to the function’s prototype. Don’t worry about this, AngularJS will create a single instance of this constructor function and keep it in the services cache.
Lets take a quick look at connect:
this.connect = function (config) {
    var deferred = $q.defer(),
        self = this;
    if (config.forceNewConnection) {
      this.socket = Io.connect(config.proxyUrl);
    } else {
      this.socket = Io.connect(config.proxyUrl, { 'force new connection': true });
    }
    this.socket.emit('init', {
      hostname: config.hostname,
      port: config.port,
      password: config.password
    });
    this.addHandlers();
    this.setConnectionTimeout(deferred);
    this.socket.on('init', function (config) {
      self.screenWidth = config.width;
      self.screenHeight = config.height;
      self.connected = true;
      clearTimeout(self.connectionTimeout);
      deferred.resolve();
    });
    return deferred.promise;
  };
connect accepts a single argument – a configuration object. When the method is called it creates new socket using the service Io, which is simple wrapper of the global io provided by socket.io. We need this wrapper in order to be able to test the application easier and prevent monkey patching. After the socket is created we send new init message to the proxy (do you remember the init message?), with the required configuration for connecting to the VNC server. We also create a connection timeout. The connection timeout is quite important, if we receive a late response by the proxy or don’t receive any response at all. The next important part of the connect method is the handler of the response init message, by the proxy. When we receive the response within the acceptable time limit (remember the timeout) we resolve the promise, which was instantiated earlier in the beginning of the connect method.
This way we transform a callback interface (by socket.io) into a promise based interface.
This is the implementation of the addHandlers method:
this.addHandlers = function (success) {
    var self = this;
    this.socket.on('frame', function (frame) {
      self.update(frame);
    });
  };
Actually we add a single handler, which handles the frame events, which carries new (changed) screen fragments. When new frame is received we invoke the update method. It may look familiar to you – this is actually the observer pattern. We add/remove callbacks using the following methods:
this.addFrameCallback = function (fn) {
    this.frameCallbacks.push(fn);
  };

  this.removeFrameCallback = function (fn) {
    var cbs = this.frameCallbacks;
    cbs.splice(cbs.indexOf(fn), 1);
  };
And in update we simply:
this.update = function (frame) {
    this.frameCallbacks.forEach(function (cb) {
      cb.call(null, frame);
    });
  };
Since we need to capture events in the browsers (like pressing keys, mouse events…) and send them to the server we need methods for this:
this.sendMouseEvent = function (x, y, mask) {
    this.socket.emit('mouse', {
      x: x,
      y: y,
      button: mask
    });
  };

  this.sendKeyboardEvent = function (code, shift, isDown) {
    var rfbKey = this.toRfbKeyCode(code, shift, isDown);
    if (rfbKey)
      this.socket.emit('keyboard', {
        keyCode: rfbKey,
        isDown: isDown
      });
  };
The VNC screen directive is responsible for calling these methods. In the sendKeyboardEvent we transform the keyCode, received by handling the keydown/up event with JavaScript, to one, which is understandable by the RFB protocol. We do this using the array keyMap defined above.
Since we didn’t create the Io service, you can instantiate it by:
And place the following snippet inside app/scripts/services/io.js:
'use strict';

angular.module('clientApp').factory('Io', function () {
  return {
    connect: function () {
      return io.connect.apply(io, arguments);
    }
  };
});
Don’t forget to include the line:
<script src="/socket.io/socket.io.js"></script>in app/index.html.
And now, the last component is the VNC screen directive! But before looking at it, replace the content of app/views/vnc.html with the following markup:
<div class="screen-wrapper">
  <vnc-screen></vnc-screen>
  <button class="btn btn-danger" ng-show="connected()" ng-click="disconnect()">Disconnect</button>
  <a href="#/" ng-hide="connected()">Back</a>
</div>
as you see we include our VNC screen completely declaratively: <vnc-screen></vnc-screen>. In the markup above, we have few directives: ng-show="connected()", ng-click="disconnect()", ng-hide="connected()", they has expressions referring to methods attached to the scope in the VncCtrl:
'use strict';

angular.module('clientApp')
  .controller('VncCtrl', function ($scope, $location, VNCClient) {
    $scope.disconnect = function () {
      VNCClient.disconnect();
      $location.path('/');
    };
    $scope.connected = function () {
      return VNCClient.connected;
    };
  });
VncCtrl is already located in app/scripts/controllers/vnc.js. You don’t have to worry about it because when we instantiated the vnc route, Yeoman was smart enough to create this controller for us.
Now lets create the VNC screen directive:
yo angular:directive vnc-screen…and now open app/scripts/directives/vnc-screen.js. This is our directive definition:
var VNCScreenDirective = function (VNCClient) {
  return {
    template: '<canvas class="vnc-screen"></canvas>',
    replace: true,
    restrict: 'E',
    link: function postLink(scope, element, attrs) {
      //body...
    }
  };
};
angular.module('clientApp').directive('vncScreen', VNCScreenDirective);
The show is in the link function in, which we will look at later. Now lets take a quick look at the other properties of the directive. The template of our directive is simple canvas with class vnc-screen, it should replace the directive. We define that the user of the vnc-screen directive should use it as element. It is also quite important to notice that we have a single dependency – the VNCClient service, we described above.
Now lets look what happens in the link function:
if (!VNCClient.connected) {
  angular.element('<span>No VNC connection.</span>').insertAfter(element);
  element.hide();
  return;
}

function frameCallback(buffer, screen) {
  return function (frame) {
    buffer.drawRect(frame);
    screen.redraw();
  };
}

function createHiddenCanvas(width, height) {
  var canvas = document.createElement('canvas');
  canvas.width = width;
  canvas.height = height;
  canvas.style.position = 'absolute';
  canvas.style.top = -height + 'px';
  canvas.style.left = -width + 'px';
  canvas.style.visibility = 'hidden';
  document.body.appendChild(canvas);
  return canvas;
}

var bufferCanvas = createHiddenCanvas(VNCClient.screenWidth, VNCClient.screenHeight),
    buffer = new VNCClientScreen(bufferCanvas),
    screen = new Screen(element[0], buffer),
    callback = frameCallback(buffer, screen);

VNCClient.addFrameCallback(callback);
screen.addKeyboardHandlers(VNCClient.sendKeyboardEvent.bind(VNCClient));
screen.addMouseHandler(VNCClient.sendMouseEvent.bind(VNCClient));

scope.$on('$destroy', function () {
  VNCClient.removeFrameCallback(callback);
  bufferCanvas.remove();
});
As first step the link function checks whether the VNCClient is connected, if it isn’t the directive simply adds the text "No VNC connection." and hides the template (actually now a DOM element). We can also take more advanced approach here, we can watch the connected property and undertake different actions depending on its value. Doing this will make our directive more dynamic. But for simplicity lets stick to the current implementation.
The line var bufferCanvas = createHiddenCanvas(VNCClient.screenWidth, VNCClient.screenHeight) creates new hidden canvas. It is responsible for capturing the current state of the remote screen in size the same as the screen itself. So if the size of the remote screen is 1024x768px this hidden canvas will be with 1024px width and 768px height. We instantiate new instance of VNCClientScreen with parameter the hidden canvas. The constructor function VNCClientScreen wraps the canvas and provides method for drawing on it:
function VNCClientScreen(canvas) {
  this.canvas = canvas;
  this.context = canvas.getContext('2d');
  this.onUpdateCbs = [];
}

VNCClientScreen.prototype.drawRect = function (rect) {
  var img = new Image(),
      self = this;
  img.width = rect.width;
  img.height = rect.height;
  img.src = 'data:image/png;base64,' + rect.image;
  img.onload = function () {
    self.context.drawImage(this, rect.x, rect.y, rect.width, rect.height);
    self.onUpdateCbs.forEach(function (cb) {
      cb();
    });
  };
};

VNCClientScreen.prototype.getCanvas = function () {
  return this.canvas;
};
As next step we create new instance of Screen. This is the last component we are going to look at in the current tutorial but before taking a look at it lets see how we use it.
We instantiate the Screen instance by passing our “visible” canvas and the VNC screen buffer (the wrapper of the “hidden” canvas) to it. For each received frame we are going to draw the buffer canvas over the VNC screen. We do this because the VNC screen could be scaled (i.e. with size different from the one of the remote machine’s screen) and we simplify our work by using this approach. Otherwise, we should calculate the relative position of each received frame before drawing it onto the canvas, taking in account the scale factor.
In the frameCallback we draw the received rectangle (changed part of the screen) on the buffer screen and after that draw the buffer screen over the Screen instance.
In the link function we also invoke the methods:
addKeyboardHandlersaddMouseHandler
They simply delegate handling of mouse and keyboard event to the VNCClient. Here is the implementation of the addKeyboardHandlers:
Screen.prototype.addKeyboardHandlers = function (cb) {
  document.addEventListener('keydown', this.keyDownHandler(cb), false);
  document.addEventListener('keyup', this.keyUpHandler(cb), false);
};

Screen.prototype.keyUpHandler = function (cb) {
  return this.keyUpHandler = function (e) {
    cb.call(null, e.keyCode, e.shiftKey, 1);
    e.preventDefault();
  };
};

Screen.prototype.keyDownHandler = function (cb) {
  return this.keyDownHandler = function (e) {
    cb.call(null, e.keyCode, e.shiftKey, 0);
    e.preventDefault();
  };
};
Now you also see why we used VNCClient.sendKeyboardEvent.bind(VNCClient), because in keyDownHandler and keyUpHandler we invoke the callback with context null. By using bind we force the context to be the VNCClient itself.
And we are done! We skipped some of the methods of Screen because I think their consideration is not that essential for the purpose of this tutorial. Anyway, here is the whole implementation of the Screen constructor function:
function Screen(canvas, buffer) {
  var bufferCanvas = buffer.getCanvas();
  this.originalWidth = bufferCanvas.width;
  this.originalHeight = bufferCanvas.height;
  this.buffer = buffer;
  this.canvas = canvas;
  this.context = canvas.getContext('2d');
  this.resize(bufferCanvas);
}

Screen.prototype.resize = function () {
  var canvas = this.buffer.getCanvas(),
      ratio = canvas.width / canvas.height,
      parent = this.canvas.parentNode,
      width = parent.offsetWidth,
      height = parent.offsetHeight;
  this.canvas.width = width;
  this.canvas.height = width / ratio;
  if (this.canvas.height > height) {
    this.canvas.height = height;
    this.canvas.width = height * ratio;
  }
  this.redraw();
};

Screen.prototype.addMouseHandler = function (cb) {
  var buttonsState = [0, 0, 0],
      self = this;

  function getMask() {
    var copy = Array.prototype.slice.call(buttonsState),
        buttons = copy.reverse().join('');
    return parseInt(buttons, 2);
  }

  function getMousePosition(x, y) {
    var c = self.canvas,
        oc = self.buffer.getCanvas(),
        pos = c.getBoundingClientRect(),
        width = c.width,
        height = c.height,
        oWidth = oc.width,
        oHeight = oc.height,
        widthRatio = width / oWidth,
        heightRatio = height / oHeight;
    return {
      x: (x - pos.left) / widthRatio,
      y: (y - pos.top) / heightRatio
    };
  }

  this.canvas.addEventListener('mousedown', function (e) {
    if (e.button === 0 || e.button === 2) {
      buttonsState[e.button] = 1;
      var pos = getMousePosition(e.pageX, e.pageY);
      cb.call(null, pos.x, pos.y, getMask());
    }
    e.preventDefault();
  }, false);
  this.canvas.addEventListener('mouseup', function (e) {
    if (e.button === 0 || e.button === 2) {
      buttonsState[e.button] = 0;
      var pos = getMousePosition(e.pageX, e.pageY);
      cb.call(null, pos.x, pos.y, getMask());
    }
    e.preventDefault();
  }, false);
  this.canvas.addEventListener('contextmenu', function (e) {
    e.preventDefault();
    return false;
  });
  this.canvas.addEventListener('mousemove', function (e) {
    var pos = getMousePosition(e.pageX, e.pageY);
    cb.call(null, pos.x, pos.y, getMask());
    e.preventDefault();
  }, false);
};

Screen.prototype.addKeyboardHandlers = function (cb) {
  document.addEventListener('keydown', this.keyDownHandler(cb), false);
  document.addEventListener('keyup', this.keyUpHandler(cb), false);
};

Screen.prototype.keyUpHandler = function (cb) {
  return this.keyUpHandler = function (e) {
    cb.call(null, e.keyCode, e.shiftKey, 1);
    e.preventDefault();
  };
};

Screen.prototype.keyDownHandler = function (cb) {
  return this.keyDownHandler = function (e) {
    cb.call(null, e.keyCode, e.shiftKey, 0);
    e.preventDefault();
  };
};

Screen.prototype.redraw = function () {
  var canvas = this.buffer.getCanvas();
  this.context.drawImage(canvas, 0, 0, this.canvas.width, this.canvas.height);
};

Screen.prototype.destroy = function () {
  document.removeEventListener('keydown', this.keyDownHandler);
  document.removeEventListener('keyup', this.keyUpHandler);
  this.canvas.removeEventListener('contextmenu');
  this.canvas.removeEventListener('mousemove');
  this.canvas.removeEventListener('mousedown');
  this.canvas.removeEventListener('mouseup');
};
The last step is to run the VNC client! Make sure you have a computer with VNC server on it.
Run the following command:
cd angular-vnc
cd proxy
node index.js
Now open the url: http://localhost:8090, and rock!