


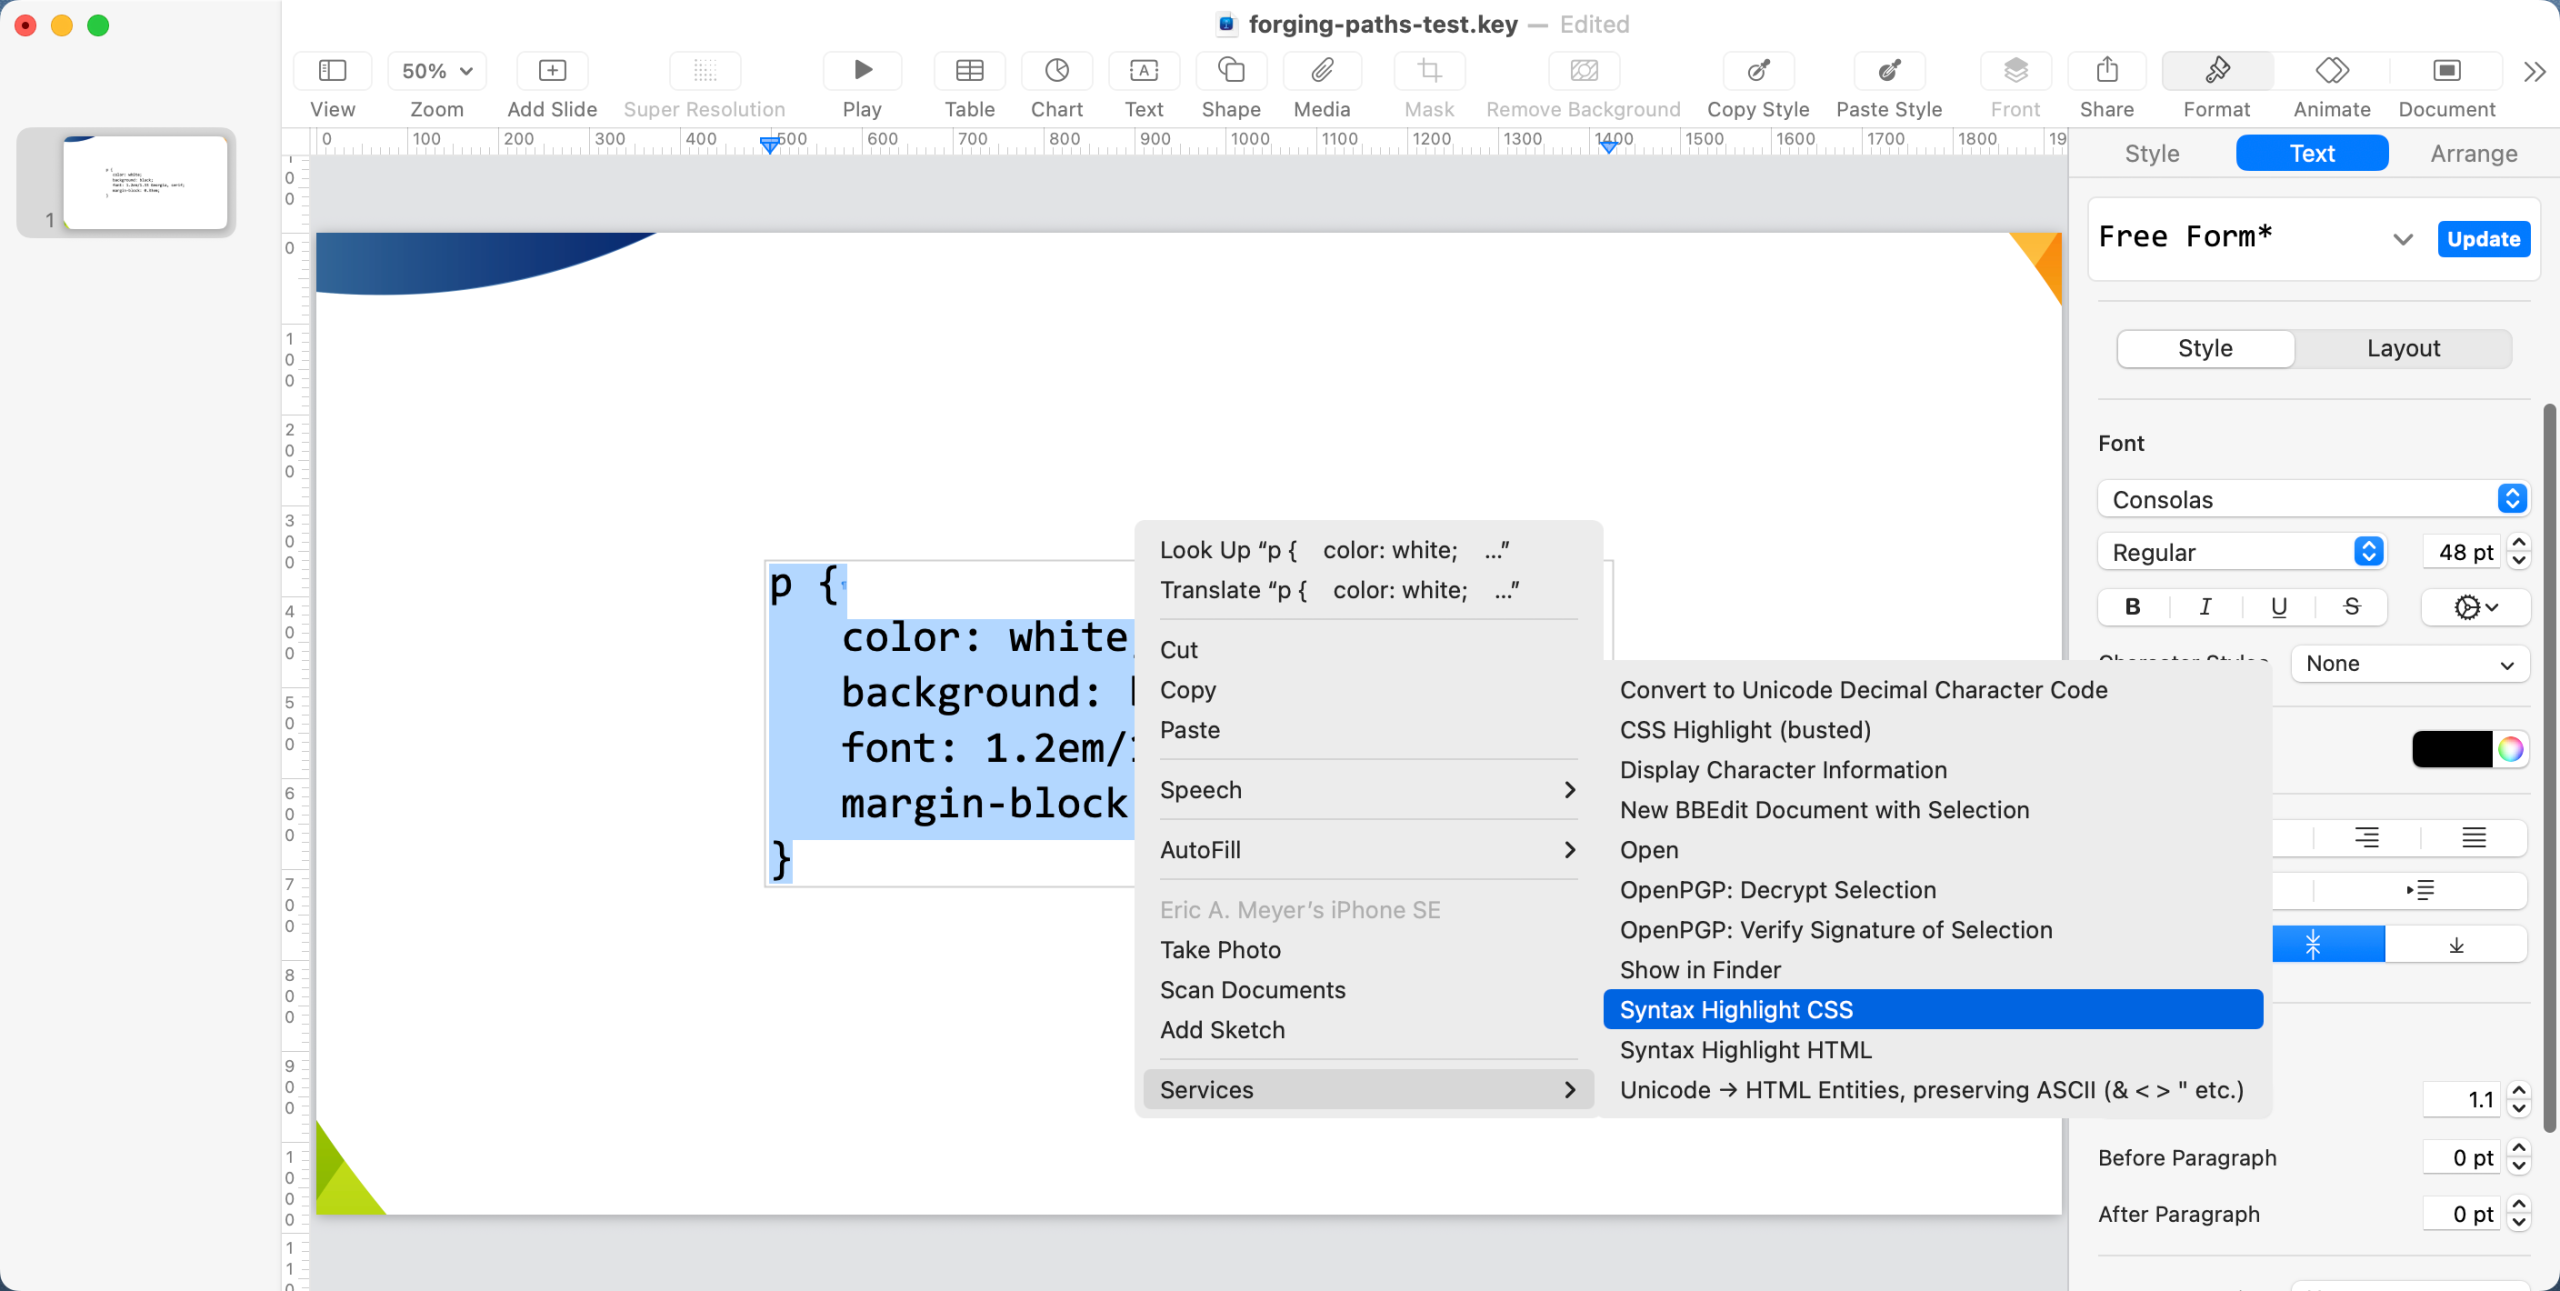
Earlier this month, I returned to CSS Day for the first time since 2018 to deliver my first in-person talk since 2022. “Forging Our Own Paths” should be available at some point; in the meantime, for the six or seven people in my audience who might need to do something similar, I’d like to share a small macOS workflow I developed to make syntax-highlighting code blocks in situ in Keynote a lot simpler. The end result is to have an entry (or entries) in the Services submenu of the contextual (right-click) menu for highlighted text. All this is adapted from an old blog post I found copied in a few places, and which needed some updates to make things work in 2026.
First, install highlight. I used brew install highlight, and the rest of this piece assumes you’ve done it that way. If you install it another way, such that it ends up in a different location than Homebrew would give it, you’ll need to modify a variable value later on, which I’ll point out when we get there.
Next, you need to install the following (also available as a gist) as a shell script called keynote-highlight:
#!  /bin/bash
set -e
while getopts 'h:o:i:s:t:' OPTION; do
	case "$OPTION" in
		h)
			highlighthome="$OPTARG"
			;;
		o)
			outputrtf="$OPTARG"
			;;
		i)
			inputrtf="$OPTARG"
			;;
		s)
			syntax="$OPTARG"
			;;
		t)
			theme="$OPTARG"
			;;
		?)
			echo "script usage incorrect?" >&2
			exit 1
			;;
	esac
done
shift "$(($OPTIND -1))"

#=============================

inputrtf="$(pbpaste -pboard -prefer public.rtf)"

regex="fcharset0 ([a-zA-Z0-9 ]+);"
if [[ "$inputrtf" =~ $regex ]]
then
	fontface=${BASH_REMATCH[1]}
else
	fontface="Courier"
fi

regex="fs([0-9]{1,5})"
if [[ "$inputrtf" =~ $regex ]]
then
	fontsize=${BASH_REMATCH[1]}
	fontsize2=$((fontsize/2))
else
	fontsize2="12"
fi

if [ -z "$theme" ]; then
	theme="candy"
fi

if [ -z "$highlighthome" ]; then
	highlighthome="/opt/homebrew/bin/highlight"
fi

highlighted=$("$highlighthome" --out-format="rtf" --syntax="$syntax" --style="$theme" --font="$fontface" --font-size="$fontsize2" --no-trailing-nl --stdout)
echo "$highlighted"
Put the script wherever you store your shell scripts, and make sure
it’s both executable and can be invoked from the command line. I
believe, without any real basis for doing so, that if you
already have syntax-highlight
installed, which is (among other things) a wrapper around
highlight, you could use it by modifying the
highlighthome variable assignment to point to it rather
than highlight, as well as modifying a variable in an
upcoming bit of code. But, as I say, I’m just guessing about that.
Once the shell script is installed and ready to execute, launch
Automator and create a new Quick Action. Call it “Syntax Highlight CSS”
or something similar. If you want to set up highlighting for other kinds
of code, like HTML or any of the nearly 250
languages (!!!) highlight supports, each language has
to be given its own Quick Action. Thus, if you want them all next to
each other in the Services menu, pick an appropriate naming scheme. For
this one, we’re doing CSS, but later you’ll see how you can quickly set
up this same thing for other formats.
At the top of the right-hand panel in the new Quick Action workflow, check the “Workflow receives current” dropdown to make sure it’s set to either “Automatic (rich text)” or “rich text”, the latter if you plan to never, ever use this in any non-RTF setting. I go with the Automatic option. If you want to restrict the action to a particular application, like Keynote, change the dropdown that says “any application” to pick a specific application. I leave mine to be available in any application, just in case I’m ever syntax highlighting code in TextEdit or something. I also set the color to “Red”, because clearly that makes it go faster.
With all those things set, the first thing to add to the workflow is a “Copy to Clipboard” action. That’s it for this step, just add that and leave it alone.
Now, add a “Run AppleScript” action. Paste the following (also available as a gist) into the textbox that contains the boilerplate skeleton (replace the skeleton):
on run {input, parameters}
	set highlightHome to "/opt/homebrew/bin/highlight"
	set syntaxType to "css"
	set themeName to "navy"
	set command to "PATH_TO_SCRIPT/keynote-highlight -h " & highlightHome & " -s " & syntaxType & " -t " & themeName
	do shell script "/bin/bash -c 'pbpaste | " & command & " | pbcopy'"
	delay 0.1
	tell application "System Events" to keystroke "v" using command down
end run
Change the PATH_TO_SCRIPT in there to wherever you put
the shell script, save the workflow, and it should be ready to go!
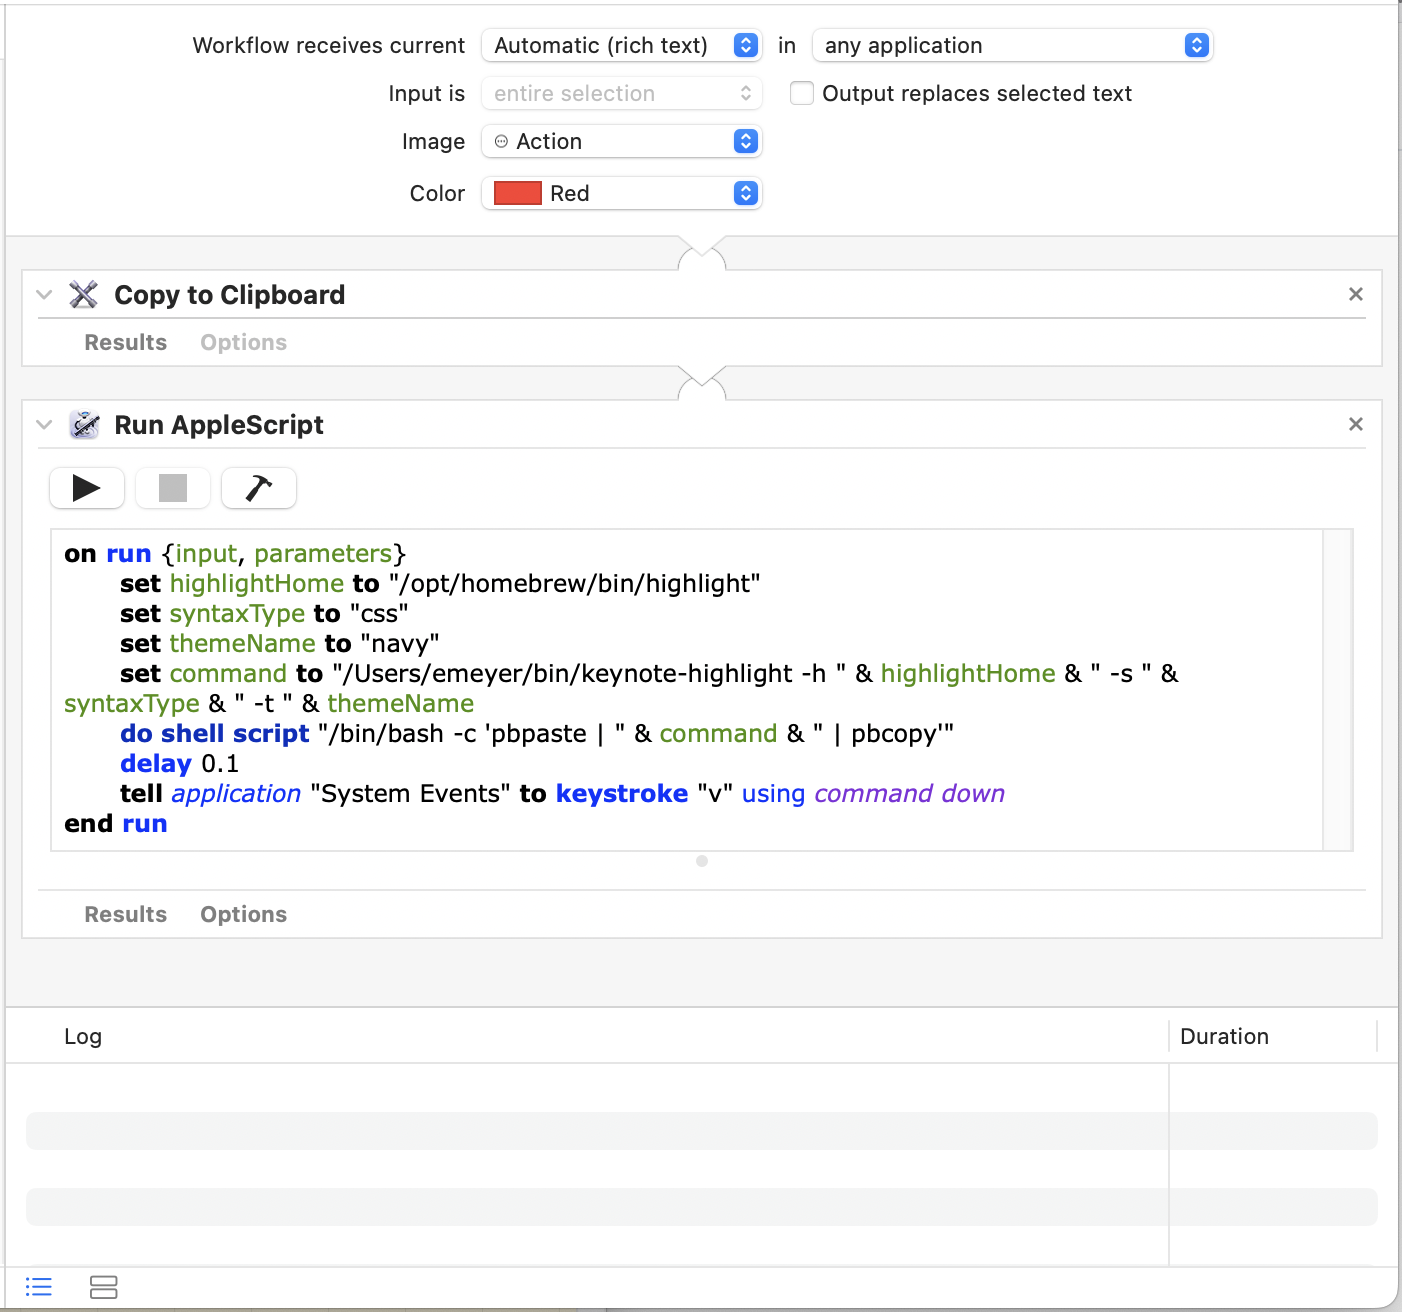
…unless your copy of highlight lives somewhere else or
you’re trying out using syntax-highlight in its place, or
you have a different theme you’d like to use. In either case, change the
value of the corresponding variable in the AppleScript. As for the
syntaxType variable, that’s what you change if you want to
highlight HTML or Pascal or BASIC or whatever else, but since we’re
doing CSS, leave it as is.
At this point, everything should be ready to go. In your Keynote slides, wherever you want to syntax-highlight some CSS, drag-select (or select-all) the CSS text in question. Just be sure you have the text actually highlighted; just selecting the outer text box that holds the text isn’t sufficient. Right-click on the selected text to bring up the Context menu, and in there open the “Services” submenu. “Syntax Highlight CSS” (or whatever you called yours) should be in that submenu. Select it, and after a second or two, the un-highlighted CSS should be replaced with the same thing, except syntax-highlighted.
Well, “the same thing” in the sense of being the same font face and
font size it was before you syntax-highlighted it. If you used a line
spacing other than 1.0, it will be reset to 1.0. This is due to a
limitation in highlight, which doesn’t accept line-height
values as an argument, and thus will always return text with 1.0
spacing. It’s likely that other fancy adjustments like kerning will also
be reset to default, though I didn’t test them all. I just know that
highlight only accepts font name and size as styling
parameters, so those were the only ones I could affect.
If you want to set up something similar for HTML, then you need only
duplicate the workflow to a different name — say, “Syntax Highlight
HTML” — and then change the value of the AppleScript
syntaxType variable from css to
html in the new workflow. That’s all. Similar steps should
be taken to set up a workflow for any other recognized language.
There are a few things to note.
There are probably more efficient or more elegant ways to do the individual bits of both scripts, but this works for me, so I figured I’d pass it on to anyone else who’d like to use it. Improvements, or pointers to solid information that can help me overcome the limitations I mentioned, are always welcome!
此内容由惯性聚合(RSS阅读器)自动聚合整理,仅供阅读参考。 原文来自 — 版权归原作者所有。