


networkOpenWrtWifiVLANsecurity
I moved to a new place recently. Using this as an opportunity, I re-configured the whole home network which I wanted to do long time ago. I put lots of thoughts into it. Even though I’m a software engineer for many years, I rarely touched the network layers below L3. So when researching and setting it up, I learned a lot on the way. This article shares the journey and the final setup I have.
1. Terminal Devices
I basically have three categories of terminal devices in the network:
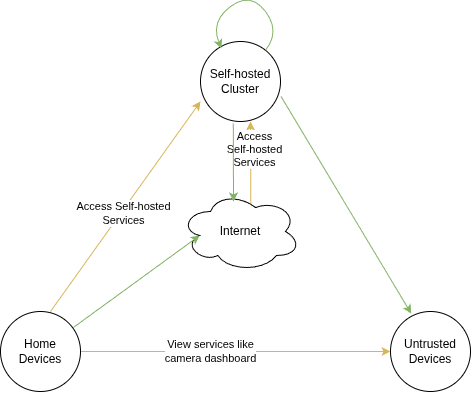
The first group is a cluster for self-host services. I talked about it in a previous blog Infrastructure Setup for High Availability. The devices in this cluster are trusted since they are mostly running open source software with regular updates. It’s also hard to setup firewall inside this cluster because of the network complexity of Kubernetes. So I want the devices in this cluster be able to talk with each other without any limits. Regarding Internet, they should all have Internet access. I also want the users outside of my home network be able to access the self hosted services. Some of them are going through Cloudflare tunnels so I don’t need to expose them to the Internet. But there are some other more privacy service that I don’t even want Cloudflare to see the traffic, or services with large traffic volume like file and photo sharing services, so I still need to expose some ports to the Internet directly.
The second group is the typical home user devices, like laptop, mobile phones, TV boxes, game consoles and so on. I want them to be able to connect to Internet, but better not be able to talk with or discover each other. They should also have access to the self hosted services in the first cluster.
The third group is the devices that hold sensitive data and I don’t trust at all. For example, security cameras. So for those devices, I just want devices in other groups to be able to talk with them, but the devices shouldn’t have any access to other devices at all, including the Internet.
Here is a diagram showing the three groups of the devices: the green arrow means access without limitation, and yellow arrow means limited access with firewall rules:
2. Physical Space
This section is pretty irrelevant about the technical side of network setup, but about the home renovation instead. So feel free to skip this section if you are not interested. I’m just recording it for my own benefit since it’s something I spent lots of time thought about and learned a lesson from it.
I planned the network setup when doing basement finishing. I needed to figure out where everything goes so that I can know how to run the network cables. It’s easy to run the cables through the basement before the drywall is installed, and relatively easy to go to the first floor from basement. Luckily, most of my devices that needs wired connection will be at basement or the first floor. Second floor is mostly bedrooms which can be served through wifi from first floor. So the arrangement is pretty flexible.
However, I noticed the flexibility pretty late. The physical location of devices and the network topology kept intertwined in my mind, and the physical location of devices also depends on the furniture arrangement. So there were too many things in my brain at the same time. It’s hard to work things out that way until I realized I should figure out the network topology and the physical locations separately, then figure out how to run the cables based on that.
So here is the lesson, maybe obvious but important: plan every detail carefully before you start the renovation project. Because of the privacy reasons, I’ll leave the physical location of the devices out of this article.
3. Network Hardware and Software
3.1 Multiple NICs vs Switch
Routers, Switches and some PCs all have multiple Ethernet ports. But they are different. Most switches and consumer level routers have the ports connected to a single SoC. In this case, the ports are not physically separated: devices connected to different ports can talk to each other at layer 2 network using MAC addresses. The typical firewall like iptables cannot enforce traffic at such layer (even though there are things like ebtables can do it). Managed switches and some routers can configure VLANs that force packets in different VLANs go through the router/switches to enforce the firewall, which we will explore later.
On the other hand, for some enterprise level routers and PCs with multiple network interface cards (NIC), every port is separated: you need the router to route the traffic through different NICs. It’s more secure but also needs more compute power. So the devices like this are much more expensive than a consumer level router.
3.2 Hardware Selection Approach
Currently all my terminal devices have 1Gbps Ethernet port at most. The incoming Internet is also 1Gbps. So I don’t feel the need to go crazy with 10Gbps routers since they are so much more expensive. 1Gbps port routers are good enough and 2.5Gbps ports are good to have. VLANs are also pretty mature so I don’t feel the need to buy devices with multiple NICs. At last, I want all the devices be able to run open source operating system, so I prefer routers with OpenWrt instead of managed switches.
I also want to re-use my existing network devices as much as possible. I already have a wireless OpenWrt router and an unmanaged switch. I feel them powerful enough for my use cases so it would be great if I can still use them in the new network setup.
Even though I only have 1Gbps ports, I still want Cat 6 cables since it’s pretty hard to change the cables in the wall in the future. And the price difference is also small enough to be accepted.
3.3 OPNsense/pfSense vs OpenWrt
Lots of self-host communities mention pfSense and OPNsense a lot but I’ve never tried them. I have interests but the supported devices are pretty expensive. And with my 1Gbps devices, I don’t think I can justify the price.
On the other hand, I’ve been using OpenWrt since I owned my first router 14 years ago. I’m pretty familiar with it even though I don’t use most of the advanced features. Even though it’s more popular for wireless routers, I find the feature set enough for my use case. Maybe I’ll try OPNsense in the future but I’m using OpenWrt this time.
4. Network Topology Design
So based on the device group in section 1 and the discussion in section 3, here are the network devices needed for my setup:
- TP-Link ER605 for the main router which acts as a gateway to the Internet. This is the only new device I need to buy.
- TP-Link TL-SG105 unmanaged switch.
- TP-Link Archer C7 v5 wireless router.
Here is the network topology:
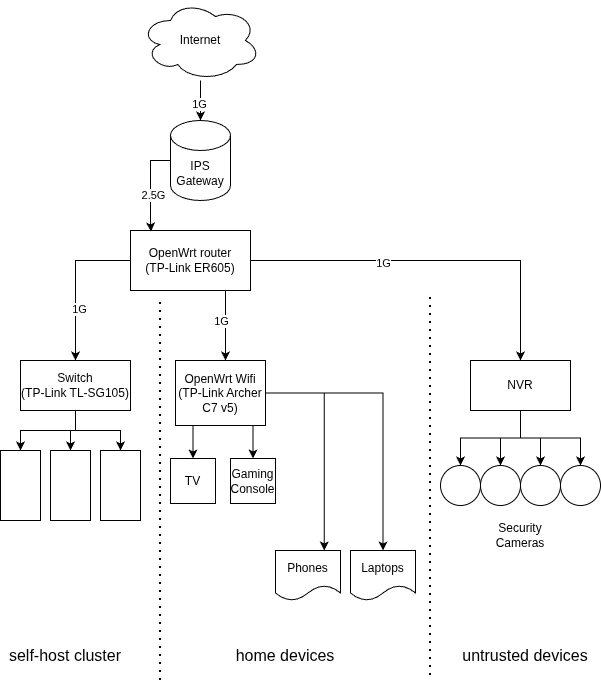
There is still an unused port on the main router which can be used for another Wifi access point, but I don’t really need it for now.
5. Implement the Network Topology with OpenWrt
So we have the topology and all the hardware connected. How do we implement the isolation as discussed in section 1? In this section, I will document how to do it in OpenWrt.
5.1 VLAN Configuration for Wired Devices
Note: The OpenWrt version I’m using for this configuration is 24.10.4. I believe the interface for configuring VLAN has been changed a little bit: in v23.x, it’s in Network -> Switch instead of the steps I’ll share below. But the logic should be very similar.
In order to configure a different VLAN for a router’s port, go to Network -> Interfaces -> Devices. There should be a default bridge device called something like br-lan. Click “Configure”, enable VLAN filtering. If want to create a separate VLAN for a port, add a row and specify a different “VLAN ID”, make the target port “Untagged” and leave other ports blank. For example, in my configuration, I created a separate VLAN for each of the ports:
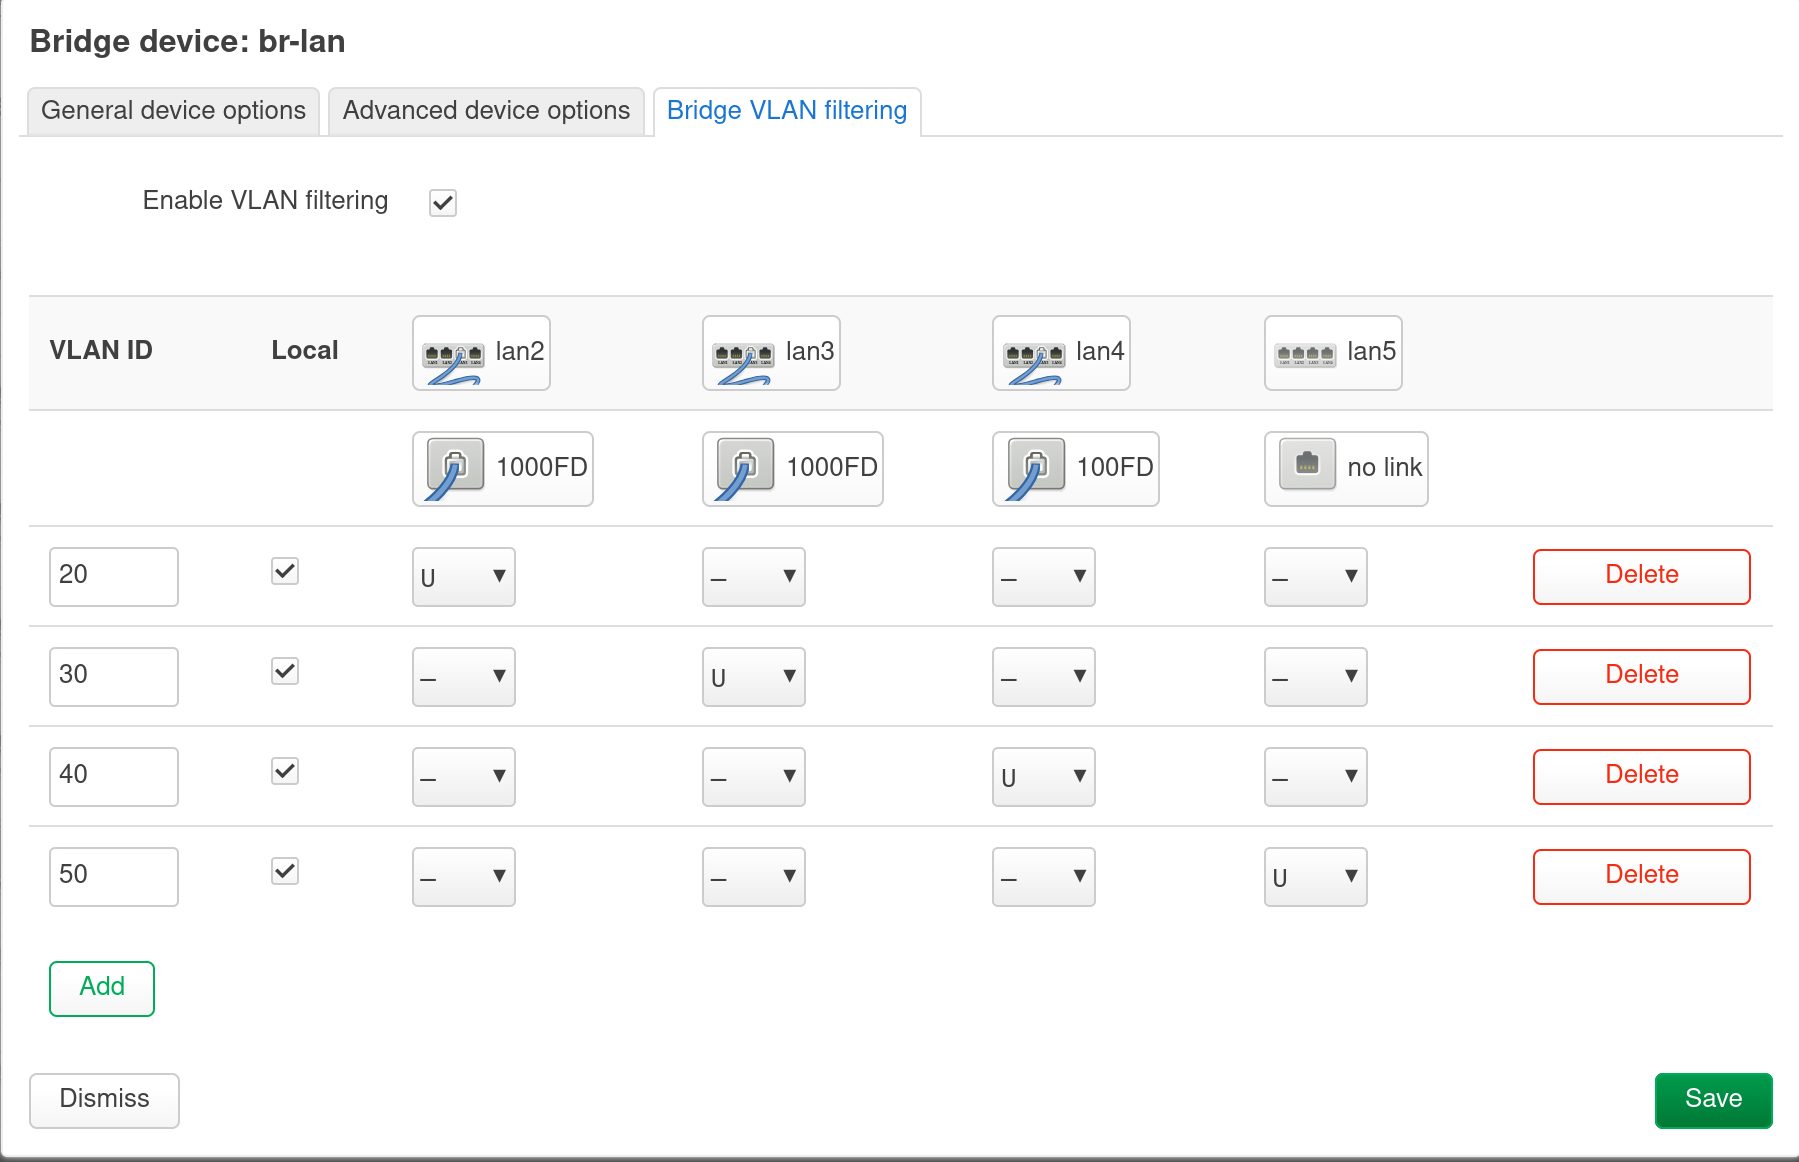
After saving this, the devices list should show something like br-lan.20, br-lan.30 and so on. And the type for those devices would be “VLAN (802.1q)”.
Now it’s time to create interfaces from the newly created VLAN devices. Go to Network -> Interfaces, and click on “Add new interface”, and use a newly created VLAN device above as the device. Configure other fields as you want like the protocol and so on. Make sure to use different subnets and assign the interface with a (new) firewall zone, which we will talk more in the next section.
At last, after verifying all the things are working, you can disable and optionally delete the lan interface (not the device) so that you can make sure the traffic is only going through the new VLAN interfaces.
5.2 Firewall Configuration
In order to create more firewall zones, go to Network -> Firewall and create more zones there. I created a zone for each of the VLAN created above. For the untrusted devices that shouldn’t have the Internet access, don’t assign any zones in the forwards. For the devices that shouldn’t access other zones, just assign wan in the forwards. Note you can add more rules in “Traffic Rules” tab to override the default configuration here. The screenshot below is my configuration based on the access rule in section 1 and topology in section 4:
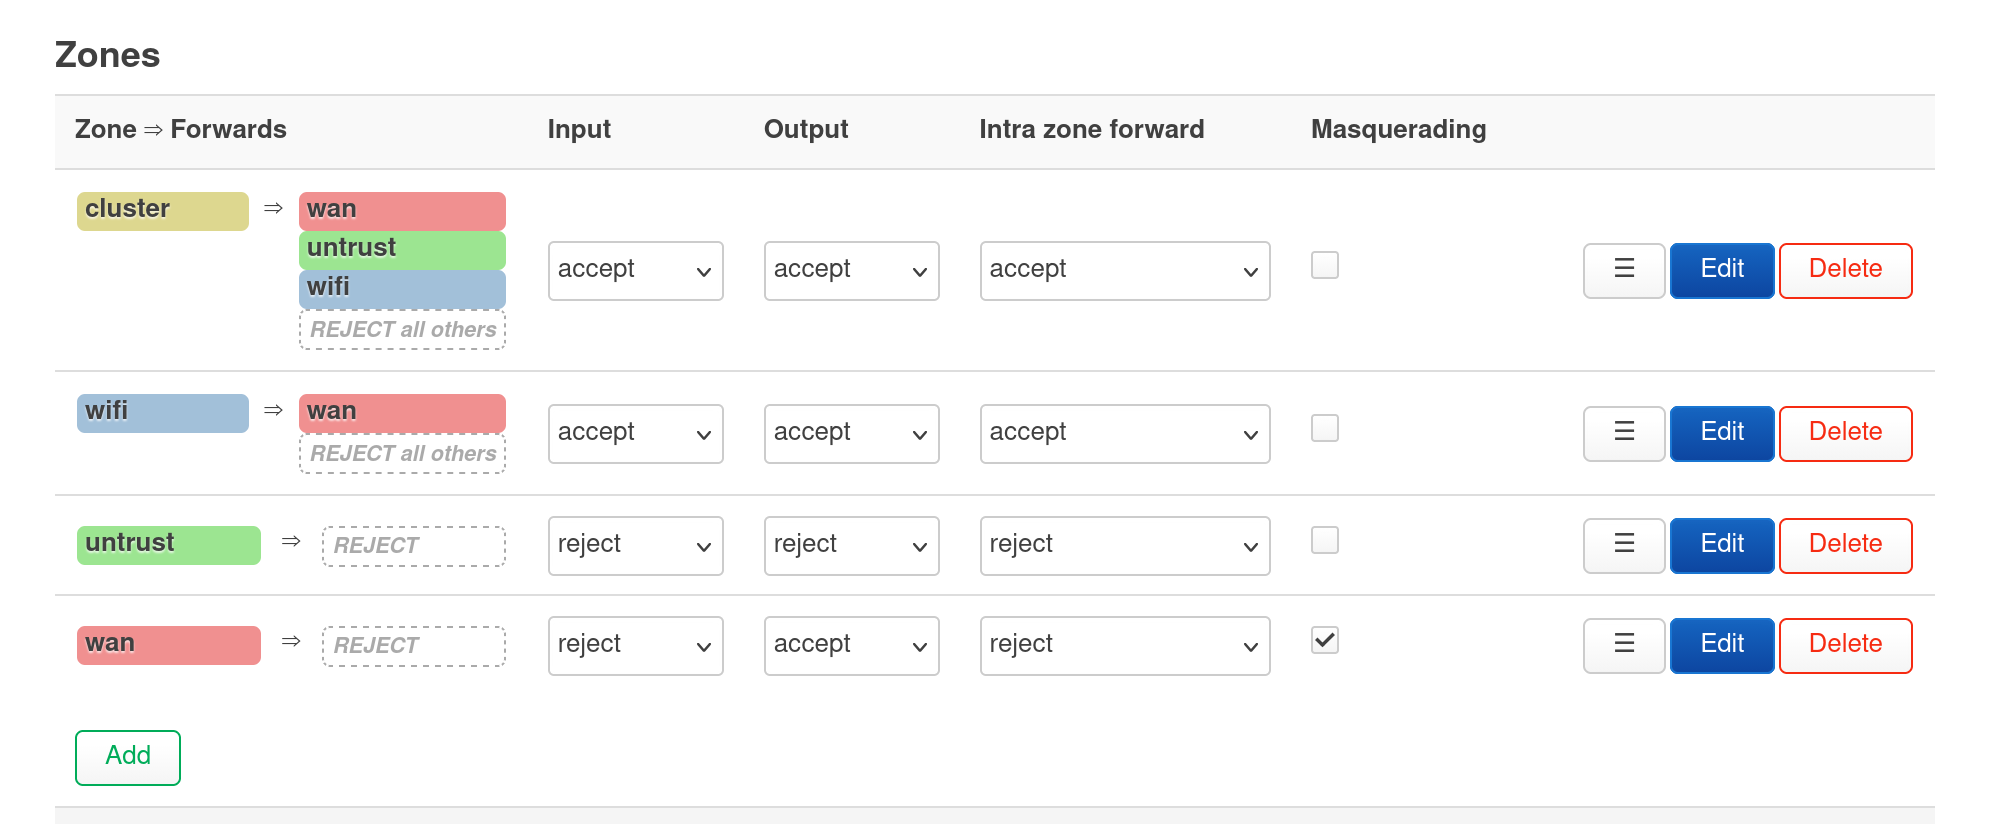
The wifi -> wan forward is disabled by default with traffic rules added to access self host services.
Be aware of “Intra zone forward”: based on our discussion in section 3.1, even if you reject the intra zone forward, the devices can still talk to each other if they are in the same VLAN, or connected to the same Wifi. So far, we’ve explored how to isolate the devices with wired connections. In the following sections, we will explore how to isolate the devices connected wirelessly.
5.3 Wireless Clients Isolation
Note: from now on, all the OpenWrt configurations are based on version 23.05.0 since that’s what I’m using for the Wifi router.
It’s easy to isolate the clients connected to the same Wifi. Go to Network -> Wireless, edit the specific wireless, then click on the “Advanced Settings” in the “Interface Configuration” section and enable “Isolate Clients”. The clients connected to this Wifi shouldn’t be able to see each other now.
However, if there are still devices connected to the same router wired, the wireless clients and the wired clients can still see each other. In the following section, we’ll see how to prevent that.
5.4 Isolation Between Wired and Wireless Clients
In order to isolate wired and wireless clients, we need to create a new interface with a separate firewall zone and assign it to the Wifi. Here is how to do it:
First, go to Network -> Interfaces -> Devices, create a new device by clicking “Add device configuration…”, then create a device with type “Bridge device”. Do not need to assign any bridge ports to it since we are going to use it for Wifi. Name it something like br-wlan.
Then in Network -> Interfaces -> Interfaces, create a new interface with the device we just created. Configure the protocol as desired and assign it to a new firewall zone. Then you can configure the firewall zones like in section 5.2 to isolate the clients in different zones.
6. Conclusion
For a long time, I didn’t feel good enough about my network setup since it is more open than I wanted, e.g. the mobile devices, TV box and self-host devices can see each other. I needed to configure complex firewall rule to protect self-host services and it’s not even enough with that. Now with the new setup, I feel much better. I know there is no 100% secure setup, especially messing them up with myself, there must be some places that’s not optimal, but I’m glad I can explore the areas I normally don’t have much opportunity otherwise. I believe it makes me understand the software and OS better, and more importantly, it is fun to set things like this in a home lab!