惯性聚合 高效追踪和阅读你感兴趣的博客、新闻、科技资讯
阅读原文 在惯性聚合中打开

推荐订阅源

The Hacker News
The Hacker News
C
Cisco Blogs
P
Privacy & Cybersecurity Law Blog
Cloudbric
Cloudbric
S
Security Affairs
PCI Perspectives
PCI Perspectives
The Last Watchdog
The Last Watchdog
AWS News Blog
AWS News Blog
Threat Intelligence Blog | Flashpoint
N
News and Events Feed by Topic
W
WeLiveSecurity
T
Tenable Blog
L
LINUX DO - 最新话题
T
Tor Project blog
Help Net Security
Help Net Security
cs.AI updates on arXiv.org
P
Proofpoint News Feed
爱范儿
爱范儿
O
OpenAI News
Hacker News - Newest:
Hacker News - Newest: "LLM"
Y
Y Combinator Blog
I
Intezer
C
Check Point Blog
Stack Overflow Blog
Stack Overflow Blog
Recent Announcements
Google DeepMind News
S
Securelist
P
Privacy International News Feed
cs.CL updates on arXiv.org
V
Vulnerabilities – Threatpost
Schneier on Security
量子位
SecWiki News
SecWiki News
L
Lohrmann on Cybersecurity
T
Threat Research - Cisco Blogs
Recent Commits to openclaw:main
M
MIT News - Artificial intelligence
H
Hackread – Cybersecurity News, Data Breaches, AI and More
Scott Helme
Scott Helme
H
Help Net Security
Vercel News
Vercel News
云风的 BLOG
云风的 BLOG
Spread Privacy
Spread Privacy
Know Your Adversary
Know Your Adversary
I
InfoQ
TaoSecurity Blog
TaoSecurity Blog
Blog — PlanetScale
Blog — PlanetScale
N
News | PayPal Newsroom
小众软件
小众软件
C
CERT Recently Published Vulnerability Notes

Zero の 日常

MacBook M1 Pro 双屏方案 上海电信SDN更换7015TV CNAME与MX记录冲突小记 RHEL 7.9 从 GRUB 引导启动 Hardware upgrade for 2022 Valve Index + HTC Tracker 3.0 开箱记录! 有手就行系列:SlimeVR全身追踪方案 基于goestools与xrit-rx的GK2A气象卫星接收教程 Prometheus实现对IDRAC的SNMP监控 Maven中央仓库项目上传指南 CQ CQ CQ DE BG5ISN PSE K 关于我买不到空气显卡这件事 Mac iTerm2 lrzsz GitHub单个文件脱敏处理 Protobuf浅解 Prometheus + AlertManager实现告警推送 Prometheus Exporter Prometheus监控系统部署 Nginx负载均衡(加权轮询)
从零开始的飞机追踪之旅
Zero · 2021-01-07 · via Zero の 日常

简介

ADS-B 系统即广播式自动相关监视系统,由多地面站和机载站构成,以网状、多点对多点方式完成数据双向通信。它主要实施空对空监视。

一般情况下,只需机载电子设备(GPS 接收机、数据链收发机及其天线、驾驶舱冲突信息显示器 CDTI),不需要任何地面辅助设备即可完成相关功能,装备了 ADS-B 的飞机可通过数据链广播其自身的精确位置和其它数据(如速度、高度及飞机是否转弯、爬升或下降等)。ADS-B 接收机与空管系统、其它飞机的机载 ADS-B 结合起来,在空地都能提供精确、实时的冲突信息。

国内民航 ADS-B 无线电频率处于 1090MHz,想要接收到民航飞机的广播信号并看到飞机的轨迹,首先需要搭建一个的 ADS-B

环境

  • CPU:Intel Celeron J1900
  • RAM:2G DDR3
  • OS:CentOS Stream release 8
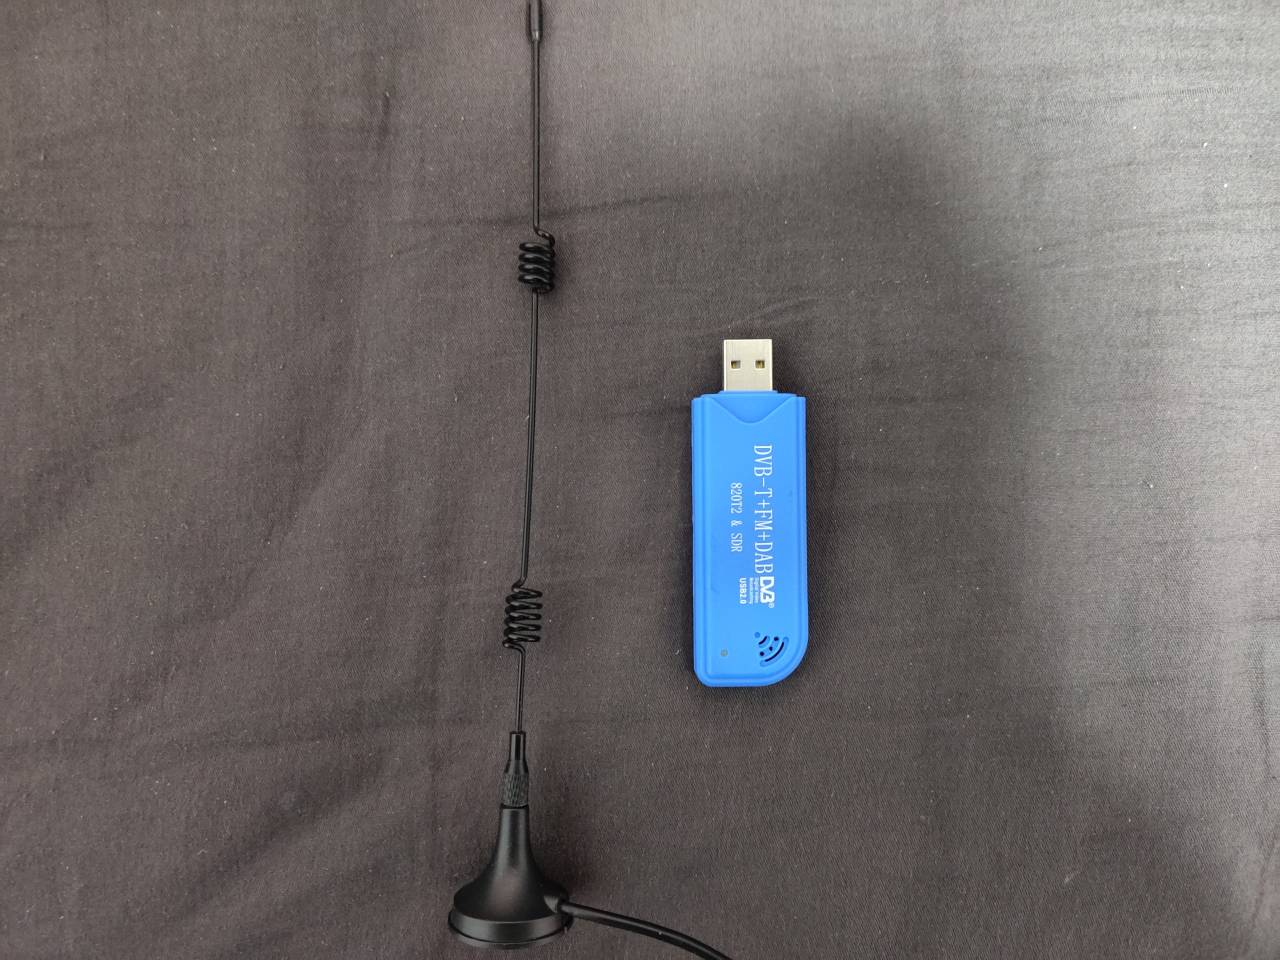
  • RTL-SDR 电视棒一个,芯片为 RTL2832U
  • 电视棒白嫖至@zrm

安装 LibUSB

如果未安装 LibUSB,编译 RTL-SDR 驱动会出现如下错误

1
2
3
4
-- Checking for module 'libusb-1.0'
-- Package 'libusb-1.0', required by 'virtual:world', not found
CMake Error at CMakeLists.txt:88 (message):
LibUSB 1.0 required to compile rtl-sdr

对于 Ubuntu 与 Debian 等系统可以尝试使用如下命令进行安装

1
sudo apt-get install libusb-1.0-0.dev

对于和我一样在 CentOS Stream 8 的同学可以使用如下方式安装

1
2
3
4
# 首先下载该RPM包
https://centos.pkgs.org/8-stream/centos-baseos-x86_64/libusbx-devel-1.0.23-4.el8.x86_64.rpm.html
# 安装RPM包
yum install libusbx-devel-1.0.23-4.el8.x86_64.rpm -y

编译 RTL-SDR 驱动

1
2
3
4
5
6
7
8
git clone git://git.osmocom.org/rtl-sdr.git
cd rtl-sdr
mkdir build && cd build
cmake ../ -DINSTALL_UDEV_RULES=ON
make
sudo make install
sudo ldconfig
sudo cp ../rtl-sdr.rules /etc/udev/rules.d/

新建 blacklist-rtl.conf 文件

1
2
3
vim /etc/modprobe.d/blacklist-rtl.conf
# 加入如下内容
blacklist dvb_usb_rtl28xxu

测试 RTL-SD,如果一切正常,你应该见到如下输出

1
2
3
4
5
6
7
8
9
10
[root@MisakaTAT ~]# rtl_test -t
Found 1 device(s):
0: Realtek, RTL2838UHIDIR, SN: 00000001

Using device 0: Generic RTL2832U OEM
Found Rafael Micro R820T tuner
Supported gain values (29): 0.0 0.9 1.4 2.7 3.7 7.7 8.7 12.5 14.4 15.7 16.6 19.7 20.7 22.9 25.4 28.0 29.7 32.8 33.8 36.4 37.2 38.6 40.2 42.1 43.4 43.9 44.5 48.0 49.6
[R82XX] PLL not locked!
Sampling at 2048000 S/s.
No E4000 tuner found, aborting.

如果出现如下错误

1
rtl_test: error while loading shared libraries: librtlsdr.so.0: cannot open shared object file: No such file or directory

请尝试按以下方式解决

1
echo "/usr/local/lib/" > /etc/ld.so.conf

部署 dump1090

拉取代码并编译 dump1090

1
2
3
git clone https://github.com/antirez/dump1090.git
export PKG_CONFIG_PATH=~/rtl-sdr/build
make

启动 dump1090

1
2
3
4
# 无Web服务
./dump1090 --interactive
# 带Web启动,默认端口8080
./dump1090 --interactive --net

安装 Mono

1.首先导入存储库的 GPG 密钥

1
sudo rpm --import 'http://pool.sks-keyservers.net/pks/lookup?op=get&search=0x3fa7e0328081bff6a14da29aa6a19b38d3d831ef'

2.添加 Mono 存储库

1
yum config-manager --add-repo https://download.mono-project.com/repo/centos8-stable.repo

3.安装 Mono

1
sudo yum install mono-complete

4.安装完成后检查 Mono 版本

1
mono --version

安装 VirtualRadarServer

首先下载并解压 VRS

1
2
3
4
mkdir vrs
cd vrs
wget http://www.virtualradarserver.co.uk/Files/VirtualRadar.tar.gz
tar -zxvf VirtualRadar.tar.gz

下载 WebAdminPlugin 并解压到 vrs 目录下

1
2
wget http://www.virtualradarserver.co.uk/Files/VirtualRadar.WebAdminPlugin.tar.gz
tar -zxvf VirtualRadar.WebAdminPlugin.tar.gz

创建 VirtualRadar.exe.config 文件并写入如下 xml 配置

1
vim VirtualRadar.exe.config
1
2
3
4
5
6
7
8
9
10
11
12
13
14
15
16
17
18
19
<?xml version="1.0"?>
<configuration>
<configSections>
</configSections>
<startup>
<supportedRuntime version="v2.0.50727"/>
</startup>
<runtime>
<assemblyBinding xmlns="urn:schemas-microsoft-com:asm.v1">
<dependentAssembly>
<assemblyIdentity name="Mono.Data.Sqlite"
publicKeyToken="0738eb9f132ed756"
culture="neutral" />
<bindingRedirect oldVersion="2.0.0.0"
newVersion="4.0.0.0" />
</dependentAssembly>
</assemblyBinding>
</runtime>
</configuration>

修改 web 端口防止与 dump1090 冲突

1
2
3
4
5
6
vim ~/.local/share/VirtualRadar/InstallerConfiguration.xml

<?xml version="1.0" encoding="utf-8" ?>
<InstallerSettings xmlns:xsi="http://www.w3.org/2001/XMLSchema-instance" xmlns:xsd="http://www.w3.org/2001/XMLSchema">
<WebServerPort>8081</WebServerPort>
</InstallerSettings>

创建用户并启动 VRS

1
mono VirtualRadar.exe -nogui -createAdmin:admin -password:password

安装 screen

1
2
yum install epel-release
yum install screen -y

启动 vrs

1
2
3
4
5
6
7
# 创建一个screen
screen -S vrs
# 启动vrs
mono VirtualRadar.exe -nogui
# 退出当前screen
Ctrl + A + D

同理,启动 dump1090

1
2
3
4
5
6
# 创建一个screen
screen -S dump1090
# 启动dump1090
./dump1090 --interactive --net
# 退出当前screen
Ctrl + A + D

其它命令

1
2
3
4
# 列出所有screen
screen ls
# 回到某个screen
screen -r vrs

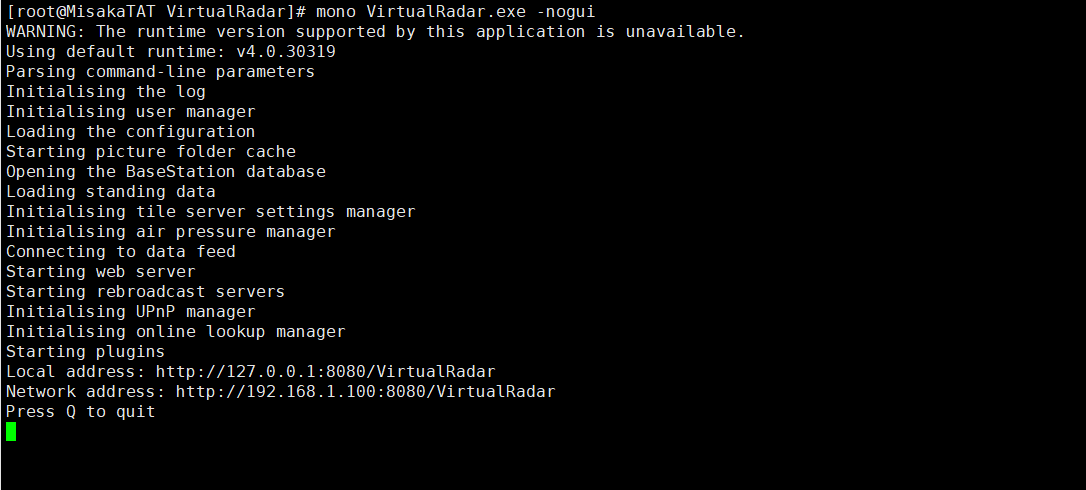
如果顺利启动的话,将会看到如下信息输出

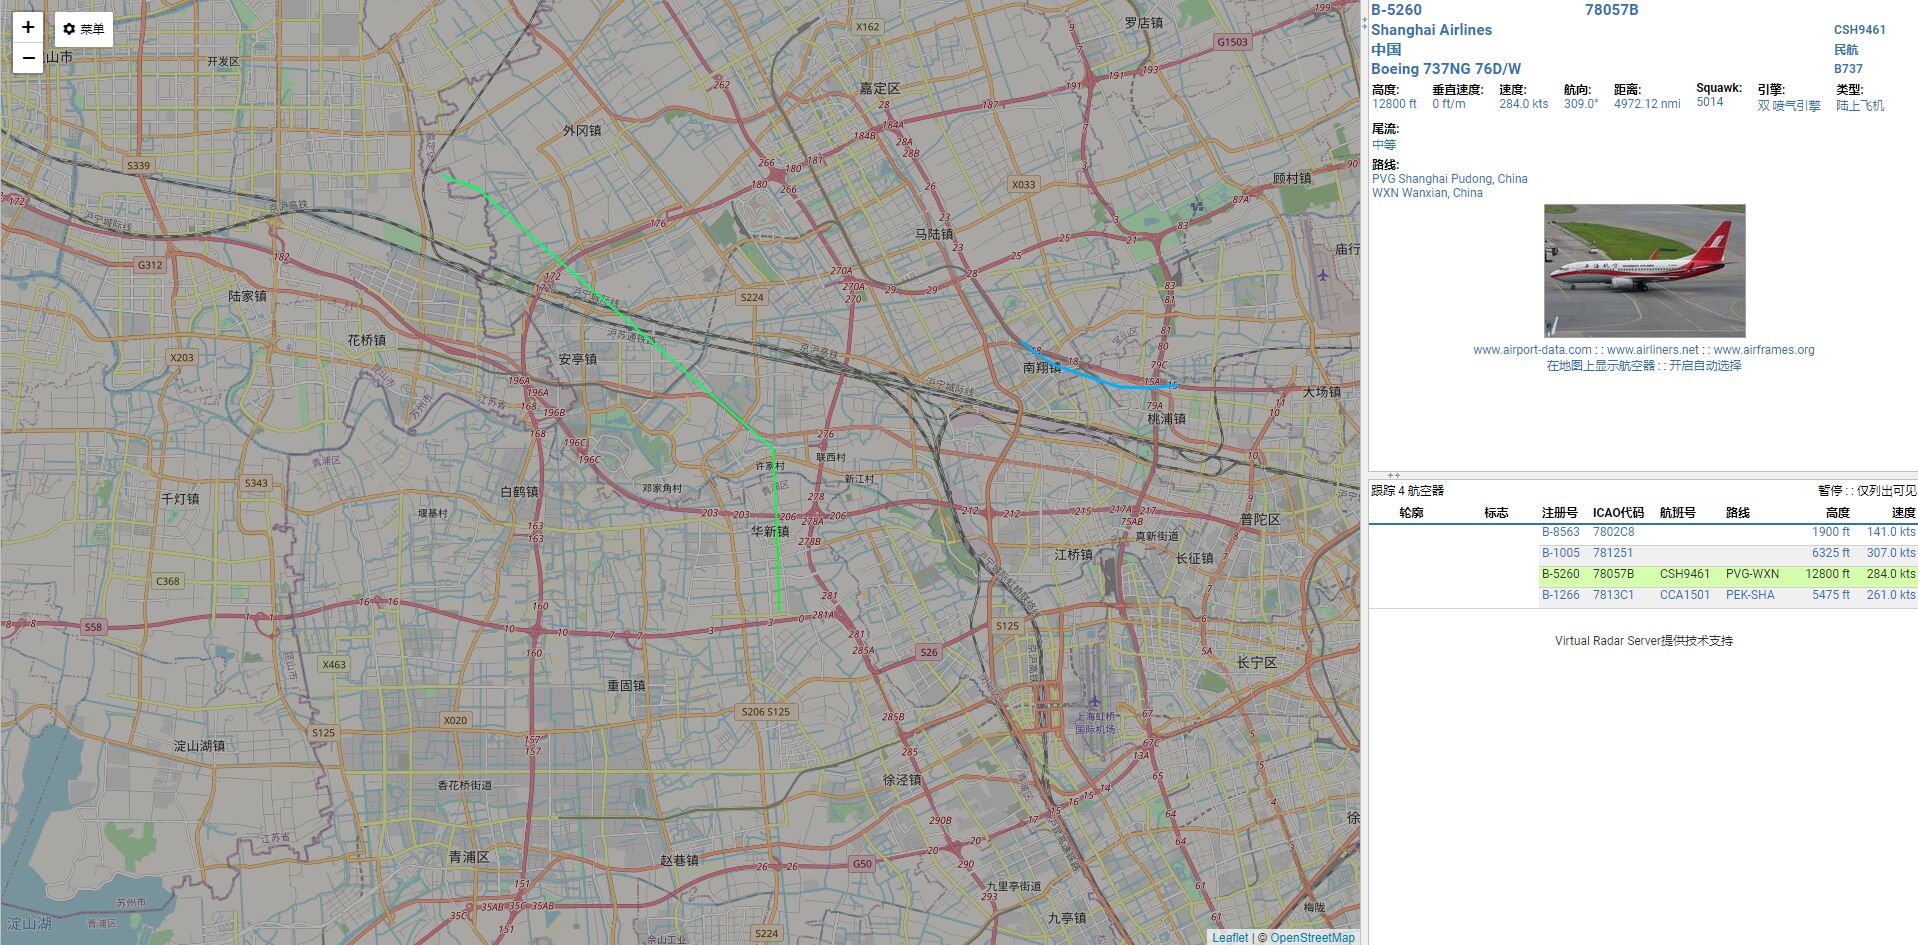
浏览器访问

VRS http://192.168.1.100:8081/VirtualRadar/desktop.html

Web 管理插件地址 http://192.168.1.100:8081/VirtualRadar/WebAdmin/Settings.html
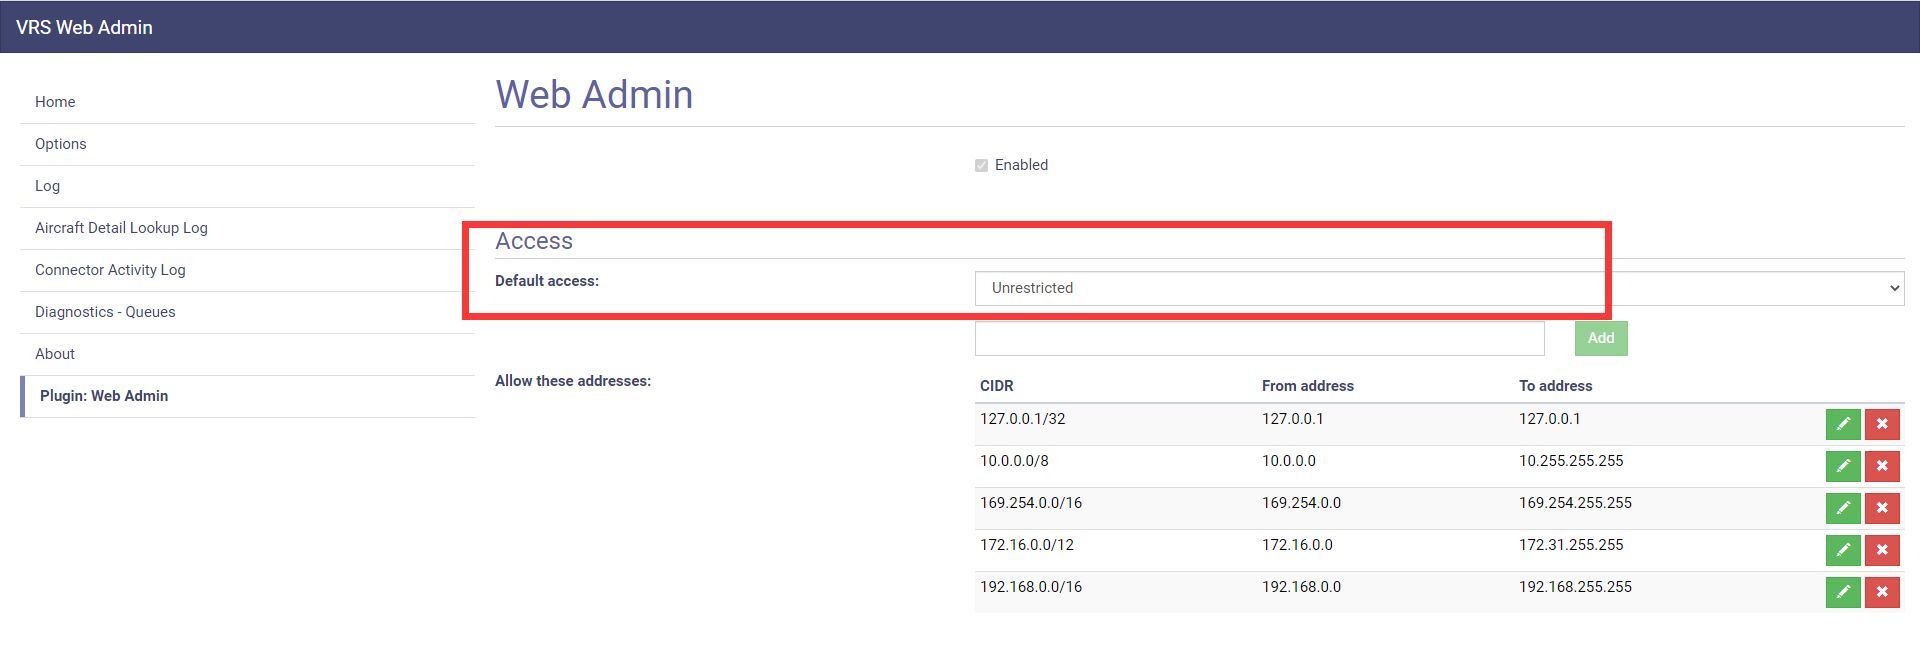
VRS 部分配置修改

如果有从公网访问管理界面的需求,请将此处修改为无限制,否则将会 403
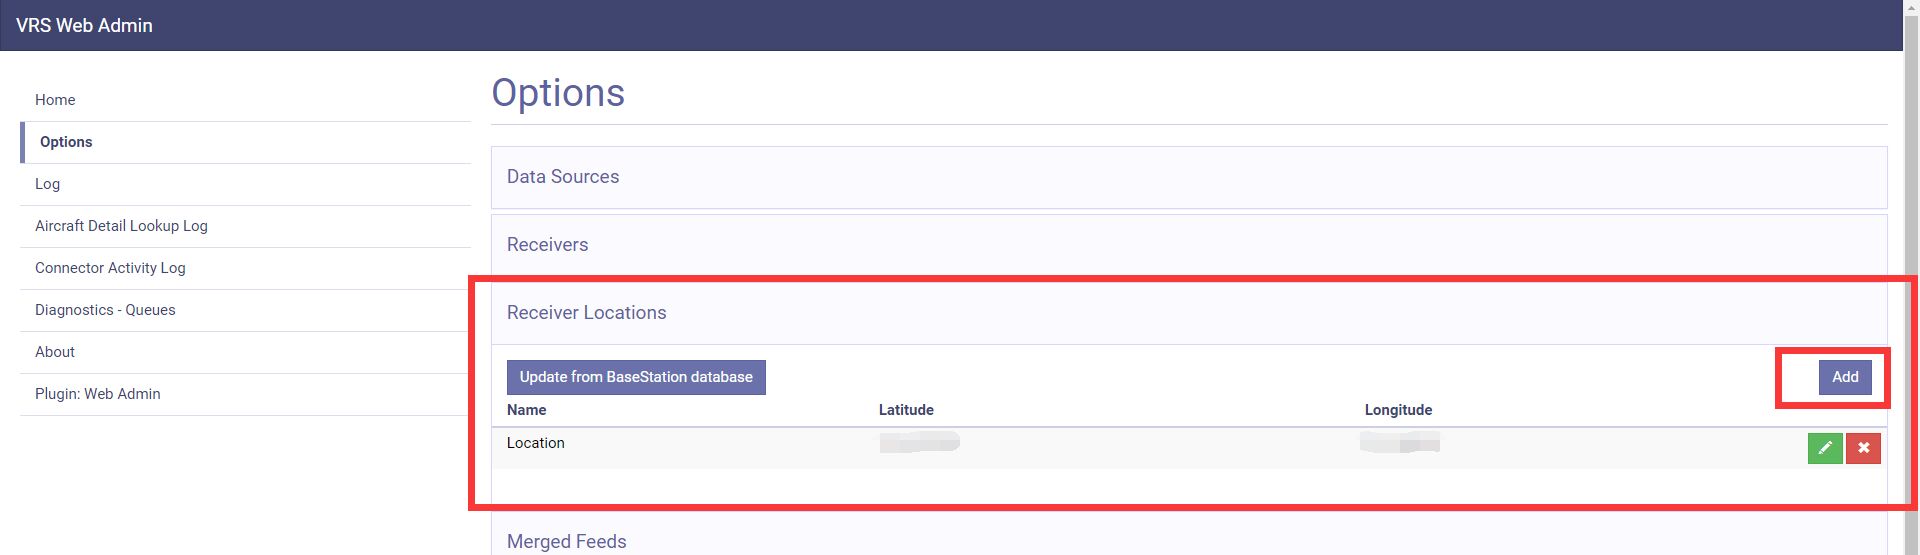
设置接收机地理位置(经纬度),可以使用百度地图的坐标拾取系统,设置完成后请拉到底部点击 Save
http://api.map.baidu.com/lbsapi/getpoint/index.html
VRS 可选插件部署

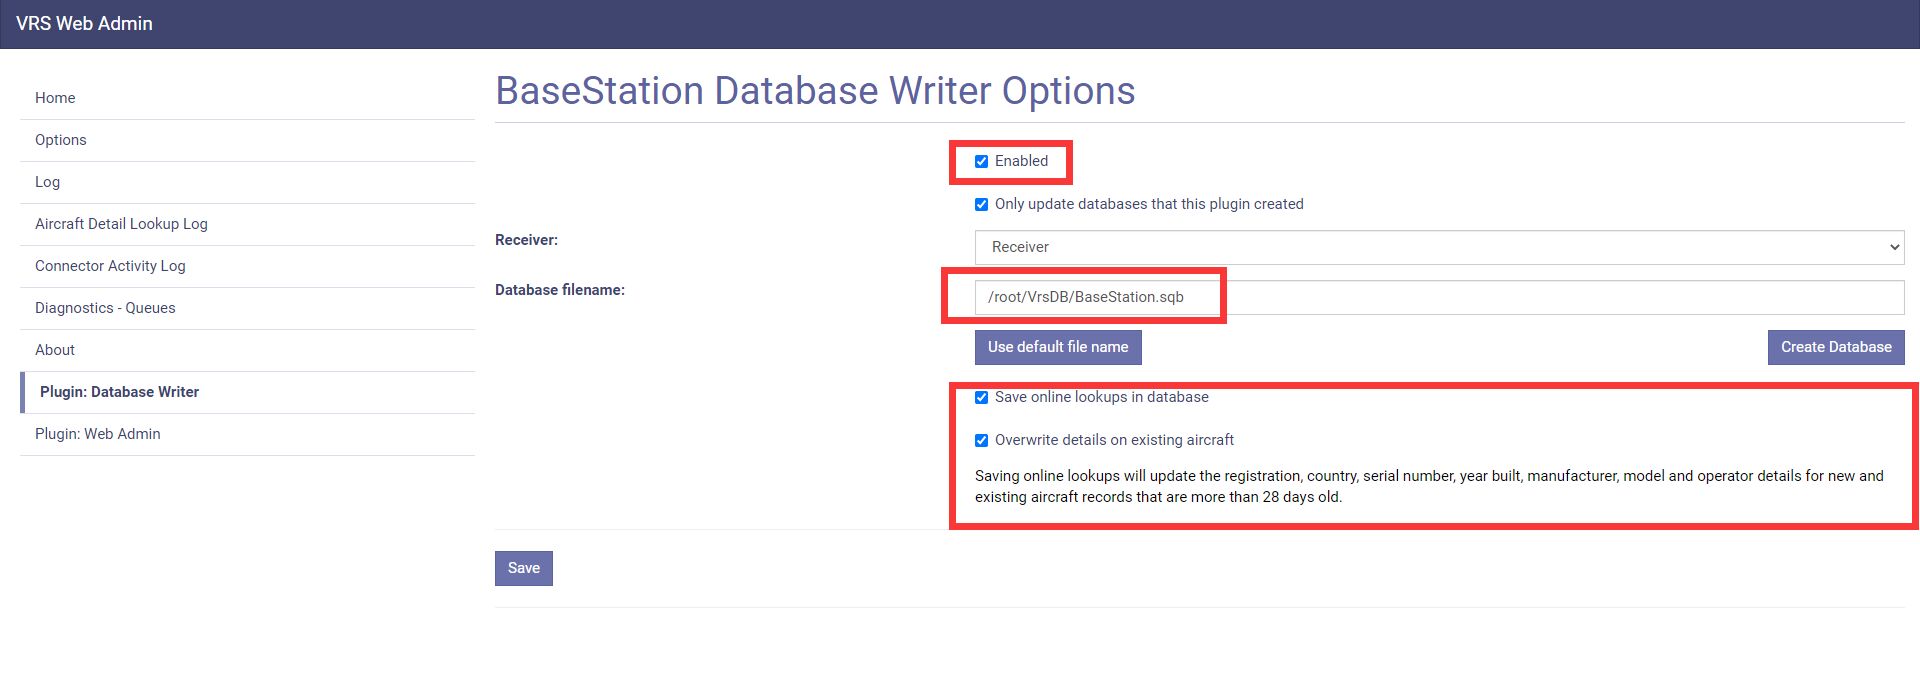
  • 数据库插件(可以将飞行记录(以及可选的飞机详细信息)保存到 BaseStation.sqb 数据库文件中)
1
2
3
4
# 下载插件并解压至vrs目录,并重启vrs
cd /root/vrs
wget http://www.virtualradarserver.co.uk/Files/VirtualRadar.DatabaseWriterPlugin.tar.gz
tar -zxvf VirtualRadar.DatabaseWriterPlugin.tar.gz

如下图所示,请将Enable勾选以启动数据库插件,并且设置数据库文件存放路径,也可选择Use Default File Name,并且勾选底下两个复选框,作用分别为将在线查询保存在数据库中以及覆盖现有飞机的详细信息,配置完成后请点击 Save 按钮进行保存
提示

如果 yum 安装 Mono 的时候特别慢,可以为 yum 添加代理

1
2
3
4
# 编辑yum配置文件
vim /etc/yum.conf
# 设置代理
proxy=http://192.168.1.101:1080/

其他文章