


In this guide, we will set up Cloudflare SSL and configure the Origin Certificate for the Apache server. Follow the simple steps to install SSL on your website.
In case you are using cPanel-powered web hosting, then you may want to read this guide where we install a Cloudflare SSL certificate using cPanel.
Here, we assume you have sudo user access to your server. Now, create a directory for storing the certificate and the key.
> sudo mkdir /etc/apache2/sslNow, to enable SSL in Apache, run the following command:
> sudo a2enmod sslRestart the Apache server for this to take effect.
> sudo systemctl restart apache2Now, you need to sign up for a Cloudflare account. There, you will need to provide your domain name (let’s say “example.com”). After, it will ask for updating the nameservers of your domain registrar. Once, you update the nameservers that Cloudflare provides and your domain points to Cloudflare nameservers, you can proceed to the next steps.
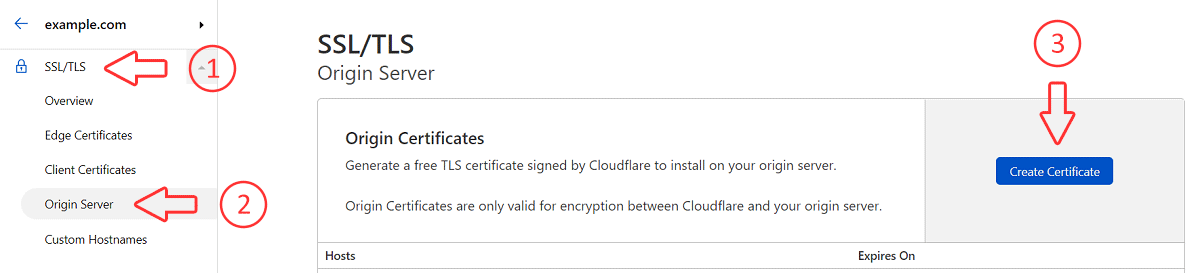
In the Cloudflare dashboard, navigate to “SSL/TLS”, then under “Origin Server”, click on “Create Certificate”.
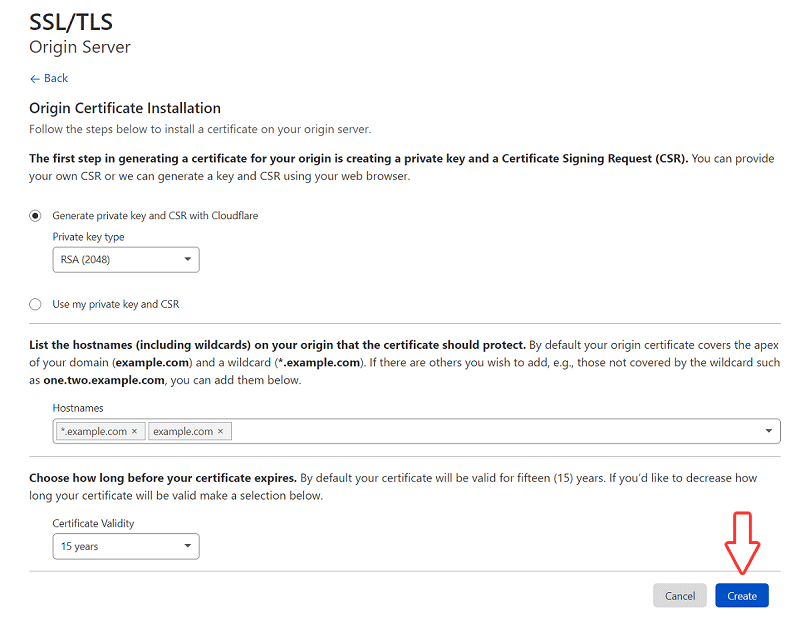
Select “Generate a private key and CSR with Cloudflare” and set “Private key type” to “RSA (2048)”. Set “Certificate Validity” to “15 years” (These steps should be done by default.). Then, click “Create”.
Now, you will see your “Origin Certificate” and “Private Key”. Make sure to copy the content of both separately.
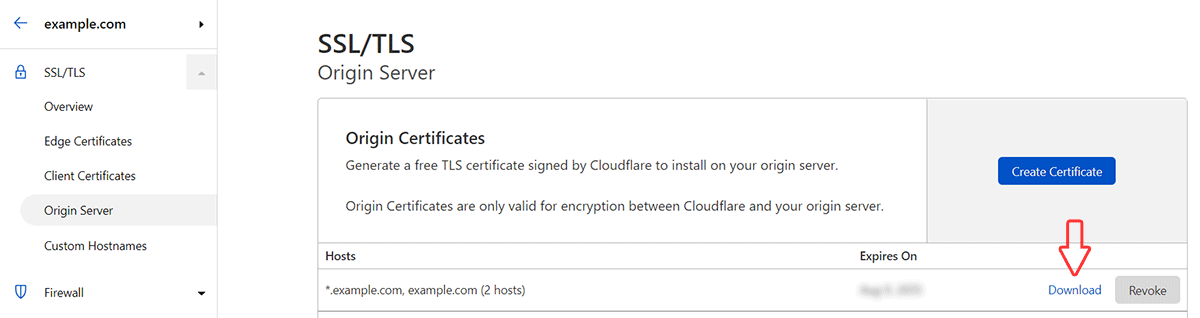
Here, the “Origin Certificate” will be something like this:
-----BEGIN CERTIFICATE-----
........
........
........
-----END CERTIFICATE-----
And, “Private Key” will be something like:
-----BEGIN PRIVATE KEY-----
........
........
........
-----END PRIVATE KEY-----Now, we will need to create two files under “/etc/apache2/ssl” directory to store the certificate and key.
Create a new file under “/etc/apache2/ssl” directory to store the “Origin Certificate”. Here, you can replace “example.com” with your domain name.
> sudo nano /etc/apache2/ssl/example.com.pemPaste the content of the “Origin Certificate” to the file and save it (Ctrl + X and Y to save).
Next, create a new file under “/etc/apache2/ssl” directory to store the “Private Key”.
> sudo nano /etc/apache2/ssl/example.com.keyPaste the content of the “Private Key” to the file and save it.
Now, you can verify if the files are there using the command:
> sudo ls /etc/apache2/ssl/Make sure, you see both files “example.com.pem” and “example.com.key”.
Now, change the permission of this directory using the command:
> sudo chmod -R 655 /etc/apache2/sslAlso, change the ownership to “www-data”.
> sudo chown -R www-data:www-data /etc/apache2/sslIn your Apache’s virtual host configuration file, we need to turn on SSL and also, point to the certificate files.
Open Apache’s virtual host file. Here, we are using the nano editor.
> sudo nano /etc/apache2/sites-available/example.com.confIn this file, you will see something like this:
<VirtualHost *:80>
	ServerName example.com
        DocumentRoot /var/www/html
</VirtualHost>
Change port 80 to 443 for SSL. Also, turn on SSLEngine and point to the certificate and key file. Then, it will look like this:
<VirtualHost *:443>
	ServerName example.com
        DocumentRoot /var/www/html

	SSLEngine on
	SSLCertificateFile /etc/apache2/ssl/example.com.pem
	SSLCertificateKeyFile /etc/apache2/ssl/example.com.key
</VirtualHost>
To activate this virtual host file, you can run the command:
> sudo a2ensite example.com.confTo test the configuration, run the following command:
> apachectl configtestLastly, restart Apache or reload Apache configuration.
> sudo service apache2 reloadNow, you can test your website by visiting: https://example.com/
Also, the SSL installation and new expiration date can be verified by different tools available online. Lastly, you may want to force all requests to https.
If you face any trouble when setting up SSL, then you can drop a message to us using our contact form. We will get back to you via email as soon as possible.
We also have a guide on how to install the Let’s Encrypt SSL certificate for your domain which is also a free alternative to the Cloudflare SSL.
此内容由惯性聚合(RSS阅读器)自动聚合整理,仅供阅读参考。 原文来自 — 版权归原作者所有。