





PyTorch-26H-1
主页:https://www.freecodecamp.org/news/learn-pytorch-for-deep-learning-in-day/
youtub:https://youtu.be/V_xro1bcAuA
github:https://github.com/mrdbourke/pytorch-deep-learning
Learn PyTorch for Deep Learning: Zero to Mastery book:https://www.learnpytorch.io/
PyTorch documentation:https://pytorch.org/docs/stable/index.html
Chapter 0 – PyTorch Fundamentals
what is deep learning?
Machine learning is turning things (data) into numbers and finding patterns in those numbers.
Deep Learning ∈ Machine Learning ∈ Aritfical Intelligence
传统程序:输入+规则→输出
机器学些:输入+输出→规则
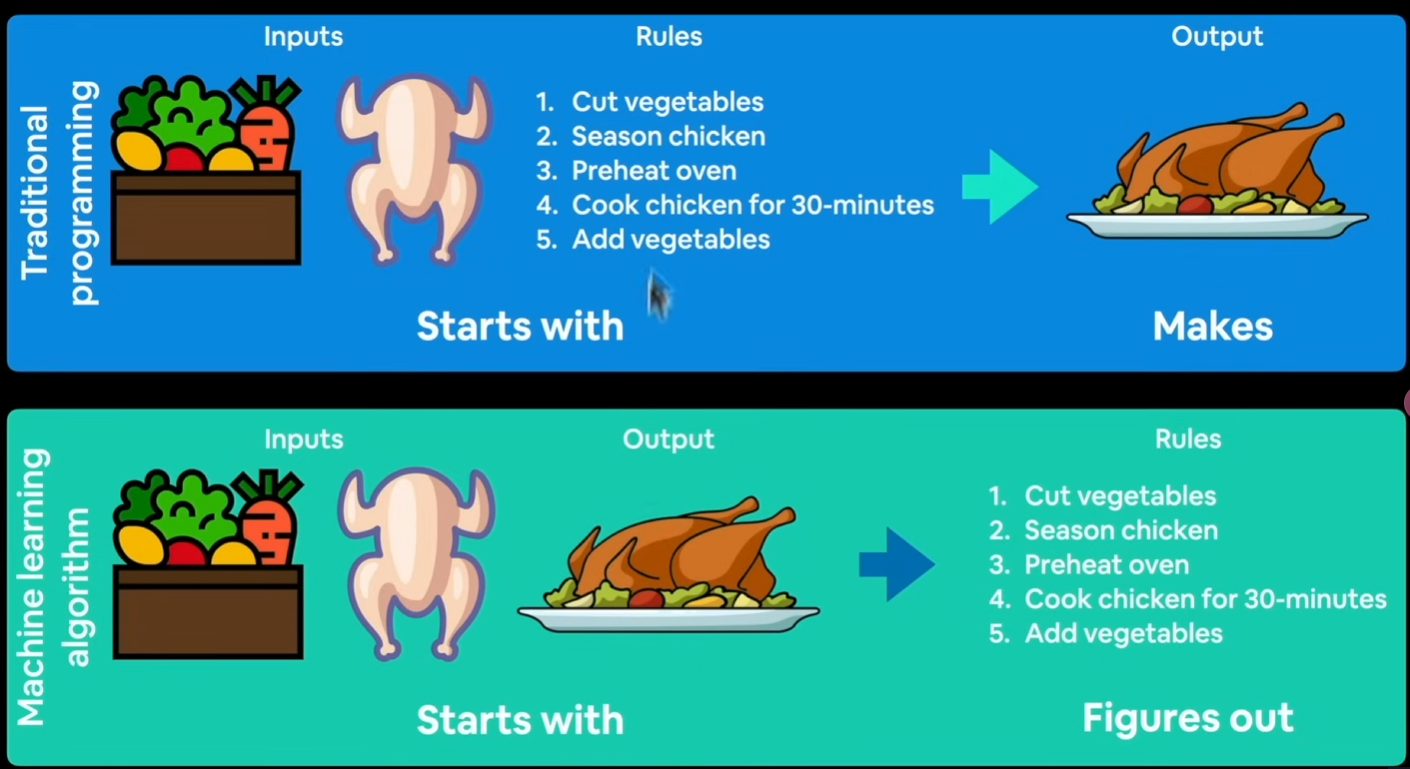
Why use machine/deep learning?
对于复杂的问题,无法找到所有的规则。
The number one rule of ML
“If you can build a simple rule-based system that doesn’t require machine learning, do that.”
A wise software engineer… (actually rule 1 of Google’s Machine Learning Handbook)
What deep learning is good for
Problems with long lists of rules- when the traditional approach fails, machine learning/deep learning may help.
规则列表过长的问题——当传统方法失败时,机器学习/深度学习可能会有所帮助。
Continually changing environments- deep learning can adapt (learn’) to new scenarios.
不断变化的环境——深度学习可以适应(学习)新场景。
Discovering insights within large collections of data- can you imagine trying to hand-craft rules for what 101 different kinds of food look like?
在大量数据中发现见解——你能想象尝试手工制定 101 种不同食物的规则吗?
- What deep learning is not good for
When you need explainability- -the patterns learned by a deep learning model are typically uninterpretable by a human.
当你需要可解释性时——深度学习模型学习到的模式通常无法被人类解释。
When the traditional approach is a better option一if you can accomplish what you need with a simple rule-based system.
当传统方法是更好的选择时——如果你可以使用简单的基于规则的系统完成所需的工作。
When errors are unacceptable一since the outputs of deep learning model aren’t always predictable.
当错误不可接受时——因为深度学习模型的输出并不总是可预测的。
When you don’t have much data一deep learning models usually require a fairly large amount of data to produce great results.
当你没有太多数据时——深度学习模型通常需要相当大量的数据才能产生很好的结果。
Machine learning vs deep learning

- Machine learning
适合处理结构化数据
常见算法:
Random forest 随机森林
Gradient boosted models 梯度提升模型
Naive Bayes 朴素贝叶斯
Nearest neighbour 最近邻
Support vector machine 支持向量机
- Deep learning
适合处理非结构化数据
常见算法:
Neural networks 神经网络
Fully connected neural network 全连接神经网络
Convolutional neural network 卷积神经网络
Recurrent neuralnetwork 循环神经网络
Transformer
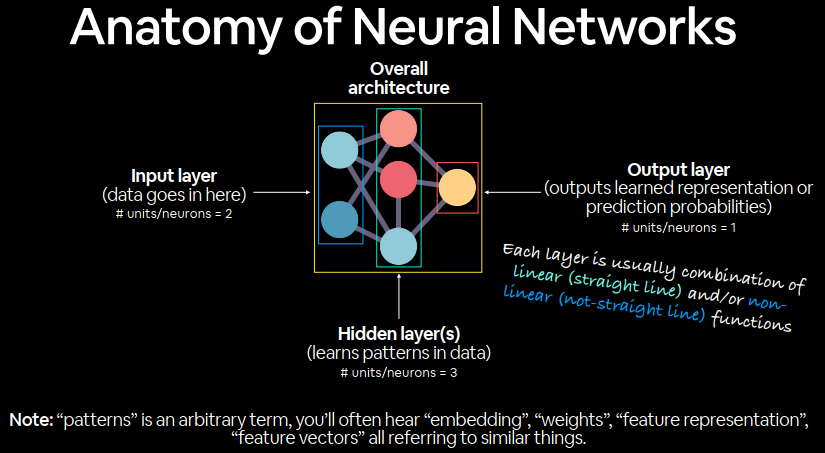
Anatomy of neural networks
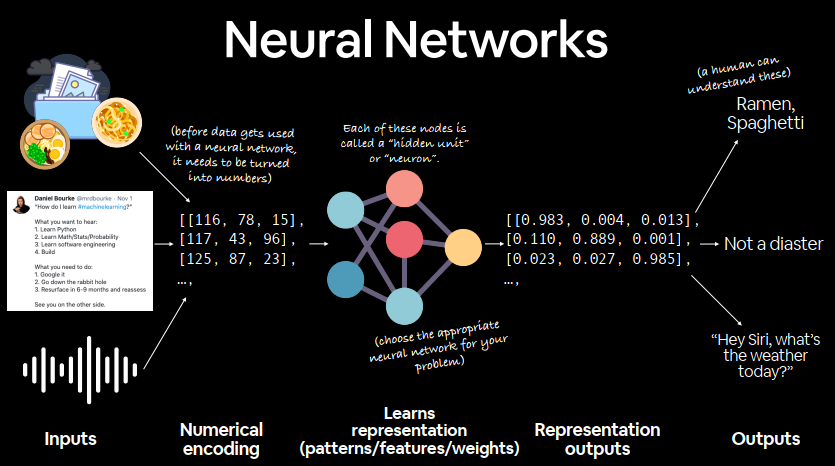
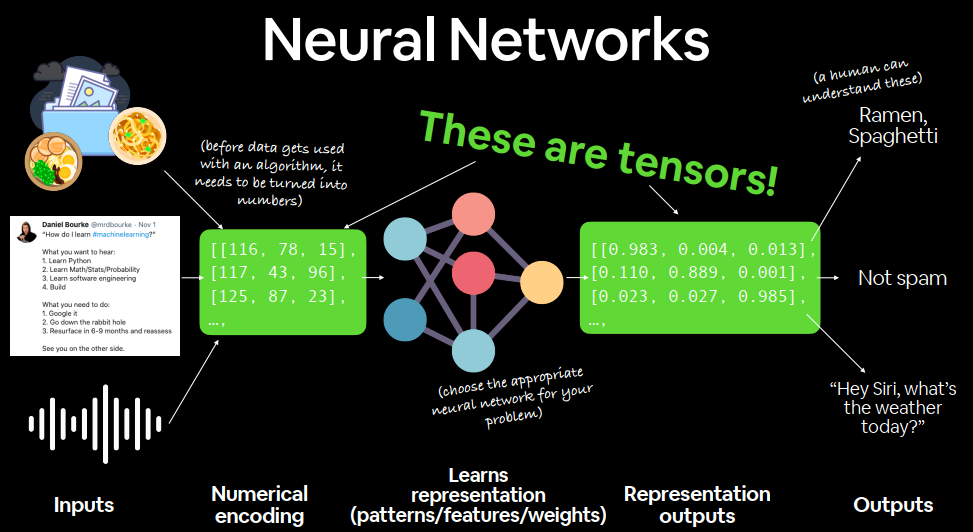
数据→数字→神经网络→权重→输出
Different learning paradigms
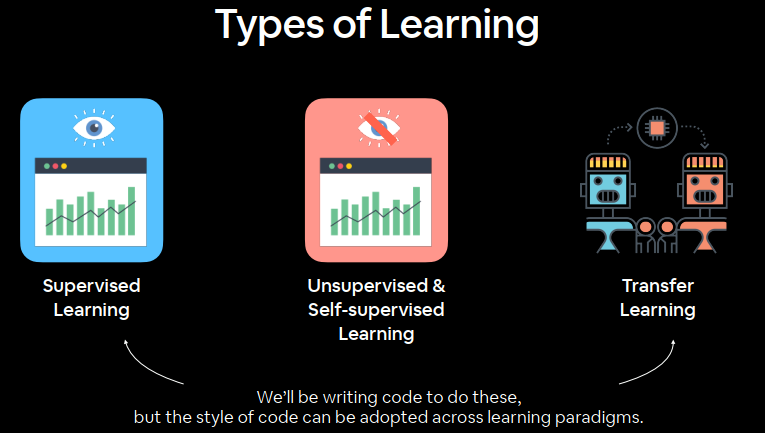
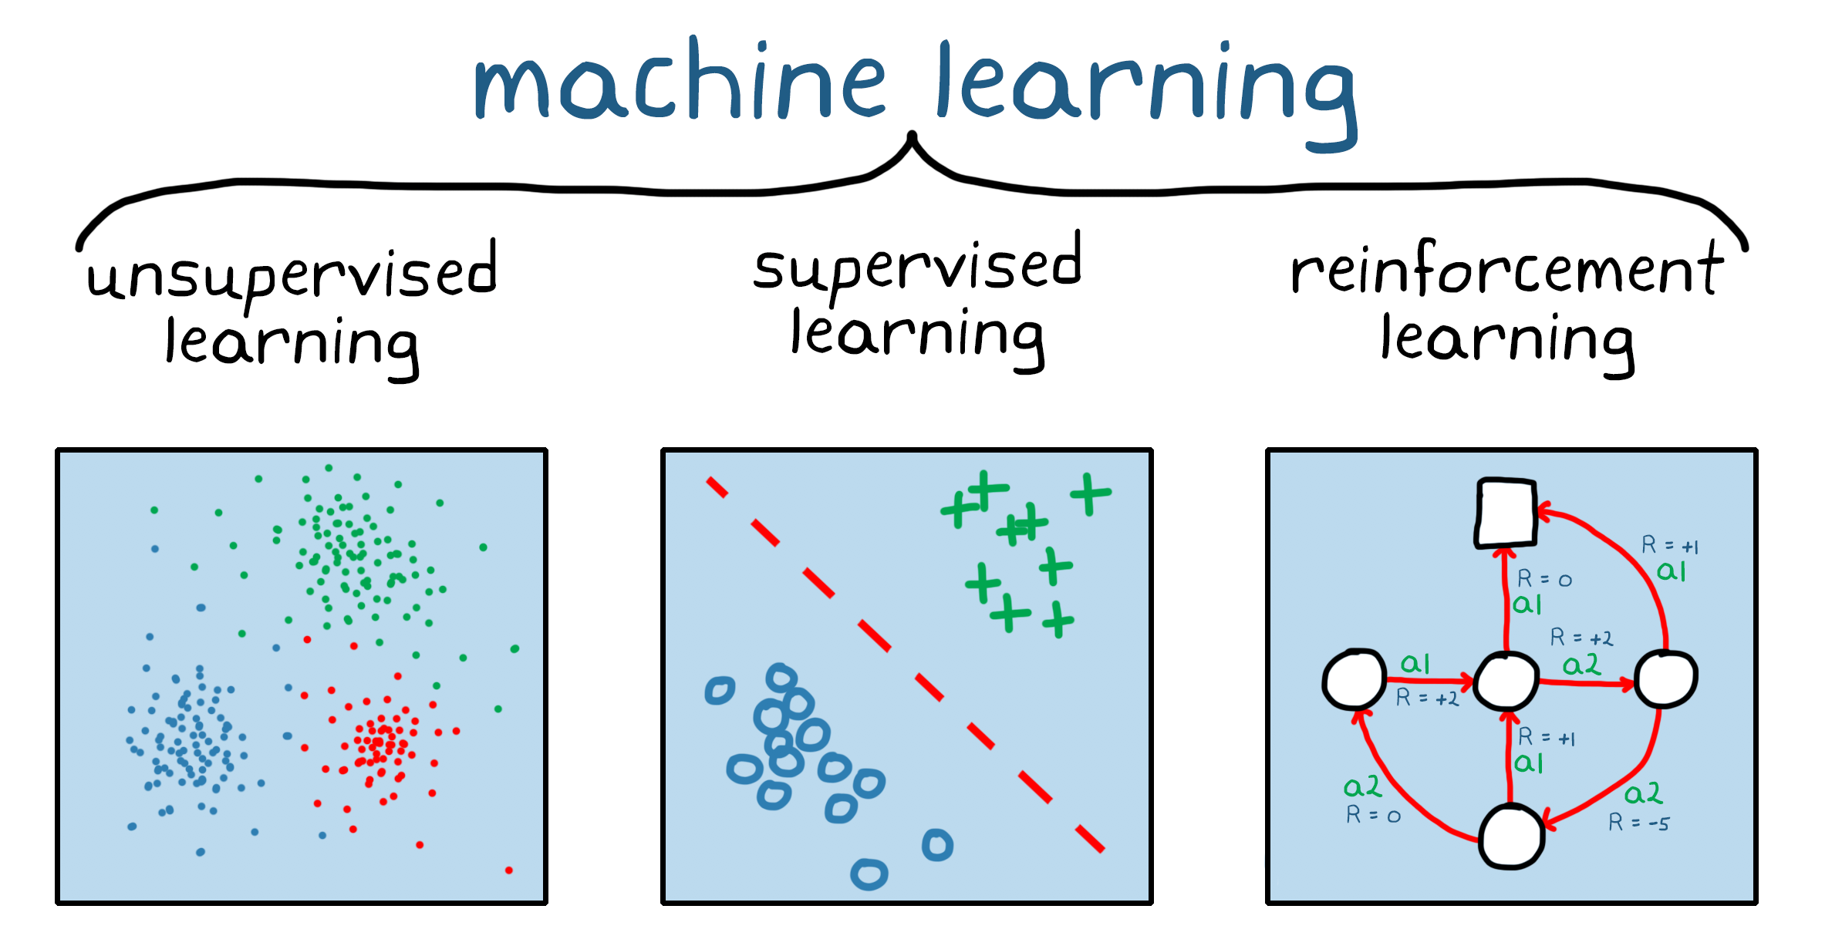
监督学习:大量已知数据标注。
无监督学习:自动分析数据。
迁移学习:将学习到的模式嵌入到新的模型中。
强化学习reinforcement learning:奖励想要的结果。
What can deep learning be used for?

CV
NATURAL LANGUAGE PROGRESS
SEQUENCE IN AND SEQUENCE OUT
What is/why PyTorch?

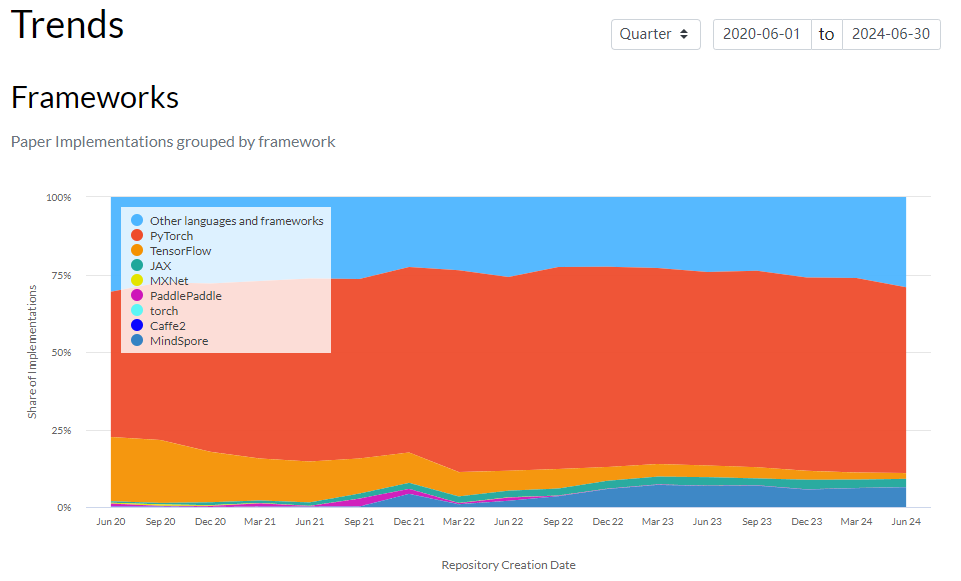
Most popular research deep learning framework
最流行的深度学习研究框架
Write fast deep learning code in Python (able to run on a GPU/many GPUs)
用 Python 编写快速的深度学习代码(可在 GPU/多个 GPU 上运行)
Able to access many pre-built deep learning models (Torch Hub/torchvision.models)
能够访问许多预构建的深度学习模型(Torch Hub/torchvision.models)
Whole stack: preprocess data, model data, deploy model in your application/cloud
整个堆栈:预处理数据、建立数据模型、在应用程序/云中部署模型
Originally designed and used in-house by Facebook/Meta (now opensource and used by companies such as Tesla, Microsoft, OpenAI)
最初由 Facebook/Meta 内部设计和使用(现已开源,并被特斯拉、微软、OpenAI 等公司使用)
GPU(Graphics Processing Unit)
TPU(Tensor Processing Unit)
What are tensors?
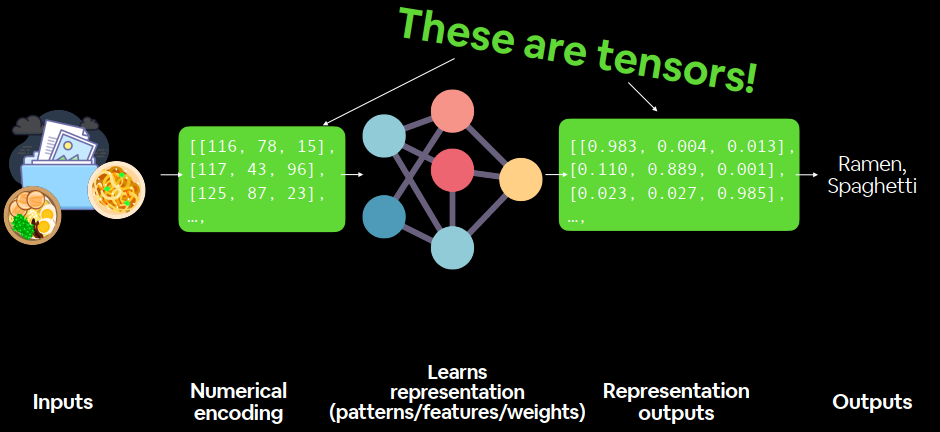
Outline
Now:
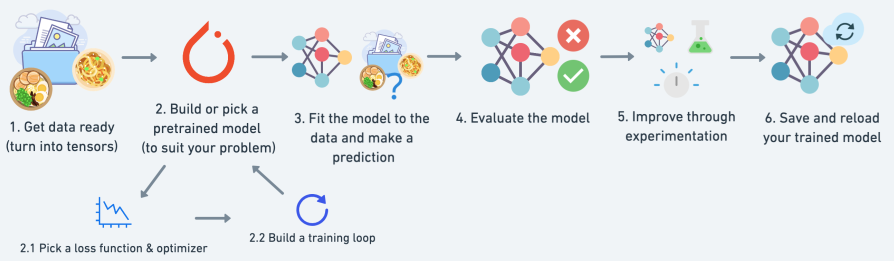
- PyTorch basics & fundamentals (dealing with tensors and tensor operations)
- PyTorch 基础和基本原理(处理张量和张量运算)
Later:
- Preprocessing data (getting it into tensors)
- 预处理数据(将数据转化为张量)
- Building and using pretrained deep learning models
- 构建和使用预训练的深度学习模型
- Fitting a model to the data (learning patterns)
- 根据数据拟合模型(学习模式)
- Making predictions with a model (using patterns)
- 使用模型进行预测(使用模式)
- Evaluating model predictions
- 评估模型预测
- Saving and loading models
- 保存和加载模型
- Using a trained model to make predictions on custom data
- 使用训练好的模型对自定义数据进行预测
一点科学,一点艺术。
How to (and how not to) approach this course
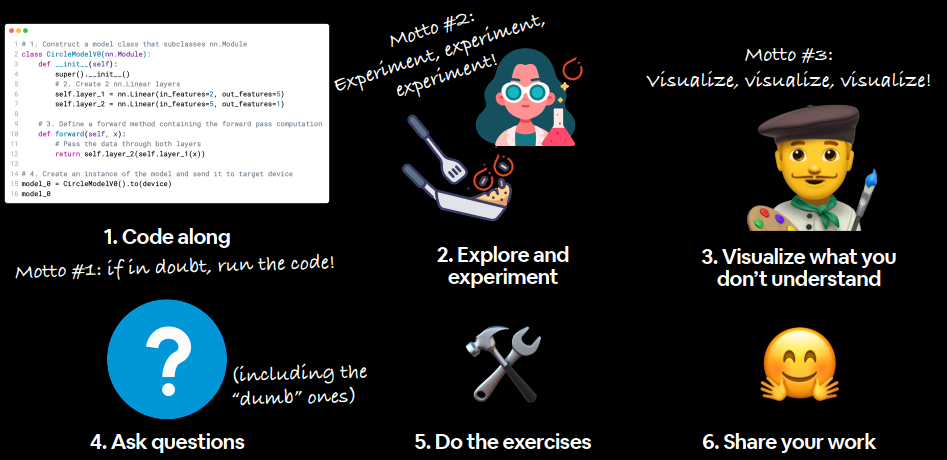
1、code alone
2、explore and experiment
3、visuallize what you don’t understand
4、ask questions
5、do the exercises
6、share your work
Important resources

课程资料:
Course materials
问答:
Course Q&A
出问题去讨论区

Getting setup
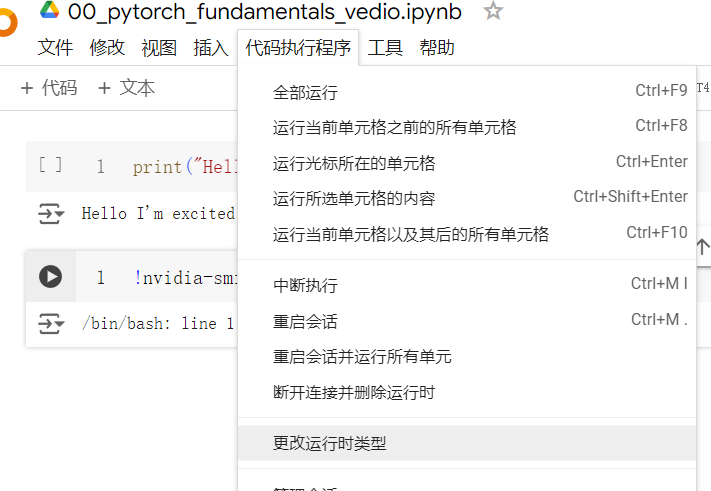
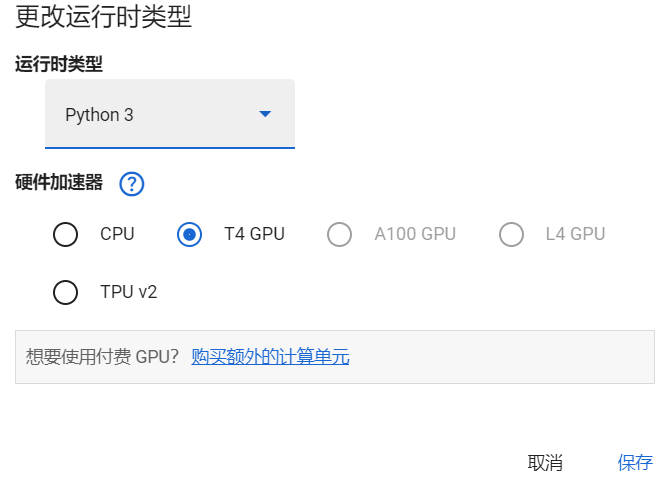
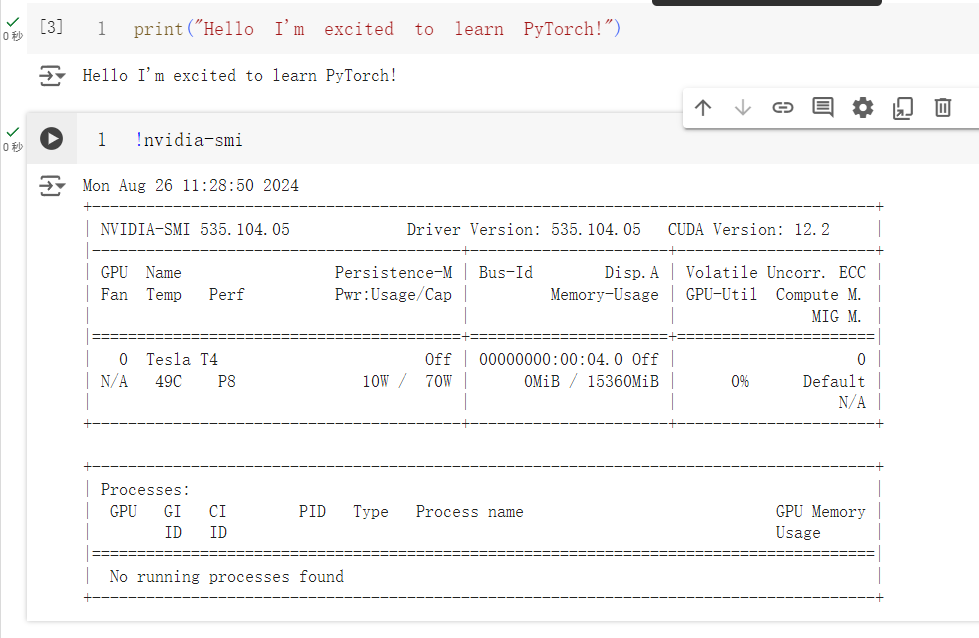
00_pytorch_fundamentals_vedio.ipynb
1 | print("Hello I'm excited to learn PyTorch!") |
Introduction to tensors
A torch.Tensor is a multi-dimensional matrix containing elements of a single data type.
张量是包含单一数据类型元素的多维矩阵。
scalar→标量
1 |
|
vecotr→向量
拥有大小和方向
1 |
|
MATRIX→矩阵
1 | MATRIX = torch.tensor([[7,8], |
TENSOR→张量
1 | TENSOR = torch.tensor([[[1, 2, 3], |

1 | TENSOR = torch.tensor([[[1, 2], |
1 | TENSOR = torch.tensor([[[1, 2], |
1 | TENSOR = torch.tensor([[[1, 2], |
| Name | 解释 | 维度 | |
|---|---|---|---|
| scalar标量 | 一个数字 | 0 | Lower(a) |
| vector向量 | 带有方向的数字(例如带有方向的风速),但也可以有许多其他数字 | 1 | Lower(y) |
| matrix矩阵 | 二维数字数组 | 2 | Upper(Q) |
| tensor张量 | n 维数字数组 | n,0 维张量是标量,1 维张量是矢量 | Upper(X) |

Creating tensors
Why random tensors?
Random tensors are important because the way many neural networks learn is that they start with tensors full of random numbers and then adjust those random numbers to better represent the data .
随机张量很重要,因为许多神经网络的学习方式是从充满随机数的张量开始,然后调整这些随机数以更好地表示数据。
start with random numbersy → look at data → update random numbers → look at data → update random numbers
- 创建随机张量
1 |
|
1 | (tensor([[0.6541, 0.4807, 0.2162, 0.6168], |
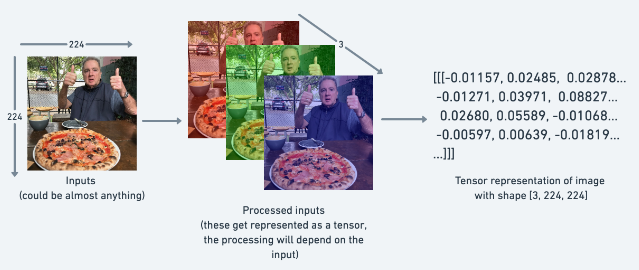
- 创建随机图像张量
1 |
|
1 | (torch.Size([224, 224, 3]), 3) |
图像表示为具有形状的张量,[3, 224, 224]这意味着[colour_channels, height, width],图像具有3颜色通道(红色、绿色、蓝色)、像素高度224和像素宽度224。
Zeros and ones
1 |
|
1 | tensor([[0., 0., 0., 0.], |
1 |
|
1 | tensor([[1., 1., 1., 1.], |
Creating a range of tensors and tensors-like
- 数字范围
1 |
|
1 | tensor([ 1, 2, 3, 4, 5, 6, 7, 8, 9, 10]) |
- 相同形状填充零或一的张量
1 |
|
1 | tensor([0, 0, 0, 0, 0, 0, 0, 0, 0, 0]) |
1 |
|
1 | tensor([1, 1, 1, 1, 1, 1, 1, 1, 1, 1]) |
Tensor datatypes
Precision in computing#:~:text=In%20computer%20science%2C%20the%20precision,used%20to%20express%20a%20value)
张量数据类型是使用 PyTorch 和深度学习时会遇到的 3 个大错误之一:
- 张量数据类型不正确datatype
- 张量形状不正确shape
- 张量不在正确的设备上device
- 默认为float32
1 |
|
1 | tensor([3., 6., 9.]) |
- 修改默认数据类型
1 |
|
1 | tensor([3., 6., 9.]), dtype=torch.float16 |
- 设备和记录操作
1 |
|
1 | tensor([3., 6., 9.]) |
- 张量转换32 → 16
1 | float_16_tensor = float_32_tensor.type(torch.float16) |
1 | tensor([3., 6., 9.], dtype=torch.float16) |
- 不同数据类型张量相乘
进行了自动类型转换,向上转换
float16 × float32 → float32
1 | test = float_16_tensor * float_32_tensor |
1 | (tensor([ 9., 36., 81.]), torch.float32) |
int64 × float32 → float32
1 | int_32_tensor = torch.tensor([3, 6, 9], dtype=torch.int64) |
1 | (tensor([3, 6, 9]), torch.int64) |
1 | test = float_32_tensor * int_32_tensor |
1 | (tensor([ 9., 36., 81.]), torch.float32) |
long × float32 → float32
1 | int_32_tensor = torch.tensor([3, 6, 9], dtype=torch.long) |
1 | (tensor([3, 6, 9]), torch.int64) |
1 | test = float_32_tensor * int_32_tensor |
1 | (tensor([ 9., 36., 81.]), torch.float32) |
Tensor attributes (information about tensors)
- shape/size():形状
- dtpye:数据类型
- device:设备
1 |
|
1 | tensor([[0.4688, 0.0055, 0.8551, 0.0646], |
Manipulating tensors
- Addition:加法
- Substraction:减法
- Multiplication (element-wise):乘法
- Division:除法
- Matrix multiplication:矩阵乘法
basic operations
1 |
|
1 | tensor([11, 12, 13]) |
1 |
|
1 | tensor([10, 20, 30]) |
1 | # Tensors don't change unless reassigned |
1 | tensor([1, 2, 3]) |
1 |
|
1 | tensor([-9, -8, -7]) |
PyTorch也有一些内置函数,如torch.mul()(乘法的缩写)和torch.add()来执行基本操作。
Matrix multiplication
矩阵乘法需要记住的两个主要规则是:
内部尺寸必须匹配:
(3, 2) @ (3, 2)不起作用
(2, 3) @ (3, 2)会起作用
(3, 2) @ (2, 3)会起作用得到的矩阵具有外部尺寸的形状:
(2, 3) @ (3, 2)->(2, 2)
(3, 2) @ (2, 3)->(3, 3)
1 | import torch |
1 | torch.Size([3]) |
- 元素乘法:
1 | tensor * tensor |
1 | tensor([1, 4, 9]) |
- 矩阵乘法:
1 | torch.matmul(tensor, tensor) |
1 | tensor(14) |
1 | torch.mm(tensor, tensor) |
1 | tensor(14) |
1 | tensor @ tensor |
1 | tensor(14) |
- 内置
torch.matmul()方法更快。
1 | %%time |
1 | CPU times: user 773 µs, sys: 0 ns, total: 773 µs |
1 | CPU times: user 146 µs, sys: 83 µs, total: 229 µs |
深度学习中最常见的错误之一(形状错误)
由于深度学习的大部分内容是对矩阵进行乘法和执行运算,并且矩阵对于可以组合的形状和大小有严格的规则,因此在深度学习中遇到的最常见错误之一就是形状不匹配。
1 |
|
1 | ... |
通过矩阵的内部维度匹配来使矩阵乘法在tensor_A和之间进行tensor_B。
使用转置(切换给定张量的维度)。
您可以使用以下任一方式在 PyTorch 中执行转置:
torch.transpose(input, dim0, dim1), 其中input是需要转置的张量, 和dim0是dim1需要交换的维度。tensor.T,tensor是需要转置的张量。
1 |
|
1 | tensor([[1., 2.], |
1 | Original shapes: tensor_A = torch.Size([3, 2]), tensor_B = torch.Size([3, 2]) |
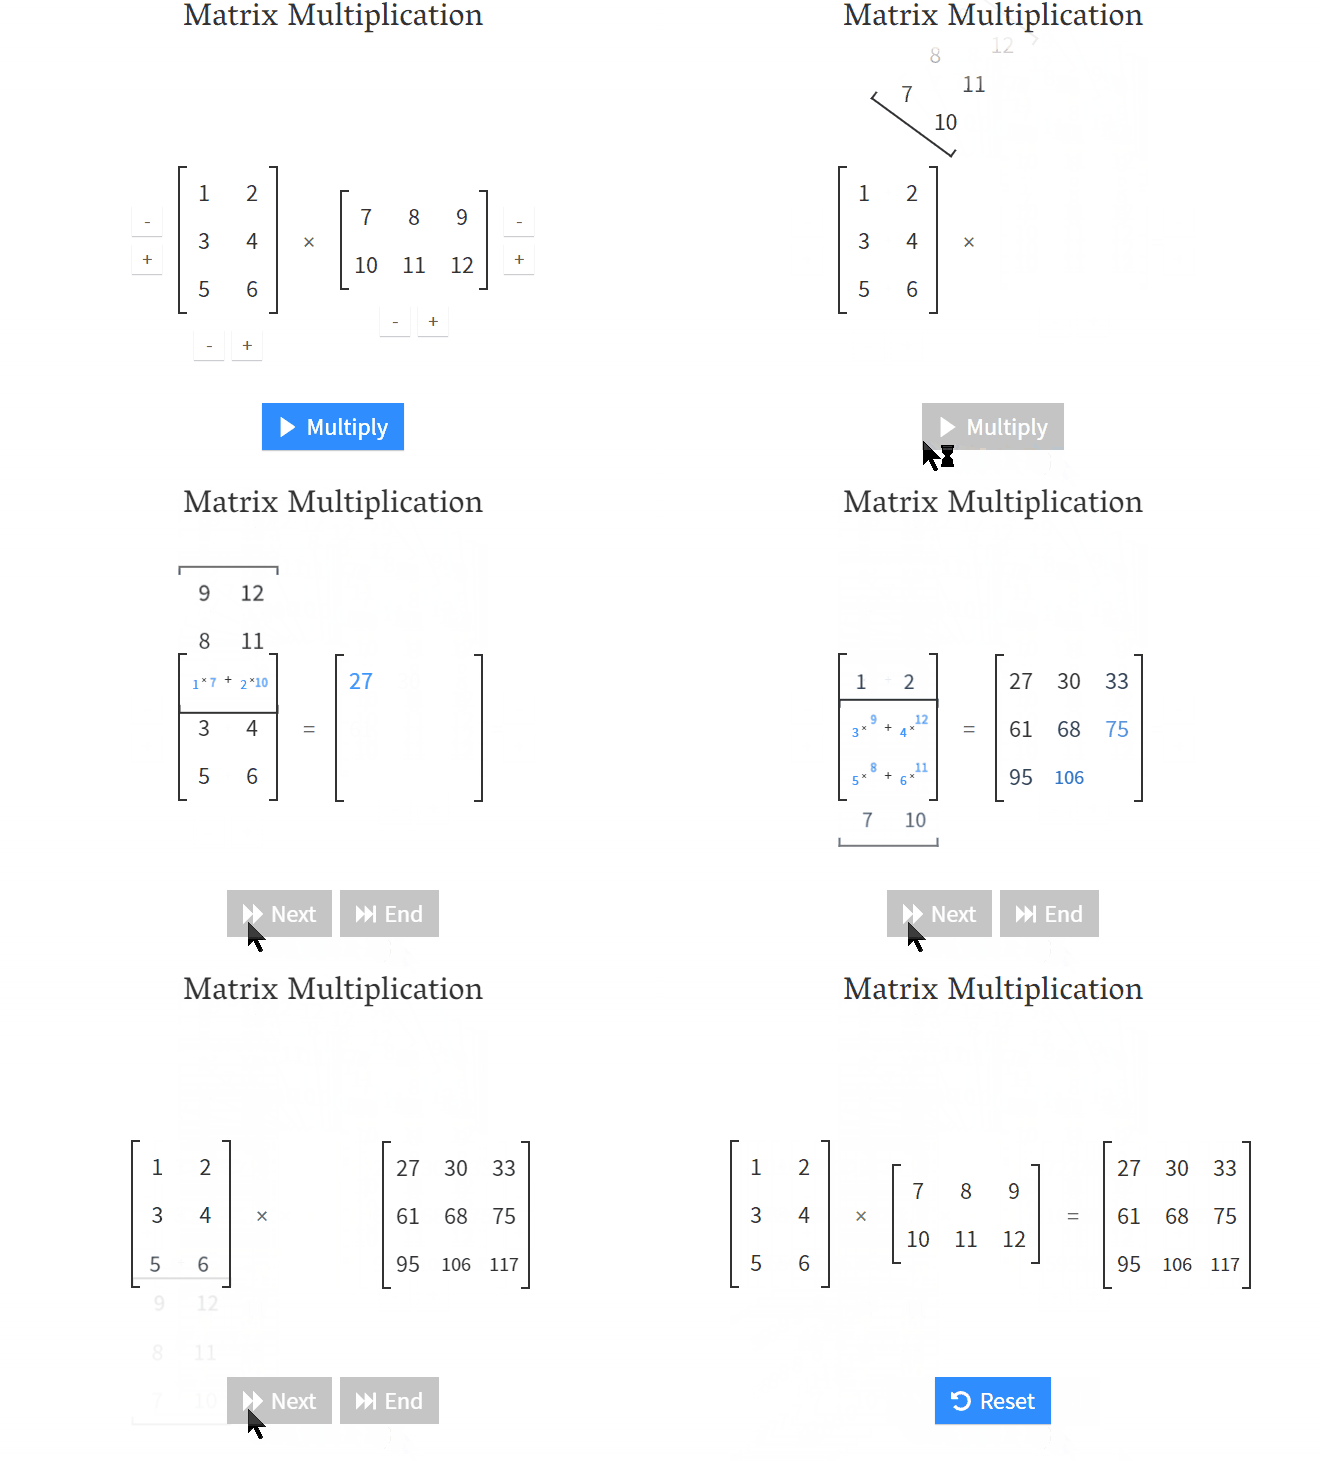
像这样的矩阵乘法也称为两个矩阵的点积。
神经网络充满了矩阵乘法和点积。
该torch.nn.Linear()模块(我们稍后会看到它的实际作用),也称为前馈层或全连接层,实现输入x和权重矩阵之间的矩阵乘法A。
- x是该层的输入(深度学习是将多个层
torch.nn.Linear()和其他层堆叠在一起)。 - A是由该层创建的权重矩阵,它开始是随机数,随着神经网络学习更好地表示数据中的模式,这些随机数会进行调整(请注意“ T”,这是因为权重矩阵被转置了)。
- 注意:您可能还经常看到
W或另一个字母,X用于展示权重矩阵。 b是用于稍微偏移权重和输入的偏差项。y是输出(对输入进行操作以期发现其中的模式)。
这是一个线性函数(你可能在高中或其他地方见过类似 $y = mx+b$ 的函数),可以用来画一条直线!
让我们尝试一下线性层。
1 |
|
1 | Input shape: torch.Size([3, 2]) |
Finding the min, max, mean & sum
最小最大平均求和
1 |
|
1 | tensor([ 0, 10, 20, 30, 40, 50, 60, 70, 80, 90]) |
1 | print(f"Minimum: {x.min()}") |
1 | Minimum: 0 |
查找最大最小索引位置
torch.argmax(),torch.argmin()。
1 |
|
1 | Tensor: tensor([10, 20, 30, 40, 50, 60, 70, 80, 90]) |
更改数据类型
torch.Tensor.type(dtype=None)
1 |
|
1 | torch.float32 |
1 |
|
1 | tensor([10., 20., 30., 40., 50., 60., 70., 80., 90.], dtype=torch.float16) |
1 |
|
1 | tensor([10, 20, 30, 40, 50, 60, 70, 80, 90], dtype=torch.int8) |
数字越小(例如 32、16、8),计算机存储的值就越不精确。存储量越少,通常计算速度越快,整体模型就越小。基于移动端的神经网络通常使用 8 位整数,与 float32 相比,它们更小、运行速度更快,但准确度较低。
重塑、视图、堆叠、压缩、解压、置换
- Reshaping - reshapes an input tensor to a defined shape
- View - return a view of a input tensor of certain shape but keep the same memory as the original tensor
- Stacking - combine multiple tnesors on top of each other (vstack) or side by side(hstack)
- Squeeze - removes all 1 dimensions from a tensor
- Unsqueeze - add a 1 dimensions to a target tensor
Permute - Return a view of the input with dimensions permuted(swapped) in a certain way
重塑 - 将输入张量重塑为定义的形状
- 视图 - 返回特定形状的输入张量的视图,但保留与原始张量相同的内存
- 堆叠 - 将多个张量组合在一起(vstack)或并排组合(hstack)
- 压缩 - 从张量中删除所有 1 维
- 解压 - 向目标张量添加 1 维
- 置换 - 返回以特定方式置换(交换)维度的输入视图
| 方法 | 描述 |
|---|---|
| torch.reshape(input, shape) | 重塑input为shape(如果兼容),也可以使用torch.Tensor.reshape()。 |
| Tensor.view(shape) | shape返回与原始张量不同的但共享相同数据的原始张量的视图。 |
| torch.stack(tensors, dim=0) | 沿新维度(dim)连接一系列张量(tensor),所有tensors必须大小相同。 |
| torch.squeeze(input) | 挤压input以删除所有具有值的维度1。 |
| torch.unsqueeze(input, dim) | 返回在 处添加input的维度值。1dim |
| torch.permute(input, dims) | 返回原始输入的视图,其尺寸已置换(重新排列)为 dims。 |
Reshaping-重塑
1 |
|
1 | (tensor([1., 2., 3., 4., 5., 6., 7.]), torch.Size([7])) |
1 |
|
1 | (tensor([[1., 2., 3., 4., 5., 6., 7.]]), torch.Size([1, 7])) |
x.reshape(1, 8) → error,因为元素数和原来数组不相同。
x.reshape(2, 7) → error,因为在不增加元素数量的情况情况下将元素数量增加一倍。
x.reshape(7, 1) → 可以运行,行列转换。
View-视图
1 |
|
1 | (tensor([[1., 2., 3., 4., 5., 6., 7.]]), torch.Size([1, 7])) |
改变张量的视图实际上只会创建同torch.view()一张量的新视图。
因此改变视图也会改变原始张量。
1 |
|
1 | (tensor([[5., 2., 3., 4., 5., 6., 7.]]), tensor([5., 2., 3., 4., 5., 6., 7.])) |
Stacking-堆叠
新的张量堆叠在其自身之上五次,torch.stack()。
1 |
|
1 | tensor([[5., 2., 3., 4., 5., 6., 7.], |
1 |
|
1 | tensor([[5., 5., 5., 5.], |
x_stacked = torch.stack([x, x, x, x], dim=2) 维度为2不行,因为原来的形状与二维不兼容。
torch.stack 和 torch.vstack 和 torch.hstack
- stack
1 | torch.stack(tensors, dim=0, *, out=None) → Tensor |
沿新维度连接一系列张量。
所有张量都需要具有相同的大小。
1 | x = torch.randn(2, 3) |
1 | (tensor([[ 0.1801, 0.1566, -2.0349], |
- vstack
1 | torch.vstack(tensors, *, out=None) → Tensor |
按垂直顺序(按行)堆叠张量。
这相当于在所有一维张量被重塑后沿第一个轴进行连接torch.atleast_2d()。
1 | a = torch.tensor([1, 2, 3]) |
1 | tensor([[1, 2, 3], |
- hstack
1 | torch.hstack(tensors, *, out=None) → Tensor |
按水平顺序(按列)堆叠张量。
这相当于沿第一个轴对一维张量进行连接,并沿第二个轴对所有其他张量进行连接。
1 | a = torch.tensor([1, 2, 3]) |
1 | tensor([1, 2, 3, 4, 5, 6]) |
Squeeze-压缩
从张量中删除所有单一维度(将张量压缩为仅具有超过 1 的维度)
1 | torch.squeeze(input: Tensor, dim: Optional[Union[int, List[int]]]) → Tensor |
返回已删除所有指定尺寸为input1的张量。
input:(A × 1 × B × C × 1 × D)
method:input.squeeze()
output:(A × B × C × D)
input:(A × 1 × B)
method:squeeze(input, 0)
output:(A × 1 × B)
input:(A × 1 × B)
method:squeeze(input, 1)
output:(A × B)
返回的张量与输入张量共享存储,因此改变一个张量的内容也会改变另一个张量的内容。
果张量的批处理维度为 1,则squeeze(input) 也会删除批处理维度,这可能会导致意外错误。
1 | print(f"Previous tensor: {x_reshaped}") |
1 | Previous tensor: tensor([[5., 2., 3., 4., 5., 6., 7.]]) |
Unsqueeze-解压
在特定索引处添加维度值 1
1 | torch.unsqueeze(input, dim) → Tensor |
返回在指定位置插入一个维度为一的新张量。
返回的张量与该张量共享相同的底层数据。
可以使用dim范围内的值。负数将对应于= 处的应用。[-input.dim() - 1, input.dim() + 1)dimunsqueeze()dimdim + input.dim() + 1
可以使用 [-input.dim() - 1, input.dim() + 1) 范围内的 dim 值。负 dim 将对应于在 dim = dim + input.dim() + 1 处应用的 unsqueeze()。
1 | print(f"Previous tensor: {x_squeezed}") |
1 | Previous tensor: tensor([5., 2., 3., 4., 5., 6., 7.]) |
Permute-置换
重新排列轴值的顺序
1 | torch.permute(input, dims) → Tensor |
返回维度已排列的原始张量输入的视图。
1 | >>> x = torch.randn(2, 3, 5) |
1 |
|
1 | Previous shape: torch.Size([224, 224, 3]) |
因为排列返回一个视图(与原始共享相同的数据),所以排列张量中的值将与原始张量相同,如果更改视图中的值,它将更改原始的值。
Selecting data (indexing)
从张量中选择特定数据(例如,仅第一列或第二行)。可以使用索引。
1 |
|
1 | (tensor([[[1, 2, 3], |
索引值从外部维度 -> 内部维度(检查方括号)
1 |
|
1 | First square bracket: |
:指定“此维度中的所有值”,然后使用逗号 ( ,) 添加另一个维度。
1 |
|
1 | tensor([[1, 2, 3]]) |
1 |
|
1 | tensor([[2, 5, 8]]) |
1 |
|
1 | tensor([5]) |
1 |
|
1 | tensor([1, 2, 3]) |
1 |
|
PyTorch tensors and NumPy
NumPy 是一个流行的 Python 数值计算库,因此 PyTorch 具有与其良好交互的功能。
从 NumPy 到 PyTorch(以及返回)需要使用的两种主要方法是:
torch.from_numpy(ndarray): NumPy 数组 -> PyTorch 张量。torch.Tensor.numpy(): PyTorch 张量 -> NumPy 数组。
NumPy array to tensor
1 |
|
1 | (array([1., 2., 3., 4., 5., 6., 7.]), |
默认情况下,NumPy 数组是使用数据类型创建的float64,如果将其转换为 PyTorch 张量,将保留相同的数据类型(如上)。
许多 PyTorch 计算默认使用float32。
转换 NumPy 数组 (float64) -> PyTorch 张量 (float64) -> PyTorch 张量 (float32),使用tensor = torch.from_numpy(array).type(torch.float32)。
改变数组,张量不变
tensor上面重新分配了
1 |
|
1 | (array([2., 3., 4., 5., 6., 7., 8.]), |
Tensor to NumPy array
1 |
|
1 | (tensor([1., 1., 1., 1., 1., 1., 1.]), |
改变张量,数组不变
1 |
|
1 | (tensor([2., 2., 2., 2., 2., 2., 2.]), |
Reproducibility
伪随机性。
计算机的设计从根本上来说就是确定性的(每个步骤都是可预测的),所以它们产生的随机性是模拟随机性。
神经网络从随机数开始描述数据中的模式(这些数字是糟糕的描述),并尝试使用张量运算(以及一些我们尚未讨论的其他内容)来改进这些随机数,以更好地描述数据中的模式。
流程:start with random numbers -> tensor operations -> try to make better (again and again and again)
尽管随机性很好而且很强大,但有时还是希望随机性少一点,因此可以进行可重复的实验。
A计算机上运行与B计算机上运行相同的代码是否可以获得相同(或非常相似)的结果。
1 | import torch |
1 | Tensor A: |
创建两个具有相同值的随机张量。
张量仍然包含随机值,但它们具有相同的特性。
这就是torch.manual_seed(seed)出现的位置,其中seed是一个整数(类似于42但可以是任何东西),它决定了随机性。
1 | import torch |
1 | Tensor C: |
在 GPU 上运行张量(并进行更快的计算)
深度学习算法需要大量的数值运算。
默认情况下这些操作通常在 CPU(计算机处理单元)上完成。
然而,还有另一种常见的硬件,称为 GPU(图形处理单元),它在执行神经网络所需的特定类型的操作(矩阵乘法)时通常比 CPU 快得多。
获取GPU
Which GPU(s) to Get for Deep Learning: My Experience and Advice for Using GPUs in Deep Learning
| Method | Difficulty to setup | Pros | Cons | How to setup |
|---|---|---|---|---|
| Google Colab | Easy | Free to use, almost zero setup required, can share work with others as easy as a link | Doesn’t save your data outputs, limited compute, subject to timeouts | Follow the Google Colab Guide |
| Use your own | Medium | Run everything locally on your own machine | GPUs aren’t free, require upfront cost | Follow the PyTorch installation guidelines |
| Cloud computing (AWS, GCP, Azure) | Medium-Hard | Small upfront cost, access to almost infinite compute | Can get expensive if running continually, takes some time to setup right | Follow the PyTorch installation guidelines |
检查本机GPU
1 | C:\Users\windows11>nvidia-smi |
让 PyTorch 在 GPU 上运行
检查cuda包
一旦您准备好访问 GPU,下一步就是使用 PyTorch 来存储数据(张量)和计算数据(对张量执行操作)。
为此,您可以使用该torch.cuda包。
1 |
|
1 | !nvidia-smi |
1 | Fri Oct 11 12:55:41 2024 |
如果上述输出为True,则 PyTorch 可以看到并使用 GPU;如果输出False,则它看不到 GPU,在这种情况下,您必须返回安装步骤。
设置device
让我们创建一个device变量来存储可用的设备类型。
1 |
|
1 | 'cuda' |
如果输出上述内容,”cuda”则意味着我们可以将所有 PyTorch 代码设置为使用可用的 CUDA 设备(GPU),如果输出”cpu”,则我们的 PyTorch 代码将坚持使用 CPU。
在 PyTorch 中,最佳做法是编写与设备无关的代码。这意味着代码将在 CPU(始终可用)或 GPU(如果可用)上运行。
best-practices:PyTroch CUDA semantics
多个GPU计算
如果您想要进行更快的计算,则可以使用 GPU,但如果您想进行更快的计算,则可以使用多个 GPU。
您可以计算 PyTorch 可以使用的 GPU 数量torch.cuda.device_count()。
1 |
|
1 | 1 |
了解 PyTorch 可以访问的 GPU 数量很有帮助,以防您想在一个 GPU 上运行特定进程,而在另一个 GPU 上运行另一个进程(PyTorch 还具有允许您在所有GPU 上运行进程的功能)。
将张量(和模型)放在 GPU 上
您可以通过对张量(和模型,我们稍后会看到)调用 to(device) 来将其放置在特定设备上。其中 device 是您希望张量(或模型)转到的目标设备。
为什么要这么做?
GPU 提供的数值计算速度比 CPU 快得多,并且如果 GPU 不可用,由于我们的设备无关代码(参见上文),它将在 CPU 上运行。
使用 to(device) 将张量放在 GPU 上(例如 some_tensor.to(device))将返回该张量的副本,例如,相同的张量将存在于 CPU 和 GPU 上。要覆盖张量,请重新分配它们:some_tensor = some_tensor.to(device)
创建一个张量并将其放在 GPU 上
1 | device = "cuda" if torch.cuda.is_available() else "cpu" |
1 | tensor([1, 2, 3]) cpu |
二个张量有device=’cuda:0’,这意味着它存储在第 0 个可用的 GPU 上(GPU 的索引为 0,如果有两个可用的 GPU,则它们分别为’cuda:0’和’cuda:1’,最多为’cuda:n’)。
将张量移回 CPU
使用 NumPy 与张量进行交互(NumPy 不利用 GPU),您需要执行此操作。
torch.Tensor.numpy()使用方法tensor_on_gpu。
1 |
|
1 | TypeError: can't convert cuda:0 device type tensor to numpy. Use Tensor.cpu() to copy the tensor to host memory first. |
相反,为了将张量返回到 CPU 并可供 NumPy 使用,使用Tensor.cpu()。
1 |
|
1 | array([1, 2, 3]) |
上面返回了 CPU 内存中 GPU 张量的副本,原始张量仍然在 GPU 上。
1 | tensor_on_gpu |
1 | tensor([1, 2, 3], device='cuda:0') |
GPU上的随机种子
在cpu上的随机种子,使用torch.manual_seed()
1 | import torch |
通过上述设置,可以确保在 CPU 和 GPU 上运行的 PyTorch 代码具有可重复性。
练习
pytorch-deep-learning/extras/exercises
…\pytorch-deep-learning\extras\exercises\00_pytorch_fundamentals_exercises.ipynb
…\pytorch-deep-learning\extras\solutions\00_pytorch_fundamentals_exercise_solutions.ipynb
配置pytroch环境
pytorch 2.4.1
windows
conda
python
CUDA12.4
1 | conda create -n pytorch241 python=3.8 |