公司主打的一款新项目,为了满足快速迭代的需要,使用rn进行开发,项目中使用到了微软的code-push热更新功能,在这里记录一下热更新的集成过程,以及注意点。
1
2
3
4
5
6
7
8
9
10
11
12
13
14
15
16
17
18
19
20
21
22
23
24
25
26
27
28
29
30
31
32
33
34
35
36
37
38
39
40
41
42
npm install -g code-push-server cd <YOUR_DIR>/code-push-server/configvi config.js db: { username: process.env.RDS_USERNAME || "root" , password: process.env.RDS_PASSWORD || null, database: process.env.DATA_BASE || "codepush" , host: process.env.RDS_HOST || "127.0.0.1" , port: process.env.RDS_PORT || 3306, dialect: "mysql" , logging: false , operatorsAliases: false , }, local : { storageDir: process.env.STORAGE_DIR || "/Users/tablee/workspaces/storage" , downloadUrl: process.env.LOCAL_DOWNLOAD_URL || "http://127.0.0.1:3000/download" , public: '/download' }, common: { ... dataDir: process.env.DATA_DIR || os.tmpdir(), storageType: process.env.STORAGE_TYPE || "local" , ... },
步骤二
安装CodePush CLI,用以和code-push-server服务进行交互,相关的code-push指令可以查看我之前的文章code-push-command
1
2
npm install -g code-push-cli
到这一步时首先确保你已经将你的app添加进了code-push-server,如果还没有,请查看code-push-command 里的讲解,添加app到code-push-server,并获取Deployment Key
1
2
3
4
npm install --save react-native-code-push react-native link react-native-code-push
在完成步骤一的操作后,会自动在Android和iOS的源码中插入一些代码,引用这个库,但是我们还需要在这个基础上做一些个性化的配置。下面介绍一下针对不同平台的配置方法。
为以后维护方便,我们将key值存放在Android目录下gradle.properties中:
1
2
3
4
5
6
7
8
9
10
...... RELEASE_STAGING=<YOUR_RELEASE_STAGING_KEY> RELEASE = <YOUR_RELEASE_KEY> ......
为了在测试机上同时安装测试版和预发布版的app包,我们需要在Android/app/build.gradle中配置对应包的applicationId后缀,在buildTypes下修改如下:
1
2
3
4
5
6
7
8
9
10
11
12
13
14
15
16
17
18
19
20
21
22
23
24
25
26
27
28
29
30
31
32
33
34
buildTypes { debug { buildConfigField "String" , "CODEPUSH_KEY" , '""' minifyEnabled enableProguardInReleaseBuilds proguardFiles getDefaultProguardFile("proguard-android.txt" ), "proguard-rules.pro" applicationIdSuffix ".debug" } staging { matchingFallbacks = ['release' , 'debug' ] buildConfigField "String" , "CODEPUSH_KEY" , RELEASE_STAGING applicationIdSuffix ".staging" signingConfig signingConfigs.release minifyEnabled enableProguardInReleaseBuilds proguardFiles getDefaultProguardFile("proguard-android.txt" ), "proguard-rules.pro" } release { debuggable false // 是否debug aaptOptions.cruncherEnabled = false // 禁止Gradle检查PNG的合法性 buildConfigField "String" , "CODEPUSH_KEY" , RELEASE signingConfig signingConfigs.release minifyEnabled enableProguardInReleaseBuilds proguardFiles getDefaultProguardFile("proguard-android.txt" ), "proguard-rules.pro" } }
MainApplication中修改如下代码
YOUR_SERVER_URL为热更新服务器的地址,通过改地址可以访问到你的code-push-server服务
1 new CodePush(BuildConfig.CODEPUSH_KEY, getApplicationContext(), BuildConfig.DEBUG,<YOUR_SERVER_URL>),
与在android上的配置相似,我们同样要给iOS配置三个版本的包名:debug、staging(beta)、release。项目初始化时已经存在debug和release版本,所以我们只需要添加staging类型
在项目的PROJECT-Info的Configurations里面点击+选择Duplicate "Release" Configuration, 并且给一个名字,我这里给了个Staging,如图:
在PROJECT-Build setting-Per-configuration Build Products path-Staging里面改成$(BUILD_DIR)/Release$(EFFECTIVE_PLATFORM_NAME)
然后在项目的PROJECT-Build Setting里面点击+选择Add User-Defined Setting,创建好之后起个名字,这里叫CODEPUSH_KEY, 然后在Release和Staging里面分别写上code-push-server中添加的项目后生成的Production和Staging对应的key值,如图:
为了使项目在打包后方便区分打包的类型,我们可以在项目名称后面加上对应的后缀:
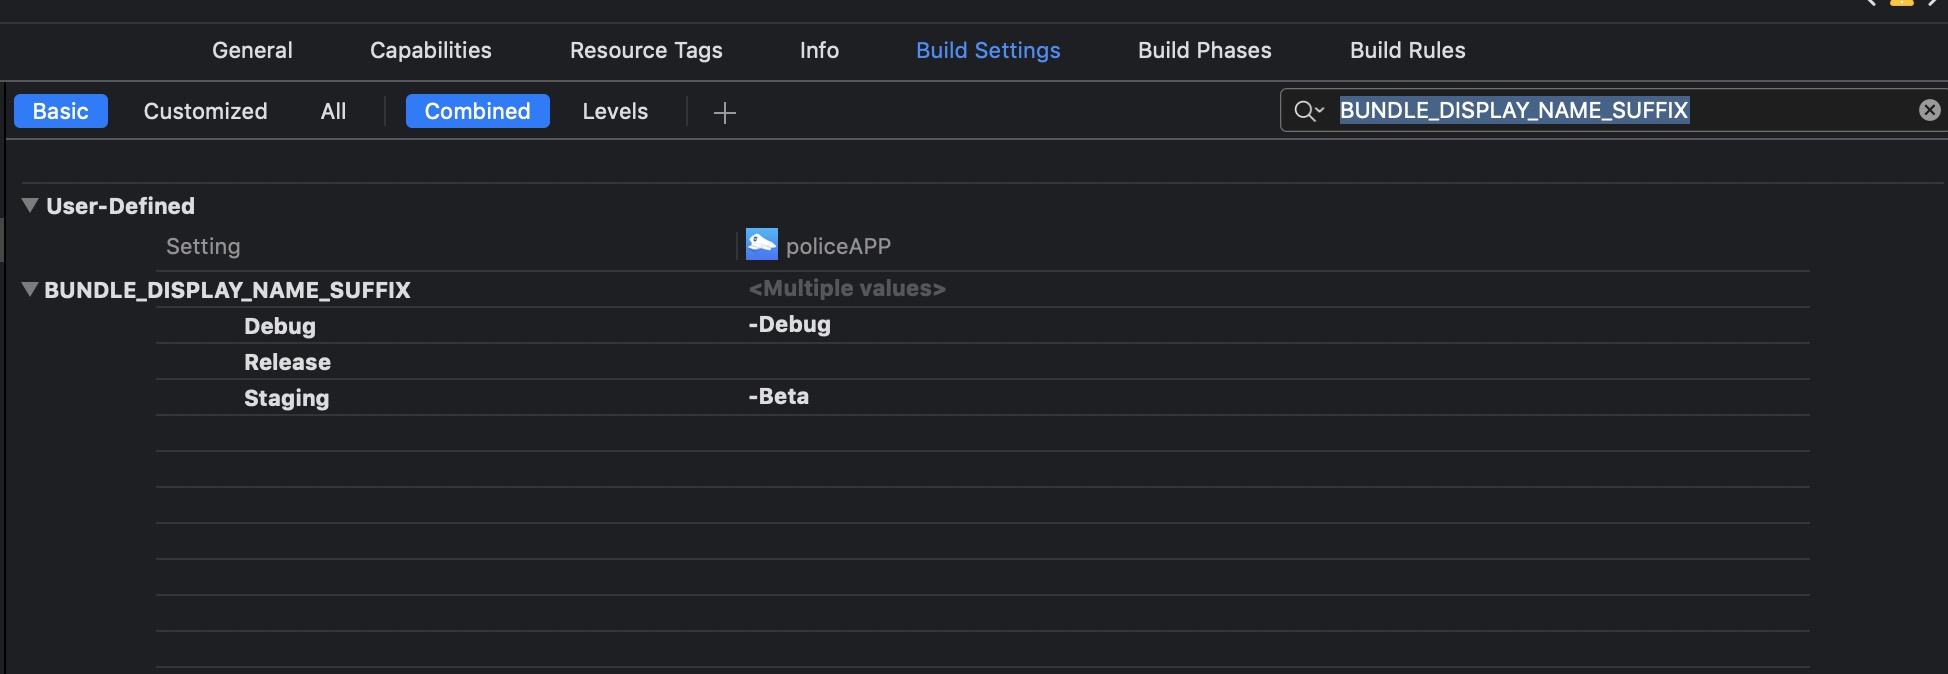
然后在项目的PROJECT-Build Setting里面点击+选择Add User-Defined Setting,创建好之后起个名字,这里叫BUNDLE_DISPLAY_NAME_SUFFIX, 然后在Debug后面写上-Debug,在Staging后面写上-Beta,如图:
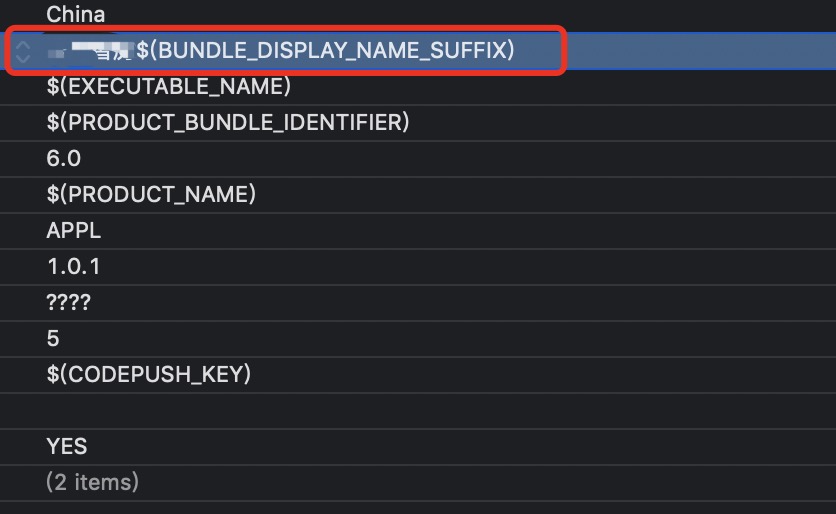
在Info.plist里面加上刚才配置好的后缀,如图:
Silent sync on app start (the simplest, default behavior)
这种方式会自动从服务器下载可用的更新,并且在应用下次启动的时候应用更新,整个过程用户是无感知的。
1
2
3
4
5
6
class MyApp extends Component<{}> {} MyApp = codePush(MyApp); export default MyApp;
Silent sync everytime the app resumes
当应用进入后台时,会从服务器检测是否有可用的更新,并下载更新,当应用再次从后台被唤醒的时候应用更新
1
2
3
4
class MyApp extends Component<{}> {} MyApp = codePush({ checkFrequency: codePush.CheckFrequency.ON_APP_RESUME, installMode: codePush.InstallMode.ON_NEXT_RESUME })(MyApp); export default MyApp;
交互式更新。只有当用户进行选择检查更新并确认后才下载和立即应用更新包
1
2
3
4
5
6
class MyApp extends Component<{}> {} MyApp = codePush({ updateDialog: true , installMode: codePush.InstallMode.IMMEDIATE })(MyApp); export default MyApp;
显示更新的进度,我们可以通过如下的方法
1
2
3
4
5
6
7
8
9
10
11
12
13
14
15
16
17
18
19
20
21
22
23
24
25
26
27
28
29
class MyApp extends Component<{}> { codePushStatusDidChange(status) { switch(status) { case codePush.SyncStatus.CHECKING_FOR_UPDATE: console.log("Checking for updates." ); break ; case codePush.SyncStatus.DOWNLOADING_PACKAGE: console.log("Downloading package." ); break ; case codePush.SyncStatus.INSTALLING_UPDATE: console.log("Installing update." ); break ; case codePush.SyncStatus.UP_TO_DATE: console.log("Up-to-date." ); break ; case codePush.SyncStatus.UPDATE_INSTALLED: console.log("Update installed." ); break ; } } codePushDownloadDidProgress(progress) { console.log(progress.receivedBytes + " of " + progress.totalBytes + " received." ); } } MyApp = codePush(MyApp); export default MyApp;
android在code-push发布更新的时候,版本独立不影响的位数是两位数。
举例说明:
a. versionName为2.1,和versionName为2.2的两个app版本,当versionName=2.2的app发布codepush更新的时候,受影响的只有2.2 和2.2.X,X为正整数。versionName=2.1是不会收到任何影响的,所以后续就需要创建两条线路对不同的版本进行维护。
b. 由a可以知道,versionName=2.2.1和versionName=2.2.2两个版本在获取更新上,获取的是同个版本,当versionName=2.2.2发布更新的时候,versionName=2.2.1的app同样会受到影响接受更新。
总结:从以上特性,我们主要将这个功能用在小版本更新,或者bug修复上。versionName = X.Y.Z的版本中,我们主要发布到应用市场的软件一般都是改变:X.Y的值。对于创业公司来说,要维护多个软件版本成本是非常高的,所以我们也是尽量要求用户升级到最新版本。
IOS在codepush发布更新时,版本独立不影响的位数是三位数。即iOS版本都是独立不影响,version=X.Y.Z,当codepush发布更新时,只会影响与其X.Y.Z三位数完全相同的版本。