










In this guide, we’ll demonstrate how to create a seamless user experience by converting speech into site content using Groq and Netlify. We’ll cover the integration between APIs, briefly discuss configuring the Visual Editor, and show how to connect all the dots.
We’ll walk you through building a speech-to-content integration for your website. You’ll learn how to combine Groq’s AI capabilities with Netlify’s backend services to manage and update site content.
We’ll use the following technologies:
Note: this functionality can be implemented with any site framework. We’re using Astro as an example.
Let’s get you setup before diving into the code.
Before you begin, you will need a Groq account. Sign up at Groq Console and generate an API key.
With your Groq API key ready, click the button below to deploy the example to your Netlify account. This process will prompt you to enter your Groq API key.

To make visual editing work properly for your Netlify Site, you must first add the API_HOST environment variable. This should be the URL of your deployed site. You can set this in the Netlify UI under Site settings > Build & deploy > Environment.
Then you’re ready to enable visual editing. Go to Site configuration > Visual Editor and select Enable visual editing.
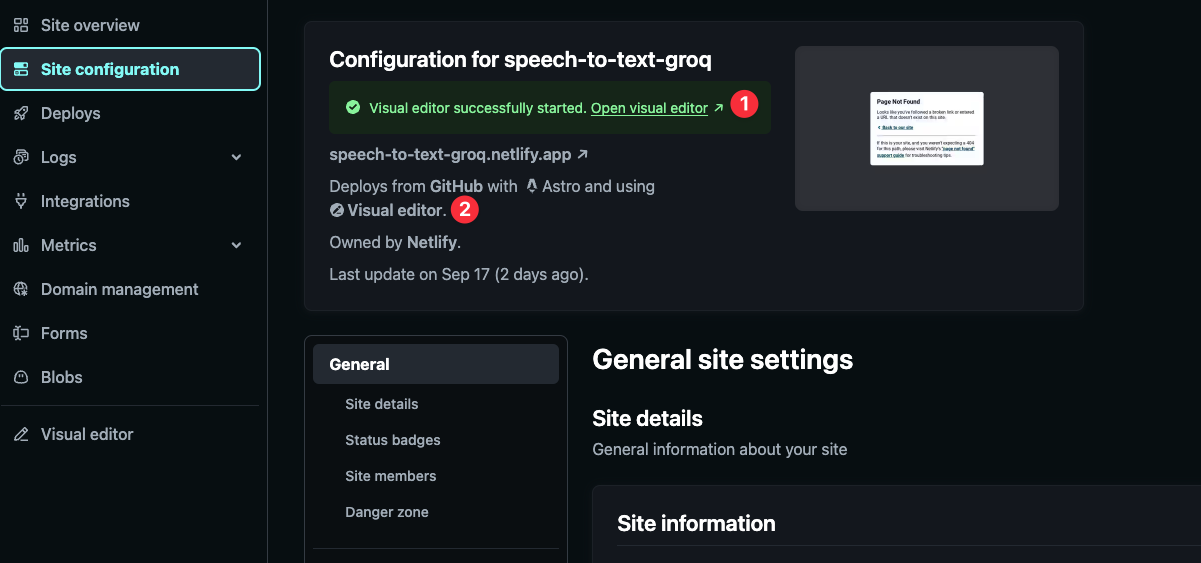
At this point the site is deployed and the Visual Editor is enabled. You can now navigate to the visual editor from the site overview in the Netlify UI or in your site configuration, by choosing Open visual editor (1) or the Visual editor link (2).
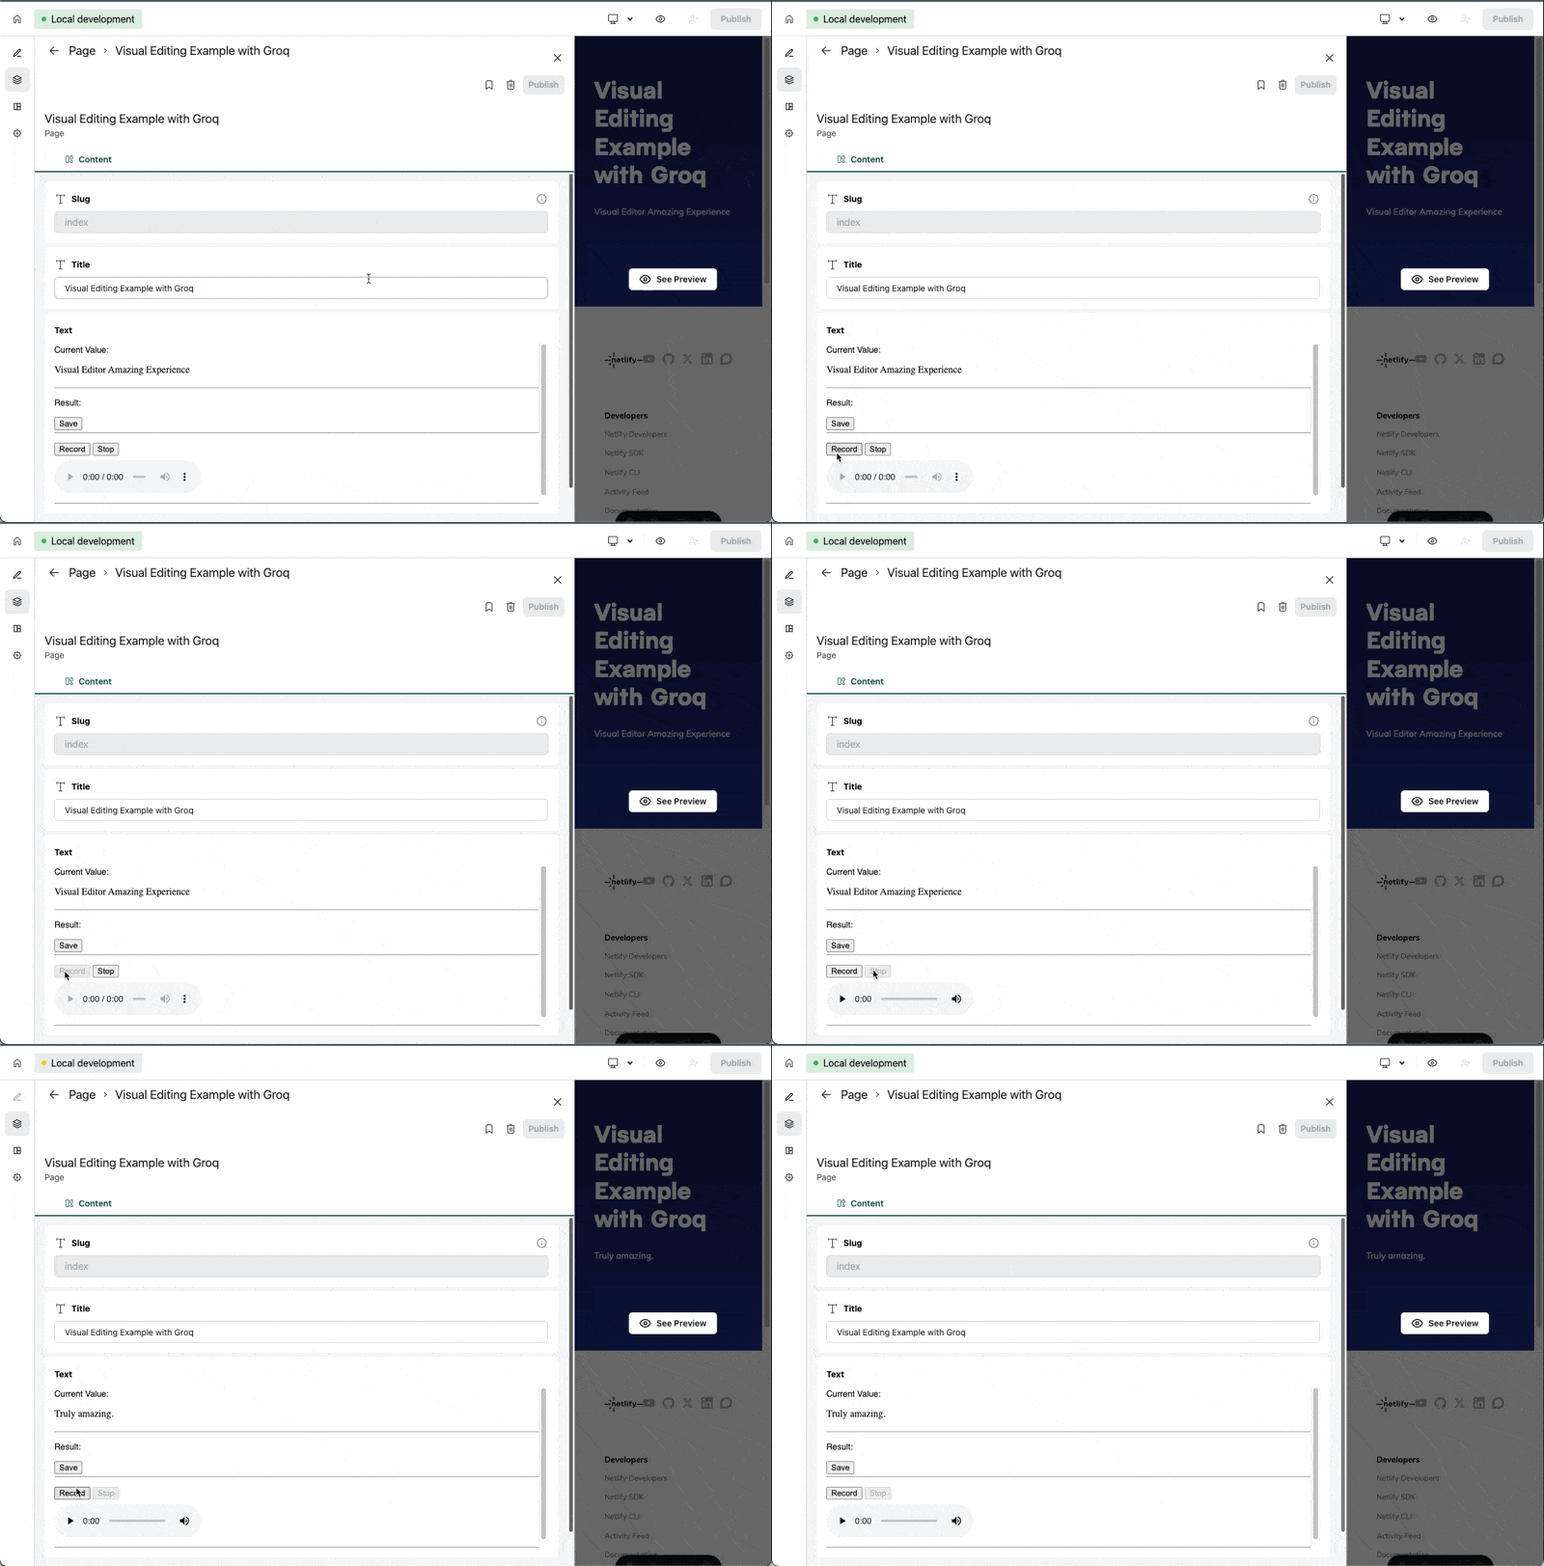
Open the content editor for the page and you’ll be able to record your voice and see the content update in real-time.
If you’d like to get the project running locally, you can clone the repo that was added to your GitHub account and navigate to the example:
git clone git@github.com:<username>/<project>.git
cd <project>
To get the project running locally, first install the Netlify CLI.
npm install -g netlify-cli
Then install the project dependencies:
Start the Astro dev server with Netlify Dev and specify the target port:
netlify dev --target-port 4321
This starts the Astro site with all Netlify features automatically enabled.
As we’ll see below, we’re using a custom field for the speech-to-text feature. To build the custom field code, run the following commands:
API_HOST="http://localhost:8888" && npm run build-custom-controls-config && npm run build-custom-controls
If Netlify Dev started on a different port, make sure to update the API_HOST value accordingly.
With Netlify Dev running, install the visual editor CLI:
npm install -g @stackbit/cli
And now you’re ready to run the visual editor locally. Remember to keep the Netlify Dev server running.
This will print out a URL where you can access the visual editor. And now you’re all set to test the speech-to-text feature locally!
With the setup complete, let’s dive into the code and understand how the speech-to-content feature works.
The Netlify Function in the netlify/functions directory is responsible for converting speech to text.
It expects to receive an audio file as a payload and passes it to Groq via their SDK with other LLM configurations. And once the audio is transformed to text, the function responds with the result.
import type { Context } from "@netlify/functions";
import Groq from "groq-sdk/index.mjs";
const groq = new Groq({
apiKey: Netlify.env.get("GROQ_API_KEY"),
});
export default async (request: Request, context: Context) => {
const form = await request.formData();
const file = form.get("audio") as File;
// Create a transcription job
const transcription = await groq.audio.transcriptions.create({
file, // Required path to audio file - replace with your audio file!
model: "distil-whisper-large-v3-en", // Required model to use for transcription
prompt: "Specify context or spelling", // Optional
response_format: "json", // Optional
language: "en", // Optional
temperature: 0.0, // Optional
});
// Return result
return Response.json({
text: transcription.text,
});
};
export const config: Config = {
path: "/api/speech-to-text",
};
With this function, the API will be available via /api/speech-to-text.
The visual editor configuration file adds some custom configuration that, aside from the basics, does a few key things:
.stackbit/models directoryimport path from "path";
import { defineStackbitConfig, SiteMapOptions, SiteMapEntry, Document } from "@stackbit/types";
import { GitContentSource, DocumentContext } from "@stackbit/cms-git";
import { page } from "./.stackbit/models/page";
const PAGES_DIR = "src/content/pages";
function filePathToPageUrl(filePath: string): string {
const pathObject = path.parse(filePath.substring(PAGES_DIR.length));
return (pathObject.name === "index" ? "/index" : path.join(pathObject.dir, pathObject.name)) || "/index";
}
export default defineStackbitConfig({
stackbitVersion: "~0.6.0",
ssgName: "custom",
nodeVersion: "18",
// prebuild custom Visual Editor custom fields
postInstallCommand: `npm run build-custom-controls-config && npm run build-custom-controls`,
// Astro to be run inside Visual Editor container
devCommand: "node_modules/.bin/astro dev --port {PORT} --hostname 127.0.0.1",
// Astro specific configuration
experimental: {
ssg: {
name: "Astro",
logPatterns: {
up: ["is ready", "astro"],
},
directRoutes: {
"socket.io": "socket.io",
},
passthrough: ["/vite-hmr/**"],
},
},
// defining content source https://docs.netlify.com/visual-editor/content-sources/overview/
contentSources: [
new GitContentSource({
rootPath: __dirname,
contentDirs: ["src/content"],
models: [page],
}),
],
modelExtensions: [{ name: "page", type: "page", urlPath: "/{slug}" }],
// confguration for sitemap navigator https://docs.netlify.com/visual-editor/sitemap-navigator/
sitemap: ({ documents }: SiteMapOptions): SiteMapEntry[] => {
return (documents as Document<DocumentContext>[]).map((document) => {
const filePath = document.context?.["filePath"] ?? document.id;
return {
stableId: document.id,
label: filePath,
urlPath: filePathToPageUrl(filePath),
document: document,
};
});
},
});
The content model schema for the page is placed in .stackbit/models. It has a simple content schema that defines a title fields, along with a text field that is used for the speech-to-text feature.
export const page: PageModel = {
name: "page",
type: "page",
hideContent: true,
filePath: "src/content/pages/{slug}.md",
fields: [
{
name: "title",
type: "string",
required: true,
},
{
name: "text",
type: "string",
required: true,
// custom field configuration
controlType: "custom-inline-html",
controlFilePath: ".stackbit/custom-controls/dist/speech-to-text.html",
},
],
};
Custom fields for the visual editor are mini applications that tap into visual editor content hooks. We won’t go through that in detail. If you’d like to dig into, you can find the custom field code in the .stackbit/custom-controls directory.
At a high level, the custom field is presents a media recorder that holds onto the audio file and sends it to the Netlify Function for processing.
Taking direct audio input and modifying a web page unlocks so many opportunities. With Groq’s extensive capabilities and industry-leading performance, the possibilities are endless for enhancing your site’s experience on Netlify and taking it to the next level.
此内容由惯性聚合(RSS阅读器)自动聚合整理,仅供阅读参考。 原文来自 — 版权归原作者所有。