





Learn how to implement multi-language support in applications using Netlify Edge functions, Astro middleware, and cookies for language preference tracking.
Deploy a complete working example by clicking the button below:

Before we dig into building the application, let’s understand how the app is supposed to work by looking at the request flow.
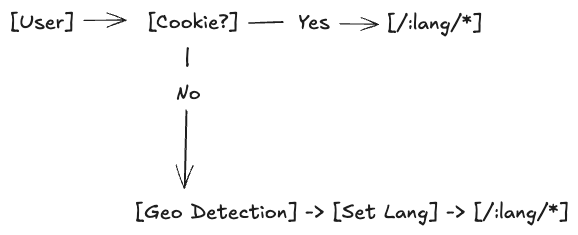
Now that we’ve covered the request flow, let’s dig in!
First, create a new Astro app and install the dependencies we’ll need.
We can then use the Astro CLI to setup Netlify and Tailwind for us through their integrations. This command will shortcut installing, configuring, and adding the necessary files for Netlify and Tailwind.
npx astro add netlify tailwind
We’re also going to need to install Netlify’s edge function package.
npm install @netlify/edge-functions
With our dependencies installed, we only have a few more steps to finish setting up the foundation to build our app.
Let’s create a directory to hold our edge function. Netlify holds all of it’s functions, edge or otherwise, inside of the netlify directory.
mkdir netlify
cd netlify
mkdir edge-functions
Now, let’s create a new file inside of the edge-functions directory.
This file will be responsible for detecting the user’s language preference based on their geo location when they first visit the site.
For now, we can move to the next step and work on creating our language utilities, our edge function, and handle the cookie logic inside of our middleware.
Starting here, we’re going to need to do a few things over the next section:
Let’s start with creating our language utilities and configuration.
We’re going to create two new folders to contain our language utilities and configuation. Inside of the src directory create a utils and config directory.
First, let’s work on the configuration file. Change to the config directory and create a new file named i18n.ts. This file will be responsible for holding our language configuration. Let’s add the following code to it:
export const SUPPORTED_LANGUAGES = ["en", "ja", "es", "fr"] as const;
export type SupportedLanguage = (typeof SUPPORTED_LANGUAGES)[number];
export const LANGUAGE_CONFIG = [
{ code: "en", label: "English", flag: "🇺🇸" },
{ code: "ja", label: "日本語", flag: "🇯🇵" },
{ code: "es", label: "Español", flag: "🇪🇸" },
{ code: "fr", label: "Français", flag: "🇫🇷" },
] as const;
export const COUNTRY_LANGUAGE_MAP: Record<string, SupportedLanguage> = {
JP: "ja",
ES: "es",
FR: "fr",
// Add more country mappings as needed
};
For this app we’re going to be supporting 4 languages. If you need to support more, you can add them to the SUPPORTED_LANGUAGES array. We’ve made this file to make it easier to manage which languages we support and make these variables more accessible around our application.
Now that we have our configuration file, let’s create our language utility. Change back to the utils directory and create a new file, also named i18n.ts.
This file will output a single utiliity that will help us keep track of the current language preference of the user. Let’s add the following code to it:
import { SUPPORTED_LANGUAGES, type SupportedLanguage } from "../config/i18n";
export function getCurrentLanguage(pathname: string): SupportedLanguage {
const pathParts = pathname.split("/").filter(Boolean);
const firstPart = pathParts[0];
if (
firstPart &&
SUPPORTED_LANGUAGES.indexOf(firstPart as SupportedLanguage) !== -1
) {
return firstPart as SupportedLanguage;
}
return "en";
}
This utility will check the first part of the pathname to see if it matches any of the supported languages. If it does, it will return the language code. If it doesn’t, it will return the default language, which is English.
Since we have the tools to build our edge function, let’s do that next.
An edge function is a perfect fit for our use case as it allows us to quickly detect the user’s location, check it against our supported languages, and return us the appropriate data. If you want to learn more about Edge functions before moving on, check the docs for more!
Change back to the netlify directory and create a new file named geo-detection.ts. Inside of the new file, we’re going to add the following code:
import type { Config, Context } from "@netlify/edge-functions";
import {
SUPPORTED_LANGUAGES,
type SupportedLanguage,
COUNTRY_LANGUAGE_MAP,
} from "../../src/config/i18n";
export default async (request: Request, context: Context) => {
// If the request method is POST, we're setting the language since they've not set their language preference yet.
if (request.method === "POST") {
try {
const { language } = await request.json();
const selectedLanguage =
SUPPORTED_LANGUAGES.indexOf(language as SupportedLanguage) !== -1
? language
: "en";
context.cookies.set({
name: "language",
value: selectedLanguage,
expires: new Date(Date.now() + 365 * 24 * 60 * 60 * 1000),
path: "/",
secure: true,
sameSite: "Strict",
});
return Response.json({ language: selectedLanguage });
} catch (error) {
return Response.json({ error: "Invalid request" }, { status: 400 });
}
}
// If the request method is GET, we're checking the cookie for the user's language preference.
if (request.method === "GET") {
const cookieLanguage = context.cookies.get("language") as SupportedLanguage;
if (cookieLanguage && SUPPORTED_LANGUAGES.indexOf(cookieLanguage) !== -1) {
return Response.json({ language: cookieLanguage });
}
const country = (context.geo?.country?.code?.toUpperCase() ??
"US") as keyof typeof COUNTRY_LANGUAGE_MAP;
const detectedLanguage = COUNTRY_LANGUAGE_MAP[country] || "en";
context.cookies.set({
name: "language",
value: detectedLanguage,
expires: new Date(Date.now() + 365 * 24 * 60 * 60 * 1000),
path: "/",
secure: true,
sameSite: "Strict",
});
return Response.json({ language: detectedLanguage });
}
// If the request method is not GET or POST, we're returning an error.
return Response.json({ error: "Method not allowed" }, { status: 405 });
};
// This export will allow us to call to `/get-location` instead of `/.netlify/edge-functions/get-location` in our fetch calls.
export const config: Config = {
path: "/get-location",
};
We almost have all of the pieces we will need to build our UI out, let’s add the last piece of the puzzle, our middleware.
Up to this point we’ve done the following:
An important piece now is handling how the app will know how to properly redirect the user based on these preferences and also handle when the preference is changed.
Change back to the src directory and create a new folder named middleware. Inside of this folder, create a new file named index.ts. Inside of this file, add the following code:
import { defineMiddleware } from "astro:middleware";
import { SUPPORTED_LANGUAGES, type SupportedLanguage } from "../config/i18n";
import { getCurrentLanguage } from "../utils/i18n";
export const onRequest = defineMiddleware(async (context, next) => {
// We're getting the current language from the cookie.
const { cookies } = context;
const currentLanguage = cookies.get("language")?.value as SupportedLanguage;
// We're getting the current pathname from the request.
const currentUrl = new URL(context.request.url);
const currentPath = currentUrl.pathname;
// We're getting the language from the pathname.
const pathLanguage = getCurrentLanguage(currentPath);
// If the cookie doesn't exist and the path language doesn't exist, we're moving on to the next middleware.
if (!currentLanguage && !pathLanguage) {
return next();
}
// If the cookie exists and the path language doesn't exist, or the path language doesn't match the cookie language, we're redirecting the user to the appropriate page.
if (currentLanguage && (!pathLanguage || pathLanguage !== currentLanguage)) {
const cleanPath = currentPath.replace(
new RegExp(`^/(${SUPPORTED_LANGUAGES.join("|")})?`),
""
);
currentUrl.pathname = `/${currentLanguage}${cleanPath}`;
return Response.redirect(currentUrl.toString(), 302);
}
// If the cookie doesn't exist and the path language exists, we're setting the cookie to the path language.
if (pathLanguage && !currentLanguage) {
cookies.set("language", pathLanguage, {
path: "/",
secure: true,
httpOnly: true,
sameSite: "strict",
expires: new Date(Date.now() + 365 * 24 * 60 * 60 * 1000),
});
}
// We're moving on to the next middleware.
return next();
});
The middleware, combined with our edge function logic, will handle all the necessary points for our users to land on the appropriate page based on their language preference.
To finish this section and move on to building our UI, let’s make sure we have our landing page and all the routes necessary to handle our different language preferences.
Before we dive into creating our base route, let’s set up internationalization inside of our Astro config file. Doing so will make sure that as our user navigates, they are redirected to the appropriate page based on their language preference.
Change back to the root of the project and open up the astro.config.ts file. Add the following code to the file:
Check out the Astro docs to learn more about Astro’s internationalization features!
// @ts-check
import { defineConfig } from "astro/config";
import netlify from "@astrojs/netlify";
import tailwind from "@astrojs/tailwind";
// https://astro.build/config
export default defineConfig({
output: "server",
adapter: netlify(),
integrations: [tailwind()],
// Adding this i18n block will let us set the default languages and the locales we'll support.
i18n: {
defaultLocale: "en",
locales: ["en", "ja", "es", "fr"],
routing: {
prefixDefaultLocale: true,
},
},
});
Now we can setup all of our routes to support these different languages. Navigate to the src directory and we’re going to create 4 new folders for each of our languages:
Inside of each of these folders, we’re going to create a new file named index.astro.
Since we have our new routes setup, let’s create a new component to house our language selector and the content for the page. This will make plugging in new languages easier along with adding new routes.
Change to the components directory and create a new file named LanguageSwitcher.astro.
Inside of this file, we’ll add the following code:
---
import { getCurrentLanguage } from "../utils/i18n";
// Add any new languages to this array, along with the translations for the header and description
const languages = [
{ code: "en", label: "English", header: "Choose Your Language", description: "Your current language is <span class='font-semibold text-[#00AD9F]'>English</span>. Select your preferred language to continue." },
{ code: "ja", label: "日本語", header: "言語を選択してください", description: "現在の言語は<span class='font-semibold text-[#00AD9F]'>日本語</span>です。続けるには、お好きな言語を選択してください。" },
{ code: "es", label: "Español", header: "Elige tu idioma", description: "Tu idioma actual es <span class='font-semibold text-[#00AD9F]'>Español</span>. Selecciona tu idioma preferido para continuar." },
{ code: "fr", label: "Français", header: "Choisissez votre langue", description: "Votre langue actuelle est <span class='font-semibold text-[#00AD9F]'>Français</span>. Sélectionnez votre langue préférée pour continuer." },
];
const currentLang = getCurrentLanguage(Astro.url.pathname);
---
<div
class="flex justify-center items-center bg-gradient-to-br from-[#00AD9F]/5 via-white to-[#002E3B]/5 -mt-16 min-h-screen"
>
<div class="mx-auto px-4 max-w-4xl">
<div class="flex md:flex-row flex-col items-center gap-8">
<div class="flex-1 space-y-4 max-w-md text-center md:text-left">
<h1
class="bg-clip-text bg-gradient-to-r from-[#00AD9F] to-[#002E3B] pb-1 font-bold text-3xl text-transparent sm:text-4xl lg:text-5xl leading-tight"
>
{languages.find(l => l.code === currentLang)?.header}
</h1>
// The `set:html` directive is used to render the description as HTML since we've included a span to style the current language
<p class="max-w-lg text-[#002E3B]/80 text-base sm:text-lg" set:html={languages.find(l => l.code === currentLang)?.description}>
</p>
</div>
<div class="flex-1 w-full max-w-md">
<div class="gap-3 grid grid-cols-1 sm:grid-cols-2">
{
languages.map((language) => (
<button
class="relative border-[#00AD9F]/10 hover:border-[#00AD9F]/30 bg-white shadow-md hover:shadow-xl p-3 border rounded-lg transition-all duration-300 overflow-hidden group"
type="button"
data-lang={language.code}
>
<div class="absolute inset-0 bg-gradient-to-r from-[#00AD9F]/5 to-[#002E3B]/5 opacity-0 group-hover:opacity-100 transition-opacity" />
<div class="relative flex justify-center items-center py-3">
<span class="group-hover:text-[#00AD9F] font-medium text-[#002E3B] text-lg transition-colors">
{language.label}
</span>
</div>
<div class="group-hover:scale-x-100 bottom-0 left-0 absolute bg-gradient-to-r from-[#00AD9F] to-[#002E3B] w-full h-1 transform origin-left transition-transform scale-x-0" />
</button>
))
}
</div>
</div>
</div>
</div>
</div>
<script>
async function setLanguageAndRedirect(lang: string): Promise<void> {
try {
const response = await fetch("/get-location", {
method: "POST",
headers: {
"Content-Type": "application/json",
},
body: JSON.stringify({ language: lang }),
});
if (!response.ok) {
throw new Error("Failed to set language");
}
const languages = ["en", "ja", "es", "fr"];
const newPath = window.location.pathname.replace(
new RegExp(`^/(${languages.join("|")})`),
`/${lang}`
);
window.location.href = newPath;
} catch (error) {
console.error("Error changing language:", error);
}
}
// Add click handlers to all language buttons
document.querySelectorAll("button[data-lang]").forEach((button) => {
button.addEventListener("click", () => {
const lang = button.getAttribute("data-lang");
if (lang) setLanguageAndRedirect(lang);
});
});
</script>
With all of our logic handled in our component, all we need to do now is include our component in each of our language routes. We’ll do this with our en route first.
---
import Layout from "../../layouts/Layout.astro";
import LanguageSwitcher from "../../components/LanguageSwitcher.astro";
---
<Layout>
<LanguageSwitcher />
</Layout>
Repeat this process for each of the other languages and we’ll have everything ready to finialize the UI and add the functionality to handle switching language preferences.
For supporting the other languages we ran the content into an AI tool to translate the content. Feel free to use this tool or any other translation service to help you out!
One more time, let’s go over what we’ve done so far:
Finishing this project will require a couple more steps:
Layout to be aware of the current language for routing back “home”Handling the Layout will be simple, so let’s get that out of the way. Navigate back to the layouts directory and open up the Layout.astro file. Add the following code to the file:
---
import { getCurrentLanguage } from "../utils/i18n";
const currentLang = getCurrentLanguage(Astro.url.pathname);
---
<!doctype html>
<html lang={currentLang}>
<head>
<meta charset="UTF-8" />
<meta name="viewport" content="width=device-width" />
<link rel="icon" type="image/svg+xml" href="/favicon.svg" />
<meta name="generator" content={Astro.generator} />
<title>Language Selector | Netlify Style</title>
</head>
<body class="antialiased">
<nav class="border-[#00AD9F]/12 bg-white border-b">
<div class="mx-auto px-4 sm:px-6 lg:px-8 w-full">
<div class="flex items-center pl-2 h-16">
<a
href={`/${currentLang}`}
class="font-medium text-[#002E3B] hover:text-[#00AD9F] transition-colors"
>
Home
</a>
</div>
</div>
</nav>
<main>
<slot />
</main>
</body>
</html>
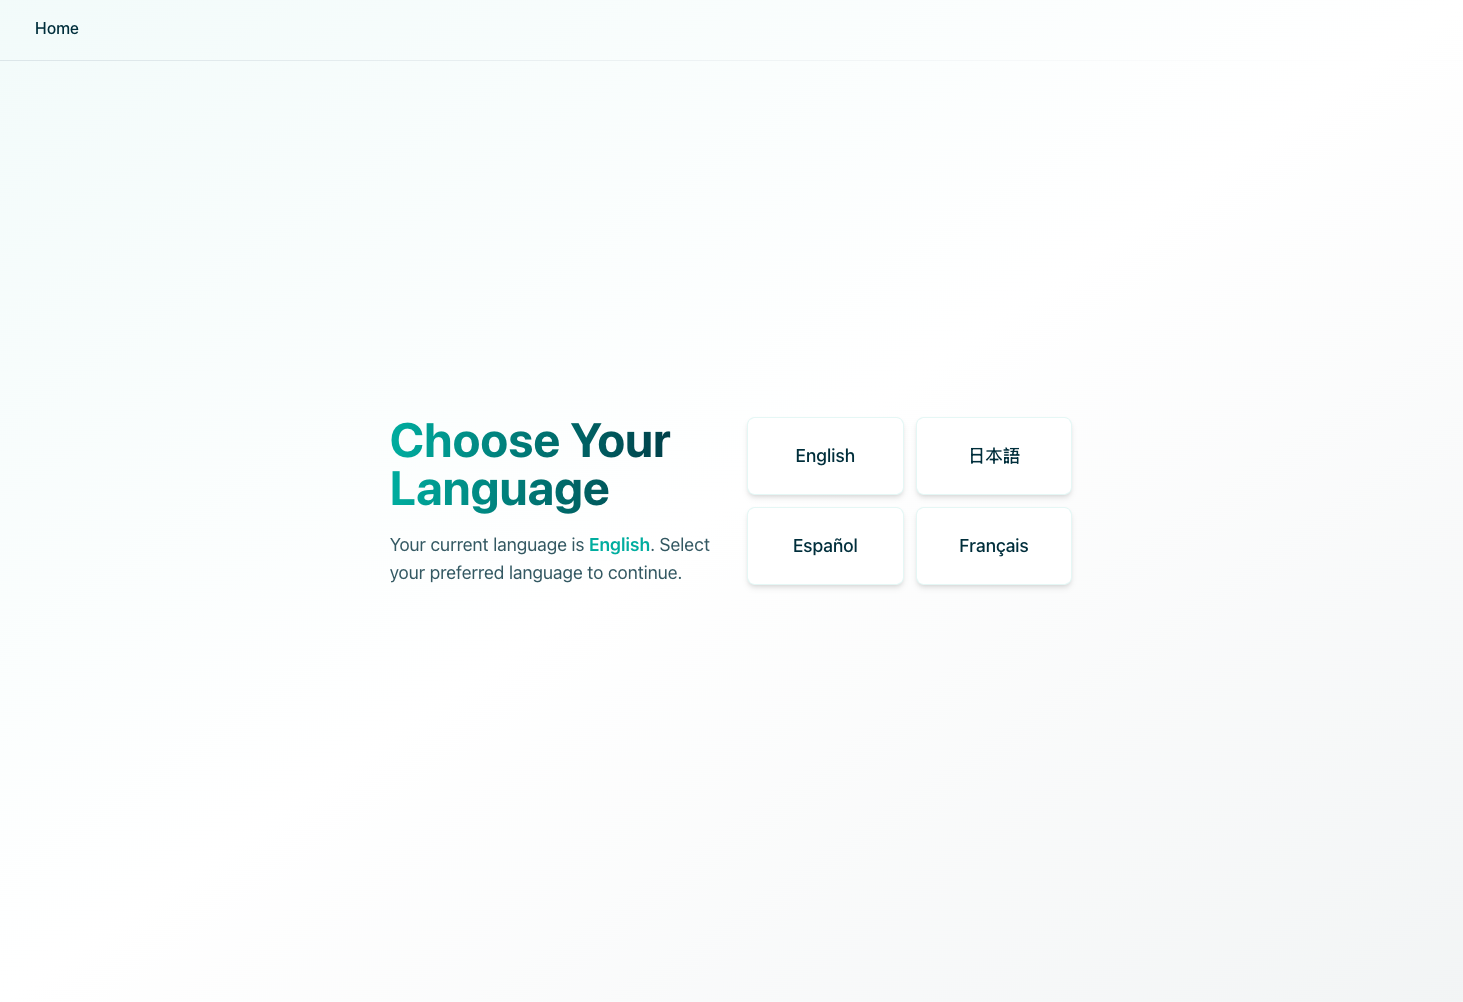
Let’s take a quick look at the what the website looks like now. Go ahead and run the app and you should see the following:
For the final step, let’s add the functionality to handle switching language preferences.
Navigate back to the src directory and open your en/index.astro file. Add the following code to the file:
// ... existing code ...
<script>
async function setLanguageAndRedirect(lang: string): Promise<void> {
try {
const response = await fetch("/get-location", {
method: "POST",
headers: {
"Content-Type": "application/json",
},
body: JSON.stringify({ language: lang }),
});
if (!response.ok) {
throw new Error("Failed to set language");
}
const languages = ["en", "ja", "es", "fr"];
const newPath = window.location.pathname.replace(
new RegExp(`^/(${languages.join("|")})`),
`/${lang}`
);
window.location.href = newPath;
} catch (error) {
console.error("Error changing language:", error);
}
}
document.querySelectorAll("button[data-lang]").forEach((button) => {
button.addEventListener("click", () => {
const lang = button.getAttribute("data-lang");
if (lang) setLanguageAndRedirect(lang);
});
});
</script>
Don’t forget, whatever we add to one page, we must add to the rest of them. In this app we’ve handled the content manually, but this is a great opportunity for a CMS to help handle content that we could feed to each page.
What we’ve learned today is a great start on the journey of supporting multiple languages in your applications. This is such an important part at the core of building applications that can be used by everyone.
If you’re interested in next steps, check out the Astro docs to learn more about how to continue to build out your application.
此内容由惯性聚合(RSS阅读器)自动聚合整理,仅供阅读参考。 原文来自 — 版权归原作者所有。