






You've set up Stripe. Checkout works. Customers can pay. But what happens after payment?
The webhook handler is where most payment integrations silently break. Your server crashes halfway through granting access. Your email service is down when you try to send the confirmation. Your database times out during a write.
Stripe retries the entire webhook, but your handler already sent the confirmation email before it crashed. Now the customer gets two emails and no access.
This article shows you how to fix this. You'll learn how to build webhook handlers that survive failures by splitting your post-payment logic into durable, independently retried steps. The pattern works for any multi-step webhook processing, not just Stripe.
Here's what you'll learn:
Why Stripe webhooks fail silently in production
How a naïve inline handler breaks under real-world conditions
The pattern: webhook receives, validates, and enqueues (nothing more)
How to build a durable purchase flow with individually checkpointed steps
How to handle refunds and abandoned checkouts with the same pattern
How to test webhook handlers locally
Prerequisites
To follow along, you should be familiar with:
Node.js and TypeScript
Basic Stripe integration (checkout sessions, webhooks)
SQL databases (the examples use PostgreSQL with Drizzle ORM)
npm or any Node.js package manager
You don't need prior experience with Inngest or durable execution. This article explains both from scratch.
What You Need to Install
If you want to run the code examples, install these packages:
npm install inngest stripe drizzle-orm @react-email/components resend
You'll also need the Stripe CLI for local webhook testing. Install it via Homebrew on macOS (brew install stripe/stripe-cli/stripe) or follow the instructions in Stripe's documentation for other platforms.
Table of Contents
Why Stripe Webhooks Fail Silently
The happy path is easy. A customer pays, Stripe sends a checkout.session.completed event to your server, and your handler processes it. In development, this works every time.
Production is different: Your webhook handler typically needs to do several things after a successful payment. It looks up the user in the database, records the purchase, sends a confirmation email, notifies the admin, grants access to the product (maybe via a GitHub invitation or an API key), and schedules follow-up emails. That's five or six operations involving three or four external services.
Here are the failure modes that will eventually hit your webhook handler:
1. Your server crashes mid-processing
The database write succeeded, but the email never sent. Stripe retries the webhook, and your handler runs again.
Now you have a duplicate database entry or a unique constraint error that kills the retry.
2. An external service is temporarily down
Your email provider returns a 500. Your GitHub API call gets rate-limited. Your analytics service times out.
The webhook handler throws, and Stripe retries the entire thing. But the steps that already succeeded (the database write, the first email) run again.
3. The handler times out
Stripe expects a 2xx response within about 20 seconds. If your handler does too much work, Stripe marks it as failed and retries. Your handler may have partially completed before the timeout.
4. Partial completion with no rollback
This is the worst failure mode. Steps 1 through 3 succeed. Step 4 fails. Stripe retries, and steps 1 through 3 run again.
The customer gets two confirmation emails. The database gets a duplicate record. But step 4 still fails because the underlying issue (a rate limit, a service outage) hasn't been resolved.
5. Race conditions on retry
Stripe can deliver the same event more than once even without a failure on your end. Network glitches, load balancer timeouts, and Stripe's own retry logic mean your handler must be prepared for duplicate deliveries. If your handler isn't idempotent at every step, duplicates compound the partial-completion problem.
Stripe's retry behavior is well-designed. It uses exponential backoff and retries up to dozens of times over several days. But Stripe retries the entire webhook delivery.
It has no way to know that your handler completed steps 1 through 3 and only needs to retry step 4. That distinction is your responsibility.
The core problem is that your webhook handler does too many things in a single request. Every external call is a potential failure point, and you have no checkpointing between them. When one fails, you lose track of which ones already succeeded.
The Naïve Approach (and Why It Breaks)
Here's what a typical webhook handler looks like. I've seen hundreds of variations of this pattern across codebases, tutorials, and Stack Overflow answers:
app.post("/api/payments/webhook", async (req, res) => {
  const event = stripe.webhooks.constructEvent(
    req.body,
    req.headers["stripe-signature"],
    process.env.STRIPE_WEBHOOK_SECRET
  );

  if (event.type === "checkout.session.completed") {
    const session = event.data.object;

    // Step 1: Look up the user
    const user = await db.users.findOne({ id: session.metadata.userId });

    // Step 2: Record the purchase
    await db.purchases.insert({
      userId: user.id,
      stripeSessionId: session.id,
      amount: session.amount_total,
      status: "completed",
    });

    // Step 3: Send confirmation email
    await sendEmail({
      to: user.email,
      subject: "Purchase confirmed!",
      template: "purchase-confirmation",
    });

    // Step 4: Grant product access (GitHub repo invitation)
    await addCollaborator(user.githubUsername);

    // Step 5: Send access email
    await sendEmail({
      to: user.email,
      subject: "Your repository access is ready!",
      template: "repo-access",
    });

    // Step 6: Track analytics
    await analytics.track(user.id, "purchase_completed", {
      amount: session.amount_total,
    });
  }

  res.json({ received: true });
});
This looks clean. It reads top-to-bottom. Every tutorial teaches it this way.
Now walk through what happens when step 4 fails. Maybe GitHub's API is rate-limited and the addCollaborator call throws an error. Your handler returns a 500 to Stripe.
Here is the state after the failure:
The user exists in the database (step 1 was just a lookup, no problem).
A purchase record was created (step 2 succeeded).
The confirmation email was sent (step 3 succeeded).
GitHub access was not granted (step 4 failed).
The access email was not sent (step 5 never ran).
Analytics were not tracked (step 6 never ran).
Stripe retries the webhook. Your handler runs again from the top:
Step 1: Looks up the user again. Fine.
Step 2: Tries to insert another purchase record. If you have a unique constraint on
stripeSessionId, this throws. If you don't, you now have a duplicate.Step 3: Sends the confirmation email again. The customer gets a second "Purchase confirmed!" email.
Step 4: Tries GitHub access again. Maybe it works this time, maybe not.
Steps 5-6: May or may not run depending on step 4.
You can patch this with idempotency checks: "if purchase already exists, skip step 2." But now your handler is full of conditional logic for every step. And you still have the duplicate email problem, because there's no way to check "did I already send this email?" without building your own tracking system.
This approach doesn't scale. Every new step adds another failure mode, another idempotency check, and another edge case.
The Pattern: Webhook to Event to Durable Function
The fix is a separation of concerns. Your webhook handler should do exactly one thing: validate the incoming event and enqueue it for processing. Nothing else.
All the actual work (database writes, emails, API calls, analytics) moves into a durable background function where each step is individually checkpointed, retried, and tracked.
Here's the flow:
Stripe webhook
    |
    v
Webhook endpoint (validate signature, extract event, enqueue)
    |
    v
Background job system (receives event)
    |
    v
Durable function
    |-- Step 1: Look up user and purchase (checkpointed)
    |-- Step 2: Track analytics (checkpointed)
    |-- Step 3: Send confirmation email (checkpointed)
    |-- Step 4: Send admin notification (checkpointed)
    |-- Step 5: Grant GitHub access (checkpointed)
    |-- Step 6: Track GitHub access (checkpointed)
    |-- Step 7: Update purchase record (checkpointed)
    |-- Step 8: Send repo access email (checkpointed)
    |-- Step 9: Schedule follow-up sequence (checkpointed)
Each step wrapped in step.run() is a durable checkpoint. If step 5 fails:
Steps 1 through 4 do not re-run. Their results are cached.
Step 5 retries independently, with its own retry counter.
Once step 5 succeeds, steps 6 through 9 continue.
This is what "durable execution" means. The function's progress survives failures. You get step-level retries instead of function-level retries. No duplicate emails. No duplicate database writes. No partial completion.
I use Inngest for this. It's an event-driven durable execution platform that provides step-level checkpointing out of the box. You define functions with step.run() blocks, and Inngest handles retry logic, state persistence, and observability. No Redis, no worker processes, no custom retry code.
Other tools can achieve similar results (Temporal, for example), but Inngest's developer experience with TypeScript is what sold me. You write normal async functions. The step.run() wrapper is the only addition.
How to Set Up the Webhook Endpoint
Your webhook endpoint should be minimal. Validate the signature, extract the event data, send it to your background job system, and return a 200 immediately.
Here's the real webhook endpoint from my production codebase:
import { constructWebhookEvent } from "@/lib/payments";
import { inngest } from "@/lib/jobs";

app.post("/api/payments/webhook", async ({ request, set }) => {
  const body = await request.text();
  const sig = request.headers.get("stripe-signature");

  if (!sig) {
    set.status = 400;
    return { error: "Missing signature" };
  }

  try {
    const event = await constructWebhookEvent(body, sig);
    console.log(`[Webhook] Received ${event.type}`);

    if (event.type === "charge.refunded") {
      const charge = event.data.object;
      await inngest.send({
        name: "stripe/charge.refunded",
        data: {
          chargeId: charge.id,
          paymentIntentId: charge.payment_intent,
          amountRefunded: charge.amount_refunded,
          originalAmount: charge.amount,
          currency: charge.currency,
        },
      });
    }

    if (event.type === "checkout.session.expired") {
      const session = event.data.object;
      await inngest.send({
        name: "stripe/checkout.session.expired",
        data: {
          sessionId: session.id,
          customerEmail: session.customer_email,
        },
      });
    }

    return { received: true };
  } catch (error) {
    console.error("[Webhook] Stripe verification failed:", error);
    set.status = 400;
    return { error: "Webhook verification failed" };
  }
});
Notice what this handler does not do: it does not look up users, write to the database, send emails, or call external APIs. It validates the Stripe signature, extracts the relevant fields, and sends a typed event to Inngest. The entire handler completes in milliseconds.
The constructWebhookEvent function wraps Stripe's signature verification:
import Stripe from "stripe";

export async function constructWebhookEvent(
  payload: string | Buffer,
  signature: string
) {
  const webhookSecret = process.env.STRIPE_WEBHOOK_SECRET;
  if (!webhookSecret) {
    throw new Error("STRIPE_WEBHOOK_SECRET is not set");
  }
  const client = new Stripe(process.env.STRIPE_SECRET_KEY);
  return client.webhooks.constructEventAsync(payload, signature, webhookSecret);
}
One critical detail: you must pass the raw request body (as a string or buffer) to Stripe's signature verification. If your framework parses the body as JSON before you can access the raw string, the signature check will fail. This is the number one cause of "webhook signature verification failed" errors.
The Inngest client setup is minimal:
import { Inngest } from "inngest";

export const inngest = new Inngest({
  id: "my-app",
});
For the purchase flow specifically, a different endpoint sends the event (the "claim" route that the frontend calls after the customer returns from Stripe checkout). But the principle is identical: validate, enqueue, return.
// After verifying payment status with Stripe
await inngest.send({
  name: "purchase/completed",
  data: {
    userId: session.user.id,
    tier,
    sessionId,
  },
});
How to Build a Durable Purchase Flow
This is the core of the article. The handlePurchaseCompleted function processes a purchase after payment using 9 individually checkpointed steps. Every step is real production code.
The example below grants access to a private GitHub repository because that's what this particular product sells.
Your product's "grant access" step will be different: upgrading a user to a Pro membership, provisioning API credits, unlocking a course, or activating a subscription. The durable step pattern is the same regardless of what you're delivering.
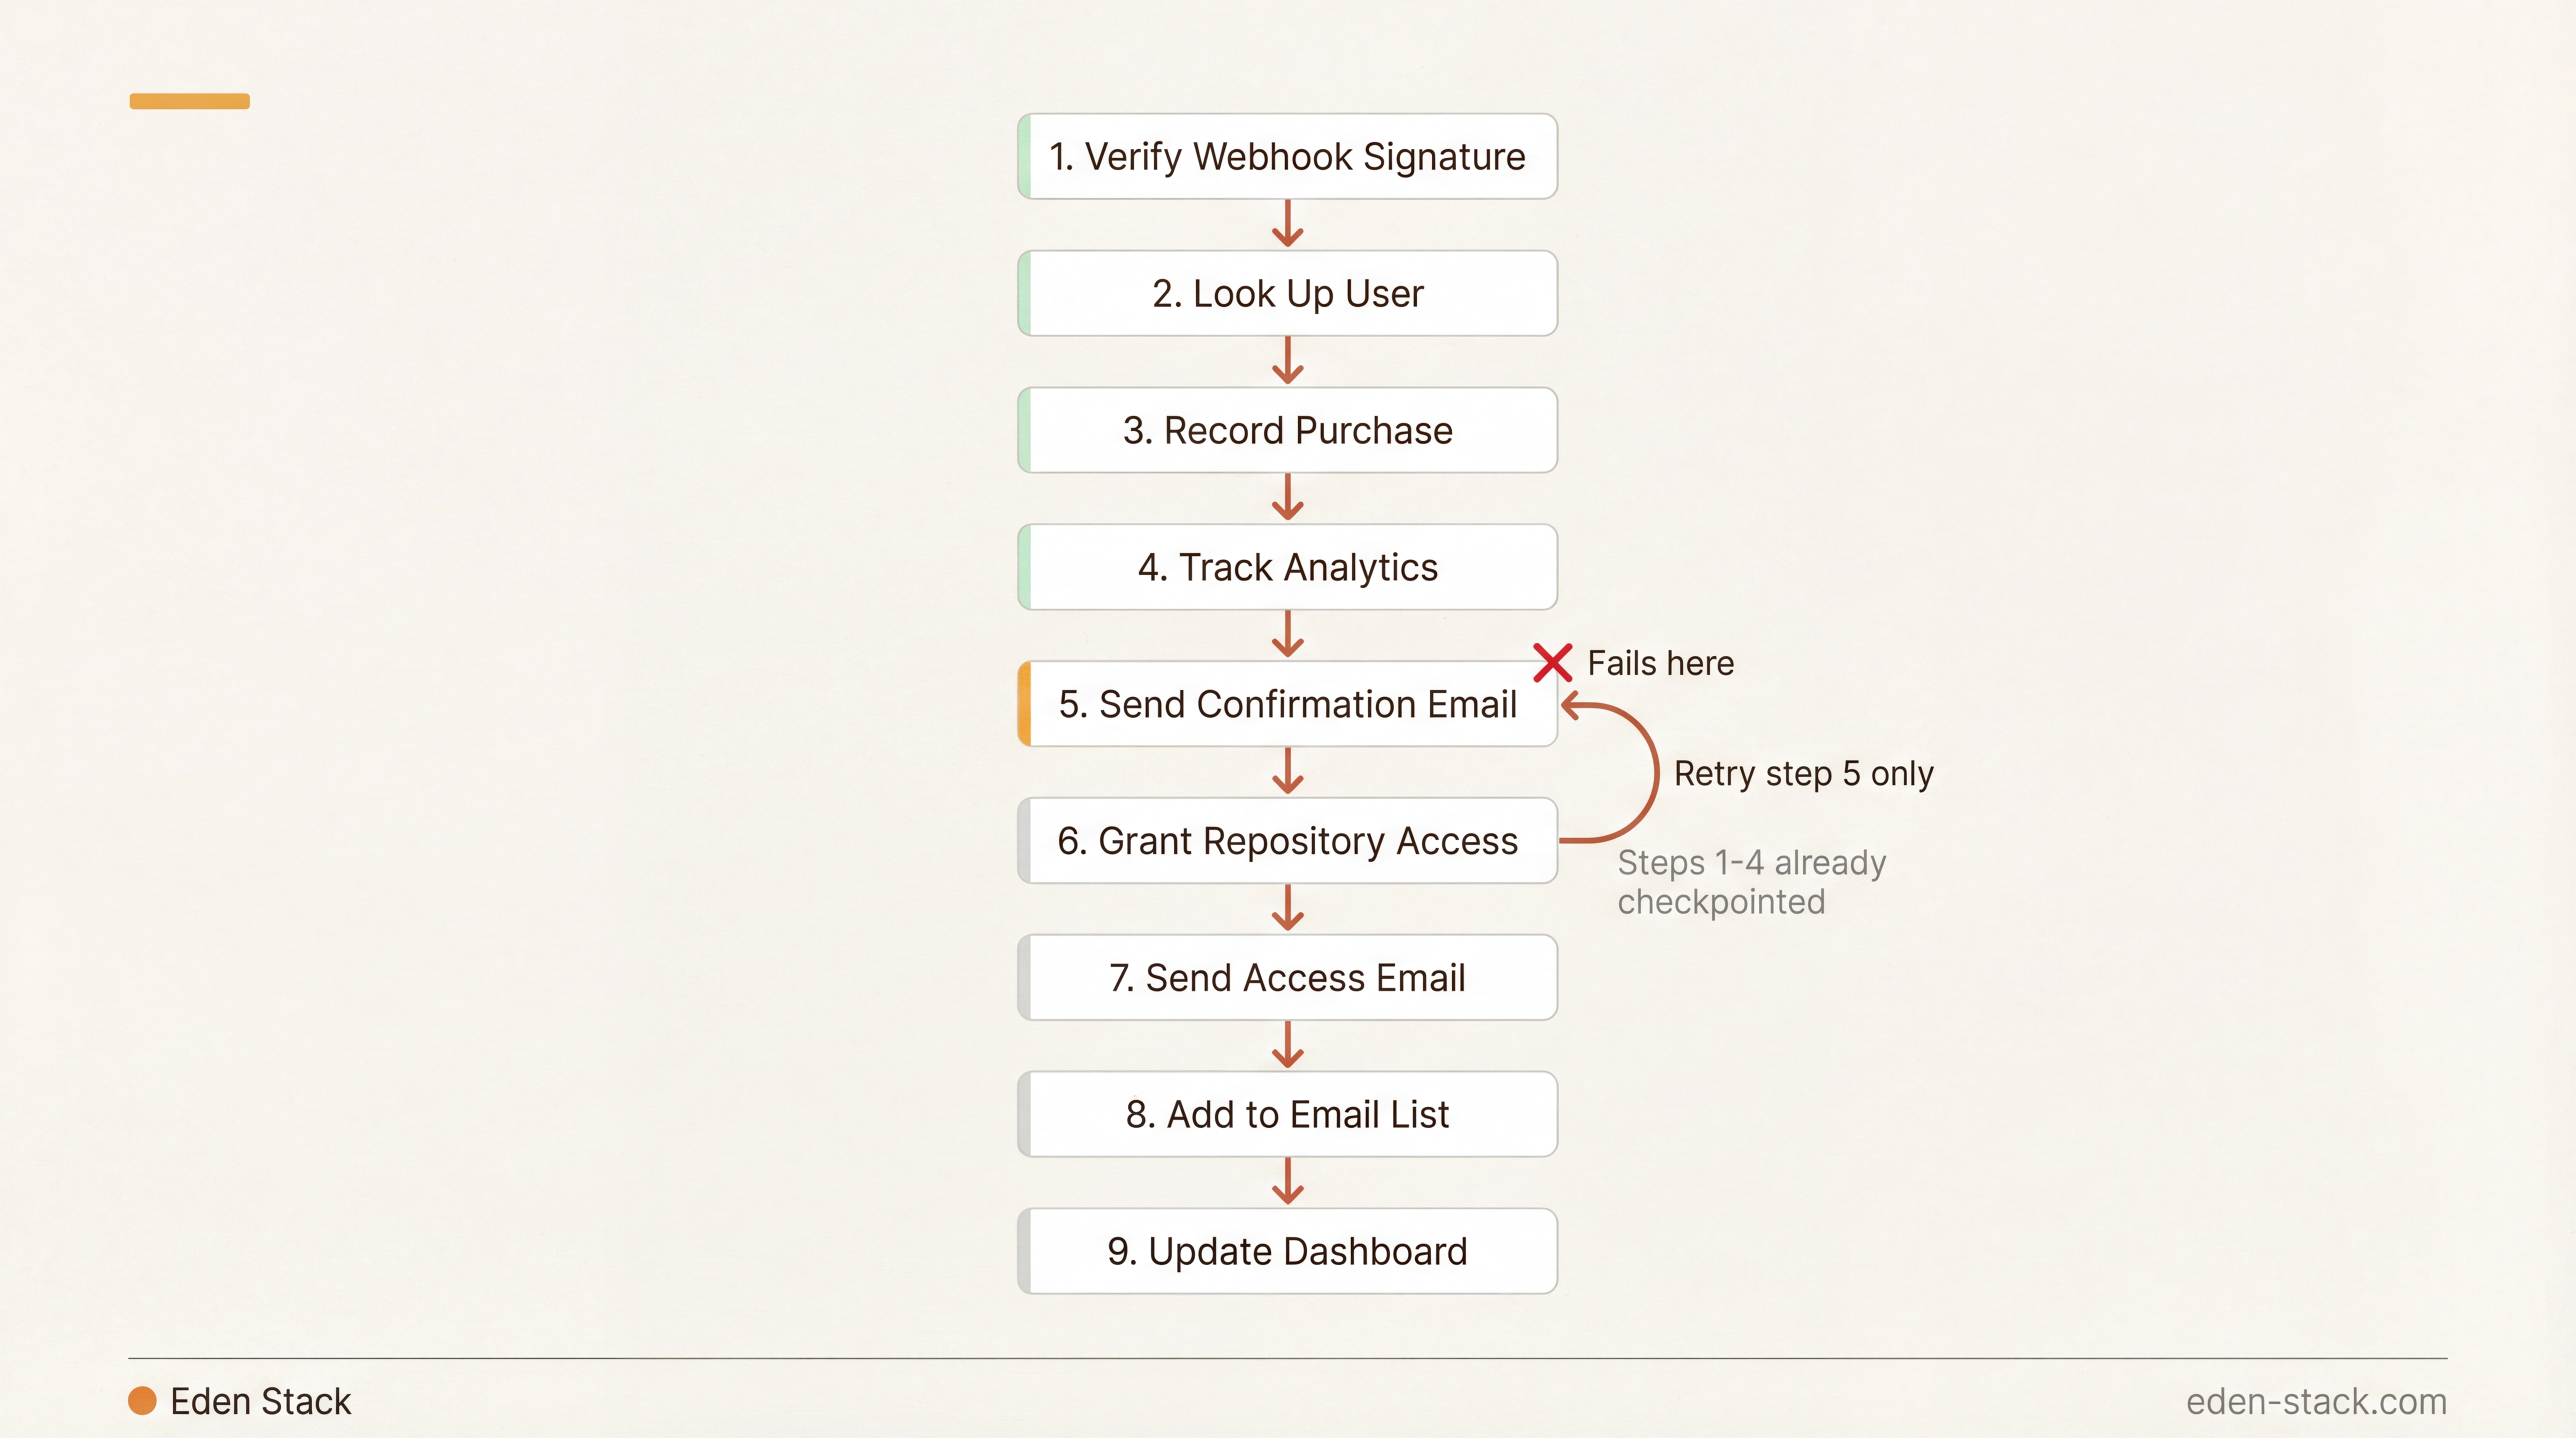
If step 5 fails (for example, the email provider is down), Inngest retries only step 5. Steps 1 through 4 are already checkpointed and don't re-execute. Steps 6 through 9 wait until step 5 succeeds.
import { eq } from "drizzle-orm";
import { createElement } from "react";

import { inngest } from "@/lib/jobs/client";
import { trackServerEvent } from "@/lib/analytics/server";
import { brand } from "@/lib/brand";
import { db, purchases, users } from "@/lib/db";
import {
  sendEmail,
  PurchaseConfirmationEmail,
  AdminPurchaseNotificationEmail,
  RepoAccessGrantedEmail,
} from "@/lib/email";
import { addCollaborator } from "@/lib/github";

export const handlePurchaseCompleted = inngest.createFunction(
  { id: "purchase-completed", triggers: [{ event: "purchase/completed" }] },
  async ({ event, step }) => {
    const { userId, tier, sessionId } = event.data;

    // Step 1: Look up user and purchase details
    const { user, purchase } = await step.run(
      "lookup-user-and-purchase",
      async () => {
        const userResult = await db
          .select({
            id: users.id,
            email: users.email,
            name: users.name,
            githubUsername: users.githubUsername,
          })
          .from(users)
          .where(eq(users.id, userId))
          .limit(1);

        const foundUser = userResult[0];
        if (!foundUser) {
          throw new Error(`User not found: ${userId}`);
        }

        const purchaseResult = await db
          .select({
            amount: purchases.amount,
            currency: purchases.currency,
            stripePaymentIntentId: purchases.stripePaymentIntentId,
          })
          .from(purchases)
          .where(eq(purchases.stripeCheckoutSessionId, sessionId))
          .limit(1);

        const foundPurchase = purchaseResult[0];

        return {
          user: foundUser,
          purchase: foundPurchase ?? {
            amount: 0,
            currency: "usd",
            stripePaymentIntentId: null,
          },
        };
      }
    );

    // Step 2: Track purchase completion in analytics
    await step.run("track-purchase-to-posthog", async () => {
      await trackServerEvent(userId, "purchase_completed_server", {
        tier,
        amount_cents: purchase.amount,
        currency: purchase.currency,
        stripe_session_id: sessionId,
      });
    });

    // Step 3: Send purchase confirmation to customer
    await step.run("send-purchase-confirmation", async () => {
      await sendEmail({
        to: user.email,
        subject: `Your purchase is confirmed!`,
        template: createElement(PurchaseConfirmationEmail, {
          amount: purchase.amount,
          currency: purchase.currency,
          customerEmail: user.email,
        }),
      });
    });

    // Step 4: Send admin notification
    await step.run("send-admin-notification", async () => {
      const adminEmail = process.env.ADMIN_EMAIL;
      if (!adminEmail) return;

      await sendEmail({
        to: adminEmail,
        subject: `New sale: ${user.email}`,
        template: createElement(AdminPurchaseNotificationEmail, {
          amount: purchase.amount,
          currency: purchase.currency,
          customerEmail: user.email,
          customerName: user.name,
          stripeSessionId: purchase.stripePaymentIntentId ?? sessionId,
        }),
      });
    });

    // Early return if user has no GitHub username
    if (!user.githubUsername) {
      return { success: true, userId, tier, githubAccessGranted: false };
    }

    // Step 5: Grant GitHub repository access
    const collaboratorResult = await step.run(
      "add-github-collaborator",
      async () => {
        return addCollaborator(user.githubUsername!);
      }
    );

    // Step 6: Track GitHub access granted
    await step.run("track-github-access", async () => {
      await trackServerEvent(userId, "github_access_granted", {
        tier,
        github_username: user.githubUsername,
        invitation_status: collaboratorResult.status,
      });
    });

    // Step 7: Update purchase record
    await step.run("update-purchase-record", async () => {
      await db
        .update(purchases)
        .set({
          githubAccessGranted: true,
          githubInvitationId: collaboratorResult.status,
          updatedAt: new Date(),
        })
        .where(eq(purchases.stripeCheckoutSessionId, sessionId));
    });

    // Step 8: Send repo access email
    await step.run("send-repo-access-email", async () => {
      await sendEmail({
        to: user.email,
        subject: `Your repository access is ready!`,
        template: createElement(RepoAccessGrantedEmail, {
          repoUrl: "https://github.com/your-org/your-repo",
        }),
      });
    });

    // Step 9: Schedule follow-up email sequence
    await step.run("schedule-follow-up", async () => {
      const purchaseRecord = await db
        .select({ id: purchases.id })
        .from(purchases)
        .where(eq(purchases.stripeCheckoutSessionId, sessionId))
        .limit(1);

      if (purchaseRecord[0]) {
        await inngest.send({
          name: "purchase/follow-up.scheduled",
          data: {
            userId,
            purchaseId: purchaseRecord[0].id,
            tier,
          },
        });
      }
    });

    return { success: true, userId, tier, githubAccessGranted: true };
  }
);
That's a lot of code. Let me walk through each step and explain why it's a separate checkpoint.
Step 1: Look Up User and Purchase
const { user, purchase } = await step.run(
  "lookup-user-and-purchase",
  async () => {
    // ... database queries ...
    return { user: foundUser, purchase: foundPurchase };
  }
);
This step queries the database for the user and purchase records. If the database is temporarily unreachable, this step retries on its own.
The return value (user and purchase) is cached by Inngest. Every subsequent step can use user.email, user.githubUsername, and purchase.amount without re-querying the database.
If this step fails permanently (the user doesn't exist), it throws an error that halts the entire function. This is intentional. There's no point continuing if you can't find the user.
Step 2: Track Analytics
await step.run("track-purchase-to-posthog", async () => {
  await trackServerEvent(userId, "purchase_completed_server", {
    tier,
    amount_cents: purchase.amount,
  });
});
Analytics tracking is a separate step because analytics services have their own failure modes (rate limits, outages, network timeouts). If PostHog is down, you don't want it to block the confirmation email.
In the production code, this step wraps the call in a try-catch so that a tracking failure doesn't halt the entire function. The analytics event is "nice to have," not critical.
Step 3: Send Purchase Confirmation Email
await step.run("send-purchase-confirmation", async () => {
  await sendEmail({
    to: user.email,
    subject: `Your purchase is confirmed!`,
    template: createElement(PurchaseConfirmationEmail, {
      amount: purchase.amount,
      currency: purchase.currency,
      customerEmail: user.email,
    }),
  });
});
This is the customer-facing confirmation. It's a separate step from the admin notification (step 4) because they're independent operations. If the admin email fails, the customer should still get their confirmation.
The sendEmail function uses Resend under the hood. If Resend returns a 500, this step retries. Because step 2 (analytics) already completed and is checkpointed, it won't re-run.
Step 4: Send Admin Notification
await step.run("send-admin-notification", async () => {
  const adminEmail = process.env.ADMIN_EMAIL;
  if (!adminEmail) return;

  await sendEmail({
    to: adminEmail,
    subject: `New sale: ${user.email}`,
    template: createElement(AdminPurchaseNotificationEmail, { /* ... */ }),
  });
});
Admin notifications are completely independent from customer-facing operations. Separating them means a failure in one doesn't affect the other.
Step 5: Grant GitHub Access
const collaboratorResult = await step.run(
  "add-github-collaborator",
  async () => {
    return addCollaborator(user.githubUsername!);
  }
);
This is the step most likely to fail. GitHub's API has rate limits: it can time out, and the user's GitHub username might be invalid.
By making this its own step, a GitHub API failure doesn't trigger re-sends of the confirmation email (step 3) or the admin notification (step 4). Those steps are already checkpointed.
Notice the early return before this step: if the user has no GitHub username, the function returns early after step 4. The remaining steps only run when there's a GitHub account to grant access to.
Step 6: Track GitHub Access
await step.run("track-github-access", async () => {
  await trackServerEvent(userId, "github_access_granted", {
    tier,
    github_username: user.githubUsername,
    invitation_status: collaboratorResult.status,
  });
});
This uses the collaboratorResult from step 5. Because step.run() caches return values, collaboratorResult.status is available here even if the function was interrupted and resumed between steps 5 and 6.
Step 7: Update Purchase Record
await step.run("update-purchase-record", async () => {
  await db
    .update(purchases)
    .set({
      githubAccessGranted: true,
      githubInvitationId: collaboratorResult.status,
      updatedAt: new Date(),
    })
    .where(eq(purchases.stripeCheckoutSessionId, sessionId));
});
The database update happens after GitHub access is confirmed. You only mark githubAccessGranted: true after the collaborator invitation actually succeeded.
If you updated the record before granting access and the GitHub step failed, your database would say access was granted when it was not.
Step 8: Send Repo Access Email
await step.run("send-repo-access-email", async () => {
  await sendEmail({
    to: user.email,
    subject: `Your repository access is ready!`,
    template: createElement(RepoAccessGrantedEmail, {
      repoUrl: "https://github.com/your-org/your-repo",
    }),
  });
});
This email only sends after the GitHub invitation is confirmed (step 5) and the database is updated (step 7). The ordering matters. You don't want to tell the customer "your access is ready" if the invitation hasn't been sent.
Step 9: Schedule Follow-Up Sequence
await step.run("schedule-follow-up", async () => {
  const purchaseRecord = await db
    .select({ id: purchases.id })
    .from(purchases)
    .where(eq(purchases.stripeCheckoutSessionId, sessionId))
    .limit(1);

  if (purchaseRecord[0]) {
    await inngest.send({
      name: "purchase/follow-up.scheduled",
      data: {
        userId,
        purchaseId: purchaseRecord[0].id,
        tier,
      },
    });
  }
});
The final step triggers a separate Inngest function that handles the follow-up email sequence (day 7 onboarding tips, day 14 feedback request, day 30 testimonial request). This is an event-driven chain: one function completes and triggers another.
The follow-up function uses step.sleep() to wait between emails:
export const handlePurchaseFollowUp = inngest.createFunction(
  {
    id: "purchase-follow-up",
    triggers: [{ event: "purchase/follow-up.scheduled" }],
    cancelOn: [
      {
        event: "purchase/follow-up.cancelled",
        match: "data.purchaseId",
      },
    ],
  },
  async ({ event, step }) => {
    const { userId, purchaseId } = event.data;

    await step.sleep("wait-7-days", "7d");

    await step.run("send-day-7-email", async () => {
      // Check eligibility (user exists, not unsubscribed, not refunded)
      // Send onboarding tips email
    });

    await step.sleep("wait-14-days", "7d");

    await step.run("send-day-14-email", async () => {
      // Send feedback request email
    });

    await step.sleep("wait-30-days", "16d");

    await step.run("send-day-30-email", async () => {
      // Send testimonial request email
    });
  }
);
Notice the cancelOn option. If the purchase is refunded, you can send a purchase/follow-up.cancelled event, and the entire follow-up sequence stops. No stale emails sent to customers who asked for a refund.
Why Each Step Must Be Separate
The rule is simple: any operation that calls an external service or could fail independently should be its own step.
A database query is a step because the database can be temporarily unreachable. An email send is a step because the email provider can return a 500. A GitHub API call is a step because it can be rate-limited.
If two operations always succeed or fail together (they share a single external call), they can be in the same step. But when in doubt, make it a separate step. The overhead is negligible, and the reliability gain is significant.
How to Handle Refunds with the Same Pattern
The refund flow follows the exact same durable step pattern. This function lives in the same file as handlePurchaseCompleted, so it shares the same imports (plus removeCollaborator from @/lib/github and the refund-specific email templates). Here's the handleRefund function:
export const handleRefund = inngest.createFunction(
  { id: "refund-processed", triggers: [{ event: "stripe/charge.refunded" }] },
  async ({ event, step }) => {
    const {
      chargeId,
      paymentIntentId,
      amountRefunded,
      originalAmount,
      currency,
    } = event.data;

    const isFullRefund = amountRefunded >= originalAmount;

    // Step 1: Look up the purchase and user
    const { user, purchase } = await step.run(
      "lookup-purchase-by-payment-intent",
      async () => {
        const purchaseResult = await db
          .select({
            id: purchases.id,
            userId: purchases.userId,
            stripePaymentIntentId: purchases.stripePaymentIntentId,
            githubAccessGranted: purchases.githubAccessGranted,
          })
          .from(purchases)
          .where(eq(purchases.stripePaymentIntentId, paymentIntentId))
          .limit(1);

        const foundPurchase = purchaseResult[0];
        if (!foundPurchase) {
          return { user: null, purchase: null };
        }

        const userResult = await db
          .select({
            id: users.id,
            email: users.email,
            name: users.name,
            githubUsername: users.githubUsername,
          })
          .from(users)
          .where(eq(users.id, foundPurchase.userId))
          .limit(1);

        return { user: userResult[0] ?? null, purchase: foundPurchase };
      }
    );

    if (!purchase || !user) {
      return { success: false, reason: "no_matching_purchase" };
    }

    let accessRevoked = false;

    // Step 2: Revoke GitHub access (only for full refunds)
    if (isFullRefund && user.githubUsername && purchase.githubAccessGranted) {
      const revokeResult = await step.run(
        "revoke-github-access",
        async () => {
          return removeCollaborator(user.githubUsername!);
        }
      );
      accessRevoked = revokeResult.success;
    }

    // Step 3: Update purchase status
    await step.run("update-purchase-status", async () => {
      if (isFullRefund) {
        await db
          .update(purchases)
          .set({
            status: "refunded",
            githubAccessGranted: false,
            updatedAt: new Date(),
          })
          .where(eq(purchases.id, purchase.id));
      } else {
        await db
          .update(purchases)
          .set({
            status: "partially_refunded",
            updatedAt: new Date(),
          })
          .where(eq(purchases.id, purchase.id));
      }
    });

    // Step 4: Track refund in analytics
    await step.run("track-refund-event", async () => {
      await trackServerEvent(user.id, "refund_processed", {
        charge_id: chargeId,
        amount_cents: amountRefunded,
        original_amount_cents: originalAmount,
        currency,
        is_full_refund: isFullRefund,
        github_access_revoked: accessRevoked,
      });
    });

    // Step 5: Notify customer
    await step.run("send-customer-notification", async () => {
      if (isFullRefund) {
        await sendEmail({
          to: user.email,
          subject: "Your refund has been processed",
          template: createElement(AccessRevokedEmail, {
            customerEmail: user.email,
            refundAmount: amountRefunded,
            currency,
          }),
        });
      } else {
        await sendEmail({
          to: user.email,
          subject: "Your partial refund has been processed",
          template: createElement(PartialRefundEmail, {
            customerEmail: user.email,
            refundAmount: amountRefunded,
            originalAmount,
            currency,
          }),
        });
      }
    });

    // Step 6: Notify admin
    await step.run("send-admin-notification", async () => {
      const adminEmail = process.env.ADMIN_EMAIL;
      if (!adminEmail) return;

      await sendEmail({
        to: adminEmail,
        subject: `\({isFullRefund ? "Full" : "Partial"} refund: \){user.email}`,
        template: createElement(AdminRefundNotificationEmail, {
          customerEmail: user.email,
          customerName: user.name,
          githubUsername: user.githubUsername,
          refundAmount: amountRefunded,
          originalAmount,
          currency,
          stripeChargeId: chargeId,
          accessRevoked,
          isPartialRefund: !isFullRefund,
        }),
      });
    });

    return { success: true, accessRevoked, isFullRefund, userId: user.id };
  }
);
Three things are worth calling out in the refund flow.
Partial versus full refunds: The function distinguishes between the two using a simple comparison:
amountRefunded >= originalAmount. For a partial refund, the customer keeps access but the purchase status changes topartially_refunded. For a full refund, GitHub access is revoked and the status becomesrefunded.This matters for your database integrity. Downstream systems (your dashboard, your analytics, your support tools) need accurate status values.
Conditional step execution: The "revoke GitHub access" step only runs if three conditions are true: it's a full refund, the user has a GitHub username, and access was previously granted. Inngest handles this cleanly by skipping steps that don't need to run.
This is more readable than deeply nested if-else blocks in a monolithic handler.
Separate notifications for customers and admins: The customer gets a different email depending on whether the refund is full or partial. The admin always gets a detailed notification including the charge ID, the customer's GitHub username, and whether access was revoked.
These are separate steps because a failure in the admin notification shouldn't block the customer notification. The customer's email is the higher priority.
How to Recover Abandoned Checkouts
Abandoned cart recovery is where the step.sleep() method shines. When a Stripe checkout session expires, you want to send a recovery email. But not immediately.
You want to wait an hour or so, giving the customer time to return on their own.
export const handleCheckoutExpired = inngest.createFunction(
  {
    id: "checkout-expired",
    triggers: [{ event: "stripe/checkout.session.expired" }],
  },
  async ({ event, step }) => {
    const { customerEmail, sessionId } = event.data;

    if (!customerEmail) {
      return { success: false, reason: "no_email" };
    }

    // Wait 1 hour before sending recovery email
    await step.sleep("wait-before-recovery-email", "1h");

    // Send abandoned cart email
    await step.run("send-abandoned-cart-email", async () => {
      const checkoutUrl = `https://yoursite.com/pricing`;

      await sendEmail({
        to: customerEmail,
        subject: "Your checkout is waiting",
        template: createElement(AbandonedCartEmail, {
          customerEmail,
          checkoutUrl,
        }),
      });
    });

    // Track the event
    await step.run("track-abandoned-cart", async () => {
      await trackServerEvent("anonymous", "abandoned_cart_email_sent", {
        customer_email: customerEmail,
        session_id: sessionId,
      });
    });

    return { success: true, customerEmail };
  }
);
The step.sleep("wait-before-recovery-email", "1h") line is the key. This pauses the function for one hour without consuming any compute resources.
Inngest handles the scheduling internally. After one hour, the function resumes and sends the email.
Without durable execution, you would need a cron job that queries a database for expired sessions, or a delayed job queue with Redis, or a setTimeout that gets lost when your server restarts. The step.sleep() approach is simpler, more readable, and more reliable.
There's also a guard at the top of the function. If Stripe doesn't have a customer email for the session (the customer closed the checkout before entering their email), the function returns early. There's no point scheduling a recovery email with no address to send it to.
This pattern scales to more complex recovery flows. You could add a second step.sleep() and send a follow-up recovery email three days later if the customer still hasn't purchased. You could check if the customer has since completed a purchase (by querying the database in a step.run()) and skip the email if they have.
Each additional step is one more step.run() or step.sleep() call. The function reads like a script describing your business logic, not a tangle of cron jobs and database flags.
How to Test Webhook Handlers Locally
Local testing is one of the biggest pain points with Stripe webhooks. You need Stripe to send events to your local machine, and you need your background job system running to process them. Here's the setup.
How to Forward Stripe Events Locally
Install the Stripe CLI and forward webhook events to your local server:
stripe listen --forward-to localhost:3000/api/payments/webhook
The CLI prints a webhook signing secret (starting with whsec_). Set this as your STRIPE_WEBHOOK_SECRET environment variable for local development.
You can trigger test events directly:
stripe trigger checkout.session.completed
stripe trigger charge.refunded
stripe trigger checkout.session.expired
How to Run the Inngest Dev Server
Inngest provides a local dev server that shows you every function execution, every step, and every retry in real time:
npx inngest-cli@latest dev -u http://localhost:3000/api/inngest
The -u flag tells the Inngest dev server where your application is running so it can discover your functions. Open http://localhost:8288 in your browser to see the Inngest dashboard.
How to Watch Step Execution
The Inngest dev dashboard is where the durable execution pattern really clicks. When you trigger a Stripe event, you can see:
The event arriving in the "Events" tab.
The function triggering in the "Runs" tab.
Each step executing one by one, with its input, output, and duration.
If a step fails, you see the error and the retry attempt.
This visibility is something you don't get with inline webhook handlers. When a customer reports "I paid but didn't get access," you can look up the function run in the Inngest dashboard and see exactly which step failed and why. That kind of observability is invaluable in production.
How to Simulate Failures
To test the retry behavior, you can intentionally make a step fail. For example, temporarily throw an error in the "add-github-collaborator" step:
const collaboratorResult = await step.run(
  "add-github-collaborator",
  async () => {
    throw new Error("Simulated GitHub API failure");
  }
);
In the Inngest dashboard, you'll see:
Steps 1 through 4 succeed and their results are cached.
Step 5 fails and is retried according to the retry policy.
Steps 6 through 9 remain pending until step 5 succeeds.
Remove the thrown error, and on the next retry, step 5 succeeds. Steps 6 through 9 then execute in sequence, while steps 1 through 4 aren't re-executed. This is the checkpoint behavior in action.
Conclusion
The pattern for reliable Stripe webhooks comes down to one principle: separate receiving from processing.
Your webhook endpoint validates the Stripe signature and sends a typed event to a background job system. That's all it does. The processing happens in a durable function where each step is individually checkpointed and retried.
Here's what this gives you:
No duplicate emails: A step that already succeeded doesn't re-run.
No partial state: If step 5 fails, steps 1 through 4 are preserved and step 5 retries independently.
Full observability: You can see exactly which step failed and why, for every function run.
Built-in delayed execution:
step.sleep()handles recovery emails and follow-up sequences without cron jobs.Composable workflows: One function can trigger another via events, creating chains like purchase completion leading to a 30-day follow-up sequence.
This pattern isn't limited to Stripe. Any multi-step webhook processing benefits from durable execution: GitHub webhooks that trigger CI pipelines, Resend webhooks that track email delivery, or calendar webhooks that sync across services.
The principle is the same: Validate. Enqueue. Process durably.
I've used this pattern in production for Eden Stack, where the purchase flow handles everything from payment confirmation to GitHub repository access grants to multi-week email sequences. The 9-step purchase function has processed every payment without a single missed step or duplicate email.
If you're building a SaaS with Stripe, start with the webhook endpoint pattern from this article. Keep the endpoint thin and move the processing into durable steps. You'll save yourself from the 3 AM debugging session when a customer says "I paid but nothing happened."
If you want the complete Stripe webhook and Inngest integration pre-built with purchase flows, refund handling, and follow-up email sequences ready to go, Eden Stack includes everything from this article alongside 30+ additional production-tested patterns.
Magnus Rodseth builds AI-native applications and is the creator of Eden Stack, a production-ready starter kit with 30+ Claude skills encoding production patterns for AI-native SaaS development.
Learn to code for free. freeCodeCamp's open source curriculum has helped more than 40,000 people get jobs as developers. Get started