








If you've been storing AWS_ACCESS_KEY_ID and AWS_SECRET_ACCESS_KEY as GitHub Secrets to deploy to AWS, you're not alone. It's the most common approach and it's also one of the biggest security risks in a CI/CD pipeline.
Here's why: static credentials don't expire on their own. If they get leaked through a misconfigured workflow, a public fork, or a compromised repository, an attacker has persistent access to your AWS environment until you manually rotate them. And most teams don't rotate them often enough.
OpenID Connect (OIDC) solves this entirely. Instead of storing long-lived credentials, GitHub Actions requests a short-lived token directly from AWS every time your workflow runs. No secrets to rotate. No credentials to leak. No manual key management.
In this tutorial, you'll learn how to set up OIDC authentication between GitHub Actions and AWS from scratch. By the end, your workflows will authenticate to AWS securely without storing a single access key.
Table of Contents
What Is OpenID Connect (OIDC)?
OpenID Connect is an identity protocol built on top of OAuth 2.0. It allows systems to verify identity through tokens rather than shared secrets.
In the context of GitHub Actions and AWS:
GitHub acts as the identity provider (IdP). It issues a signed JWT (JSON Web Token) for each workflow run.
AWS acts as the service provider. It validates that token against GitHub's public keys and exchanges it for temporary AWS credentials. The credentials AWS returns are short-lived (valid for up to 1 hour by default) and scoped to exactly the IAM role you define. When the workflow ends, those credentials are gone.
This model is called federated identity. It's the same concept used when you "Sign in with Google" on a third-party website. The difference is that instead of a user signing in, your workflow is the one authenticating.
How OIDC Works Between GitHub Actions and AWS
Before writing a single line of YAML, it beneficial to understand the flow. This is my personal approach when implementing new technologies or concepts. Here's what happens every time your workflow runs:
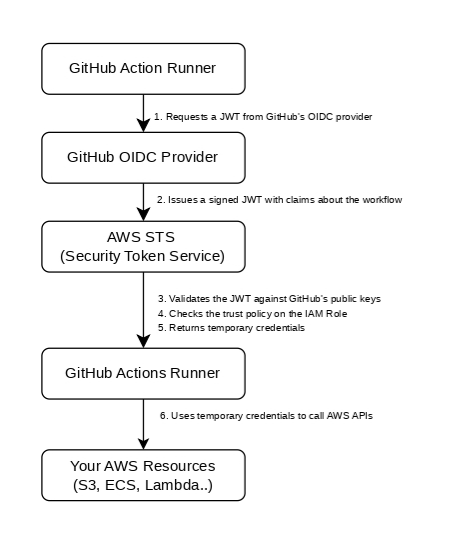
The diagram illustrates a secure authentication flow between GitHub Actions and AWS using OpenID Connect (OIDC), eliminating the need to store long-lived AWS credentials in GitHub. Here's what happens step-by-step:
1. Initial Authentication Request
When your GitHub Actions workflow starts, the runner (the virtual machine executing your workflow) requests a JSON Web Token (JWT) from GitHub's OIDC provider located at https://token.actions.githubusercontent.com.
2. Token Issuance
GitHub's OIDC provider generates and signs a JWT containing important claims (metadata) about your workflow. These claims include details like which repository the workflow is running from, which branch triggered it, what environment it's running in, and other contextual information that proves the workflow's identity.
3. Token Validation
The GitHub Actions runner presents this signed JWT to AWS Security Token Service (STS). AWS STS validates the JWT's signature by checking it against GitHub's publicly available cryptographic keys, ensuring the token is authentic and hasn't been tampered with.
4. Trust Policy Verification
AWS STS checks the trust policy configured on your IAM Role. This trust policy specifies which GitHub repositories, branches, or environments are allowed to assume this role. If the claims in the JWT match your trust policy conditions, authentication succeeds.
5. Temporary Credentials Issued
Once validated, AWS STS returns temporary security credentials to the GitHub Actions runner. These credentials include an Access Key ID, Secret Access Key, and Session Token that are valid for a limited time (typically 1 hour by default, configurable up to 12 hours).
6. AWS API Access
The GitHub Actions runner uses these temporary credentials to authenticate API calls to your AWS resources such as pushing Docker images to ECR, updating ECS services, writing to S3 buckets, or invoking Lambda functions.
The key point: AWS never sees your GitHub credentials, and GitHub never sees your AWS credentials. The JWT is the only thing exchanged and it's signed, scoped, and short-lived.
Prerequisites
Before you start, make sure you have the following in place:
An AWS account with IAM permissions to create identity providers and roles
A GitHub repository (public or private) where your workflows will run
Basic familiarity with GitHub Actions, knowing how to write a
.ymlworkflow fileBasic familiarity with AWS IAM roles, policies, and permissions
The AWS CLI installed and configured (optional, but useful for verification). You don't need to be an AWS expert. Each step includes the exact console path and the configuration values you need.
Step 1: Create an IAM OIDC Identity Provider in AWS
The first thing you need to do is tell AWS to trust GitHub as an identity provider. This is a one-time setup per AWS account.
How to Do It in the AWS Console
Open the AWS IAM Console
In the left sidebar, click Identity providers
Click Add provider
For Provider type, select OpenID Connect
For Provider URL, enter:
https://token.actions.githubusercontent.com
- For Audience, enter:
sts.amazonaws.com
- Click Add provider
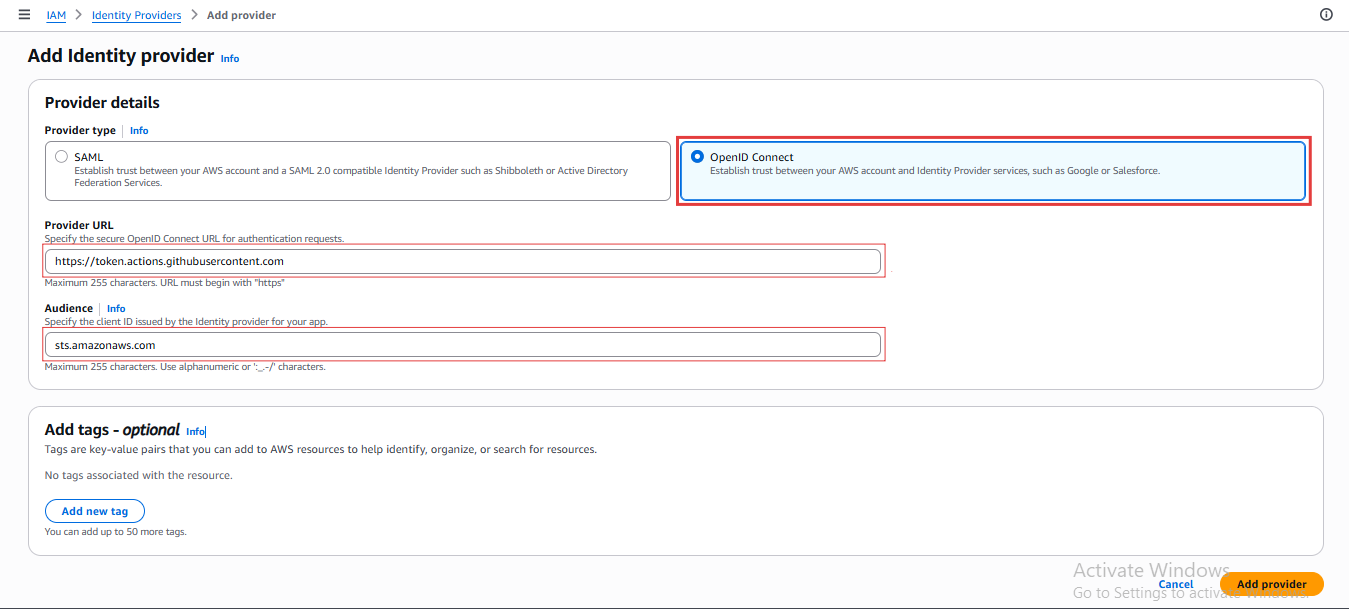
How to Do It with the AWS CLI
If you prefer the terminal, run this command:
aws iam create-open-id-connect-provider \
  --url https://token.actions.githubusercontent.com \
  --client-id-list sts.amazonaws.com \

Once created, you'll see token.actions.githubusercontent.com listed under Identity providers in your IAM console. This provider will be referenced in your IAM role's trust policy in the next step.
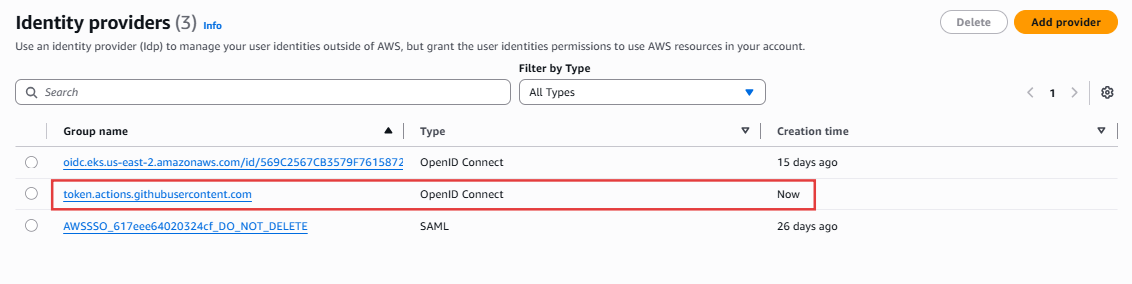
Step 2: Create an IAM Role with a Trust Policy
Now you need an IAM role that your GitHub Actions workflow will assume. The trust policy on this role controls which repositories and branches are allowed to request credentials.
How to Create the IAM Role in the AWS Console
Open the AWS IAM Console
In the left sidebar, click Roles
Click Create role
For Trusted entity type, select Web identity
For Identity Provider, choose:
token.actions.githubusercontent.comwhich you created earlier.For Audience, choose
sts.amazonaws.comas wellFor GitHub organisation, enter your GitHub username or organization name
For GitHub repository, enter your GitHub repository
For GitHub branch, enter your branch name (for example, main)
Click Next, then Next, give a name to the role and click create role
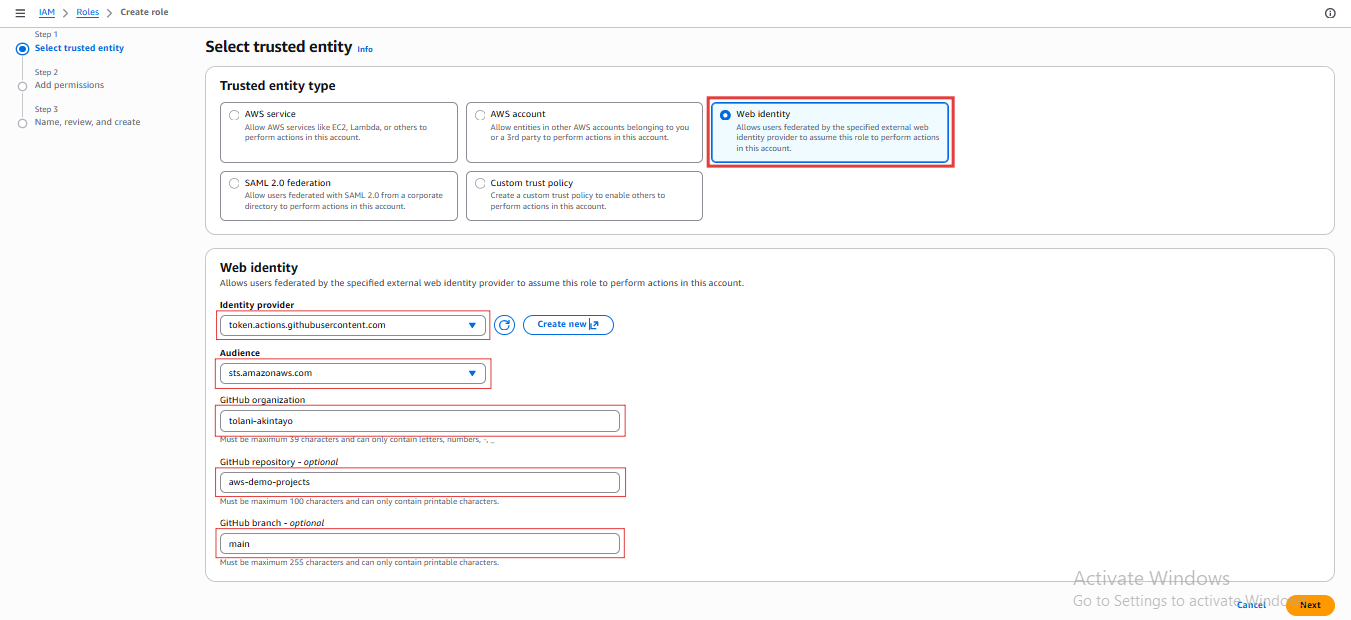
Note: Creating the IAM role using this approach already establishes the Trusted Entities using a trusted policy based on the step 4-9 above. You can verify this by clicking on the created role and navigating to Trust relationships.
How to Create the IAM Role with the AWS CLI
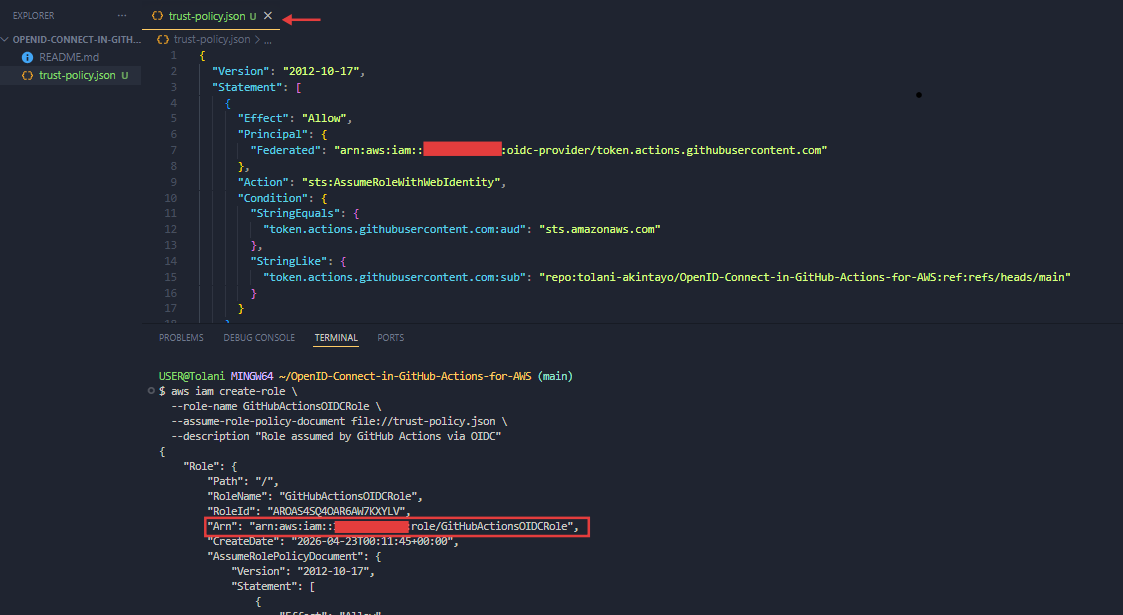
First, you'll need to create a trust policy document on your local machine: You can call it trust-policy.json:
{
  "Version": "2012-10-17",
  "Statement": [
    {
      "Effect": "Allow",
      "Principal": {
        "Federated": "arn:aws:iam::YOUR_ACCOUNT_ID:oidc-provider/token.actions.githubusercontent.com"
      },
      "Action": "sts:AssumeRoleWithWebIdentity",
      "Condition": {
        "StringEquals": {
          "token.actions.githubusercontent.com:aud": "sts.amazonaws.com"
        },
        "StringLike": {
          "token.actions.githubusercontent.com:sub": "repo:YOUR_GITHUB_ORG/YOUR_REPO_NAME:*"
        }
      }
    }
  ]
}
Replace the following placeholders before saving:
| Placeholder | Replace With |
|---|---|
YOUR_ACCOUNT_ID |
Your 12-digit AWS account ID |
YOUR_GITHUB_ORG |
Your GitHub username or organization name |
YOUR_REPO_NAME |
The name of your GitHub repository |
How to Understand the sub Condition
The sub (subject) claim in the JWT tells AWS exactly where the request is coming from. The value repo:your-org/your-repo:* means any branch in that repository can assume this role.
You can tighten this further depending on your needs:
# Only the main branch
"token.actions.githubusercontent.com:sub": "repo:your-org/your-repo:ref:refs/heads/main"

# Only a specific GitHub Environment
"token.actions.githubusercontent.com:sub": "repo:your-org/your-repo:environment:production"
Scoping this correctly is one of the most important security decisions in this setup. Here's how to decide:
Use
ref:refs/heads/mainif only your main/production branch should deploy to AWS. This is the most restrictive and secure option: feature branches can't accidentally (or maliciously) trigger deployments or modify production resources.Use
environment:productionif you're using GitHub Environments with protection rules (required reviewers, deployment gates). This lets you control deployments through GitHub's approval workflow while still restricting which workflows can access AWS.Use
repo:your-org/your-repo:*(wildcard) only if you need any branch to deploy. for example, in development environments where every feature branch deploys to its own isolated stack. Never use this for production roles.
Run this command to create the role using your trust policy:
aws iam create-role \
  --role-name GitHubActionsOIDCRole \
  --assume-role-policy-document file://trust-policy.json \
  --description "Role assumed by GitHub Actions via OIDC"
Take note of the Role ARN in the output. It will look like this:
arn:aws:iam::YOUR_ACCOUNT_ID:role/GitHubActionsOIDCRole
You'll need this ARN in your workflow YAML in Step 4.
Step 3: Attach Permissions to the IAM Role
The IAM role can now authenticate, but it has no permissions yet. You need to attach a policy that defines what your workflow is actually allowed to do in AWS.
How to Apply the Principle of Least Privilege
Only grant the permissions your workflow genuinely needs. If your workflow deploys to S3, give it S3 permissions. If it pushes images to ECR, give it ECR permissions. Never attach AdministratorAccess to a CI/CD role.
Option 1: Attach an AWS managed policy (quick start):
aws iam attach-role-policy \
  --role-name GitHubActionsOIDCRole \
  --policy-arn arn:aws:iam::aws:policy/AmazonS3FullAccess
Option 2: Create a custom policy scoped to a specific S3 bucket (recommended for production):
This approach is recommended for production because it limits the blast radius of a security incident. If your workflow credentials are ever compromised, a custom policy scoped to a specific bucket means an attacker can only affect that single bucket not every S3 bucket in your AWS account. It also prevents accidental misconfigurations in your workflow from impacting unrelated resources.
Create a file called s3-deploy-policy.json:
{
  "Version": "2012-10-17",
  "Statement": [
    {
      "Effect": "Allow",
      "Action": [
        "s3:PutObject",
        "s3:DeleteObject",
        "s3:ListBucket"
      ],
      "Resource": [
        "arn:aws:s3:::your-bucket-name",
        "arn:aws:s3:::your-bucket-name/*"
      ]
    }
  ]
}
Then create and attach it:
aws iam create-policy \
  --policy-name GitHubActionsS3DeployPolicy \
  --policy-document file://s3-deploy-policy.json

aws iam attach-role-policy \
  --role-name GitHubActionsOIDCRole \
  --policy-arn arn:aws:iam::YOUR_ACCOUNT_ID:policy/GitHubActionsS3DeployPolicy
Note: You can as well implement Step 3 via the console.
Reference: For a full list of available AWS IAM actions, see the AWS IAM actions reference.
Step 4: Store the Role ARN as a GitHub Actions Variable
Before you configure your workflow, you need to make the Role ARN available to it. You'll store it as a repository variable in GitHub, not a secret, because the ARN itself isn't sensitive data.
How to Add the Variable in Your Repository
- Open your GitHub repository and click Settings:
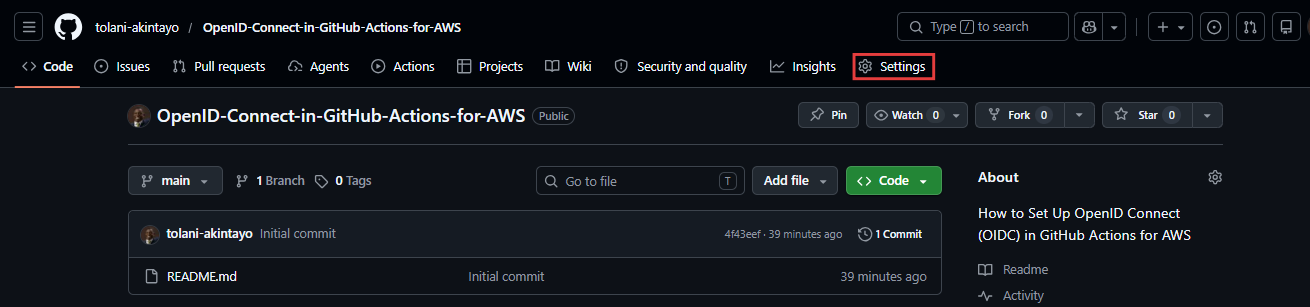
- In the left sidebar, scroll down to Secrets and variables, then click Actions:
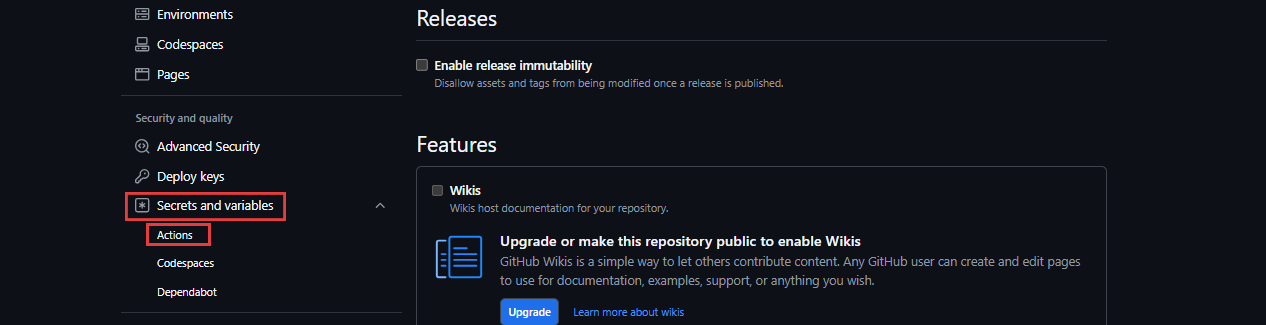
Click the Variables tab (not Secrets)
Click New repository variable
You can set the Name to:
AWS_ROLE_ARN
- Set the Value to your Role ARN from Step 2, for example:
arn:aws:iam::YOUR_ACCOUNT_ID::role/GitHubActionsOIDCRole
- Click Add variable
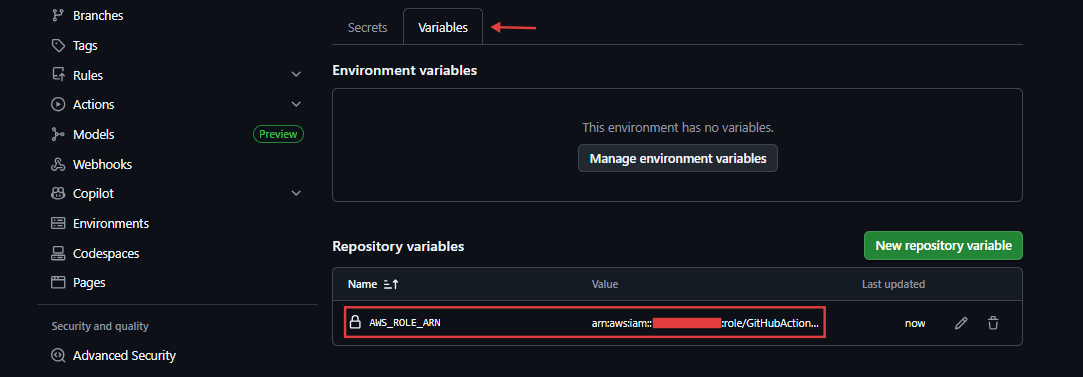
You'll reference this variable in your workflow in the next step using ${{ vars.AWS_ROLE_ARN }}.
Step 5: Configure Your GitHub Actions Workflow
With AWS and GitHub fully configured, you now need to update your workflow to request an OIDC token and use it to authenticate.
How to Set the Required Workflow Permissions
Your workflow must declare id-token: write. Without this, GitHub won't issue an OIDC token to the runner.
permissions:
  id-token: write   # Required to request the OIDC JWT
  contents: read    # Required to checkout the repository
Important: If you set permissions at the job level, they override any top-level permissions. Make sure id-token: write is present at whichever level your AWS authentication step runs.
Full Workflow Example
Here's a complete workflow that authenticates to AWS using OIDC and deploys a static site to S3:
name: Deploy to AWS S3

on:
  push:
    branches:
      - main

permissions:
  id-token: write
  contents: read

jobs:
  deploy:
    name: Deploy
    runs-on: ubuntu-latest

    steps:
      - name: Checkout code
        uses: actions/checkout@v4

      - name: Configure AWS credentials via OIDC
        uses: aws-actions/configure-aws-credentials@v4
        with:
          role-to-assume: ${{ vars.AWS_ROLE_ARN }}
          aws-region: us-east-2

      - name: Verify AWS identity
        run: aws sts get-caller-identity

      - name: Deploy to S3
        run: |
          aws s3 sync ./code s3://your-bucket-name
Replace the following before committing:
| Placeholder | Replace With |
|---|---|
AWS_ROLE_ARN |
The variable name for your IAM role ARN in GitHub |
us-east-2 |
Your target AWS region |
your-bucket-name |
Your S3 bucket name |
./code |
The local directory where the file you want to sync to S3 is located |
You can see the code sample in my GitHub Repo here.
Note: The aws-actions/configure-aws-credentials action handles the entire OIDC token exchange automatically. It requests the JWT from GitHub, calls sts:AssumeRoleWithWebIdentity, and exports the temporary credentials as environment variables for the rest of the job.
See the action's official documentation for all available options.
Step 6: Run and Verify Your Workflow
Push your workflow to the main branch and open the Actions tab in your repository to watch it run.
What a Successful Run Looks Like
The Configure AWS credentials via OIDC step should show:
Assuming role with OIDC: arn:aws:iam::YOUR_ACCOUNT_ID:role/GitHubActionsOIDCRole
The Verify AWS identity step (aws sts get-caller-identity) should return:
{
    "UserId": "AROA...:GitHubActions",
    "Account": "YOUR_ACCOUNT_ID",
    "Arn": "arn:aws:sts::YOUR_ACCOUNT_ID:assumed-role/GitHubActionsOIDCRole/GitHubActions"
}
If you see an assumed-role ARN in the output, OIDC is working correctly. Your workflow is now authenticating to AWS without a single stored credential.
Security Best Practices
Getting OIDC working is step one. Locking it down properly is step two.
Scope the sub Condition as Tightly as Possible
Don't use a wildcard like repo:your-org/*:* that allows any repository in your organization to assume the role. Scope it to the exact repository and branch that needs access.
"token.actions.githubusercontent.com:sub": "repo:your-org/your-repo:ref:refs/heads/main"
Use GitHub Environments for Production Deployments
GitHub Environments let you add manual approval gates and restrict which branches can deploy. When combined with OIDC, you can scope your trust policy to only allow the production environment:
"token.actions.githubusercontent.com:sub": "repo:your-org/your-repo:environment:production"
Apply Least-Privilege Permissions to Every IAM Role
Never attach AdministratorAccess or PowerUserAccess to a role used by CI/CD. Define a custom policy with only the actions your workflow actually needs.
Create Separate IAM Roles Per Environment
A staging role and a production role should have different permission scopes. Your staging deployment role should never have write access to production resources.
Enable AWS CloudTrail
Every call made using the temporary credentials is logged in CloudTrail under the assumed role ARN. This gives you a full audit trail of exactly what your workflow did in AWS.
Reference: GitHub's official security hardening guide for OIDC: About security hardening with OpenID Connect
Troubleshooting Common Errors
Error: Not authorized to perform sts:AssumeRoleWithWebIdentity
This usually means the trust policy on your IAM role doesn't match the sub claim in the JWT.
Check the following:
The
subcondition exactly matches your repository path (it is case-sensitive)The
audcondition is set tosts.amazonaws.comThe
Federatedprincipal uses the correct AWS account ID
To inspect the actual token claims your workflow is receiving, add this debug step temporarily:
- name: Print OIDC token claims
  run: |
    TOKEN=\((curl -s -H "Authorization: Bearer \)ACTIONS_ID_TOKEN_REQUEST_TOKEN" \
      "$ACTIONS_ID_TOKEN_REQUEST_URL&audience=sts.amazonaws.com" | jq -r '.value')
    echo $TOKEN | cut -d '.' -f2 | base64 -d 2>/dev/null | jq .
Error: Could not load credentials from any providers
This almost always means id-token: write is missing from your workflow permissions. Double-check that you have:
permissions:
  id-token: write
  contents: read
Error: AccessDenied When Calling an AWS Service
Authentication succeeded but the IAM role doesn't have permission to perform the action your workflow is attempting. Check the permissions policy attached to your role and compare it against the specific action in the error message.
Conclusion
You've gone from storing static, long-lived AWS credentials in GitHub Secrets to a fully keyless authentication setup using OIDC. Here's what you accomplished:
Registered GitHub as a trusted OIDC identity provider in AWS.
Created an IAM role with a scoped trust policy tied to a specific repository.
Attached least-privilege permissions to that role.
Configured your GitHub Actions workflow to request and use short-lived AWS credentials.
Verified the authentication flow end-to-end.
This pattern works across every AWS service from S3, ECS, Lambda, ECR, Secrets Manager, and more. The workflow example here uses S3, but you only need to swap out the permissions policy and the deployment commands to adapt it for any service.
If you want to go further, explore:
Configuring OIDC for multiple cloud providers: Azure, GCP, and HashiCorp Vault.
GitHub Environments and deployment protection rules: for multi-stage pipelines with approval gates.
AWS IAM Access Analyzer: to validate and tighten your role policies automatically.
If you're building out your DevOps practice and want a complete, production-ready reference for infrastructure automation, CI/CD, and platform engineering, check out The Startup DevOps Field Guide. It covers the patterns, templates, and runbooks I've used across real AWS environments.
You can also connect with me on LinkedIn
References
Learn to code for free. freeCodeCamp's open source curriculum has helped more than 40,000 people get jobs as developers. Get started