










Backend applications are required to send emails to users to deliver notifications and maintain communication outside the application interface. These emails usually contain information specific to each user, such as the user's name or address, making them dynamic.
This article walks you through building a dynamic email template with React Email, converting it to HTML, and injecting data into it using Go templates. It also contains an optional section that shows you how to send and test the email delivery with MailHog.
To follow along with this article, you need to have Go and Node.js installed on your computer. You should also have a basic understanding of React and some familiarity with Go templates, though these aren't strict requirements because you can pick them up as you practise along.
Table of Contents
What is React Email?
React Email is a JavaScript library that helps you build dynamic email templates with React. If you already know basic React, React Email provides a better developer experience for building dynamic email templates. Here are some reasons why:
Familiar syntax with React: If you know React already, React Email eliminates the hassle in learning a separate templating language, using inefficient drag-and-drop UIs, or writing emaiil templates from scratch with HTML tables.
Reusable built-in components: React Email provides ready-to-use UI components like Buttons and Footers so you don't have to start from scratch, making email development seamless and fast.
Consistency across email clients: React Email generates email templates that have been tested and work well across popular email clients. This helps eliminate worries over emails rendering inconsistently across email clients.
Email development tooling: React Email has features for previewing and assessing emails built with it. Some of these features include:
A local development server that lets you preview mobile and desktop views of your emails in your web browser as you develop the emails in real time
An email delivery feature that sends your email to a real email address for preview
A compatibility checker that shows you how well your email is supported across popular email clients
A spam scorer that analyses your email to determine if it's likely to be marked as spam
Tailwind integration: Tailwind is a popular CSS framework that provides classes for styling HTML and making it responsive. React Email integrates with Tailwind easily for creating beautiful emails.
All these features are free to use.
In this article, you'll learn how to generate an HTML file from a React Email template, convert it to a Go template, and inject data into the template for previewing.
Go Templates
The Go html/template package allows you to define reusable HTML templates that can be populated with dynamic data. These templates contain placeholders (called actions) that are evaluated by Go's templating engine and replaced with actual values during execution.
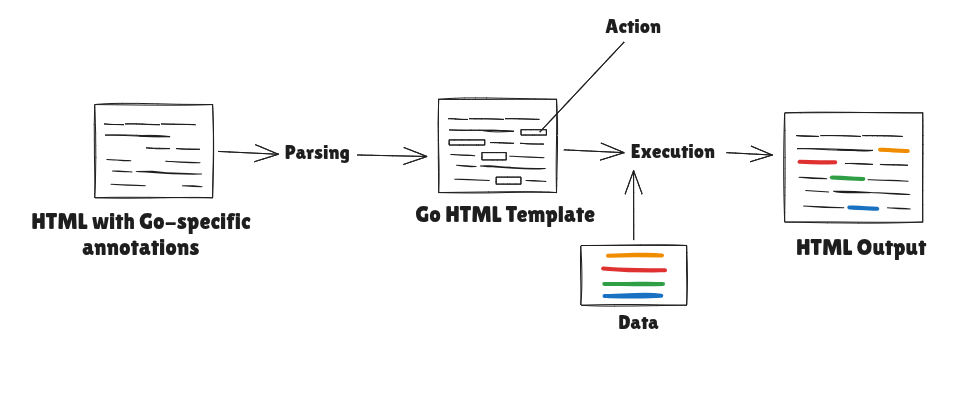
First, you give the package HTML content that contains Go-specific annotations. It converts the HTML content to a Go HTML template and the Go-specific annotations to actions in the template. The template is then executed with data to produce HTML output that contains the data.
package main

import (
	"html/template"
	"os"
)

func main() {
	tmpl := template.New("hello")
	tmpl, _ = tmpl.Parse(`<p>Hello {{.}}</p>`)
	tmpl.Execute(os.Stdout, "Gopher")
}

// Output: <p>Hello Gopher</p>
// Playground: https://goplay.tools/snippet/KxbkWPIArz5
In the code snippet above:
template.Newcreates an empty template object with the name "hello"tmpl.Parse(`<p>Hello {{.}}</p>`)parses the HTML string<p>Hello {{.}}</p>to create a Go HTML template and saves it intmpl. The{{.}}part of the HTML string is an action which acts as a placeholder for data.{{and}}are called delimiters and.is the data access identifier.tmpl.Execute(os.Stdout, "Gopher")populates the action with data - the "Gopher", string, and writes the resulting HTML output to the console.
Go Template Delimiters
In the previous code snippet, you used double curly braces ({{ and }}) as the delimiters in the Go template. Delimiters are symbols that Go uses to determine what parts of the input string represent an action – that is, a statement to be evaluated.
You can change the delimiters by using the Delims method on a template. An example is shown in the snippet below:
package main

import (
	"html/template"
	"os"
)

func main() {
	tmpl := template.New("hello")
	tmpl, _ = tmpl.Delims("((", "))").Parse(`<p>Hello ((.))</p>`)
	tmpl.Execute(os.Stdout, "Gopher")
}

// Output: <p>Hello Gopher</p>
// Playground: https://goplay.tools/snippet/00RuDzvZYwN
In the snippet above, (( and )) are used as the delimiters for the hello template.
This is important because you'll set your delimiters to prevent conflicts between Go's default delimiters and React's curly braces in React Email templates.
The image below summarizes how the sample application you'll build in this article works:
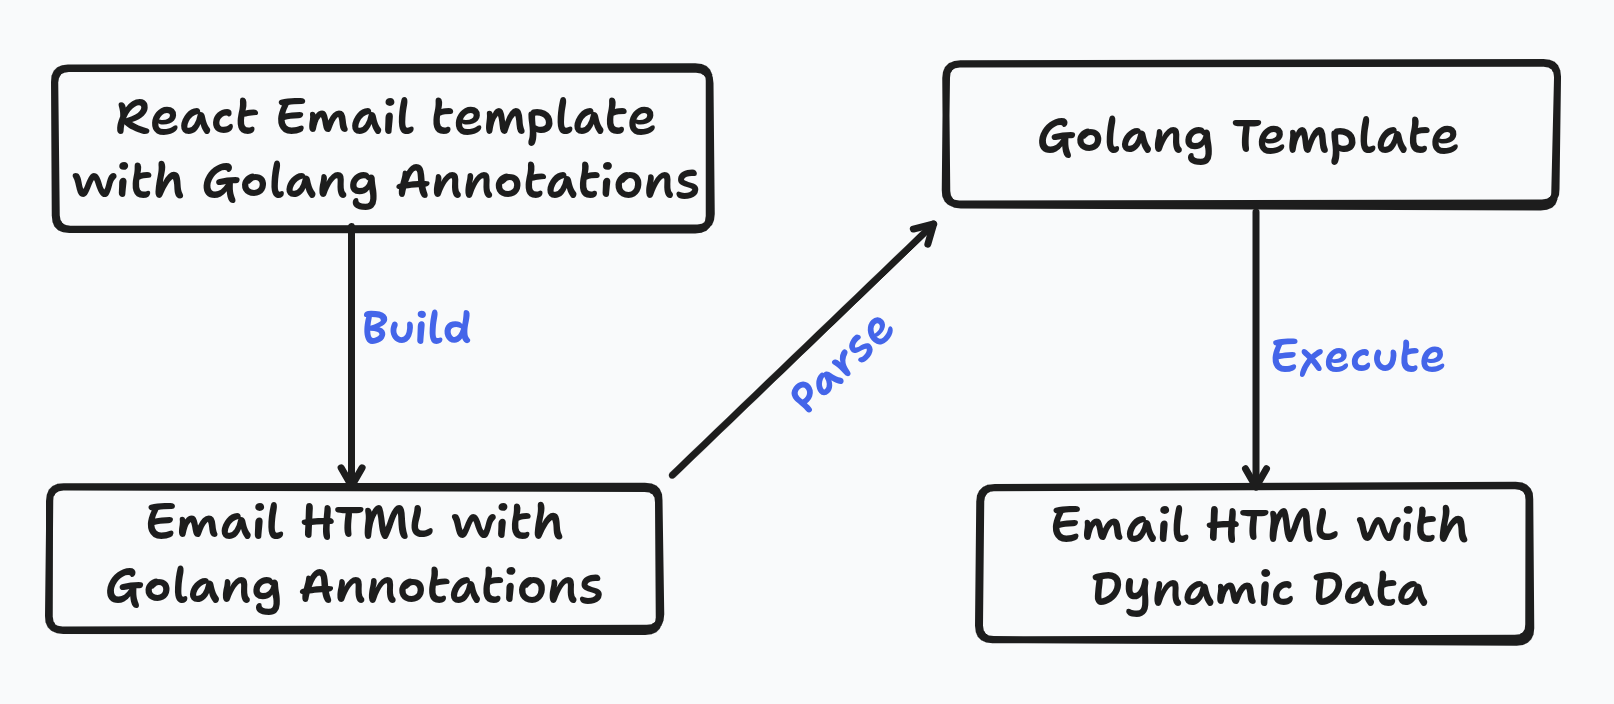
You'll create a React Email template that contains Go template annotations. Next, you'll use Node.js to create HTML files from it. Go will parse the HTML file to create a Go template, execute it, and send it.
Optionally, you'll use go-mail to send the email and MailHog, a local SMTP server, to preview it in your browser.
Set Up the Project
First, make sure that you have Go and Node.js installed on your computer already. Clone this freeCodeCamp-go-react-email repository and checkout the 01-setup branch using git checkout 01-setup.
The project contains a main.go file in the cmd directory and a go.mod file. It also contains a .gitignore file to instruct Git to ignore all node_modules directories.
Run go run cmd/main.go in the terminal of the project. If you see "It works!" logged to the console, you have set it up properly and you can continue to the next section.
Set Up React Email
In the project root directory, create a mailer directory which will serve as the mailer package. It will hold all functionality related to creating and sending mails.
In the mailer directory, you'll create the emails Node.js project that will handle React Email functionality. To create the project:
Create a directory called
_emailsin themailerdirectory. The name of the directory starts with an underscore because it should be ignored when thego buildcommand is run. So it won't be included in the Go compiled executable file.Run
npm init -yin the root terminal of the_emailsdirectory to initialise the Node.js project in it. This will create apackage.jsonfile in the directory.Update the value of the name field in
package.jsonto "emails" to make the package name more conventional. This step is not compulsory.
Next, install the required React Email libraries by running the following commands in the root terminal of the _emails directory:
npm install @react-email/ui @types/react -D -E
npm install react-email react react-dom -E
After the installation is complete, replace the scripts field of the package.json file with the code snippet below:
  "scripts": {
    "dev": "email dev --dir ./src",
    "export": "email export --pretty --dir ./src --outDir ../templates"
  },
The dev script starts and runs the server for previewing the React Email templates in the browser. You will write the template with React and store it in the src directory under _emails. The export script transpiles the template files in the src directory from JSX (or TSX) to HTML and stores them in a directory called templates, a direct child of the mailer directory – not a child of the _emails directory.
The templates directory is stored as a child directory of the mailer directory because the Go project needs only the HTML output stored in the templates directory and not the contents of _emails.
If you've completed all these steps, you have set up React Email in the emails Node.js project. To view the current status of the project at this point, visit freeCodeCamp-go-react-email/02-setup-react-email.
In the next section, you'll create a React Email template and preview it in the browser.
Create a React Email Template
In this section, you'll create a React Email template and preview it in the browser. You'll also build and export the template to HTML files.
Create a directory called src inside the _emails directory. Inside the src directory, create a file called welcome.tsx. Copy and paste the content of the snippet below into welcome.tsx.
import {
  Body,
  Button,
  Container,
  Head,
  Heading,
  Html,
  Img,
  Preview,
  Section,
  Tailwind,
  Text,
} from "react-email";

interface WelcomeEmailProps {
  username?: string;
  company?: string;
  gophers?: string[];
}

const WelcomeEmail = ({
  username = "Nicole",
  company = "GoWorld",
  gophers = ["Tinky Winky", "Dipsy", "Laa-Laa", "Po"],
}: WelcomeEmailProps) => {
  const previewText = `Welcome to \({company}, \){username}!`;

  return (
    <Html>
      <Head />
      <Preview>{previewText}</Preview>
      <Tailwind>
        <Body className="m-auto font-sans">
          <Container className="mb-10 mx-auto p-5 max-w-[465px]">
            <Section className="mt-10">
              <Img
                src={`https://storage.googleapis.com/gopherizeme.appspot.com/gophers/69428e5ec867c34bb4a49d5a063fdbc2a6633aed.png`}
                width="80"
                height="80"
                alt="Logo"
                className="my-0 mx-auto"
              />
            </Section>
            <Heading className="text-2xl font-normal text-center p-0 my-8 mx-0">
              Welcome to <strong>{company}</strong>, {username}!
            </Heading>
            <Text className="text-start text-base">Hello {username},</Text>
            <Text className="text-start text-base leading-relaxed">
              We're excited to have you onboard at <strong>{company}</strong>.
              We hope you enjoy your journey with us. If you have any questions
              or need assistance, feel free to reach out to any of the following
              gophers:
            </Text>
            <div className="text-start text-base leading-relaxed">
              <ul className="pl-3">
                {gophers.map((gopher) => (
                  <li>{gopher}</li>
                ))}
              </ul>
            </div>
            <Section className="text-center mt-[32px] mb-[32px]">
              <Button
                className="py-2.5 px-5 bg-white rounded-md text-base font-semibold no-underline text-center bg-black text-white"
                href={`https://go.dev`}
              >
                Get Started
              </Button>
            </Section>
            <Text className="text-start text-base text-white">
              Cheers,
              <br />
              The {company} Team
            </Text>
          </Container>
        </Body>
      </Tailwind>
    </Html>
  );
};

export default WelcomeEmail;
The code snippet above is the React Email template that you'll use in this article. To preview it, navigate to the terminal of the _emails root directory and run npm run dev . Use your web browser to visit the preview URL displayed on the terminal. Click on the "welcome" link on the left sidebar and you should see a UI similar to the one in the screenshot below:
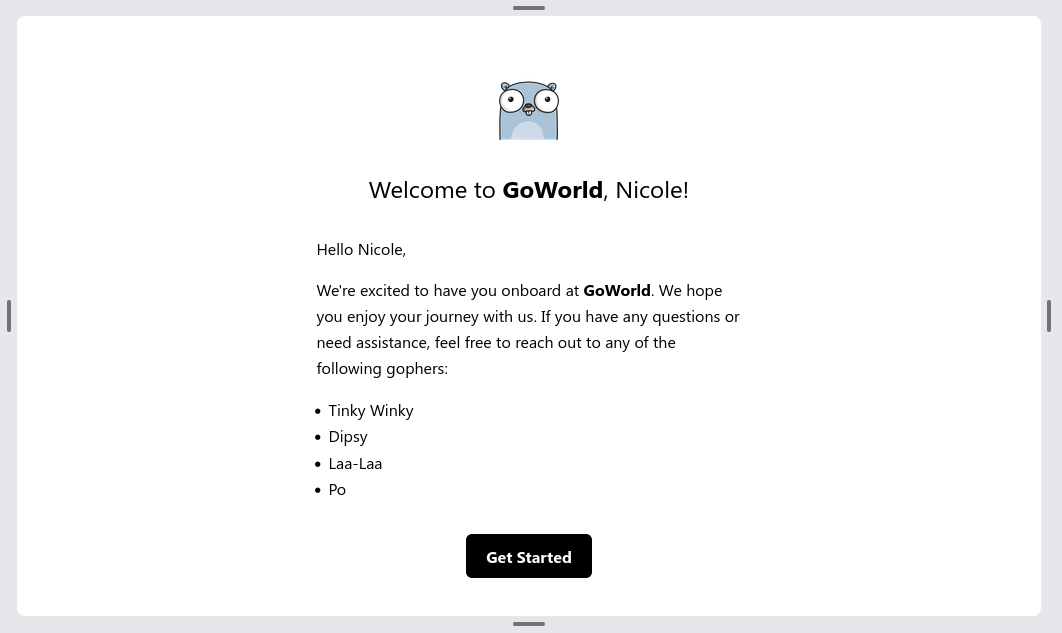
In the UI above, React Email renders the email with the default values supplied to the welcome email template.
Stop the server by clicking on the terminal that runs it by pressing CTRL + C. Build the HTML output of the src directory and export it by running npm run export in the terminal of the _emails root directory. This creates a templates directory within the mailer directory where the exported HTML files are stored. In the templates directory, you'll see a welcome.html file – the HTML output from welcome.tsx.
To see the current status of the project, visit freeCodeCamp-go-react-email/03-create-react-email-template.
Set Up Go Templates from HTML Files
You have created a React Email template, previewed it, built it, and exported it as an HTML file. In this section, you'll update the React Email template to use the delimiters you set and not React's curly braces. You'll also create a Go template from the HTML file.
To get started, replace the content of welcome.tsx with the code snippet below to to use (( and )) as delimiters and remove TypeScript types:
import {
  Body,
  Button,
  Container,
  Head,
  Heading,
  Html,
  Img,
  Preview,
  Section,
  Tailwind,
  Text,
} from "react-email";

const WelcomeEmail = () => {
  const previewText = `Welcome to ((.Company)), ((.Username))!`;

  return (
    <Html>
      <Head />
      <Preview>{previewText}</Preview>
      <Tailwind>
        <Body className="m-auto font-sans">
          <Container className="mb-10 mx-auto p-5 max-w-[465px]">
            <Section className="mt-10">
              <Img
                src={`https://storage.googleapis.com/gopherizeme.appspot.com/gophers/69428e5ec867c34bb4a49d5a063fdbc2a6633aed.png`}
                width="80"
                height="80"
                alt="Gopher"
                className="my-0 mx-auto"
              />
            </Section>
            <Heading className="text-2xl font-normal text-center p-0 my-8 mx-0">
              Welcome to <strong>((.Company))</strong>, ((.Username))!
            </Heading>
            <Text className="text-start text-base">Hello ((.Username)),</Text>
            <Text className="text-start text-base leading-relaxed">
              We're excited to have you onboard at <strong>((.Company))</strong>
              . We hope you enjoy your journey with us. If you have any
              questions or need assistance, feel free to reach out to any of the
              following Gophers:
            </Text>
            <div className="text-start text-base leading-relaxed">
              <ul className="pl-3">
                ((range .Gophers))
                <li>((.))</li>
                ((end))
              </ul>
            </div>
            <Section className="text-center mt-[32px] mb-[32px]">
              <Button
                className="py-2.5 px-5 bg-white rounded-md border text-black text-base font-semibold no-underline text-center"
                href={`https://go.dev`}
              >
                Get Started
              </Button>
            </Section>

            <Text className="text-start text-base">
              Cheers,
              <br />
              The ((.Company)), Team
            </Text>
          </Container>
        </Body>
      </Tailwind>
    </Html>
  );
};

export default WelcomeEmail;
Run npm run export in the root terminal of the _emails directory to build and export this version of the React Email template to HTML. The HTML generated will contain Go template annotations that will become actions when parsed by Go to form a Go HTML template.
In the mailer directory, create a file named fs.go. The code in the file will be used to embed the files in the templates directory for use in the Go application. Copy and paste the content of the snippet below into fs.go:
package mailer

import (
	"embed"
	"io/fs"
)

//go:embed templates/*
var embedded embed.FS
var templateFS, _ = fs.Sub(embedded, "templates")
//go:embed templates/* tells the Go compiler to embed files from the current directory (mailer) into the compiled binary of the Go application. You need this to access the HTML template files from the Go application. templateFS will be used to access the files in the templates subdirectory.
Create another file in the mailer directory and name it mailer.go. mailer.go will contain code used to parse HTML files to make Go HTML templates and also send emails. Copy the content of the code snippet below into mailer.go:
package mailer

import (
	"html/template"
	"io"
)

const (
	welcomeMailKey = "welcome_mail"
)

func setUpTemplates() (map[string]*template.Template, error) {
	templates := make(map[string]*template.Template)

	tmpl := template.New("welcome.html").Delims("((", "))")
	welcomeEmailTmpl, err := tmpl.ParseFS(templateFS, "welcome.html")
	if err != nil {
		return nil, err
	}

	templates[welcomeMailKey] = welcomeEmailTmpl

	return templates, nil
}

type Mailer struct {
	templates map[string]*template.Template
}

// NewMailer creates a new mailer
func NewMailer() (*Mailer, error) {
	tpls, err := setUpTemplates()
	if err != nil {
		return nil, err
	}

	return &Mailer{
		templates: tpls,
	}, nil
}

type WelcomEmailData struct {
	Username string
	Company  string
	Gophers  []string
}

func (mailer *Mailer) WriteWelcomeMail(w io.Writer, data WelcomEmailData) error {
	tmpl := mailer.templates[welcomeMailKey]
	err := tmpl.Execute(w, data)

	return err
}
In the code snippet above:
setUpTemplatescreates a template object,tmpl, and sets its delimiters.tmplparseswelcome.htmlto convert it to a Go template and stores the template withwelcomeEmailTmplas its identifier. After that,welcomeEmailTmplis added to thetemplatesmap withwelcomeMailKeyas its key andtemplatesis returned.NewMailercreates and returns aMailerobject which holds the templates map and methods to work with the mail templates.WriteWelcomeMail is a method on
Mailerthat's used to execute the welcome email template with real data.
To view the current status of the codebase at this point, visit freeCodeCamp-go-react-email/04-create-golang-template.
Render the Dynamic Email in the Browser
In this section, you'll create a simple web server to view the rendered email template containing the dynamic values passed to it.
Replace the content of main.go with the code snippet below:
package main

import (
	"fmt"
	"net/http"
	"os"

	pkgMailer "github.com/orimdominic/freeCodeCamp-go-react-email/mailer"
)

func main() {
	mailer, err := pkgMailer.NewMailer()
	if err != nil {
		fmt.Fprint(os.Stderr, err)
		os.Exit(1)
	}

	http.HandleFunc("/mail", func(w http.ResponseWriter, r *http.Request) {
		username := r.URL.Query().Get("username")
		company := r.URL.Query().Get("company")
		gophers := []string{"Tinky Winky", "Dipsy", "Laa-Laa", "Po"}

		err := mailer.WriteWelcomeMail(w, pkgMailer.WelcomEmailData{
			Username: username,
			Company:  company,
			Gophers:  gophers,
		})
		if err != nil {
			http.Error(w, err.Error(), http.StatusInternalServerError)
			return
		}
	})

	port := ":8888"
	err = http.ListenAndServe(port, nil)
	if err != nil {
		fmt.Fprint(os.Stderr, err)
		os.Exit(1)
	}
}
The code snippet above first creates a mailer object using the NewMailer function from mailer.go. After the error handling, it creates a simple web server running on port 8888 with a GET /mail route.
The GET /mail route accepts two query parameters: username and company, which will be used as the dynamic data for the email. The result of executing the template with WriteWelcomeMail is written as an HTML response on the browser. You'll use this route to test the functionality of the mailer package.
Before you start the server, you should build and export the React Email templates so that your HTML files always have the most recent changes from React Email templates. Instead of navigating between different directories to build, export and run the server, you can use a Makefile.
Navigate to the terminal of the root directory of the project and create a file called Makefile. Copy and paste the content of the code snippet below into it:
run: email-build
	go run cmd/main.go

email-build: mailer/_emails
	npm --prefix mailer/_emails run export
The run script of the Makefile above builds and exports the React Email templates as HTML to the mailer/templates directory and then starts the Go application. Ensure that Makefile uses hard tabs, not spaces for indentation.
Run make run in the terminal of the root directory of the project and visit http://localhost:8888/mail?username=Nicole&company=GoWorld in the browser. You'll see the email rendered on the browser UI.
Replace the values of username and company in the URL to test the email with different values.
With this setup, you can integrate the result of executing the template with your mail client and the email recipient will see the email as it's displayed in the browser.
To view the current status of the codebase at this point, visit freeCodeCamp-go-react-email/05-render-dynamic-email.
Send and Test Email with go-mail and MailHog
In the previous section, you supplied data to execute your template, but it was rendered in the browser, not an email client. In this section, you'll use go-mail to send the email and MailHog to intercept and view it.
This section is optional. If you don't have MailHog installed locally, you'll need Docker Compose to set it up for this project. Make sure Docker Compose is installed on your computer before proceeding.
In your terminal, navigate to the root directory of the project and run go get github.com/wneessen/go-mail to install go-mail. Create a compose.yml file in the root directory of the project and paste the contents of the code snippet below into it:
services:
  mailhog:
    image: mailhog/mailhog
    restart: no
    logging:
      driver: "none" # disable saving logs
    ports:
      - 1025:1025 # smtp server
      - 8025:8025 # web ui
In your terminal, navigate to the project's root directory and run docker compose up to pull and start the MailHog SMTP server. MailHog listens for emails on port 1025 and exposes a web UI at http://localhost:8025 where you can view intercepted emails. Depending on your internet connection, the initial image pull may take a few minutes.
Replace mailer.go with the content of the code snippet below:
package mailer

import (
	"html/template"
	"io"

	"github.com/wneessen/go-mail"
)

const (
	welcomeMailKey = "welcome_mail"
    sender = "noreply@localhost.com"
)

func setUpTemplates() (map[string]*template.Template, error) {
	templates := make(map[string]*template.Template)

	tmpl := template.New("welcome.html").Delims("((", "))")
	welcomeEmailTmpl, err := tmpl.ParseFS(templateFS, "welcome.html")
	if err != nil {
		return nil, err
	}

	templates[welcomeMailKey] = welcomeEmailTmpl

	return templates, nil
}

type Mailer struct {
	client    *mail.Client
	templates map[string]*template.Template
}

// NewMailer creates a new mailer
func NewMailer() (*Mailer, error) {
	tpls, err := setUpTemplates()
	if err != nil {
		return nil, err
	}

	c, err := mail.NewClient(
		"localhost",
		mail.WithPort(1025),
		mail.WithTLSPolicy(mail.NoTLS),
	)

	if err != nil {
		return nil, err
	}

	return &Mailer{
		client:    c,
		templates: tpls,
	}, nil
}

type WelcomEmailData struct {
	Username string
	Company  string
	Gophers  []string
}

func (mailer *Mailer) WriteWelcomeMail(w io.Writer, data WelcomEmailData) error {
	tmpl := mailer.templates[welcomeMailKey]
	err := tmpl.Execute(w, data)

	return err
}

func (mailer *Mailer) SendWelcomeMail(to string, data WelcomEmailData) error {
	m := mail.NewMsg()
	m.From(sender)
	m.To(to)
	m.Subject("Welcome to " + data.Company)
	m.SetBodyHTMLTemplate(mailer.templates[welcomeMailKey], data)

	err := mailer.client.DialAndSend(m)
	return err
}
The new changes to mailer.go include:
An import of the go-mail
The creation of a
senderconstant which represents the email of the senderThe creation of a mail client with go-mail
The creation of a
SendWelcomeMailmethod on themailerstruct which creates an email withwelcomeEmailTmpl, executes it, and sends it to a receiver.
In main.go, update the GET /mail route to use SendWelcomeMail instead of WriteWelcomeMail. You can use any email address you want. The snippet below uses fcc@go.dev:
		err := mailer.SendWelcomeMail("fcc@go.dev", pkgMailer.WelcomEmailData{
			Username: username,
			Company:  company,
			Gophers:  gophers,
		})
		if err != nil {
			http.Error(w, err.Error(), http.StatusInternalServerError)
			return
		}

		fmt.Fprint(w, "Email sent")
Ensure that the mail server is running by visiting http://localhost:8025 in your web browser. In another terminal, from the root directory of the project, run make run to start the server. Test the functionality of the route by visiting http://localhost:8888/mail?username=Nicole&company=GoWorld once again. Next, check the email server by visiting http://localhost:8025. You should see a UI similar to the one in the screenshot below:
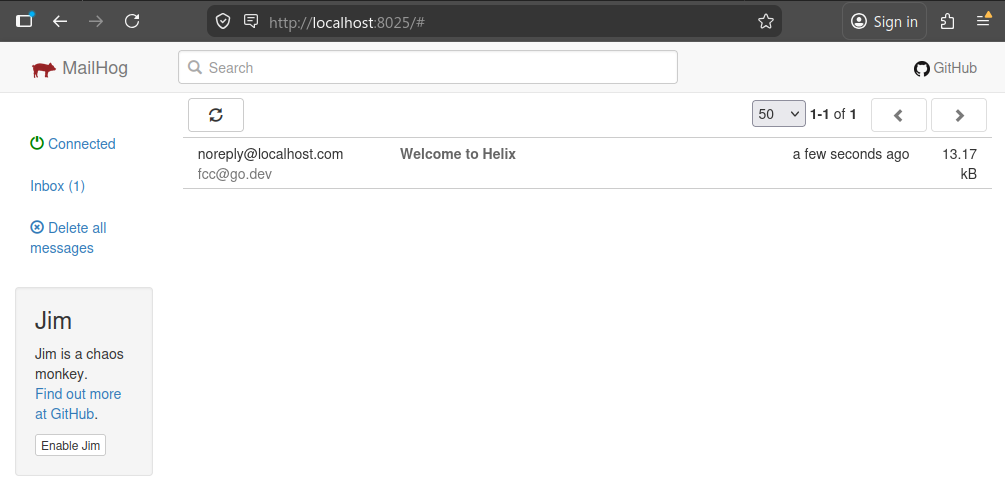
Click on "Welcome to Helix" to view the email.
To view the current status of the codebase at this point, visit freeCodeCamp-go-react-email/06-send-email.
Conclusion
By following along with this tutorial, you have:
Learned how to create Go email templates from React Email templates
Learned how to use Makefiles to run custom scripts
Previewed your email in the browser and tested it using MailHog
You can now skip the hassle of writing raw HTML email tables or learning a new templating language. With React Email and Go templates, you have a cleaner, more developer-friendly way to build and send beautiful emails.
Learn to code for free. freeCodeCamp's open source curriculum has helped more than 40,000 people get jobs as developers. Get started