








Linux版本: Rocky Linux release 9.5 (Blue Onyx)
打开MySQL-Community-Server官方下载页面:https://downloads.mysql.com/archives/community/
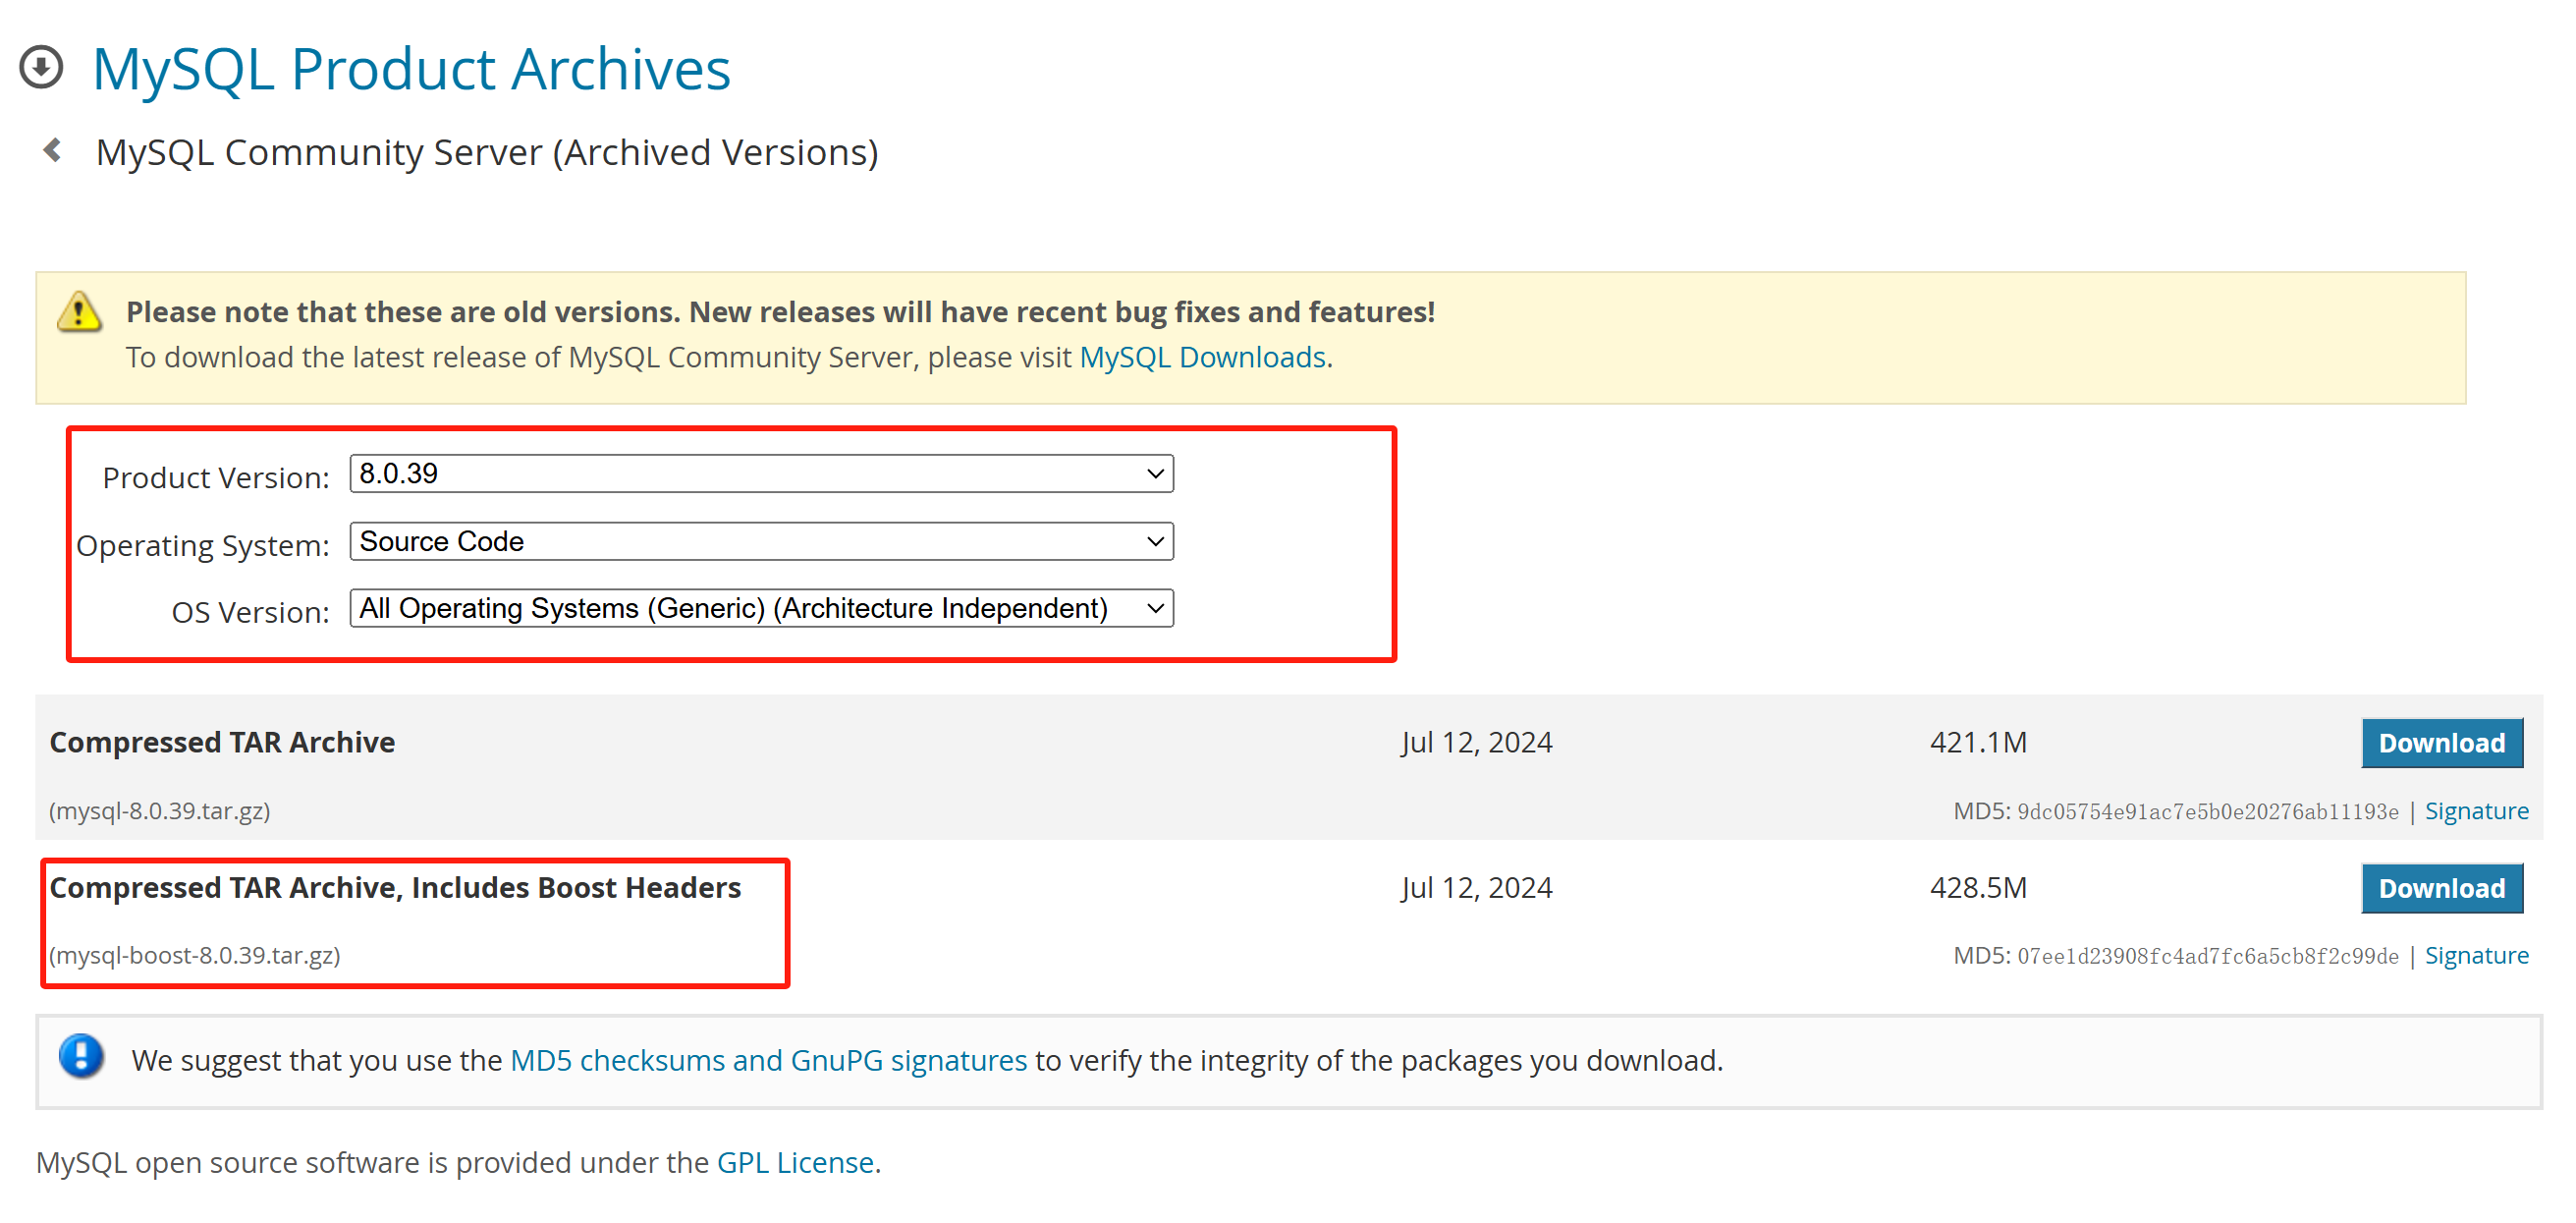
筛选出要下载的版本,Product Version选择8.0.39,Operating System选择Source Code,OS Version选择All Operating Systems,然后选择最后一个自带boost的MySQL源码包All Operating Systems (Generic) (Architecture Independent), Compressed TAR Archive
Includes Boost Headers (mysql-boost-8.0.39.tar.gz),进行下载,并将下载到的源码包先放到服务器的/opt目录下。
下载链接:
mysql-boost-8.0.39.tar.gz
https://downloads.mysql.com/archives/get/p/23/file/mysql-boost-8.0.39.tar.gz
解压tar包,得到文件夹mysql-8.0.39,里面就是MySQL源码和一些构建信息
[root@localhost opt]# cd mysql-8.0.39/
[root@localhost mysql-8.0.39]# ll
total 684
-rw-r--r--.  1 7161 31415  94660 Jul 13 03:15 CMakeLists.txt
drwxr-xr-x.  2 7161 31415     65 Jul 13 03:43 Docs
-rw-r--r--.  1 7161 31415   5425 Jul 13 03:15 Doxyfile-ignored
-rw-r--r--.  1 7161 31415 123326 Jul 13 03:15 Doxyfile.in
-rw-r--r--.  1 7161 31415    333 Jul 13 03:15 INSTALL
-rw-r--r--.  1 7161 31415 282186 Jul 13 03:15 LICENSE
-rw-r--r--.  1 7161 31415    118 Jul 13 03:15 MYSQL_VERSION
-rw-r--r--.  1 7161 31415    666 Jul 13 03:15 README
drwxr-xr-x.  3 7161 31415     26 Jul 13 03:45 boost
drwxr-xr-x. 10 7161 31415   4096 Jul 13 03:43 client
drwxr-xr-x.  4 7161 31415   4096 Jul 13 03:43 cmake
drwxr-xr-x. 16 7161 31415   4096 Jul 13 03:43 components
-rw-r--r--.  1 7161 31415  10843 Jul 13 03:15 config.h.cmake
-rw-r--r--.  1 7161 31415  23642 Jul 13 03:15 configure.cmake
drwxr-xr-x.  3 7161 31415    124 Jul 13 03:43 doxygen_resources
drwxr-xr-x. 19 7161 31415   4096 Jul 13 03:43 extra
drwxr-xr-x.  4 7161 31415   8192 Jul 13 03:43 include
drwxr-xr-x.  5 7161 31415    112 Jul 13 03:43 libbinlogevents
drwxr-xr-x.  3 7161 31415     39 Jul 13 03:43 libbinlogstandalone
drwxr-xr-x.  4 7161 31415     54 Jul 13 03:43 libchangestreams
drwxr-xr-x.  7 7161 31415   4096 Jul 13 03:43 libmysql
drwxr-xr-x.  2 7161 31415   4096 Jul 13 03:43 libservices
drwxr-xr-x.  2 7161 31415   4096 Jul 13 03:45 man
drwxr-xr-x. 10 7161 31415   4096 Jul 13 03:43 mysql-test
drwxr-xr-x.  2 7161 31415   4096 Jul 13 03:43 mysys
drwxr-xr-x. 10 7161 31415    131 Jul 13 03:43 packaging
drwxr-xr-x. 25 7161 31415   4096 Jul 13 03:43 plugin
drwxr-xr-x.  6 7161 31415    155 Jul 13 03:43 router
-rw-r--r--.  1 7161 31415   6268 Jul 13 03:15 run_doxygen.cmake
drwxr-xr-x.  4 7161 31415   4096 Jul 13 03:43 scripts
drwxr-xr-x.  3 7161 31415    155 Jul 13 03:43 share
drwxr-xr-x. 24 7161 31415  24576 Jul 13 03:44 sql
drwxr-xr-x.  3 7161 31415   4096 Jul 13 03:43 sql-common
drwxr-xr-x. 14 7161 31415   4096 Jul 13 03:45 storage
drwxr-xr-x.  3 7161 31415   4096 Jul 13 03:43 strings
drwxr-xr-x.  2 7161 31415   4096 Jul 13 03:43 support-files
drwxr-xr-x.  2 7161 31415    101 Jul 13 03:43 testclients
drwxr-xr-x.  5 7161 31415     70 Jul 13 03:43 unittest
drwxr-xr-x.  2 7161 31415   4096 Jul 13 03:43 utilities
drwxr-xr-x. 2 7161 31415 4096 Jul 13 03:43 vio和编译MySQl5.7一样,进入boost/文件夹下,查看boost是哪个版本,一会编译时会用到。
[root@localhost mysql-8.0.39]# cd boost/
[root@localhost boost]# ll
total 0
drwxr-xr-x. 3 7161 31415 19 Jul 13 03:45 boost_1_77_01.新添加一个用户: mysql
useradd mysql2.安装编译所需依赖
dnf install -y make cmake gcc gcc-c++ ncurses-devel openssl-devel libtirpc还有些不能通过yum安装的软件包要手动下载安装
yum install -y wget

wget https://dl.rockylinux.org/pub/rocky/9/devel/x86_64/os/Packages/l/libtirpc-devel-1.3.3-9.el9.x86_64.rpm

wget https://dl.rockylinux.org/pub/rocky/9/AppStream/x86_64/os/Packages/r/rpcgen-1.4-9.el9.x86_64.rpm

rpm -ivh libtirpc-devel-1.3.3-9.el9.x86_64.rpm

rpm -ivh rpcgen-1.4-9.el9.x86_64.rpm然后再安装MySQL8.0.39需要的gcc工具集,安装前,需要升级软件包libsemanage为高版本,同样需要下载软件包到本地,然后rpm -Uvh更新
wget https://dl.rockylinux.org/pub/rocky/9/BaseOS/x86_64/os/Packages/l/libsemanage-3.6-2.1.el9_5.x86_64.rpm

rpm -Uvh libsemanage-3.6-2.1.el9_5.x86_64.rpm
然后执行安装gcc工具集命令
yum install gcc-toolset-12-gcc gcc-toolset-12-gcc-c++ gcc-toolset-12-binutils gcc-toolset-12-annobin-annocheck gcc-toolset-12-annobin-plugin-gcc3./usr/local/下必须新建文件夹mysql
mkdir /usr/local/mysql1.在源码目录/opt/mysql-8.0.39下执行cmake命令,进行编译前的检查和配置,使用CMake配置和生成MySQL源码编译所需的构建系统文件,安装MySQL到/usr/local/mysql目录下,-DWITH_BOOST=的路径根据源码包内自带boost的版本而定,默认端口3306,数据路径/usr/local/mysql/data,字符集utf8mb4
cmake \
-DCMAKE_INSTALL_PREFIX=/usr/local/mysql \
-DINSTALL_DATADIR=/usr/local/mysql/data \
-DMYSQL_USER=mysql \
-DMYSQL_UNIX_ADDR=/usr/local/mysql/mysqld.sock \
-DDEFAULT_CHARSET=utf8mb4 \
-DDEFAULT_COLLATION=utf8mb4_general_ci \
-DWITH_INNOBASE_STORAGE_ENGINE=1 \
-DWITH_EMBEDDED_SERVER=1 \
-DFORCE_INSOURCE_BUILD=1 \
-DWITH_MYISAM_STORAGE_ENGINE=1 \
-DENABLED_LOCAL_INFILE=1 \
-DEXTRA_CHARSETS=all \
-DWITH_BOOST=boost/boost_1_77_0/2.cmake命令执行成功后,执行以下make命令开始编译安装,-j 2是同时开启两个线程编译,加速编译
make -j 2 && make install执行后,开始编译,不断输出日志,编译的过程很耗时间,需要等待很久,编译完成后,可以在/usr/local/mysql目录下看到编译好的MySQL
[root@localhost mysql-8.0.39]# cd /usr/local/mysql/
[root@localhost mysql]# ll
total 704
-rw-r--r--.  1 root root 282186 Jul 13 03:15 LICENSE
-rw-r--r--.  1 root root 282186 Jul 13 03:15 LICENSE-test
-rw-r--r--.  1 root root 115948 Jul 13 03:15 LICENSE.router
-rw-r--r--.  1 root root    666 Jul 13 03:15 README
-rw-r--r--.  1 root root    666 Jul 13 03:15 README-test
-rw-r--r--.  1 root root    679 Jul 13 03:15 README.router
drwxr-xr-x.  2 root root   4096 Dec 21 18:08 bin
drwxr-xr-x.  2 root root     69 Dec 21 18:08 docs
drwxr-xr-x.  3 root root   4096 Dec 21 18:08 include
drwxr-xr-x.  6 root root   4096 Dec 21 18:08 lib
drwxr-xr-x.  4 root root     30 Dec 21 18:08 man
drwxr-xr-x. 10 root root   4096 Dec 21 18:08 mysql-test
-rw-r--r--.  1 root root   1672 Dec 21 13:33 mysqlrouter-log-rotate
drwxrwxr-x.  2 root root      6 Dec 21 18:08 run
drwxr-xr-x. 28 root root   4096 Dec 21 18:08 share
drwxr-xr-x.  2 root root     77 Dec 21 18:08 support-files
drwxr-xr-x. 3 root root 17 Dec 21 18:08 var1.在/usr/local/mysql创建一个mysql配置文件,并写入字符集相关配置进去。
vi /usr/local/mysql/my.cnf[mysqld]
port = 3306
character-set-server=utf8mb4
default_authentication_plugin=mysql_native_password
[mysql]
default-character-set=utf8mb42.在/usr/local/mysql下执行命令初始化MySQL数据库
./bin/mysqld  \
--defaults-file=/usr/local/mysql/my.cnf  \
--user=mysql \
--basedir=/usr/local/mysql  \
--datadir=/usr/local/mysql/data  \
--initialize-insecure3.在/usr/local/mysql目录执行以下命令,将文件所有者设置为之前新建的mysql用户
chown -R mysql:mysql ./在/usr/local/mysql下执行启动脚本文件启动数据库
./support-files/mysql.server start关闭
./support-files/mysql.server stop重启
./support-files/mysql.server restart登录数据库测试,切换到目录/usr/local/mysql,执行./bin/mysql -uroot -p命令登录数据库,root密码默认是空
[root@localhost mysql]# ./bin/mysql -uroot -p
Enter password:
Welcome to the MySQL monitor.  Commands end with ; or \g.
Your MySQL connection id is 8
Server version: 8.0.39 Source distribution

Copyright (c) 2000, 2024, Oracle and/or its affiliates.

Oracle is a registered trademark of Oracle Corporation and/or its
affiliates. Other names may be trademarks of their respective
owners.

Type 'help;' or '\h' for help. Type '\c' to clear the current input statement.

mysql> show databases;
+--------------------+
| Database           |
+--------------------+
| information_schema |
| mysql              |
| performance_schema |
| sys                |
+--------------------+
4 rows in set (0.01 sec)
修改默认密码
mysql> ALTER USER 'root'@'localhost' IDENTIFIED WITH mysql_native_password BY 'lzj';修改后要刷新权限
mysql> FLUSH PRIVILEGES;刷新权限后退出使用新密码再次登录,此时已经可以正常操作数据库了。
[root@localhost mysql]# ./bin/mysql -uroot -p
Enter password:
Welcome to the MySQL monitor.  Commands end with ; or \g.
Your MySQL connection id is 9
Server version: 8.0.39 Source distribution

Copyright (c) 2000, 2024, Oracle and/or its affiliates.

Oracle is a registered trademark of Oracle Corporation and/or its
affiliates. Other names may be trademarks of their respective
owners.

Type 'help;' or '\h' for help. Type '\c' to clear the current input statement.

mysql> show databases;
+--------------------+
| Database           |
+--------------------+
| information_schema |
| mysql              |
| performance_schema |
| sys                |
+--------------------+
4 rows in set (0.01 sec)

mysql> select version();
+-----------+
| version() |
+-----------+
| 8.0.39    |
+-----------+
1 row in set (0.00 sec)

mysql> SHOW VARIABLES LIKE 'character_set%';
+--------------------------+----------------------------------+
| Variable_name            | Value                            |
+--------------------------+----------------------------------+
| character_set_client     | utf8mb4                          |
| character_set_connection | utf8mb4                          |
| character_set_database   | utf8mb4                          |
| character_set_filesystem | binary                           |
| character_set_results    | utf8mb4                          |
| character_set_server     | utf8mb4                          |
| character_set_system     | utf8mb3                          |
| character_sets_dir       | /usr/local/mysql/share/charsets/ |
+--------------------------+----------------------------------+
8 rows in set (0.02 sec)
至此,就完成了在RockyLinux9上面安装和运行MySQL8
此内容由惯性聚合(RSS阅读器)自动聚合整理,仅供阅读参考。 原文来自 — 版权归原作者所有。