








{(MainTitle)}
{(MainTitleEnd)} {(PostTitle)}【小记】Matplotlib 中设置自定义中文字体的正确姿势{(PostTitleEnd)} {(PostDate)}20241123{(PostDateEnd)} {(PostContent)} 这篇文章也发布到了[咱的博客园站](https://www.cnblogs.com/somebottle/p/18564830/matplotlib_with_cjk_chars)。 最近做实验涉及到用 Matplotlib 绘制图表,我希望相同的代码能不仅在本地运行,且还能在 Google Colab, Binder 这些线上平台运行。 问题就来了,为了在各个平台上都能绘制中文字符,该如何在 Matplotlib 中使用自定义的字体?(毕竟国外的一些平台不会预装支持中文字符的字体) <bblock style='display:none'> { "src":"https://api.xbottle.top/ne/url/2600726633", "cover":"https://api.xbottle.top/ne/cover/2600726633", "title":"若者のすべて", "artist":"suis", "loop":"false", "float":"right" } </bblock> 网上查了一下,很多文章都是复制粘贴来的,十分误导人,遂决定写下此笔记。  ## 1. 开门见山 ```python import matplotlib.pyplot as plt import matplotlib.font_manager as fm # 自定义字体(OTF, TTF)的路径 FONT_PATH = './SourceHanSerifCN-Regular.otf' # 💡 利用 fontManager 的方法添加字体到内部的字体列表中 fm.fontManager.addfont(FONT_PATH) # 获得字体属性对象 font_props=fm.FontProperties(fname=FONT_PATH) # 获得字体名 font_name=font_props.get_name() # 优先使用自定义的字体,不满足的则 fallback 到 sans-serif plt.rcParams['font.family']=[font_name, 'sans-serif'] # (可选)还可以单独设置数学公式字体,这里用 matplotlib 默认的字体 plt.rcParams["mathtext.fontset"]='cm' # unicode_minus 即采用 Unicode 中的 '−' 字符(U+2212),而不是 ASCII 中的 '-' 字符(U+002D) # 如果你用的字体没有 U+2212 对应的字形,就需要把这一项设定为 False,让减号用 ASCII 编码。 # plt.rcParams['axes.unicode_minus'] = False ``` 这样配置后,Matplotlib 就可以用自定义字体来渲染文本了。 * 在线运行测试代码:[Binder](https://mybinder.org/v2/gist/SomeBottle/f8ed826af270d665d2e55e68fef4dda2/HEAD?labpath=custom_matplotlib_fonts.ipynb) * `unicode_minus` 选项的文档:[Unicode minus — Matplotlib 3.9.2 documentation](https://matplotlib.org/3.9.2/gallery/text_labels_and_annotations/unicode_minus.html) * 测试采用的 Matplotlib 版本:`3.8.0`, `3.9.2` ## 2. 顺藤摸瓜 ### 2.1. 让 Matplotlib 能找到字体 在渲染图像时,如果涉及到文字部分,Matplotlib 会在内部调用字体管理模块 `FontManager` 的方法 `matplotlib.font_manager.FontManager.findfont` 来找到合适的字体**对应的路径**。 * `findfont` 源码:[matplotlib.font_manager.py#L1238](https://github.com/matplotlib/matplotlib/blob/a254b687df97cda8c6affa37a1dfcf213f8e6c3a/lib/matplotlib/font_manager.py#L1238) 调用 `findfont` 时实际上是调用了同模块的 `_findfont_cached` 方法,从这个方法的源码中可以看到,查找 TTF/OTF 字体时,依赖于 `FontManager` 对象本身的一个列表 `ttflist` ([#L1417](https://github.com/matplotlib/matplotlib/blob/a254b687df97cda8c6affa37a1dfcf213f8e6c3a/lib/matplotlib/font_manager.py#L1417))。 在 `FontManager` 对象初始化的时候,程序实际上是扫描了所有的系统字体,把它们添加到 `ttflist` 中,采用了 `FontManager.addfont` 方法([#L1048](https://github.com/matplotlib/matplotlib/blob/a254b687df97cda8c6affa37a1dfcf213f8e6c3a/lib/matplotlib/font_manager.py#L1048))。 * 相关文档:[How Matplotlib selects fonts — Matplotlib 3.9.2 documentation](https://matplotlib.org/stable/users/explain/text/fonts.html#how-matplotlib-selects-fonts) 💡 因此为了让 Matplotlib 能找到我们自定义的中文字体,要做的事就是调用 `FontManager.addfont` 这个方法,其把自定义 TTF/OTF 字体路径包装为 `FontEntry` 对象后**添加到 `ttflist` 这个列表中**([#L1057](https://github.com/matplotlib/matplotlib/blob/a254b687df97cda8c6affa37a1dfcf213f8e6c3a/lib/matplotlib/font_manager.py#L1057))。 ```python fm.fontManager.addfont(FONT_PATH) ``` ### 2.2. 获得字体族名 在用字体属性对象 `FontProperties` 包装了自定义字体后,可以用其 `get_name` 方法来获得字体名: ```python # 获得字体属性对象 font_props=fm.FontProperties(fname=FONT_PATH) # 获得字体名 font_name=font_props.get_name() ``` `get_name` ([#L672](https://github.com/matplotlib/matplotlib/blob/a254b687df97cda8c6affa37a1dfcf213f8e6c3a/lib/matplotlib/font_manager.py#L672))的方法调用链如下: ```text FontProperties.get_name -> FontManager.get_font -> FontManager.find_font -> FontManager._findfont_cached ``` 因为已经通过 `FontProperties` 的 `fname` 参数指定了字体路径,`FontManager.find_font` 会直接返回这个路径给 `get_font` ([#L1531](https://github.com/matplotlib/matplotlib/blob/a254b687df97cda8c6affa37a1dfcf213f8e6c3a/lib/matplotlib/font_manager.py#L1531))方法,`get_font` 则将字体载入后取得字体的 `family_name`。 因此上面代码片段中 `font_name` 存储的是自定义字体的 family name(这里是 `Source Han Serif CN`)。 ### 2.3. 修改 Matplotlib 的字体配置 ```python # 设定字体 family name plt.rcParams['font.family']=[font_name, 'sans-serif'] # (可选)单独设定数学字体 plt.rcParams["mathtext.fontset"]='cm' ``` > 注:`plt.rcParams` 和 `matplotlib.rcParams` 是一样的,前者只不过是在 `pyplot` 模块内导入了 `rcParams`。 这里修改了 Matplotlib 的运行时配置(Runtime Configuration,即 rc)中的相关配置,相关文档已有说明: * [Configuring the font family — Matplotlib 3.9.2 documentation](https://matplotlib.org/3.9.2/gallery/text_labels_and_annotations/font_family_rc.html) ## 3. 拓展:字体回退(Fallback) Matplotlib 支持字体回退,借此我可以让中文和英文字符在被渲染时分别基于不同的字体: ```python # 英文字符用 Monospace,中文字符用自定义字体 plt.rcParams['font.family']=['monospace', font_name, 'sans-serif'] fig, axe = plt.subplots(figsize=(1, 1)) axe.axis("off") axe.text(0, 0.5, "I 有 some 水 in that 瓶子.") ``` 遇到 `monospace` 不支持的 CJK 字符时,会回退(fallback)到第二个字体,即我们自定义的中文字体。字体渲染效果如下: 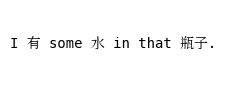 * 相关文档:[Font fallback — Matplotlib 3.9.2 documentation](https://matplotlib.org/stable/users/explain/text/fonts.html#font-fallback) ### 3.1. 存在的问题 写这篇笔记的过程中我意外发现,文本中**包含有数学公式时**字体无法正常回退: ```python axe.text(0, 0.5, "I 有 some 水 in that $bottle$. 哦看哪,这里有一个数学公式:$sin(x)$") ``` 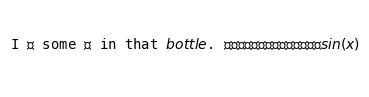 注意,这里英文字符仍然是用 `monospace` 字体渲染的,但是遇到中文字符时却没有回退,因而找不到对应的字形。 火速去 Github 提了个 issue,目前已经被确认为 BUG。期待维护者们能在后续版本中修复,加油! * https://github.com/matplotlib/matplotlib/issues/29173 ### 3.2. 权宜之计 既然没法回退,那么只好把我们自定义的字体放在首个位置上了: ```python # 中文和英文字符都基于自定义字体来渲染 plt.rcParams['font.family']=[font_name, 'sans-serif'] ``` 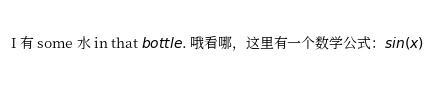 ## 4. 写在最后 以上的方式可以直接让当前运行环境中的 Matplotlib 支持中文字符的渲染。 如果你要为少数几条文本**单独配置字体**,可以在相关的绘制语句上配置相应参数: ```python font_props=fm.FontProperties(fname=FONT_PATH) # fontproperties 配置后会覆盖默认的配置 plt.text(0, 0.5, "为什么是 SomeBottle 而不是 SomeBottles ?", fontproperties=font_props) ``` ----- 那么这篇笔记就是这样,咱们下次再会~ (∠・ω< )⌒★ <script>/* bblock.s(); */</script> {(PostContentEnd)} {(PostTag)}学习,小记,Python,数据可视化{(PostTagEnd)} {(PostID)}298{(PostIDEnd)} {(PostCover)}none{(PostCoverEnd)} {(PubTime)}1732355348112{(PubTimeEnd)} {(EditTime)}1732376030914{(EditTimeEnd)}
此内容由惯性聚合(RSS阅读器)自动聚合整理,仅供阅读参考。 原文来自 — 版权归原作者所有。