



This blog was originally published on Descope.
Creating cross-platform applications has become much easier with frameworks like Flet. Flet allows developers to build modern web, desktop, and mobile apps using Python. Its simplicity and flexibility help developers focus on creating great user experiences without having to worry about platform-specific complexities.
However, as your application grows, so does the need to secure it. Adding secure authentication to your application helps to protect sensitive data by ensuring that only authorized users can access it. Descope is a modern authentication and user management platform that simplifies the integration of secure authentication features into your application. By providing out-of-the-box support for OAuth 2.0 and OpenID Connect (OIDC), Descope offers a reliable solution for implementing authentication in your Flet app.
In this guide, you will learn how to integrate Descope authentication and single sign-on (SSO) into a Flet application. You'll learn how to add basic authentication to your Flet app using Descope magic links and social login. You'll also configure Descope to use Okta as the identity provider (IdP), enabling SSO for your Flet app.
Why is adding SSO important for these types of apps?
SSO is essential for B2B applications that serve multiple companies. Each company may already use its own IdP—such as Okta, Google, or Azure—for authentication. By adding SSO, your application allows users to log in with existing credentials, which eliminates the need to create and manage separate accounts. This simplifies the onboarding process and enhances security by relying on trusted authentication providers.
SSO also improves the user experience by providing seamless access to different services within an organization. It allows employees to use their company credentials to log in, which reduces password fatigue and IT support overhead.
For businesses handling sensitive data, SSO ensures centralized access control, which makes it easier to enforce security policies while maintaining a smooth login process.
Prerequisites
To complete this tutorial, you need the following:
- A Descope account
- An Okta Developer account
- Python 3 installed on your local machine
- Git CLI installed on your local machine
- A code editor and a web browser
Creating a Flet application
This tutorial uses a prebuilt starter template so you can focus on implementing authentication. To clone the starter template to your local machine, execute the following command:
git clone --single-branch -b starter-template https://github.com/kimanikevin254/descope-flet-auth-sso.git
cd into the project folder, set up a virtual environment, activate it, and install the project dependencies:
cd descope-flet-auth-sso

python3 -m venv venv

source venv/bin/activate

pip install -r requirements.txt
Here's an overview of the most important files in this project:
-
main.py: Sets up a simple Flet app with two views: a main view and a profile view. The
MyAppclass initializes the app, sets the page theme to light, and handles route changes and view pops. When the route changes (for example, when navigating to/profile), it updates the view accordingly, either showing the profile or the main view. It uses theAuthManagerclass to handle user authentication (login/logout). Theroute_handlermethod switches views based on the current route, andview_popallows navigating backward through views. Finally, therunmethod starts the app with the main view. -
auth/auth_helpers.py: Defines an
AuthManagerclass that manages the auth-related functions. Thehandle_loginmethod navigates the user to the/profileroute while thehandle_logoutmethod navigates the user to the/route. -
views/main_view.py: Displays a message with a login button that calls the
handle_loginmethod when clicked. -
views/profile_view.py: Displays a message with a logout button that calls the
handle_logoutmethod when clicked.
You can run the application using the following command:
flet run -w --port 8550
This command opens the web version of the app. To view it, navigate to http://localhost:8550 on your browser, and you should see the demo application homepage with a Login button:
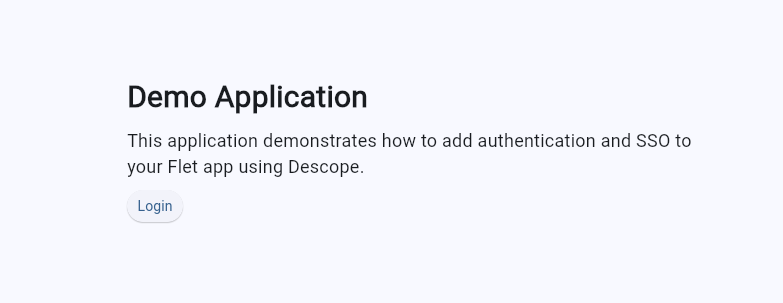
Click the Login button and you should be navigated to the profile page:
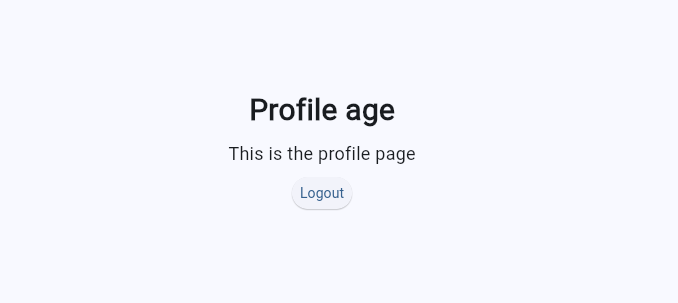
Right now, the profile page is accessible to anyone, which is not ideal. In the next section, you'll implement authentication to restrict access to authorized users.
Setting up Descope
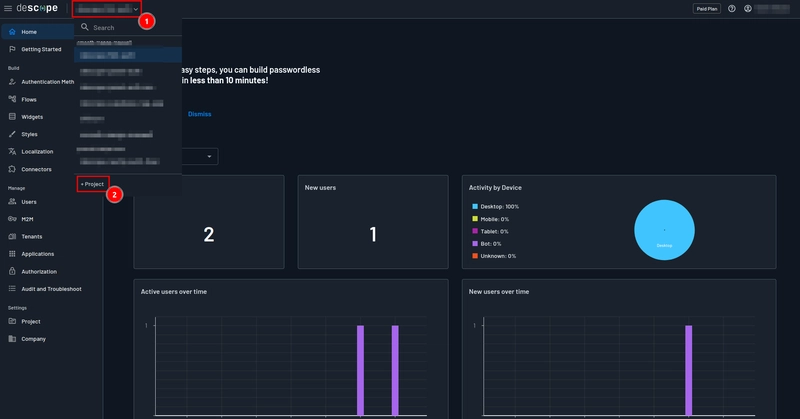
To implement authentication in your Flet app, you first need to create a project and design a flow on your Descope console. To get started, launch your Descope console, click the project dropdown, and select + Project to create a new project:
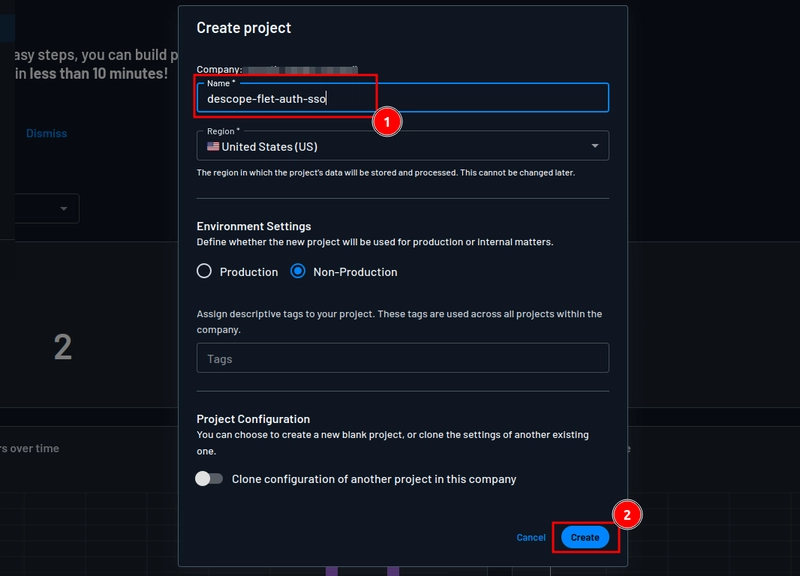
On the Create project page, provide "descope-flet-auth-sso" as the project name and click Create to create the project:
The next step is to design a Descope flow. Flows define the authentication process. You're going to add support for three authentication methods: magic links, social login, and SSO. You need to design a flow that will support all the authentication methods.
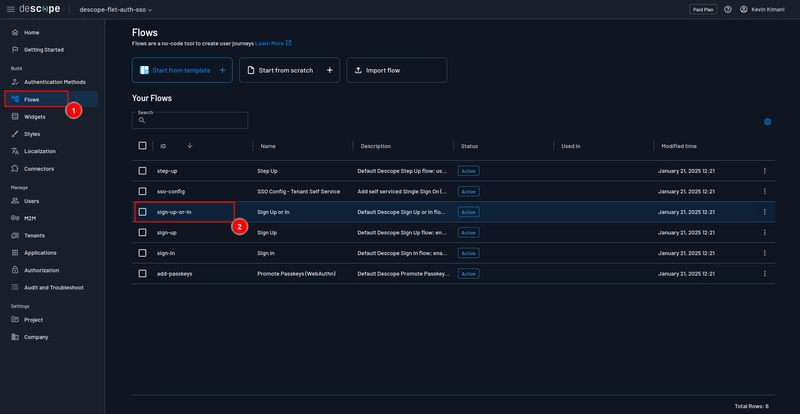
Typically, you would need to design this flow from scratch, but to make it easy for you to follow along, this tutorial uses a pre-prepared flow, which is included in the starter template. You can find it in the project root folder in a file named sign-up-or-in.json. You just need to import this flow into the Descope console. To do this, navigate open the default sign-up-or-in flow in the flow editor by navigating to Flows > sign-up-or-in:
In the editor, select Import flow / Export flow > Import flow and upload the flow from your local machine:
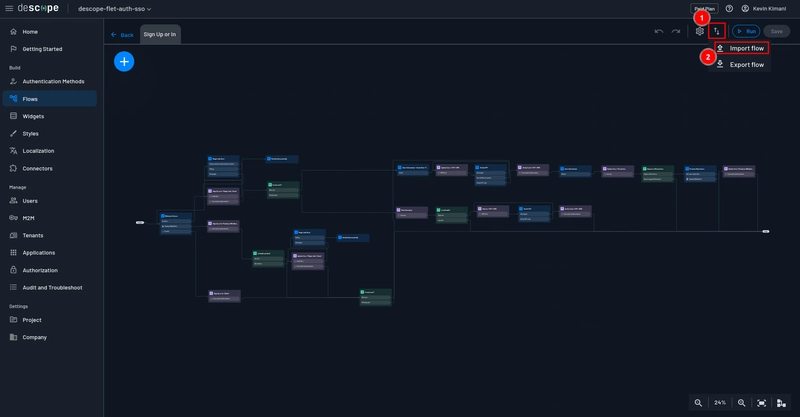
The flow you imported presents three login methods on the welcome screen: magic link, SSO, and social login. If the user selects the magic link, an email is sent to the provided address. When the user clicks the link in the email, they are asked for additional details if they're a new user. If they're not new, the flow returns a JSON Web Token (JWT) and ends. For social login or SSO, the user is redirected to the appropriate provider. After successful authentication, they receive a JWT, and the flow ends.
Authentication with Descope
Now that you have implemented the authentication flow in the Descope console, you can go ahead and configure your Flet app to use Descope as an OAuth provider. Flet allows you to implement authentication with any identity provider that supports the OAuth 2.0 Authorization code flow. By default, Flet ships with a few built-in OAuth providers, such as Azure and Google, but it also allows you to configure a custom OAuth provider, like Descope.
To configure a custom OAuth provider, you need to configure the following in your Flet app:
- Client ID: A public identifier for the application
- Client secret: A secret that is only known to the application and the authorization server
- Authorization endpoint: The endpoint that initializes the authorization flow
- Token endpoint: The endpoint that exchanges an authorization code for access tokens
- User endpoint: The endpoint that retrieves the authenticated user's information
- Redirect URL: The URL where the user is redirected to after authentication
- User ID function: A function that extracts the user ID from the returned user dictionary
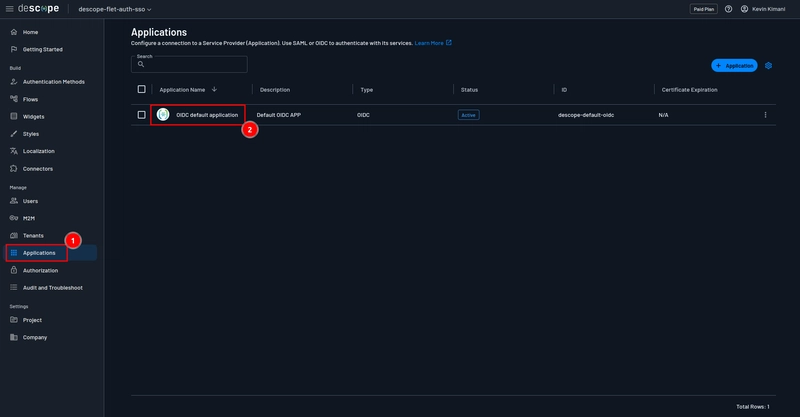
To integrate Descope as the authentication provider for your Flet app, you first need to configure an OIDC app in the Descope dashboard to obtain the necessary endpoints required for the authorization code flow. To do this, navigate to Applications > OIDC default application on the Descope console:
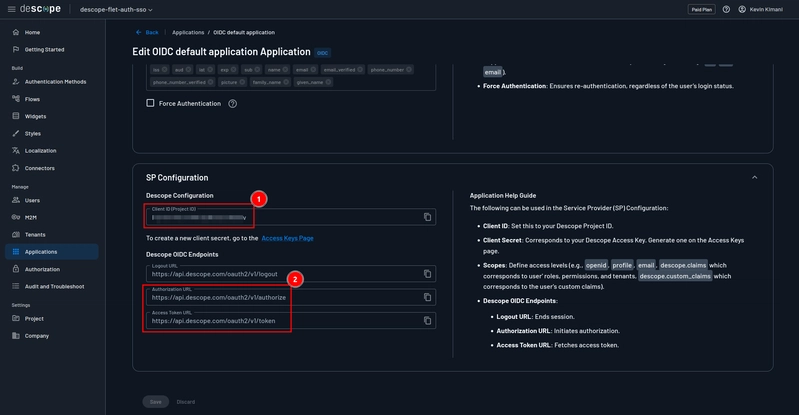
Scroll down to the SP Configuration section and take note of the Client ID, Authorization URL, and Access Token URL. You will use these values in your Flet app.
For the user endpoint, you'll use https://api.descope.com/oauth2/v1/userinfo, which is discussed along with the other endpoints in the Descope documentation.
You also need to generate a client secret. You can do this by navigating to M2M > + Access Key. On the Generate Access Key form, provide the key name, select Generate Key, and copy the value of your key.
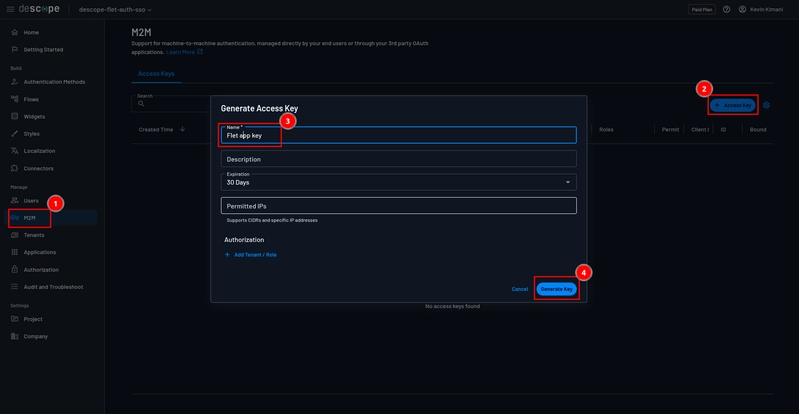
Now that you have these values, you can go back to your Flet app and start implementing authentication. First, create a new file named .env in the project root folder and add the following code:
OAUTH_CLIENT_ID="<YOUR-DESCOPE-CLIENT-ID>"
OAUTH_CLIENT_SECRET="<YOUR-DESCOPE-CLIENT-SECRET>"
OAUTH_AUTHORIZATION_ENDPOINT="https://api.descope.com/oauth2/v1/authorize"
OAUTH_TOKEN_ENDPOINT="https://api.descope.com/oauth2/v1/token"
OAUTH_USER_ENDPOINT="https://api.descope.com/oauth2/v1/userinfo"
OAUTH_REDIRECT_URI="http://localhost:8550/oauth_callback"
OAUTH_USER_ID_FIELD="sub"
OAUTH_SCOPES="openid profile email"
Some of the values have been prefilled for you as they will be the same for everyone. However, the client ID and client secret will be unique to you. Make sure you replace the placeholder values with the values you obtained from the Descope console.
You also need a utility file to extract the environment variables and make them available for use in different parts of the application. Create a new file named config.py in the project root folder and add the following code:
from dotenv import load_dotenv
import os

load_dotenv()

class Config:
    @staticmethod
    def get_env_var(name, default=None, required=True):
        value = os.getenv(name, default)
        if required and value is None:
            raise ValueError(f"Environment variable '{name}' is required but not set.")
        return value

    OAUTH_CLIENT_ID = get_env_var('OAUTH_CLIENT_ID')
    OAUTH_CLIENT_SECRET = get_env_var('OAUTH_CLIENT_SECRET')
    OAUTH_AUTHORIZATION_ENDPOINT = get_env_var('OAUTH_AUTHORIZATION_ENDPOINT')
    OAUTH_TOKEN_ENDPOINT = get_env_var('OAUTH_TOKEN_ENDPOINT')
    OAUTH_USER_ENDPOINT = get_env_var('OAUTH_USER_ENDPOINT')
    OAUTH_REDIRECT_URI = get_env_var('OAUTH_REDIRECT_URI')
    OAUTH_USER_ID_FIELD = get_env_var('OAUTH_USER_ID_FIELD')
    OAUTH_SCOPES = get_env_var('OAUTH_SCOPES')
This code loads environment variables from a .env file and defines a Config class with a method to retrieve them, raising an error if a required variable is missing. It then uses this method to set various OAuth-related settings as class attributes.
To define a custom OAuth provider, create a new file named auth_provider.py in the auth folder and add the code below:
from flet.auth import OAuthProvider as BaseOAuthProvider
from config import Config

class OAuthProvider(BaseOAuthProvider):
    def __init__(self):
        super().__init__(
            client_id=Config.OAUTH_CLIENT_ID,
            client_secret=Config.OAUTH_CLIENT_SECRET,
            authorization_endpoint=Config.OAUTH_AUTHORIZATION_ENDPOINT,
            token_endpoint=Config.OAUTH_TOKEN_ENDPOINT,
            user_endpoint=Config.OAUTH_USER_ENDPOINT,
            redirect_url=Config.OAUTH_REDIRECT_URI,
            user_id_fn=lambda u: u[Config.OAUTH_USER_ID_FIELD],
        )
This code defines an OAuthProvider class that inherits from the Flet OAuthProvider class and initializes it with OAuth configuration settings from the Config class.
Open the auth/auth_helpers.py file. Here, you will modify the methods to log in and log out the user instead of just navigating them. First, replace the import statements with the following:
from flet import Page, LoginEvent
from config import Config
Then, replace the handle_login method with the following to trigger the login process using the OAuth provider configured for the page:
def handle_login(self, e):
    self.page.login(self.page.oauth_provider)
Replace the handle_logout method with the following to log the user out by calling the logout function on the page:
def handle_logout(self, e):
    self.page.logout()
In the same class, add the following methods to configure methods that will be called when the user is successfully logged in or out:
def on_login(self, e: LoginEvent):
    if e.error:
        raise Exception(e.error)

    self.page.go('/profile')

def on_logout(self, e):
    self.page.go('/')
These methods handle login and logout events: on_login checks for errors during login and navigates to the /profile route if successful, while on_logout redirects the user to the home route (/).
Open the views/profile_view.py file and replace the get_view method with the following:
def get_view(self):
    return ft.View(
        route='/profile',
        vertical_alignment=ft.MainAxisAlignment.CENTER,
        horizontal_alignment=ft.CrossAxisAlignment.CENTER,
        controls=[
            ft.Column(
                alignment=ft.MainAxisAlignment.CENTER,
                horizontal_alignment=ft.CrossAxisAlignment.CENTER,
                controls=[
                    ft.CircleAvatar(
                        foreground_image_src=self.page.auth.user.get("picture", ""),
                        bgcolor=ft.Colors.GREY_400,
                        radius=40
                    ),
                    ft.Text(value=self.page.auth.user.get("name", "N/A"), size=20, weight=ft.FontWeight.BOLD),
                    ft.Text(value=self.page.auth.user.get("email", "N/A"), size=18),
                    ft.ElevatedButton(text="Logout", on_click=self.handle_logout),
                ],
            )
        ]
    )
This method returns a view for the profile page that displays the authenticated user's profile picture, name, and email in the center of the page, along with a Logout button.
Open the main.py file and add the following import statement:
from auth.auth_provider import OAuthProvider
Add the following line of code to the __init__ method just before self.auth_manager = AuthManager(page=self.page) to create an instance of the OAuth provider and attach it to the current page:
self.page.oauth_provider = OAuthProvider()
Register the event handler you created earlier to the page by adding the following code at the end of the __init__ method:
self.page.on_login = self.auth_manager.on_login
self.page.on_logout = self.auth_manager.on_logout
Finally, you need to protect the /profile page to make sure it cannot be accessed by unauthenticated users. To do this, in the route_handler method, replace the first block of the if statement with the following:
if self.page.route == '/profile':
    if(self.page.auth is None):
        return self.page.go(route='/')
    view = ProfileView(self.page, self.auth_manager.handle_logout)
    self.page.views.append(view.get_view())
This code checks if the current route is /profile; if the user isn't authenticated, it redirects them to the home page. Otherwise, it loads the ProfileView and appends it to the page.
At this point, you should be able to log in to the application using either magic links or social login. In the next section, you will implement SSO.
Implement SSO with OIDC using Descope
OIDC is a simple identity layer built on top of OAuth 2.0. It helps enable SSO by allowing users to authenticate through trusted IdPs, such as Azure or Okta. With Descope, you can easily integrate OIDC SSO into your app, letting users log in securely with their existing credentials, which streamlines access without the need for new accounts.
In this section, you'll implement SSO by configuring Okta as the IdP and Descope as the authentication service. To do this, open your Okta admin dashboard and navigate to Applications > Applications > Browse App Catalog:
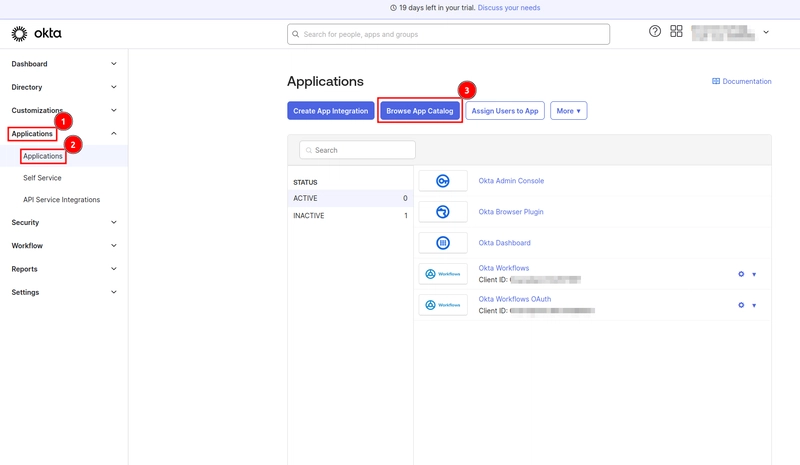
On the Browse App Integration Catalog page, search for "descope" and select the Descope app:
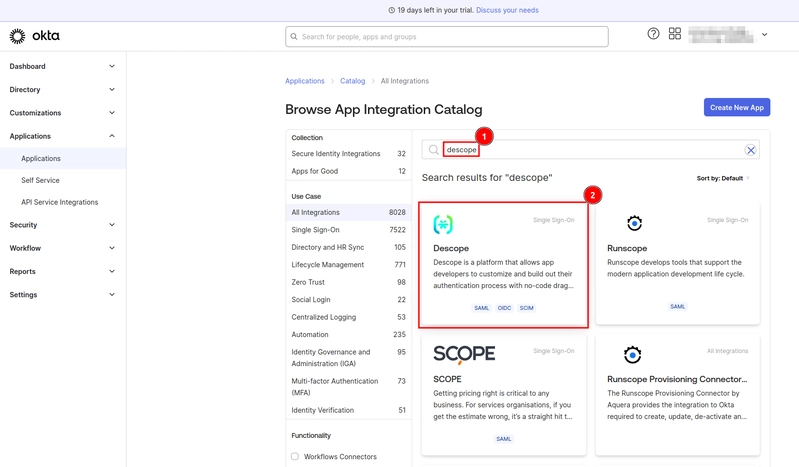
On the app details page, select Add Integration:
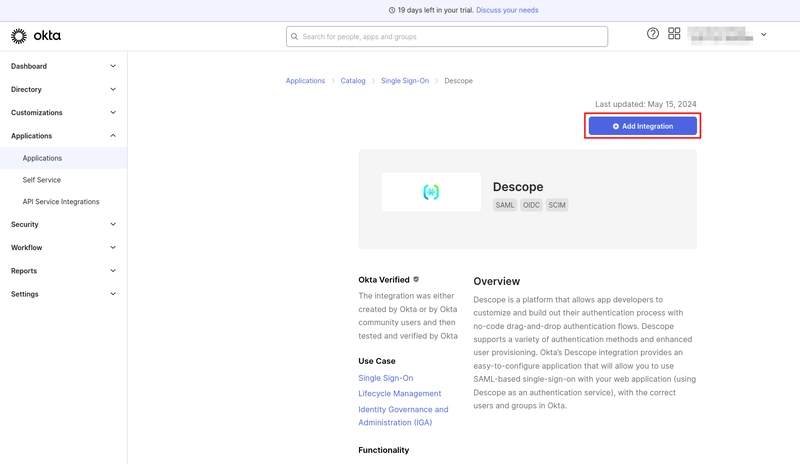
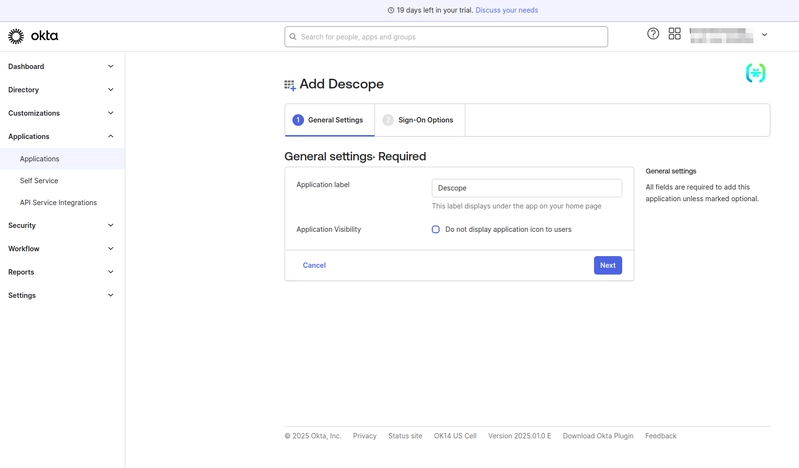
On the Add Descope page under General Settings, leave the default settings and click Next:
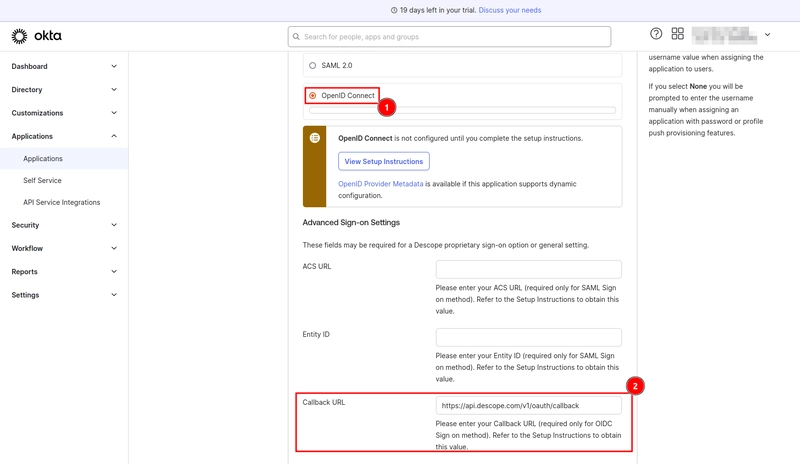
On the Sign-On Options page, select OpenID Connect as the sign-on method, and under Advanced Sign-on Settings, in the Callback URL field, provide the value https://api.descope.com/v1/oauth/callback. This is where the user will be redirected after successful authentication by Okta.
Scroll down to the bottom of the page and click Done.
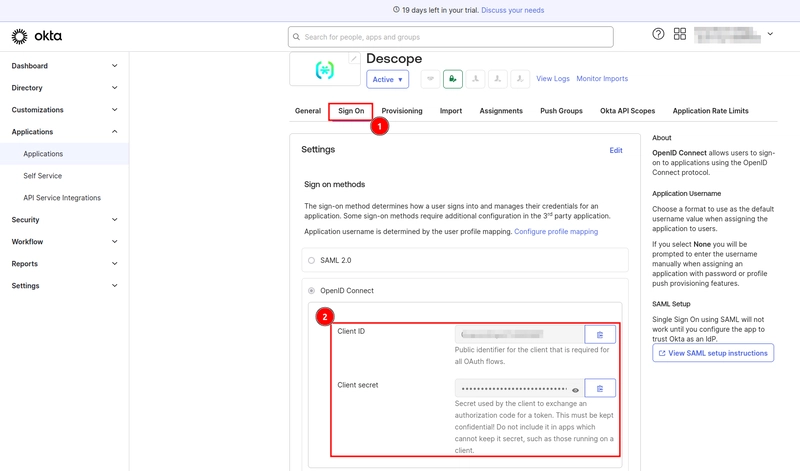
On the app details page, select the Sign On tab and take note of the client ID and secret.
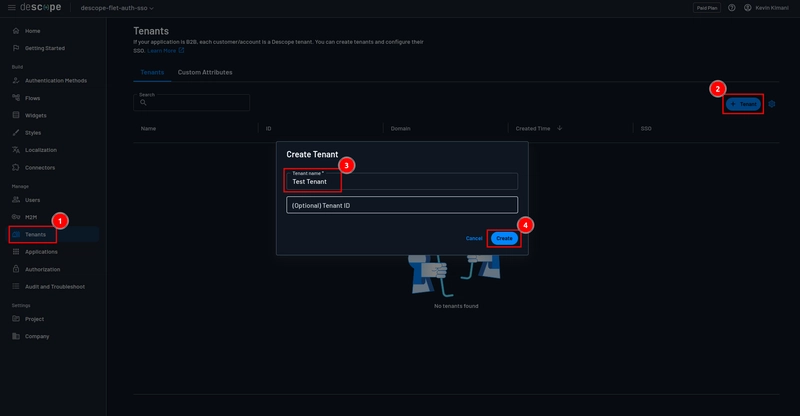
You'll also need a tenant to use SSO. Back on your Descope console, navigate to Tenants > + Tenant. On the Create Tenant form, provide the tenant name and click Create:
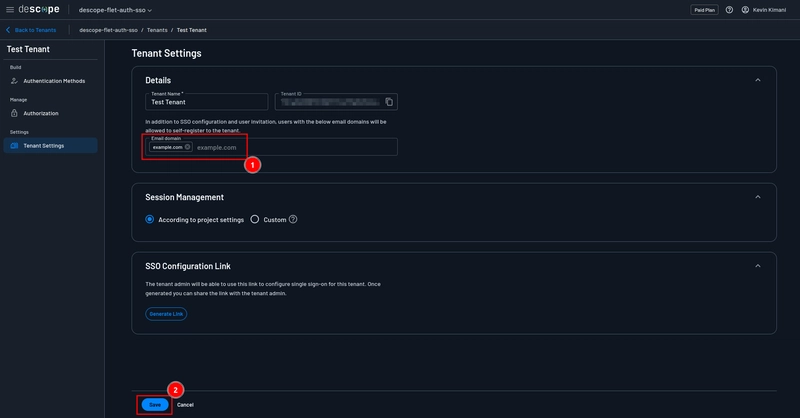
Open the details page of the tenant you just created and under Tenant Settings. Make sure you add your email domain to the list of allowed domains and click Save:
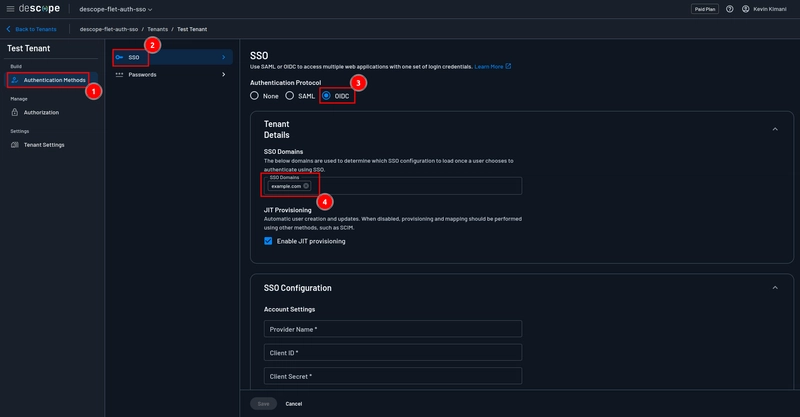
Next, still on the tenant details page, select Authentication Methods > SSO > OIDC. Under Tenant Details > SSO Domains, make sure to provide your email domain. This domain is used to determine which SSO configuration to load once a user chooses to authenticate using SSO.
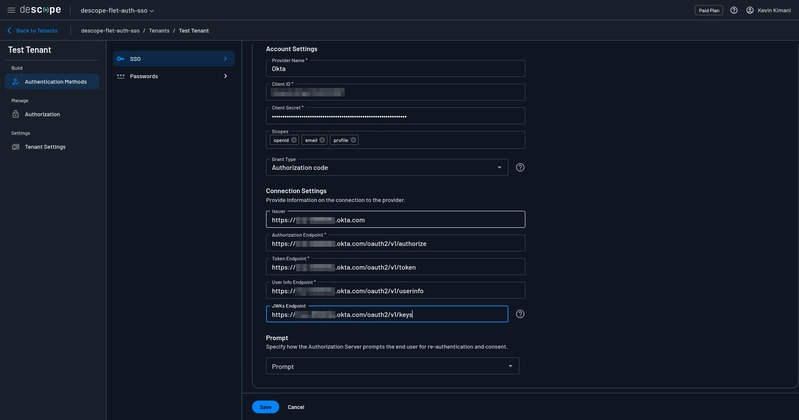
Scroll down to the SSO configuration > Account Settings section and provide the required values as follows:
- Provider Name: Okta
- Client ID: The Client ID you obtained from the Okta dashboard
- Client Secret: The client secret you obtained from the Okta dashboard
-
Scope:
openid profile email - Grant Type: Authorization code
You also need to provide the required values for the SSO configuration > Connection Settings section. For this, you need to obtain OAuth endpoints from the Okta "well-known" configuration, which provides standardized metadata for OAuth and OIDC integrations. To obtain this, navigate to https://<YOUR-OKTA-INSTANCE>.okta.com/.well-known/openid-configuration on your browser and take note of the issuer and authorization, token, user info, and JWKs endpoints.
Make sure to replace <YOUR-OKTA-INSTANCE> with the correct value, which is your organization's Okta instance ID.
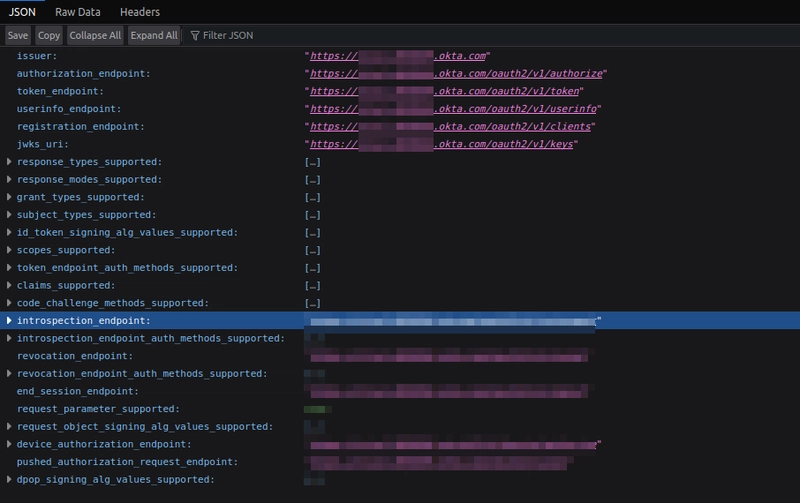
Go back to the Descope console and provide the values you just obtained from the Okta well-known endpoint in the respective inputs under SSO configuration > Connection Settings and save the changes.
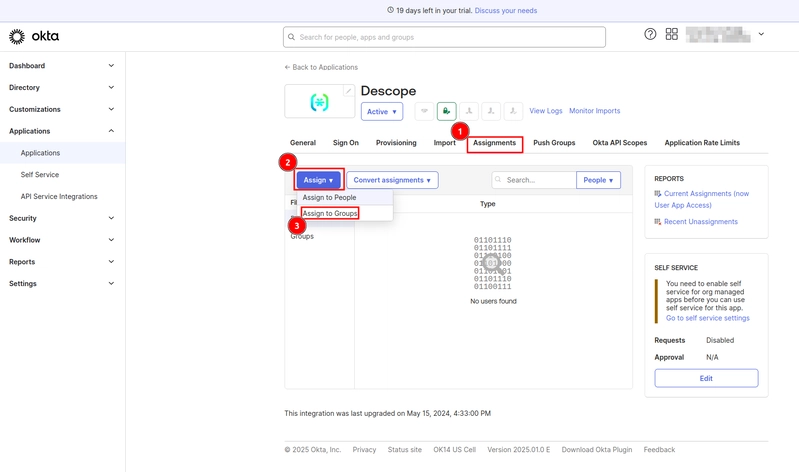
To ensure that only authorized users can authenticate via the app and access your Flet application, you assign users to the Descope app you installed in your Okta console. To do this, open the app details page in Okta and select Assignments > Assign > Assign to Groups:
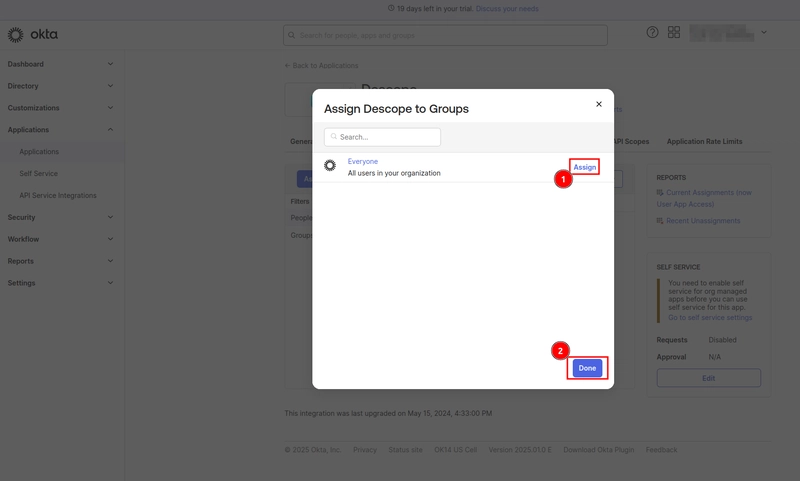
On the Assign Descope Groups page, select the Assign button beside the Everyone group to allow all users in your organization to log in via SSO and click Done to save the changes.
SSO with Okta as the IdP is now fully configured.
Adding a persistent login feature
Currently, the app does not save the access token obtained from Descope. So if a user logs in, leaves the app, and then returns, they will need to log in again. To improve the user experience, you can add a function that saves the access token to client storage.
However, you cannot store the token in client storage as plain text as this would make it vulnerable to malicious actors who could access and manipulate it. Instead, you need to encrypt the token using a secret key and save the encrypted value securely.
Open the .env file in the project root folder and add the following:
OAUTH_TOKEN_SECRET="cv3Gc9RG-9o8icwTBUEDb0HJC7M5A0b2FxT3WpWvg1I="
OAUTH_TOKEN_KEY="auth_token"
Values for these variables have been provided, but you can change them to any string.
OAUTH_TOKEN_SECRET will be used to encrypt the access token before saving it to the client storage, while OAUTH_TOKEN_KEY is the key under which the encrypted token will be saved in the client storage.
To load the environment variables you just created into the Flet application, open the config.py file and add the following attributes to the Config class:
OAUTH_TOKEN_SECRET = get_env_var('OAUTH_TOKEN_SECRET')
OAUTH_TOKEN_KEY = get_env_var('OAUTH_TOKEN_KEY')
Open the auth/auth_helpers.py file and add the following import statements:
from flet.security import encrypt, decrypt
encrypt and decrypt are utility methods provided by Flet for encrypting text data using a symmetric algorithm. This means that the same key is used for encryption and decryption.
Replace the on_login method with the following to modify the on_login method to encrypt and save the token to client storage once a user is successfully authenticated:
def on_login(self, e: LoginEvent):
    if e.error:
        raise Exception(e.error)

    # Save token in client storage
    token = self.page.auth.token.to_json()
    encrypted_token = encrypt(token, Config.OAUTH_TOKEN_SECRET)
    self.page.client_storage.set(Config.OAUTH_TOKEN_KEY, encrypted_token)

    self.page.go('/profile')
This code retrieves the access token, encrypts it using the secret key you set earlier, and stores the encrypted token in client storage. It then redirects the user to the profile page.
Replace the handle_login method with the following to modify the handle_login method to check if a valid token is stored in the client storage before redirecting the user to the sign-in page:
def handle_login(self, e):
    saved_token = None

    # Retrieve token from client storage
    encrypted_token = self.page.client_storage.get(Config.OAUTH_TOKEN_KEY)

    # Decrypt retrieved token
    if encrypted_token:
        saved_token = decrypt(encrypted_data=encrypted_token, secret_key=Config.OAUTH_TOKEN_SECRET)

    # Log in the user
    if e is not None or saved_token is not None:
        self.page.login(provider=self.page.oauth_provider, saved_token=saved_token, scope=Config.OAUTH_SCOPES.split())
This code retrieves the saved encrypted token from the client storage, decrypts it, and passes it to the self.page.login method. This way, if the token is valid, the application will obtain the user's info without prompting the user to reauthenticate.
Lastly, replace the handle_logout method with the following to modify the handle_logout method to make sure that it removes the token from storage when a user logs out:
def handle_logout(self, e):
    self.page.client_storage.remove(Config.OAUTH_TOKEN_KEY)
    self.page.logout()
Persistent login should now be working as expected.
Demonstrating the application
You can run the application to confirm that everything is working as expected.
Run the application using the command flet run -w --port 8550, navigate to http://localhost:8550 on your browser, and click the Login button. You should be redirected to the sign-in page:
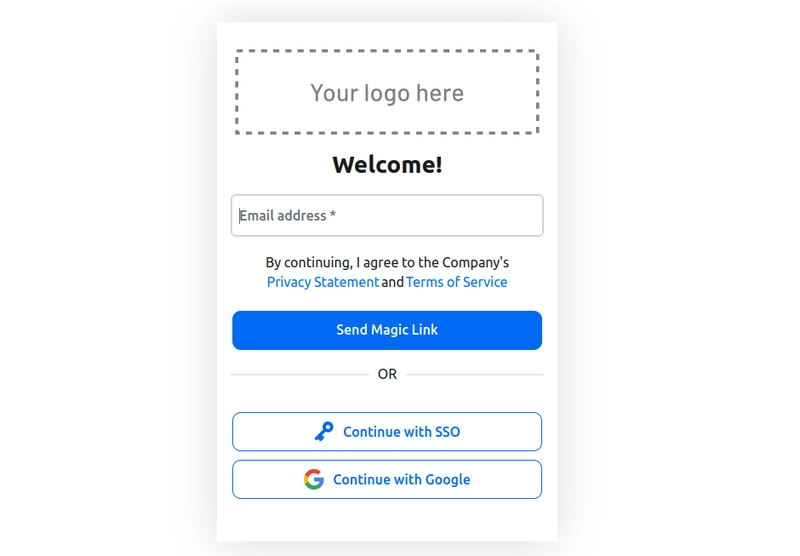
Here, you can choose to sign in with any method, and after successful authentication, you will be redirected to the profile page, where your details are displayed:
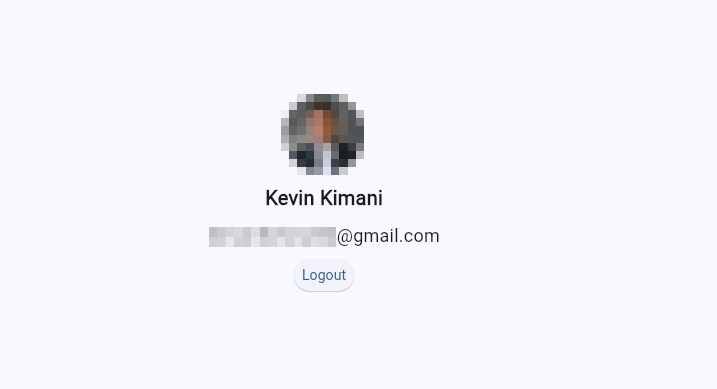
You can stop the application and run it again. Then, on the home route, click the Login button. You will be redirected to the profile page without being prompted to sign in again.
You can access the full code on GitHub.
Conclusion
Implementing authentication and SSO into your Flet app using Descope is a straightforward process that significantly enhances your application's security and user experience. By integrating features like magic link authentication, social logins, and SSO with OIDC, you can offer your users seamless and secure access, whether they are individuals or part of an organization using their existing credentials.
Descope is a drag-and-drop customer authentication and identity management platform. Our no- or low-code CIAM solution helps hundreds of organizations easily create and customize their entire user journey using visual workflows—from authentication and authorization to MFA and federated SSO. Customers such as GoFundMe, Navan, You.com, and Branch use Descope to reduce user friction, prevent account takeover, and get a unified view of their customer journey. To learn more, join our dev community, AuthTown, and explore the Descope documentation.