










Most image enhancement pipelines have a dirty secret: they need you to tune them.
Clip limit too high and CLAHE halos. Strength too aggressive and skin looks plastic.
Tile size wrong for your image and you get block artifacts.
PACE (Perceptual Adaptive Contrast Enhancement) is my attempt to fix that.
It analyzes the image, derives every enhancement parameter from its own statistics, and enhances it — without a single slider you need to touch.
This article is for people who care about why the math works, not just that it does.
If you're a web dev or just want to see what it can do, I'll be writing follow-up articles for you — but start here if you want the full picture.
🚀 Try Live Demo
The core problem with "just use CLAHE"
CLAHE is everywhere, and for good reason — it's fast, effective, and well-understood.
But it has two parameters that matter enormously: tileSize and clipLimit.
A clipLimit of 2.0 is a rule of thumb. It has nothing to do with your image.
A tileSize of 8 might be perfect for a high-frequency texture scene and completely wrong for a portrait. And that's before you layer in any post-processing — sharpening, tone mapping, detail recovery.
The standard answer is "tune it per image." That's fine for a research dataset you've seen before. It breaks down the moment you're processing arbitrary inputs.
PACE asks a different question: what does the image itself say it needs?
The pipeline at a glance
PACE runs seven stages in sequence:
┌──────────────────────────────────────────────┐
│              Input: RGB Image                │
└──────────────────────────────────────────────┘
                     ↓
┌──────────────────────────────────────────────┐
│ 1. Color Space Transformation                │
│    (RGB → OKLab)                             │
└──────────────────────────────────────────────┘
                     ↓
┌──────────────────────────────────────────────┐
│ 2. Global Perceptual Analysis                │
│    (Distribution, Structure, Noise)          │
└──────────────────────────────────────────────┘
                     ↓
┌──────────────────────────────────────────────┐
│ 3. Adaptive Parameter Estimation             │
│    (α, λ, β, τ, tileSize, clipLimit)         │
└──────────────────────────────────────────────┘
                     ↓
┌──────────────────────────────────────────────┐
│ 4. Local Contrast Enhancement CLAHE          │
│    (adaptive tileSize, clipLimit)            │
└──────────────────────────────────────────────┘
                     ↓
┌──────────────────────────────────────────────┐
│ 5. Control Map Synthesis                     │
│    (Edge, Structure, Skin, Alpha Maps)       │
└──────────────────────────────────────────────┘
                     ↓
┌──────────────────────────────────────────────┐
│ 6. Perceptual Fusion                         │
│    (CLAHE + Retinex + Laplacian (nonlinear)) │
└──────────────────────────────────────────────┘
                     ↓
┌──────────────────────────────────────────────┐
│ 7. Inverse Transformation                    │
│    (OKLab → RGB)                             │
└──────────────────────────────────────────────┘
                     ↓
┌──────────────────────────────────────────────┐
│          Output: Enhanced Image              │
└──────────────────────────────────────────────┘
Every parameter used in stages 4–6 is computed in stages 2–3.
There is no configuration file.
Why OKLab instead of sRGB or Lab?
The pipeline works entirely on the luminance (L) channel of OKLab, leaving the chroma planes (a, b) untouched.
OKLab is perceptually uniform in a way that CIE Lab is not in practice — a Euclidean distance of 0.05 in OKLab corresponds to roughly the same perceived difference regardless of hue. This matters because the blending math in stage 6 adds deltas to L directly. In sRGB those deltas would cause perceptually inconsistent results across the tonal range: aggressive in shadows, gentle in highlights. In OKLab, the math has consistent perceptual meaning everywhere.
The conversion is LUT-accelerated: a 256-entry table for sRGB→linear, and a 4096-entry table for the cube root (cbrt) needed in the OKLab transform. At the inner loop scale of a 12-megapixel image, those two lookups save meaningful time over calling Math.cbrt() on every pixel.
Stage 2: Reading the image
Before any enhancement, PACE does a full statistical read of the luminance plane. Three feature groups:
Distribution features
A 512-bin histogram gives us mean, variance, skewness, kurtosis, and Shannon entropy. Dynamic range is computed as the p95–p5 spread (robust to outliers at either tail). Shadow and highlight ratios count pixels below 0.2 and above 0.8 respectively.
Entropy is normalized by log2(512) so it sits in [0, 1] regardless of bin count.
Structure features
Gradient magnitude uses the Alpha-Max + Beta-Min approximation:
grad ≈ max(|gx|, |gy|) + 0.25 * min(|gx|, |gy|)
This trades a small amount of accuracy for a significant speedup — no square root, no multiply. Edge density is then noise-adjusted before it leaves this stage:
edgeDensity = (rawEdge / (1 + 0.5 * noiseRatio)) / (adjusted + 0.25)
The soft normalization in the denominator prevents high-texture images from saturating the density estimate.
Noise features
Each pixel's absolute deviation from its 4-neighbor mean is the noise proxy. It's not as precise as a Laplacian-of-Gaussian approach, but it's a single pass, requires no window allocation, and correlates well enough with perceived noise to drive the downstream parameters correctly.
Stage 3: Deriving every parameter
This is where PACE diverges from conventional pipelines. Rather than exposing parameters to the user, it maps features to parameters through a set of monotonic functions with smooth clamping.
λ — nonlinear compression strength
contrastStrength = 0.6√variance + 0.5 * dynamicRange + 0.4 * edgeDensity

noiseEnergy = noiseRatio + 0.7 * microContrast

λ_raw = 0.3 + 0.8 * (1 − contrastStrength) + 1.2 * noiseEnergy + 0.4 * textureIndex

λ = λ_raw / (1 + λ_raw)      ← smooth clamp to [0, 1)
λ controls how aggressively the final delta is compressed via Δ / (1 + λ|Δ|). High noise → high λ → stronger compression → less noise amplification. High existing contrast → low λ → lighter touch. The x/(1+x) clamp guarantees λ never reaches 1 and the denominator never explodes.
β — highlight protection
highlightDominance = highlightRatio + 0.4 * max(0, skewness) + 0.3 * mean + 0.2 * dynamicRange

x = highlightDominance − 0.5 * shadowRatio

β = 0.8 * (x / (1 + |x|))
β feeds into a luminance mask max(0.15, 1 − β*L[i]). A bright, positively-skewed image gets high β, which pulls the mask down toward 0.15 in the highlights — protecting them from over-enhancement without a hard clip.
τ — tone limiter threshold
τ = 0.35 + 0.8 * (1 − √variance) * (1 − 0.5 * entropy)
τ ∈ [0.35, 1.2]
Low-contrast, low-entropy images (flat skies, underexposed shots) get high τ — the tone limiter allows more headroom because the image needs more work. High-contrast scenes get lower τ — the limiter kicks in earlier to prevent clipping.
globalAlpha and CLAHE parameters
contrastNeed = (1 − entropy) * (1 − dynamicRange)
structureConfidence = edgeDensity / (1 + noiseRatio)
imbalance = |shadowRatio − highlightRatio|

globalAlpha = f(imbalance, contrastNeed, structureConfidence)
tileSize ∈ [8, 64], rounded to nearest 8
clipLimit = 0.02 + 0.08 * structureConfidence
Structured, noise-free images get smaller tiles (capturing local contrast at the right scale) and higher clip limits (allowing more redistribution). Noisy images get larger tiles and conservative clip limits.
Stage 5: Spatial control maps
Six maps are generated from a single gradient pass over L. The key ones:
Edge map: Alpha-Max + Beta-Min magnitude, same approximation as stage 2.
Structure mask: Euclidean gradient magnitude, normalized globally by its maximum. Used to boost enhancement in structurally confident regions via structureMask^0.7.
Skin damp map: A Gaussian centered at L=0.5 with σ=0.18, producing values in [0.3, 1.0]. Mid-luminance pixels receive suppressed enhancement. This is a luminance heuristic, not color-based skin detection — it works because skin tones in OKLab tend to cluster near mid-L, and it naturally protects smooth gradients (faces, fabric) from over-sharpening.
Local alpha map: Computed tile-by-tile. Each tile measures gradient coherence (mean gradient / gradient std dev) weighted by noise, then modulates globalAlpha spatially. High-structure tiles get more enhancement; flat or noisy tiles get less. This map is then smoothed by a guided filter to prevent block boundaries from appearing in the output.
Lsmall and Lmedium: A 3×3 Gaussian-approximated smooth and a 5×5 box smooth of that result. These two scales provide the illumination estimates used in the Retinex computation.
Stage 6: The blending stack
This is the core of PACE. Per pixel:
Three signals combined into one delta
// Retinex
reflectance = log(Lsmall[i]) − log(Lmedium[i])
detailMask = clamp(reflectance * 0.8 + 0.5, 0, 1)

localMean = mean of 4 neighbors in Lsmall
textureMask = edge / (edge + 0.015)
deltaDetail = clamp((Lsmall[i] − localMean) * textureMask, −0.25, 0.25)

deltaClahe = Lclahe[i] − L[i]
edgeAdaptive = edge / (edge + 0.03)

delta = deltaClahe + 0.45 * deltaDetail * detailMask * skinDamp * structureBoost * edgeAdaptive
delta = clamp(delta, −0.5, 0.5)
The Retinex term (log(Lsmall) − log(Lmedium)) approximates the reflectance component of the image by treating Lmedium as the illumination estimate. A positive reflectance means the pixel is brighter than its local surround — a highlight or edge — and the detail mask opens up to let more Laplacian texture through.
The Laplacian term (Lsmall − localMean) is a band-pass detail signal. The textureMask gates it by edge strength so it only amplifies where there's genuine structure, not flat regions or noise.
Three successive nonlinear compressions
// Halo suppression
deltaStable = delta / (1 + 2|delta| + ε)

// Tone limiter (luminance-adaptive)
deltaLimited = deltaStable / (1 + |deltaStable| / (τ * (0.5 + L[i])))

// Soft nonlinear compression (Reinhard-style)
compressed = deltaLimited / (1 + λ * |deltaLimited|)
Each stage compresses large values more than small ones. Together they form a cascaded soft clipper that prevents any single large delta from blowing through — but doesn't hard-clip anything, so gradients remain smooth.
The tone limiter has a luminance term (0.5 + L[i]) in the denominator. In highlights, L[i] is large, so the divisor is large, so the limit is gentler — the signal is allowed to pass through more easily when there's already little headroom for error. In shadows, the divisor is small, so the limit is stricter — protecting shadow detail from noise amplification.
Final luminance
edgeResponse = edge / (edge + kAdaptive)
edgeGain = edgeResponse^0.8 * (1 + 0.6 * edgeResponse)
lumMask = max(0.15, 1 − β * L[i])
contrastGain = 1 + finalAlpha * (1 − 0.5 * L[i])

enhanced = L[i] + compressed * edgeGain * lumMask * contrastGain
edgeGain is a soft edge boost that scales superlinearly with edge strength. lumMask provides the highlight rolloff from β. contrastGain provides a luminance-weighted global intensity that naturally lifts shadows more than highlights.
Results
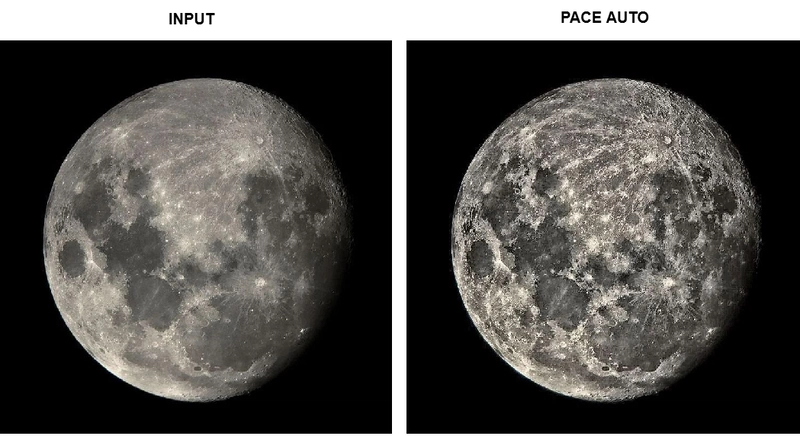
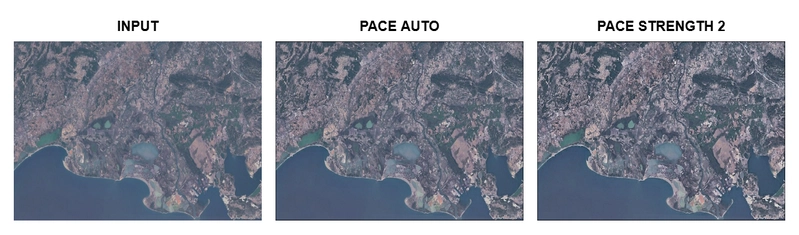
A comparison across image categories (these use the live demo):
👉 Open Demo
- Underexposed portraits: shadows lift without skin posterization or highlight clipping
- Hazy landscapes: contrast recovers without halo artifacts at sky/ground boundaries
- High-noise low-light: texture enhanced, noise suppressed rather than amplified
- Already well-exposed images: minimal change — the pipeline reads the statistics and backs off
The live demo is available at the repository — you can drag in your own images and watch the per-stage progress in real time.
Try it / contribute
The full source implementations, is on GitHub:
👉 github.com/muhammedshahid/pace
The pipeline runs in a Web Worker, is framework-free, and exposes a single async function:
import { applyPACE } from 'pace-enhance';

const enhanced = await applyPACE(imageData, {
  strength: 1.0,   // default 1.0 = PACE auto
  debug: false     // true = downloadable trace JSON per stage
});
There's also an override option for researchers who want to fix specific parameters and experiment with the rest:
const enhanced = await applyPACE(imageData, {
  override: {
    controlParams: { clipLimit: 0.05 },
    perceptualParams: { lambda: 0.4, tau: 0.8 }
  }
});
What's next
Several directions I'm actively thinking about:
- No-op path: an early exit for images that statistically don't need enhancement, based on entropy + dynamic range thresholds
-
True structure confidence: the standalone
structureConfidencefunction in the repo is more sophisticated than what's currently wired up — it uses exponential edge decay and noise suppression rather than the raw ratio - Boundary handling: the current 1-pixel border exclusion in blending needs proper edge-extension
- Perceptual evaluation: SSIM and PSNR don't capture perceptual enhancement quality well. I want to build a feature-based evaluation that correlates with human preference
If any of this overlaps with your work, I'd genuinely love to hear from you — open an issue, or find me here in the comments.
This is the first in a series. Next up: the same pipeline explained for frontend developers — what it does without the math, how to drop it into a project, and when you'd actually want to use it.