







Introduction
A two-tier architecture on AWS — the bread and butter of real-world cloud deployments. Here's the idea:
- Tier 1 (Public): An EC2 instance sitting in a public subnet, running a Flask web application. This is what users hit.
- Tier 2 (Private): An RDS MySQL database sitting in private subnets. No direct internet access. Only the EC2 instance can talk to it.
The infrastructure is provisioned with Terraform (modularized), the app is deployed with Ansible, and the application itself is a simple Flask + HTML frontend that talks to MySQL.
By the end of this post, you'll understand why every single file exists and how they all connect together.
Architecture
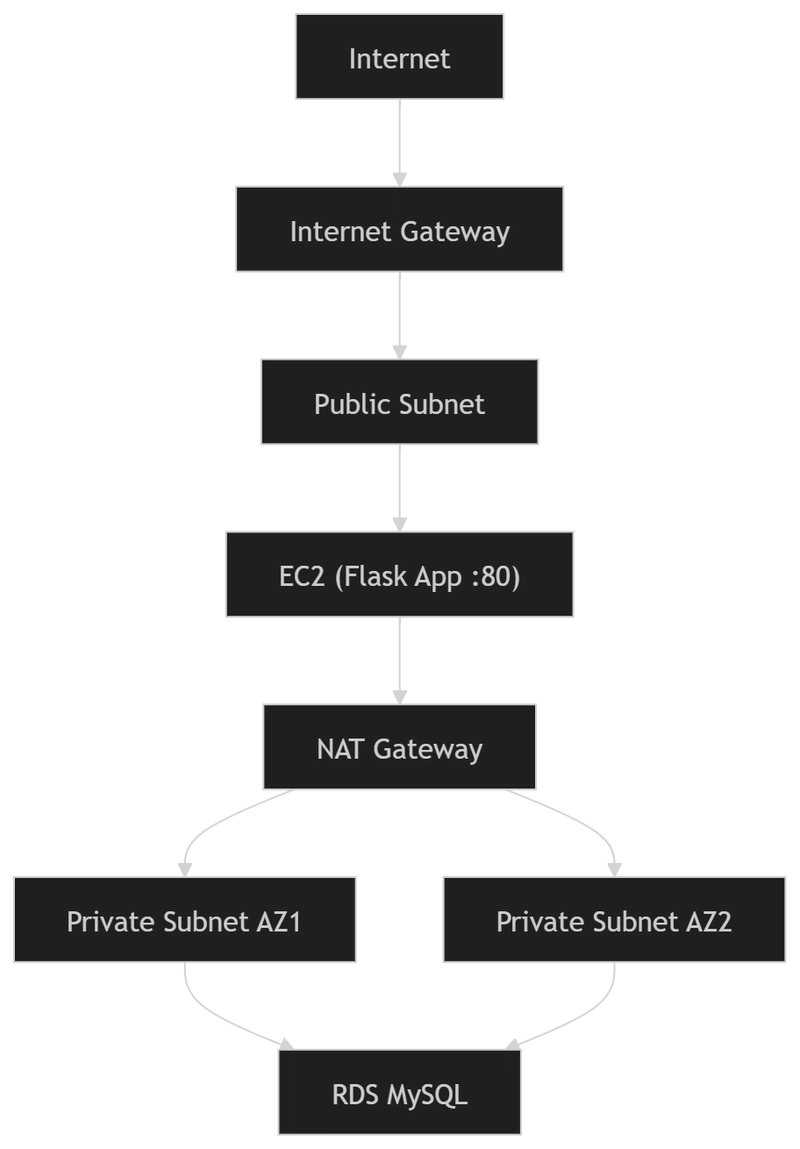
Project Structure
two-tier-aws-infra/
├── app/
│   ├── app.py
│   ├── requirements.txt
│   └── frontend/
│       └── index.html
├── terraform/
│   ├── main.tf
│   ├── provider.tf
│   ├── backend.tf
│   ├── variables.tf
│   ├── outputs.tf
│   ├── terraform.tfvars
│   └── modules/
│       ├── vpc/
│       ├── ec2/
│       ├── security_group/
│       ├── rds/
│       └── nat_gateway/
└── ansible/
    ├── playbook.yml
    ├── inventory.ini
    └── roles/
        └── app/
            └── tasks/
                └── main.yml
Part 1: Terraform — Infrastructure as Code
Why Modules?
You could dump everything into one massive main.tf. But that's a nightmare to maintain. Terraform modules let you:
- Isolate concerns: VPC logic doesn't bleed into EC2 logic.
- Reuse: Need another EC2 instance? Call the module again.
- Test independently: Each module has its own inputs and outputs.
Each module follows a three-file pattern:
- main.tf — the actual resources
- variables.tf — inputs the module needs
- outputs.tf — values the module exposes to other modules
terraform/provider.tf:
Terraform doesn't know anything about AWS by default. This file says: "Download the AWS provider plugin (version 6.x), and operate in the region I specify." We use var.region instead of hardcoding "us-east-1" so you can deploy to any region just by changing a variable.
terraform {
  required_providers {
    aws = {
      source  = "hashicorp/aws"
      version = "~> 6.0"
    }
  }
}
provider "aws" {
    region = var.region
}
terraform/backend.tf:
Every time you run terraform apply, Terraform writes a "state file" that maps your .tf files to real AWS resources. By default, it's stored locally. That's fine for solo work, but in a team:
- S3 backend = everyone shares the same state
- use_lockfile = true = prevents two people from running apply at the same time (avoids corruption)
- encrypt = true = your state file (which contains secrets like DB passwords) is encrypted at rest
terraform {
    backend "s3" {
        bucket       = "your-bucket-name"
        key          = "terraform/state.tfstate"
        region       = "us-east-1"
        use_lockfile = true
        encrypt      = true
    }
}
terraform/variables.tf:
It's the single control panel for the entire infrastructure. Notice some variables have default values (like vpc_cidr) — you can override them but don't have to. Others like ami_id, key_name, and db_password have no default — Terraform forces you to provide them. db_password is marked sensitive = true so it never appears in logs or plan output.
It's the single control panel for the entire infrastructure. Notice some variables have default values (like vpc_cidr) — you can override them but don't have to. Others like ami_id, key_name, and db_password have no default — Terraform forces you to provide them. db_password is marked sensitive = true so it never appears in logs or plan output.
Why two private subnets? AWS RDS requires a DB Subnet Group that spans at least two Availability Zones. One private subnet isn't enough — the RDS creation will literally fail.
variable "region"              { default = "us-east-1" }
variable "vpc_cidr"            { default = "10.0.0.0/16" }
variable "public_subnet_cidr"  { default = "10.0.1.0/24" }
variable "private_subnet_cidr" { default = "10.0.2.0/24" }

variable "private_subnet_cidr_2" {
    description = "CIDR block for the second private subnet (different AZ for RDS)"
    default     = "10.0.3.0/24"
}

variable "instance_type" { default = "t2.micro" }

variable "ami_id" {
    description = "AMI ID for the EC2 instance"
    type        = string
}

variable "key_name" {
    description = "Name of the SSH key pair for EC2"
    type        = string
}

variable "db_password" {
    description = "Password for the RDS database"
    type        = string
    sensitive   = true
}
}
terraform/terraform.tfvars:
Separates what you can configure (variables.tf) from what you actually configured (terraform.tfvars). Terraform automatically loads this file. This file should be in your .gitignore — it contains secrets.
Separates what you can configure (variables.tf) from what you actually configured (terraform.tfvars). Terraform automatically loads this file. This file should be in your .gitignore — it contains secrets.
ami_id      = "ami-098e39bafa7e7303d"
key_name    = ""  #Enter you key name
db_password = ""  # Enter your password
terraform/outputs.tf:
After terraform apply, you need two pieces of information: the EC2's public IP (to SSH into and to point your browser at) and the RDS endpoint (to configure the app). Without outputs, you'd have to dig through the AWS Console.
output "ec2_public_ip" {
  value = module.ec2.public_ip
}
output "db_endpoint" {
  value = module.rds.endpoint
}
terraform/main.tf:
This is where the magic happens. It wires all modules together by passing outputs from one module as inputs to another. Look at the data flow:
- module.vpc creates the VPC and subnets → exposes vpc_id, public_subnet_id, private_subnet_id
- module.sg takes the vpc_id → creates security groups → exposes sg_id and db_sg_id
- module.ec2 takes the public subnet + security group → launches the instance
- module.rds takes two private subnets + DB security group → creates the database
- module.nat_gateway takes the public subnet + VPC → enables private subnet internet access
No module directly references another module's resources. They only communicate through variables and outputs. This is the key principle of modular Terraform.
module "vpc" {
    source = "./modules/vpc"
    vpc_cidr              = var.vpc_cidr
    public_subnet_cidr    = var.public_subnet_cidr
    private_subnet_cidr   = var.private_subnet_cidr
    private_subnet_cidr_2 = var.private_subnet_cidr_2
}
module "ec2" {
    source         = "./modules/ec2"
    ami_id         = var.ami_id
    subnet_id      = module.vpc.public_subnet_id
    security_group = module.sg.sg_id
    instance_type  = var.instance_type
    key_name       = var.key_name
}
module "sg" {
    source = "./modules/security_group"
    vpc_id = module.vpc.vpc_id
}
module "rds" {
    source               = "./modules/rds"
    private_subnets      = [module.vpc.private_subnet_id, module.vpc.private_subnet_id_2]
    db_security_group_id = module.sg.db_sg_id
    db_password          = var.db_password
}
module "nat_gateway" {
    source            = "./modules/nat_gateway"
    public_subnet_id  = module.vpc.public_subnet_id
    vpc_id            = module.vpc.vpc_id
    private_subnet_id = module.vpc.private_subnet_id
}
modules/vpc/main.tf:
This is the biggest module because networking is the foundation of everything.
Instead of hardcoding us-east-1a, we dynamically fetch available AZs. This makes the code portable across regions.
data "aws_availability_zones" "available" {
  state = "available"
}
The VPC is your private network in AWS. 10.0.0.0/16 gives you 65,536 IP addresses. DNS support is enabled because RDS endpoints are DNS names — without it, your app can't resolve the database hostname.
resource "aws_vpc" "main" {
    cidr_block           = var.vpc_cidr
    enable_dns_support   = true
    enable_dns_hostnames = true
}
Why three subnets?
- Public subnet: EC2 lives here. map_public_ip_on_launch = true means instances automatically get a public IP.
- Private subnet 1 & 2: RDS lives here. No public IPs. The two subnets MUST be in different AZs because AWS RDS requires it for the DB Subnet Group — even if you're not using Multi-AZ replication.
resource "aws_subnet" "public" {
    vpc_id                  = aws_vpc.main.id
    cidr_block              = var.public_subnet_cidr      # 10.0.1.0/24
    availability_zone       = data.aws_availability_zones.available.names[0]
    map_public_ip_on_launch = true
}

resource "aws_subnet" "private" {
    vpc_id            = aws_vpc.main.id
    cidr_block        = var.private_subnet_cidr           # 10.0.2.0/24
    availability_zone = data.aws_availability_zones.available.names[0]
}

resource "aws_subnet" "private_2" {
    vpc_id            = aws_vpc.main.id
    cidr_block        = var.private_subnet_cidr_2         # 10.0.3.0/24
    availability_zone = data.aws_availability_zones.available.names[1]  # Different AZ!
}
modules/ec2/main.tf:
This creates the actual VM where your Flask app runs. Every value is parameterized — nothing is hardcoded. The key_name lets you SSH into the instance for debugging. The security group controls what traffic can reach it (ports 22 and 80).
resource "aws_instance" "main" {
    ami           = var.ami_id
    instance_type = var.instance_type

    subnet_id              = var.subnet_id
    vpc_security_group_ids = [var.security_group]

    key_name = var.key_name

    tags = {
        Name = "two-tier-app"
    }
}
modules/security_group/main.tf:
- main (for EC2): Allows SSH (22) and HTTP (80) from anywhere, plus all outbound traffic. The egress rule is critical — without it, your EC2 can't download packages, reach the internet, or talk to RDS.
- db_sg (for RDS): Only allows MySQL traffic (3306) from the EC2's security group. Not from 0.0.0.0/0. Not from any IP. Only from instances that have the main security group attached. This is how you lock down the database.
resource "aws_security_group" "main" {
    vpc_id = var.vpc_id

    ingress { from_port = 22;  to_port = 22;  protocol = "tcp"; cidr_blocks = ["0.0.0.0/0"] }
    ingress { from_port = 80;  to_port = 80;  protocol = "tcp"; cidr_blocks = ["0.0.0.0/0"] }
    egress  { from_port = 0;   to_port = 0;   protocol = "-1";  cidr_blocks = ["0.0.0.0/0"] }
}

resource "aws_security_group" "db_sg" {
    vpc_id = var.vpc_id

    ingress {
        from_port       = 3306
        to_port         = 3306
        protocol        = "tcp"
        security_groups = [aws_security_group.main.id]
    }
}
modules/rds/main.tf:
The DB Subnet Group tells RDS "launch the database in these private subnets." The db.t3.micro is the smallest RDS instance (free-tier eligible). skip_final_snapshot = true is for dev environments — in production, you'd want a final snapshot before deletion. The password comes from a variable marked sensitive = true — it never appears in Terraform output.
resource "aws_db_subnet_group" "db_subnet" {
    name       = "db-subnet-group"
    subnet_ids = var.private_subnets
}

resource "aws_db_instance" "db" {
    allocated_storage      = 20
    engine                 = "mysql"
    engine_version         = "8.0"
    instance_class         = "db.t3.micro"
    db_name                = "appdb"
    username               = "admin"
    password               = var.db_password
    db_subnet_group_name   = aws_db_subnet_group.db_subnet.name
    skip_final_snapshot    = true
    vpc_security_group_ids = [var.db_security_group_id]
}
modules/nat_gateway/main.tf:
RDS is in a private subnet — no internet access. But what if the database needs to download patches, or a Lambda in the private subnet needs to call an external API? The NAT Gateway sits in the public subnet and acts as a proxy. Private subnet traffic goes through the NAT → through the IGW → to the internet. The response comes back the same way. Crucially, nothing from the internet can initiate a connection to the private subnet. One-way door.
Why the route table association? Without it, the private subnet uses the VPC's default route table (which has no internet route). The association says "this private subnet should use the route table that points to the NAT Gateway."
resource "aws_eip" "nat" { ... }

resource "aws_nat_gateway" "nat" {
    allocation_id = aws_eip.nat.id
    subnet_id     = var.public_subnet_id    # NAT lives in PUBLIC subnet
}

resource "aws_route_table" "private_rt" { ... }

resource "aws_route" "private_internet" {
    route_table_id         = aws_route_table.private_rt.id
    destination_cidr_block = "0.0.0.0/0"
    nat_gateway_id         = aws_nat_gateway.nat.id
}

resource "aws_route_table_association" "private_rt_association" {
    subnet_id      = var.private_subnet_id
    route_table_id = aws_route_table.private_rt.id
}
Part 2: The Flask Application
Three routes, three purposes:
- / — Serves the frontend HTML. Flask acts as both the API server and the static file server.
- /api — Connects to RDS MySQL, runs SELECT NOW() to prove the connection works, and returns the result. The finally block ensures the connection is always closed, even if an error occurs. Without it, you'd leak database connections until MySQL refuses new ones.
- /health — A simple health check endpoint. Useful for load balancers and monitoring.
- Database credentials come from environment variables (DB_HOST, DB_USER, DB_PASS) — never hardcoded in the app. The systemd service loads them from an .env file.
app/app.py: — The Backend
from flask import Flask, send_from_directory
import os
import pymysql

app = Flask(__name__, static_folder="frontend")

def get_db_connection():
    return pymysql.connect(
        host=os.getenv("DB_HOST"),
        user=os.getenv("DB_USER"),
        password=os.getenv("DB_PASS"),
        database="appdb"
    )

@app.route("/")
def frontend():
    return send_from_directory("frontend", "index.html")

@app.route("/api")
def backend():
    conn = None
    try:
        conn = get_db_connection()
        with conn.cursor() as cursor:
            cursor.execute("SELECT NOW()")
            result = cursor.fetchone()
        return f"DB Connected! Time: {result}"
    except Exception as e:
        return f"DB Error: {str(e)}"
    finally:
        if conn:
            conn.close()

@app.route("/health")
def health():
    return "OK"

if __name__ == "__main__":
    app.run(host="0.0.0.0", port=80)
app/frontend/index.html:
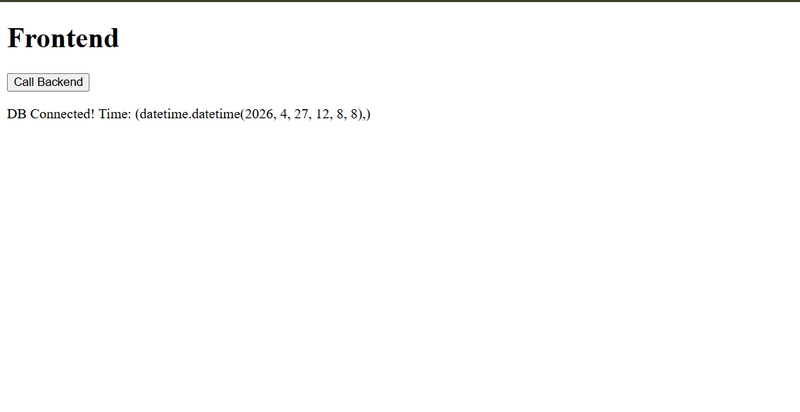
A minimal frontend that proves the two-tier flow works end-to-end. Click the button → JavaScript calls /api → Flask queries MySQL → result displays on screen. The .catch() block handles network errors gracefully
<!DOCTYPE html>
<html lang="en">
<head>
    <meta charset="UTF-8">
    <meta name="viewport" content="width=device-width, initial-scale=1.0">
    <title>Two Tier App</title>
</head>
<body>
    <h1>Frontend</h1>
    <button onclick="callAPI()">Call Backend</button>
    <p id="result"></p>

    <script>
        function callAPI() {
            fetch('/api')
                .then(res => res.text())
                .then(data => {
                    document.getElementById("result").innerText = data;
                })
                .catch(err => {
                    document.getElementById("result").innerText = "Error: " + err.message;
                });
        }
    </script>
</body>
</html>
Part 3: Ansible — Automated Deployment
ansible/inventory.ini:
Tells Ansible which server to connect to, which SSH user to use (ec2-user is the default on Amazon Linux), and which private key to authenticate with. After terraform apply, replace with the actual IP from the Terraform output.
[web]
<EC2_PUBLIC_IP> ansible_user=ec2-user ansible_ssh_private_key_file=~/.ssh/key.pem
ansible/playbook.yml:
The playbook ties everything together. become: true means "run as root" (needed to install packages and create systemd services). vars_prompt asks you for the database endpoint and password at runtime — no secrets stored in files. These variables cascade down into the app role's tasks.
- name: Deploy Two-Tier Flask Application
  hosts: web
  become: true
  vars_prompt:
    - name: db_endpoint
      prompt: "Enter the RDS database endpoint"
      private: false
    - name: db_password
      prompt: "Enter the database password"
      private: true
  roles:
    - app
ansible/roles/app/tasks/main.yml:
Six tasks, executed in order:
- Install dependencies — mariadb is the MySQL client on Amazon Linux (not mysql). python3-pip is explicitly installed because pip may not exist by default.
- Copy app — Uploads the entire app/ directory to the EC2 instance.
- Install Python deps — Uses pip3 explicitly (not pip which might point to Python 2).
- Create .env file — Writes database credentials. The {{ db_endpoint }} and {{ db_password }} are populated from the playbook's vars_prompt.
- Create systemd service — This is the key. Instead of nohup python3 app.py & (which dies on reboot and is impossible to manage), we create a proper systemd service. EnvironmentFile loads the .env file so os.getenv() in Python works. Restart=always means if the app crashes, systemd restarts it automatically.
- Start the service — daemon_reload tells systemd to re-read service files. enabled: true means it starts automatically on boot.
- name: Install dependencies
  yum:
    name: [python3, python3-pip, git, mariadb]
    state: present

- name: Copy app
  copy:
    src: ../../../../app/
    dest: /home/ec2-user/app

- name: Install Python deps
  pip:
    requirements: /home/ec2-user/app/requirements.txt
    executable: pip3

- name: Create env file
  copy:
    dest: /home/ec2-user/app/.env
    content: |
      DB_HOST={{ db_endpoint }}
      DB_USER=admin
      DB_PASS={{ db_password }}

- name: Create systemd service for the app
  copy:
    dest: /etc/systemd/system/two-tier-app.service
    content: |
      [Unit]
      Description=Two Tier Flask App
      After=network.target

      [Service]
      User=ec2-user
      WorkingDirectory=/home/ec2-user/app
      EnvironmentFile=/home/ec2-user/app/.env
      ExecStart=/usr/bin/python3 /home/ec2-user/app/app.py
      Restart=always

      [Install]
      WantedBy=multi-user.target

- name: Start and enable app service
  systemd:
    name: two-tier-app
    state: started
    enabled: true
    daemon_reload: true
The Complete Flow
You → terraform apply
       │
       ├── VPC, Subnets, IGW created
       ├── Security Groups created
       ├── EC2 launched in public subnet
       ├── RDS launched in private subnets
       ├── NAT Gateway created
       │
       └── Output: EC2 IP + RDS endpoint

You → ansible-playbook -i inventory.ini playbook.yml
       │
       ├── SSH into EC2
       ├── Install Python, pip, mariadb
       ├── Upload Flask app
       ├── Write .env with DB credentials
       ├── Create systemd service
       └── Start the app

User → http://<EC2_IP>/
       │
       ├── Flask serves index.html
       ├── User clicks "Call Backend"
       ├── JavaScript fetches /api
       ├── Flask connects to RDS (via private subnet)
       ├── MySQL returns current time
       └── Result displayed on screen
Complete Deployment Process — Step by Step
Phase 1: Terraform — Infrastructure Provisioning
Step 1 — Format the Code
cd terraform
terraform fmt
- Automatically formats all .tf files to canonical HCL style
- Fixes indentation, spacing, and alignment
- Always run this before committing to Git — keeps code clean and consistent
- Returns a list of files it modified (no output = already clean)
Step 2 — Initialize the Working Directory
terraform init
- Downloads and installs required provider plugins (e.g., AWS provider)
- Sets up the backend for storing terraform.tfstate (local or remote like S3)
- Initializes modules if any are referenced
- Must be run once when starting fresh or after adding new providers/modules
Step 3 — Validate the Configuration
terraform validate
- Checks all .tf files for syntax errors and logical issues
- Validates resource arguments, types, and required fields
- Does not connect to AWS — purely a static config check
- Returns Success! The configuration is valid. if everything is correct
- Run this before plan to catch mistakes early
Step 4 — Preview the Changes
terraform plan
- Connects to AWS and compares desired state vs current state
- Shows exactly what will be created, modified, or destroyed
- Look out for:
- + → resource will be created
- ~ → resource will be modified
- - → resource will be destroyed
- No changes are made at this stage — it's a dry run
- Review this output carefully before proceeding
Step 5 — Apply the Infrastructure
terraform apply
- Provisions the actual resources on AWS
- Prompts for confirmation — type yes to proceed
- Creates resources like:
- ✅ EC2 instance (app server)
- ✅ RDS MySQL database
- ✅ Security groups, VPC, subnets, etc.
- On completion, prints output values defined in outputs.tf
Step 6 — Note the Terraform Outputs
ec2_public_ip = "54.xxx.xxx.xxx"
db_endpoint   = "terraform-xxx.us-east-1.rds.amazonaws.com:3306"
- These are critical values needed for the next phase
- ec2_public_ip → where your app will be hosted
- db_endpoint → RDS connection string for the application
- Copy and save these before moving to Ansible
Phase 2: Ansible — Application Deployment:
Step 7 — Update the Inventory File
# ansible/inventory.ini
[web]
54.xxx.xxx.xxx ansible_user=ec2-user ansible_ssh_private_key_file=~/.ssh/your-key.pem
- Replace with the actual IP from Terraform output
- This tells Ansible which server to connect to and how to SSH into it
- ansible_user is typically ec2-user (Amazon Linux) or ubuntu (Ubuntu AMI)
Step 8 — Run the Playbook
cd ../ansible
ansible-playbook -i inventory.ini playbook.yml
- -i inventory.ini → specifies the target server(s)
- playbook.yml → contains all automation tasks to set up the app
- When prompted:
- Enter the RDS endpoint (from Step 6)
- Enter the DB password (set during Terraform or manually)
- Ansible typically handles tasks like:
- Installing dependencies (Python, Nginx, etc.)
- Copying application code to EC2
- Configuring environment variables
- Starting and enabling the app service
Phase 3: Verify
Step 9 — Access the Application
http://<EC2_PUBLIC_IP>/
- Open in browser to confirm the app is live and running
- If it doesn't load, check:
- Security group inbound rules (port 80/443 open?)
- App service status on EC2 (systemctl status )
- RDS connectivity from EC2
Phase 4: Cleanup — Destroy Infrastructure
Step 10 — Destroy All Provisioned Resources
cd terraform
terraform destroy
- Permanently removes all resources that were created by terraform apply
- Connects to AWS and shows a destruction plan first — lists everything that will be deleted
- Prompts for confirmation — type yes to proceed
- Destroys resources like:
- ❌ EC2 instance
- ❌ RDS database
- ❌ Security groups, VPC, subnets, etc.
- ⚠️ This action is irreversible — all data on RDS will be lost unless you have a snapshot
Real Errors I Hit (And How I Fixed Them)
No deployment goes smoothly on the first try. Here are the actual errors I ran into while deploying this project, and the exact fixes I applied. If you're following along, you'll likely hit the same ones.
Error: Ansible Doesn't Run on Windows:
PS> ansible-playbook -i inventory.ini playbook.yml
ansible-playbook : The term 'ansible-playbook' is not recognized as the name
of a cmdlet, function, script file, or operable program.
Why it happens: Ansible is a Linux-only tool. There is no native Windows version. If you're developing on Windows (like I was), running ansible-playbook from PowerShell will always fail — it simply doesn't exist in the Windows ecosystem.
The fix: You have two options:
- Use WSL (Windows Subsystem for Linux) — Install Ubuntu via wsl --install -d Ubuntu, then install Ansible inside it with sudo apt install ansible.
- Skip Ansible entirely — SSH into the EC2 instance directly and run the deployment commands manually. This is what I ended up doing since my WSL only had Docker Desktop's minimal distro.
ssh -i ~/.ssh/my-key.pem ec2-user@<EC2_PUBLIC_IP>
Then execute the equivalent of each Ansible task as shell commands on the EC2 instance. The Ansible role is essentially a recipe — you can follow it step by step manually.
Lesson learned: If you're on Windows, either set up WSL beforehand or plan for manual deployment. Alternatively, you could run Ansible from the EC2 instance itself, or use a CI/CD pipeline (GitHub Actions, Jenkins) running on Linux.
Conclusion
Building a two-tier architecture from scratch isn't just about getting an app to run — it's about understanding why every piece exists and how they all connect.
Here's what this project actually teaches you:
- Terraform modules aren't just organization — they enforce separation of concerns so your VPC logic never bleeds into your EC2 logic, and your infrastructure stays maintainable as it grows.
- Remote state with S3 isn't overhead — it's what makes infrastructure collaborative and safe in team environments.
- Ansible roles aren't just scripts — they give you repeatable, idempotent deployments where running the playbook twice produces the same result as running it once.
- Private subnets for RDS aren't optional — keeping your database unreachable from the internet is the bare minimum of production security.
- NAT Gateway isn't magic — it's a one-way door that lets private resources reach the internet without exposing them to it.
The real-world errors section matters too. No deployment works perfectly on the first try — and knowing that Ansible doesn't run natively on Windows, or that RDS requires two AZs for a subnet group, are exactly the kinds of lessons that don't appear in documentation but absolutely appear in interviews and on the job.
This project covers the full DevOps lifecycle — from writing infrastructure code, validating and applying it, deploying the application, verifying it's live, and tearing it all down cleanly. That end-to-end thinking is what separates someone who can follow a tutorial from someone who can own a deployment.
source code:two-tier-aws-infra
Every production system you admire was once someone's first Terraform apply.